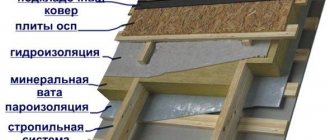
Slope calculator
The slope calculator
will help you calculate the slope, elevation or distance at the right time without any problems.
The calculator can calculate the roof slope
.
pipeline slope
.
slope of the stairs
.
road slope
, etc. It is also possible to calculate the elevation between points or the distance from point to point (useful in geodesy).
Operating procedure:
1. Select the value that you need to calculate2. Select in which unit of measurement you want to set/calculate the slope (3 types to choose from: degrees, ppm, percent)3. Set the 1st unknown4. Set the 2nd unknown5. Click the “Calculation” button
For reference:
- slope in degrees is calculated using the tangent of the angle:
tgx = h / L
- slope in ppm is calculated using the following formula:
x = 1000 * h / L
- slope in percentage is calculated using the following formula:
x = 100 * h / L
Slope calculator
created as an addition to the main online calculations on the site, and if you liked it, then do not forget to tell your friends and colleagues about it.
Determining the angle of inclination through tangent
From trigonometry it is known that tangent is a fraction, at the base of which is the leg adjacent to the angle, and on top is the opposite leg (difference in heights). To determine the roof slope in percentage and degrees via tangent, you will need to take measurements:
- heights from the ceiling to the roof ridge;
- distance from the edge of the slope to the projection of the upper line of closure of the two planes.
Having made simple calculations, they obtain a certain value and, using the Bradis table or using an engineering calculator, find the corresponding number of degrees for the desired angle. How to calculate the slope as a percentage - defined above : the height of the ridge is divided by half the width of the attic floor, if the slopes are of equal size. Or on the projection of each of the roof surfaces, when the sizes of the sides differ. You can see that this is the tangent of the angle already defined in degrees. To go to the percentage expression of the slope, you need to perform the action: value tg * 100, and the result will be obtained as a percentage.
Calculation of slope for external sewerage
For your own home, you need to know that installing a stormwater system is a very troublesome job. Storm drainage consists not only of a pipeline, but also of ditches that also drain water. The minimum slope per meter of storm pipes also depends on the type and what diameter it has.
For storm sewerage, pipes should have a diameter of 150-200 mm, and the slope at 200 mm should be 0.007, and at 150 mm – 0.008. that is, the larger the diameter, the smaller the slope. Since water in such a sewer will flow in any case without any difficulties. The slope also depends on the surface of the drainage system. If it is rough, the more you need to do it and vice versa.
For the external system, a level is used. After all the pipes are connected, thanks to the level, their correct slope is set. But it is very difficult to cope alone. For such work you will need at least 3 people: one sets the slope, the other monitors what level the level shows, and the third, of course, manages this process.
Basic rules for calculating the slope and installing a sewer pipe:
- For a pipe with a diameter of 50 mm, 3 cm of angle is required per meter, and if it is 110 mm in diameter, then 2 cm.
- The total length of the pipeline angle for both the external and external systems is 15 cm.
- When calculating standards for an external sewer system, according to SNiP, you need to take into account how much the ground freezes.
- Using the above formulas, it is possible to calculate the correct slope of the pipe yourself, but in turn, to confirm your calculations, you need to consult with specialists.
Thus, having learned all the details about the tilt, everyone will be able to carry out such work on their own. But do not forget to find out all the recommendations from specialists. Use different tilting methods for apartments and private homes. Take into account all the details, carry out the calculations correctly. Then your system will last a very long time, it will be reliable, and you won’t have to worry about it being able to break through at any moment.
More materials:
- air valve for sewerage 50;
- sewer return valve internal 50 mm;
- vacuum sewer valve 110 mm.
How to convert the roof slope in degrees to percentages table and therefore the choice of materials
Depending on the slope of the roof, a certain roofing material is used and the number of layers required for a given slope is arranged (Fig. 2). Roofing materials according to their technical, economic and physical properties are grouped into groups 1-11, which are indicated on the graph by arcuate arrows. Sloping lines indicate the slope of the slope. The thick inclined line on the graph shows the ratio of the height of the ridge h to half of its location 1/2. The ratio 1:2 (shown at the top of the inclined line) shows that the vertical segment h fits on the horizontal segment 1/2 twice. On a semicircular scale, this inclined line shows the slope of the roof in degrees, and on a vertical scale, it shows the slope as a percentage. In a similar way, using the graph, you can determine the smallest slope for a particular group of recommended roofing materials:
i = h. (1/2) = 2.5. (12 / 2) = 5 / 12 or 5.12.
To express the slope as a percentage, this ratio is multiplied by 100:
i = (5 / 12) 100 = 5 100 /12 = 41.67.
The calculated slope of 41.67%, subject to the given structural dimensions of the roof, ensures normal discharge of storm water.
Roll roofs of various types with roof slopes up to 2.5% are installed in four layers on adhesive bitumen mastic. Hydroisol GI-G, GI-K, glass roofing material S-RM, roofing material RKM-350B, etc. are used as roll materials. Operable roofs are constructed from five layers. A protective layer of gravel 20 mm thick on antiseptic mastic is poured over the roofing carpet.
Converting fractions
1
To convert a fraction to a decimal, simply divide the numerator by the denominator.
Remember that the line between the numerator and denominator represents the division operation. That is, the fraction x/y is “x” divided by “y”.[7]
- For example: fraction 4/8 = 0.5.
2
Decide on the number of characters (digits) after the decimal point.
Many numbers are divisible by an integer. When dividing such numbers, leave a certain number of decimal places. In most cases, you can leave two places after the decimal point. Remember the rounding rules: if after the sign being rounded there is a number from 5 to 9, then the number being rounded is increased by 1; otherwise, the rounded figure does not change. For example, the fraction 0.145 is rounded to 0.15.
- For example, 5/17 = 0.2941176470588 ...
Here the rounded fraction is 0.29.
3
Divide the numerator by the denominator, and then multiply the result by 100 to get a percentage.
Divide the numerator of a common fraction by its denominator, multiply the resulting result by 100, add a percent sign (%) to the answer, and you get percentages.[8]
- For example, given the fraction 4/8. Divide 4 by 8 to get 0.50. Multiply 0.50 by 100 to get 50. Add a percent sign to get the final answer: 50%.
Additional examples: 3/10 = 0.30 * 100 = 30%
- 5/8 = 0,625 * 100 = 62,5%
Slope in percent
Slopes in degrees and percentages 1º - 1.7% 1% - 34′ 20″ Just for reference.
You wouldn’t be ashamed to say that the magnitude of the slope is directly and linearly proportional to the angle - this is simply ignorance of the basics of mathematics! or just misinformation! “a secret”: the slope is the ratio of the opposite side to the adjacent side - in mathematics they call the “tangent of the angle”, now open the textbook and look at the graph of this function - as you can see, it does not look like a straight line at all.
Even the simplest example: an angle of 45º. and slope = 100% - this no longer fits into your formula. or do you think that at 45º the legs are not equal?
In some documents I saw that this bias is written much more, what is this connected with?
This may have something to do with it - that the slope in some cases is much greater! For example, some of us still write the slope of a pitched roof in fractions, not in degrees. so if you compare the slope in fractions for the road and the slope for the roof slope, the difference can be huge, but there is no mistake in this.
Tangent and distance
The percentage designation of the road slope reflects the tangent of the angle of inclination. It was required to simplify the understanding of the elevation level and calculations for drivers. The meaning of this marking is based on trigonometric calculations of triangles. If you imagine a slide in the form of a geometric figure, then you can distinguish two legs and a hypotenuse in it. We remember from school that the ratios of the sides of a triangle are reflected in the values of sine and cosine. They help to calculate one of the sides based on the angle of inclination of the hypotenuse. Meanwhile, in calculations, the ratio of sine to cosine, which is called tangent, is often used. If you set the hypotenuse at an angle of 45 degrees, then the sine and cosine will be exactly the same, and the tangent will be 1.
To calculate road slopes, this ratio is taken as the basis. An angle of 45 degrees is taken as 100%, and the length of the adjacent leg, that is, the horizontal projection of the road going uphill, is 100 m. Not all cars can climb such a slope, but only those that have ideal weight distribution, good tires and powerful motor.
Question answer
Can I challenge a camera ticket if there is no new warning sign?
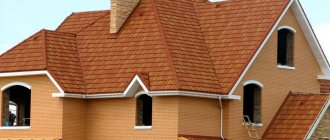
Types of roofs and choice of their material
Types of roof shapes.
For each building, the roof slope is calculated individually.
There are 4 types of roofs:
Flat floors are not absolutely horizontal, but have an angle of inclination, but it is not less than 3º, while the roof is equipped with special drainage funnels with a wall slope of about 1.5º.
During operation, wind exerts pressure on the roof surface, so tall roofs are more susceptible to this effect, and on very flat roofs, a hurricane can tear off the roof covering.
The angle of inclination of the roof depends on the material chosen for the roof, as well as the plane of the slope.
With an increase in the size of the inclination angle from 11º to 45º, this pressure increases almost 5 times. Taking into account wind loads, in areas with light winds this size is chosen within the range of 35-40º, and where the speed of movement of air masses is high - 15-25º.
It should be noted that at large values of the angle of inclination of the floor plane (about 50º), in winter the snow will slide off it under its own weight, reducing its pressure on the roof to zero.
The choice of material, and sometimes the number of its layers during installation, depends on the steepness of the slope plane.
The diagram relates the minimum roof slope to the roofing material and helps in choosing both if necessary. The vertical scale indicates the slope in percent, the arcuate scale indicates the slope in degrees, and the shelves indicate the ratio of height to ground level. The material is conditionally grouped according to its technical and economic properties into 11 categories.
Practice shows that roll materials are used to cover roofs with a slope of 0-25% (0-10% is a three-layer coating, 10-25% is a single-layer coating, but the material must be sprinkled). Asbestos-cement slate is laid on roofs with a slope of up to 28%, steel sheets - up to 29%, tiles - more than 33%.
Correlation of values with roof slope
For each roofing material, tolerances are established for the smallest slope. Other factors influencing the choice of roof slope angle:
- the ability to comprehensively protect a structure from external influences - man-made and natural;
- resistance to wind loads - steep surfaces increase the windage of the structure, this makes the structure vulnerable;
- the predominance of certain solutions by architects in certain regions;
- the amount of precipitation and pollution - loads will not accumulate on a roof with a large slope.
Building codes and regulations - SNiP II -26−76 regulate the flatness of slopes as a percentage. The ratio of percentages and degrees for some angles is given in the table.
| Degree º | Tangent | Percent, % | Permille, ‰ | Degree º | Tangent | Percent, % | Permille, ‰ |
| 1 | 0,0175 | 1,75 | 17,5 | 22 | 0,4040 | 40,40 | — |
| 5 | 0,0875 | 8,75 | 87,5 | 24 | 0,4452 | 44,52 | — |
| 10 | 0,1740 | 17,40 | 174 | 26 | 0,4878 | 48,78 | — |
| 12 | 0,2125 | 21,25 | — | 28 | 0,5318 | 53,18 | — |
| 14 | 0,2494 | 24,94 | — | 30 | 0,5773 | 57,73 | — |
| 16 | 0,2868 | 28,68 | — | 35 | 0,7001 | 70,01 | — |
| 18 | 0,3250 | 32,50 | — | 40 | 0,8390 | 83,90 | — |
| 20 | 0,3828 | 38,28 | — | 45 | 1,0000 | 100,0 | — |
Mathematical methods for calculating slope are used when special accuracy is not needed and measurements are made approximate. If it is necessary to calculate accurate indicators, use modern measuring instruments.
Calculation example: the distance from the edge of the roof slope to the projection of the line of conjugation of the sides - laying length, 5.2 m. The height from the attic floor to the top level of the roof is 2 meters. The slope (tangent of the angle) is determined by the action: 2/5.2 = 0.3846. The closest value from the table is 20 degrees, which corresponds to approximately 38%.
Another option is to use a protractor to determine the angle of the roof, its value is 5º. According to the corresponding line, the surface slope will be 8.75 percent or 87.5 ppm.
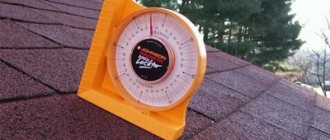
How to maintain the required slope
Determining the slope of the sewer is not enough. It still needs to be maintained during installation. The most convenient option is to have a special level with a protractor. If you don’t have professional equipment, you’ll have to be cunning.
Construction level with protractor
There are ways to control the angle of a sewer pipe using a regular level:
- Having drawn a line on the wall with the desired slope, apply a building level to it and make a mark on the plastic in the place where the edge of the bubble is located. When placing the pipes, position them so that the bubble is in the desired position.
- If you take a meter level, you can attach a pad of the required width to one side. This method does not work in short sections, but it is convenient to install a long pipeline.
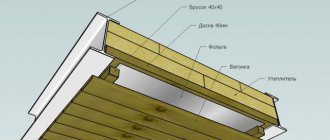
Internal sewerage
When laying a pipeline, it is necessary to maintain a given slope and prevent deflections and sagging. By the way, when laying outlet pipes from different plumbing fixtures, it is necessary to withstand different slopes (see photo below).
Slope of drain pipes from various plumbing fixtures
When laying an internal pipeline, you can draw the required slopes on the wall and align the pipes along them. You should not focus on the floor level; it is better to mark a horizontal line. It’s easier to do this if you have a level; if you don’t have one, you can use a bubble level. After this, having calculated the required difference (described above), you “lift” the far end. Once again check the accuracy of the calculations and drawn lines. Afterwards you can begin installation.
Example of internal sewerage layout
In bathrooms and toilets, the required level is usually laid out using a thick sand-cement mortar. Anyway, then the pipe is finished off - a plasterboard box is placed, onto which the tiles are then glued. A more modern option - laying pipes in a groove is not available to everyone - panel houses do not have such thick walls. When laying sewer pipes from the kitchen, stands and wedges are often used. After the pipeline is laid with the required slope, it is fixed to the walls using special holders. They are installed in increments of no more than 40 cm.
External sewerage
The sewage system on the site is laid in trenches. When laying the route, try to make it as straight as possible. Any turns are a potential place for a blockage to form. If you can’t do without turning, install a tee next to it, bring the pipe just above ground level and cap it with a sealed cap. This will be the right decision - you will be able to clean the plugs quickly and without problems.
When laying an external sewer, dig a trench with a flat bottom. The depth of the trench is 20 cm more than necessary - this is a place for a sand cushion. If the length is short and the drop is small, the bottom can be left as it is - flat. If the difference is large, you will have to form a slope. At this stage there is no need to maintain the tilt too much - do it approximately. Then the bottom is leveled, all stones and roots are removed, the holes are leveled, and compacted. There must be a flat, dense base.
Key points to remember
Sand is poured onto the leveled bottom. It must be sprinkled in layers of 5 cm, leveled, compacted (spill with plenty of water). By laying 4 layers in layers, we get a cushion of 20 cm. Pipes are laid in the sand, forming a given slope. The slope can be checked with a long building level (1.5-2 meters or more). If this is not the case, you can tape a bubble level to a long, flat strip (beam) in the middle with tape. This way you can achieve minimal error.
After the pipe is laid and its slope is checked, it is covered with sand. It should cover it almost halfway. The sand is carefully leveled and spilled. After this, the pipe is covered 1/3 with dense sand (the level can be higher). Then you can fill it with soil.
Calculation of ridge height
Roof slope degree/percentage ratio
After you have decided on the roof structure, decided what material will be used, taken into account all climatic conditions and decided on the slope of the roof, it’s time to find out how to calculate the height of the ridge.
This can be done using a square or mathematically. For the second option, the span width of the house (h) is divided by 2. The resulting number is multiplied by the relative value.
To find it, use the table below (Fig. 4). As you can see, the values are written for each angle of inclination. To make it clearer, let's give an example. The width of the building is 6m, the roof slope is 20 degrees. We get:
The height of the ridge is 1.08 meters. Using this formula, you can find out the slope of the roof (this is sometimes necessary when repairing an already finished roof). How to count? In reverse order.
The roof slope angle is the ratio between the height of the roof ridge and half the pitch.
What we get: 1.08:3=0.36, multiply this value by 100 and get the roof slope as a percentage: 0.36x100=36%, look at the table and see: 36%=20 degrees, which is what we needed to prove.
We learned how to calculate the slope angle of a roof, and how to determine this value using an inclinometer, what is this tool?
This is a rail with a frame attached to it. Between the slats there is an axis to which the pendulum is attached (two rings, a plate, a weight and a pointer).
Inside the cutout there is a scale with divisions. When the rack is in a horizontal position, the pointer coincides with zero on the scale.
To determine the roof slope angle. The inclinometer rod is held perpendicular to the ridge (at an angle of 90 degrees). The pendulum pointer will show the desired value in degrees. To convert to percentages, use the table above (Fig. 3).
Very often, during the construction of roofs, you can hear the phrase “roof slope”. What it is?
Converting Decimals
1
Multiply the decimal by 100 to get a percentage.
Or simply move the decimal point two places to the right. Remember that a percentage is a fraction of 100, so multiplying a decimal by 100 will give you that “fraction of 100.” After multiplying, do not forget to add the percent sign (%).[3] For example: 0.32 = 32%; 0.07 = 7%; 1.25 = 125%; 0.083 = 8.3%
2
Convert the trailing decimal to a fraction.
The final decimal after the decimal point has a limited number of digits. Move the decimal point a number of places to the right equal to the number of digits after the decimal point. The resulting number is the numerator of the common fraction. In the denominator, write 1 with the number of zeros equal to the number of digits after the decimal point. Then you need to simplify the resulting fraction (if, of course, this is possible).[4]
- For example, the decimal fraction 0.32 has two digits after the decimal point. Move the decimal point two places to the right, and write 100 in the denominator; thus 0.32 = 32/100. Divide both the numerator and denominator by 4 and you get: 36/100 = 9/25.
Another example: in the decimal fraction 0.8 there is one digit after the decimal point. Move the decimal point one place to the right, and write 10 in the denominator; thus 0.8 = 8/10. Divide both the numerator and denominator by 2 and you get: 8/10 = 4/5.
- To check your answer, simply divide the numerator by the denominator - the result should be equal to the original decimal fraction. In our example: 8/25 = 0.32.
3
Convert a periodic fraction to a common fraction.
A periodic fraction after the decimal point has a periodically repeating group of digits. For example, in the fraction 0.131313... two digits (13) are periodically repeated. Determine how many digits are repeated periodically, and then multiply the periodic fraction by 10n, where n is the number of digits that repeat periodically.[5]
- In our example, 0.131313... multiply by 100 (10 to the second power) and get 13.131313...
To find the numerator (top number) of a common fraction, subtract the repeating group of digits from the resulting fraction. In our example: 13.131313… – 0.131313… = 13, that is, the numerator is 13.[6]
- To find the denominator (bottom number) from the number you multiplied the original periodic fraction by, subtract 1. For example, you multiplied the original fraction 0.131313... by 100, so the denominator is 100 – 1 = 99.
- In our example: 0.131313...= 13/99.
- Additional examples: 0.333... = 3/9
- 0,123123123… = 123/999
- 0,142857142857… = 142857/999999
- If necessary, simplify the fraction, for example, 142857/999999 = 1/7.
Calculation of the slope angle to the horizon
It can be simply measured with an inclinometer, which is a bar with a frame with a pendulum with an arrow showing the degree value. But today this device is no longer relevant, since there are many drop and electronic inclinometers with much greater measurement accuracy and ease of use.
In the absence of geodetic measuring devices, there is a simple mathematical method that allows you to relatively accurately calculate the angle of inclination of the rafters. To do this, use a tape measure and a plumb line. A plumb line is lowered from the ridge to the floor of the building and the height h is measured. Then, from the point at which the plumb line touched the ceiling under the ridge, we measure the distance to the bottom point of the slope - position l.
The angle of inclination of the roof depends on the material chosen for the roof.
The angle of inclination of the slope i is equal to the ratio of the height of the ridge to the foundation (with the same units of measurement) i = h:l. In this case, the slope is expressed by a ratio that shows to what height the roof rises over the course of a unit of laying (how many meters the upper edge of the roof will be raised on one meter of horizontal flooring). To calculate the same slope as a percentage, multiply the resulting ratio by 100%. If you need to know this value in degrees, we translate it using a table.
For example: roof height h = 3.0 m, laying length l = 6.5 m. Then i = h:l = 3.0:6.5 = 1:2.17. This is an example of measuring slope by ratio. i = 3.0:6.5 = 0.4615. In percentage terms, this value is calculated by multiplying it by 100%: i = 0.4615. 100% = 46.15%. To determine the angle in degrees, we translate from the table and get 25º. If there is a need for a more accurate degree value, then from the resulting ratio, using a calculator or special tables, we calculate the cotangent, which will be equal to 24.78º.
It should be noted that a slope of 100% is when the roof height is equal to the pitch, that is, it corresponds to a 1:1 ratio or a slope angle of 45º. But you should not think that the percentage value of the slope and its degree value have a direct relationship. After all, the percentage slope is the value of the tangent of the angle at the bottom point of the slope, multiplied by 100%, and the graph of the tangent (tangent) has never been a straight line. And if 100% is 45º, then 50% is not 22.5º, but about 27º (more precisely 26.56º).
https://youtube.com/watch?v=kpnzjnJhgbQ%26feature%3Dshare%26list%3DPLxGukzvbwLed88MOnNdM0yBnuDYcVUW8H%26index%3D4
How to calculate the roof slope angle: use a calculator
Projects of country mansions being built can take into account many requirements, wishes and even the whims or “whims” of their owners. But they are always “related” by a common feature - none of their buildings can ever do without a reliable roof. And in this matter, what should come to the fore is not so much the architectural delights of the customer, but rather the specific requirements for this element of the structure. This is the reliability and stability of the entire rafter system and roofing covering, the full performance by the roof of its direct purpose - protection from moisture penetration (and in some cases, in addition, thermal and sound insulation), and, if necessary, the functionality of the premises located directly under the roof.
How to calculate the angle of a roof
Designing a roof structure is an extremely responsible and quite difficult task, especially with complex configurations. It would be wisest to entrust this matter to professionals who know the methodology for carrying out the necessary calculations and the appropriate software for this. However, the home owner may also be interested in some theoretical points. For example, it is important to know how to calculate the angle of the roof yourself, at least approximately - for starters.
This will make it possible to immediately estimate the possibility of implementing your “author’s estimates” - according to the correspondence of the plan to the real conditions of the region, according to the “architecture” of the roof itself, according to the planned roofing material, according to the use of the attic space. To a certain extent, the calculated angle of the roof slope will help to make a preliminary calculation of the parameters and quantity of lumber for the rafter system, and the total area of the roof covering.
In what quantities is it more convenient to measure the angle of the roof slope?
It would seem a completely unnecessary question, since everyone knows from school that angle is measured in degrees. But clarity is still needed here, because in technical literature, in reference tables, and in the everyday life of some experienced craftsmen, other units of measurement are often found - percentages or relative aspect ratios.
And one more necessary clarification - what is taken as the angle of inclination of the roof?
What is meant by the angle of the roof?
The angle of inclination is the angle formed by the intersection of two planes: the horizontal and the plane of the roof slope. In the figure it is shown by the letter α of the Greek alphabet.
The acute angles that interest us (there cannot be obtuse angles simply by definition) lie in the range from 0 to 90°. Slopes steeper than 50 ÷ 60 ° in a “pure” form are extremely rare, and then, as a rule, for the decorative design of roofs - during the construction of pointed towers in the Gothic style. However, there is an exception - the slopes of the lower row of rafters of a mansard-type roof can be so steep.
The lower rafters of a mansard roof can be positioned at a very large angle
And yet, most often you have to deal with slopes lying in the range from 0 to 45°
With degrees it’s clear - everyone probably imagines a protractor with its divisions. What about other units of measurement?
Nothing complicated either.
The relative aspect ratio is the most simplified fraction showing the ratio of the height of the rise of the slope (in the figure above indicated by the Latin H ) to the projection of the roof slope onto the horizontal plane (in the diagram - L ).
L - this can be, depending on the roof design, half the span (with a symmetrical gable roof), the entire span (if the roof is single-pitched), or, with complex roof configurations, a truly linear section, determined by the projection drawn to the horizontal plane. For example, in the diagram of an attic roof such a section is clearly shown - along a horizontal beam from the very corner to a vertical post running from the top point of the lower rafter.
The slope angle is written as a fraction, for example “1 : 3».
However, in practice it often happens that using the slope angle in such a representation will be extremely inconvenient if, say, the numbers in the fraction are non-round and irreducible. 3:11 will have little meaning to an inexperienced builder . In this case, it is possible to use another value for measuring the roof slope - percentages.
Finding this value is extremely simple - you just need to find the result of dividing the already mentioned fraction, and then multiply it by 100. For example, in the example above 3 : 11
3 : 11 = 0,2727 × 100 = 27,27 %
So, the value of the slope of the roof slope, expressed as a percentage, is obtained.
But what if you need to switch from degrees to percentages or vice versa?
You can remember this ratio. 100% is an angle of 45 degrees when the legs of a right triangle are equal to each other, that is, in our case, the height of the slope is equal to the length of its horizontal projection.
In this case, 45° / 100 = 0.45° = 27´ . One percent slope is equal to 27 minutes of arc.
If you approach from the other side, then 100 / 45° = 2.22%. That is, we find that one degree is 2.22% of the slope.
To easily convert values from one to another, you can use the table:
| Value in degrees | Value in % | Value in degrees | Value in % | Value in degrees | Value in % |
| 1° | 2,22% | 16° | 35,55% | 31° | 68,88% |
| 2° | 4,44% | 17° | 37,77% | 32° | 71,11% |
| 3° | 6,66% | 18° | 40,00% | 33° | 73,33% |
| 4° | 8,88% | 19° | 42,22% | 34° | 75,55% |
| 5° | 11,11% | 20° | 44,44% | 35° | 77,77% |
| 6° | 13,33% | 21° | 46,66% | 36° | 80,00% |
| 7° | 15,55% | 22° | 48,88% | 37° | 82,22% |
| 8° | 17,77% | 23° | 51,11% | 38° | 84,44% |
| 9° | 20,00% | 24° | 53,33% | 39° | 86,66% |
| 10° | 22,22% | 25° | 55,55% | 40° | 88,88% |
| 11° | 24,44% | 26° | 57,77% | 41° | 91,11% |
| 12° | 26,66% | 27° | 60,00% | 42° | 93,33% |
| 13° | 28,88% | 28° | 62,22% | 43° | 95,55% |
| 14° | 31,11% | 29° | 64,44% | 44° | 97,77% |
| 15° | 33,33% | 30° | 66,66% | 45° | 100,00% |
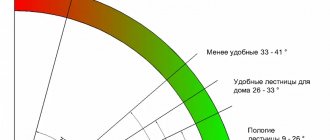
For clarity, it will be useful to provide a graphical diagram that very clearly shows the relationship of all the mentioned linear parameters with the angle of the slope and its measurement values.
Diagram A. Interdependence of units of measurement of roof slope angle and permissible types of roofing
We will have to return to this figure when we consider the types of roofing coverings.
It will be even easier to calculate the steepness and angle of inclination of the slope. if you use the built-in calculator below:
Calculator for calculating the steepness of the slope based on the known value of the ridge height
Go to calculations
Dependence of the type of roofing on the steepness of the slope
When planning to build their own house, the owner of the site is probably already assessing both in his head and with his family members what their future home will look like. The roof in this matter, of course, occupies one of the paramount importance. And here it is necessary to take into account the fact that not every roofing material can be used on roof slopes of different steepnesses. To avoid misunderstandings later, it is necessary to foresee this relationship in advance.
Diagram of distribution of roofs by slope steepness
Roofs based on the angle of inclination of the slope can be conditionally divided into flat (slope up to 5°), with a small slope (from 6 to 30°) and steeply inclined, respectively, with a slope angle of more than 30°.
Each type of roof has its own advantages and disadvantages. For example, flat roofs have a minimal area but will require special waterproofing measures. Snow masses do not linger on steep roofs, but they are more susceptible to wind loads due to their “windage”. Likewise, roofing material, due to its own technological or operational characteristics, has certain limitations for use with different slopes.
Let us turn to the figure already discussed earlier ( diagram A ). Black circles with arc-shaped arrows and blue numbers indicate areas of application of various roofing coverings (the arrowhead indicates the minimum permissible value of the slope steepness):
1 – these are shingles, wood chips, natural shingles. The use of reed roofs, still used in the southern regions, also lies in this area.
2 – natural piece tile covering, bitumen-polymer tiles, slate tiles.
3 – rolled materials on a bitumen basis, at least four layers, with an external gravel topping, recessed into a layer of molten mastic.
4 – similar to point 3, but for the reliability of the roof, three layers of rolled material are sufficient.
5 – roll materials similar to those described above (at least three layers), but without external protective gravel topping.
6 – rolled roofing materials glued to hot mastic in at least two layers. Metal tiles, corrugated sheets.
7 – corrugated asbestos-cement sheets (slate) of a unified profile.
8 – tiled clay covering
9 – asbestos-cement sheets with reinforced profile.
10 – roofing sheet steel with flared joints.
11 – slate covering of regular profile.
Thus, if there is a desire to cover the roof with a certain type of roofing material, the slope angle should be planned within the specified limits.
Dependence of the height of the ridge on the angle of inclination of the roof
For those readers who remember their high school trigonometry course well, this section may not seem interesting. They can skip it right away and move on. But those who have forgotten this need to refresh their knowledge about the interdependence of angles and sides in a right triangle.
What is this for? In the case under consideration, the construction of the roof is always based on a right triangle. Its two legs are the length of the projection of the slope onto the horizontal plane (length of the span, half span, etc. - depending on the type of roof) and the height of the slope at the highest point (at the ridge or when moving to the upper rafters - when calculating the lower rafters of the attic roofs). It is clear that there is only one constant value here - the span length. But the height can be changed by varying the angle of the roof.
The table shows two main dependencies, expressed through the tangent and sine of the slope angle. There are other dependencies (via cosine or cotangent), but in this case these two trigonometric functions are enough for us.
| Graphic diagram | Basic trigonometric relations | |
| H - ridge height | ||
| S - roof slope length | ||
| L - half the span length (with a symmetrical gable roof) or span length (with a shed roof) | ||
| α - roof slope angle | ||
| tan α = H/L | Н = L × tan α | |
| sinα = H/S | S = H / sin α | |
Knowing these trigonometric identities, you can solve almost all problems in the preliminary design of a truss structure.
For clarity, a triangle attached to the roof of a house
So, if you need to “dance” from a clearly established height of the skate, then using the ratio tg α = H / L it will be easy to determine the angle.
Using the number obtained by division in the table of tangents, the angle in degrees is found. Trigonometric functions are often included in engineering calculators; they are required in Excel tables (for those who know how to work with this convenient application. However, the calculations there are carried out not in degrees, but in radians). But so that our reader does not have to be distracted by searching for the necessary tables, we present the values of tangents in the range from 1 to 80°.
| Corner | Tangent value | Corner | Tangent value | Corner | Tangent value | Corner | Tangent value |
| tg(1°) | 0.01746 | tg(21°) | 0.38386 | tg(41°) | 0.86929 | tg(61°) | 1.80405 |
| tg(2°) | 0.03492 | tg(22°) | 0.40403 | tg(42°) | 0.9004 | tg(62°) | 1.88073 |
| tg(3°) | 0.05241 | tg(23°) | 0.42447 | tg(43°) | 0.93252 | tg(63°) | 1.96261 |
| tg(4°) | 0.06993 | tg(24°) | 0.44523 | tg(44°) | 0.96569 | tg(64°) | 2.0503 |
| tg(5°) | 0.08749 | tg(25°) | 0.46631 | tg(45°) | 1 | tg(65°) | 2.14451 |
| tg(6°) | 0.1051 | tg(26°) | 0.48773 | tg(46°) | 1.03553 | tg(66°) | 2.24604 |
| tg(7°) | 0.12278 | tg(27°) | 0.50953 | tg(47°) | 1.07237 | tg(67°) | 2.35585 |
| tg(8°) | 0.14054 | tg(28°) | 0.53171 | tg(48°) | 1.11061 | tg(68°) | 2.47509 |
| tg(9°) | 0.15838 | tg(29°) | 0.55431 | tg(49°) | 1.15037 | tg(69°) | 2.60509 |
| tg(10°) | 0.17633 | tg(30°) | 0.57735 | tg(50°) | 1.19175 | tg(70°) | 2.74748 |
| tg(11°) | 0.19438 | tg(31°) | 0.60086 | tg(51°) | 1.2349 | tg(71°) | 2.90421 |
| tan(12°) | 0.21256 | tg(32°) | 0.62487 | tg(52°) | 1.27994 | tg(72°) | 3.07768 |
| tg(13°) | 0.23087 | tg(33°) | 0.64941 | tg(53°) | 1.32704 | tg(73°) | 3.27085 |
| tg(14°) | 0.24933 | tg(34°) | 0.67451 | tg(54°) | 1.37638 | tg(74°) | 3.48741 |
| tg(15°) | 0.26795 | tg(35°) | 0.70021 | tg(55°) | 1.42815 | tg(75°) | 3.73205 |
| tg(16°) | 0.28675 | tg(36°) | 0.72654 | tg(56°) | 1.48256 | tg(76°) | 4.01078 |
| tg(17°) | 0.30573 | tg(37°) | 0.75355 | tg(57°) | 1.53986 | tg(77°) | 4.33148 |
| tg(18°) | 0.32492 | tg(38°) | 0.78129 | tg(58°) | 1.60033 | tg(78°) | 4.70463 |
| tg(19°) | 0.34433 | tg(39°) | 0.80978 | tg(59°) | 1.66428 | tg(79°) | 5.14455 |
| tan(20°) | 0.36397 | tg(40°) | 0.8391 | tg(60°) | 1.73205 | tg(80°) | 5.67128 |
In the case, on the contrary, when the angle of inclination of the roof is taken as a basis, the height of the ridge is determined by the inverse formula:
H = L × tan α
Now, having the values of two legs and the angle of inclination of the roof, it is very easy to calculate the required length of the rafters from the ridge to the eaves overhang. You can apply the Pythagorean theorem
S = √ ( L² + H² )
Or, which is probably easier, since the magnitude of the angle is already known, apply the trigonometric relationship:
S = H / sin α
The value of the sines of angles is in the table below.
| Corner | Sine value | Corner | Sine value | Corner | Sine value | Corner | Sine value |
| sin(1°) | 0.017452 | sin(21°) | 0.358368 | sin(41°) | 0.656059 | sin(61°) | 0.87462 |
| sin(2°) | 0.034899 | sin(22°) | 0.374607 | sin(42°) | 0.669131 | sin(62°) | 0.882948 |
| sin(3°) | 0.052336 | sin(23°) | 0.390731 | sin(43°) | 0.681998 | sin(63°) | 0.891007 |
| sin(4°) | 0.069756 | sin(24°) | 0.406737 | sin(44°) | 0.694658 | sin(64°) | 0.898794 |
| sin(5°) | 0.087156 | sin(25°) | 0.422618 | sin(45°) | 0.707107 | sin(65°) | 0.906308 |
| sin(6°) | 0.104528 | sin(26°) | 0.438371 | sin(46°) | 0.71934 | sin(66°) | 0.913545 |
| sin(7°) | 0.121869 | sin(27°) | 0.45399 | sin(47°) | 0.731354 | sin(67°) | 0.920505 |
| sin(8°) | 0.139173 | sin(28°) | 0.469472 | sin(48°) | 0.743145 | sin(68°) | 0.927184 |
| sin(9°) | 0.156434 | sin(29°) | 0.48481 | sin(49°) | 0.75471 | sin(69°) | 0.93358 |
| sin(10°) | 0.173648 | sin(30°) | 0.5 | sin(50°) | 0.766044 | sin(70°) | 0.939693 |
| sin(11°) | 0.190809 | sin(31°) | 0.515038 | sin(51°) | 0.777146 | sin(71°) | 0.945519 |
| sin(12°) | 0.207912 | sin(32°) | 0.529919 | sin(52°) | 0.788011 | sin(72°) | 0.951057 |
| sin(13°) | 0.224951 | sin(33°) | 0.544639 | sin(53°) | 0.798636 | sin(73°) | 0.956305 |
| sin(14°) | 0.241922 | sin(34°) | 0.559193 | sin(54°) | 0.809017 | sin(74°) | 0.961262 |
| sin(15°) | 0.258819 | sin(35°) | 0.573576 | sin(55°) | 0.819152 | sin(75°) | 0.965926 |
| sin(16°) | 0.275637 | sin(36°) | 0.587785 | sin(56°) | 0.829038 | sin(76°) | 0.970296 |
| sin(17°) | 0.292372 | sin(37°) | 0.601815 | sin(57°) | 0.838671 | sin(77°) | 0.97437 |
| sin(18°) | 0.309017 | sin(38°) | 0.615661 | sin(58°) | 0.848048 | sin(78°) | 0.978148 |
| sin(19°) | 0.325568 | sin(39°) | 0.62932 | sin(59°) | 0.857167 | sin(79°) | 0.981627 |
| sin(20°) | 0.34202 | sin(40°) | 0.642788 | sin(60°) | 0.866025 | sin(80°) | 0.984808 |
For those readers who simply do not want to dive into independent trigonometric calculations, we recommend a built-in calculator that will quickly and accurately determine the length of the roof slope (without taking into account the eaves overhang) based on the available values of the ridge height and the length of the horizontal projection of the slope.
Calculator for calculating the length of the roof slope based on the known value of the ridge height
Skillful use of trigonometric formulas allows, with normal spatial imagination and the ability to make simple drawings, to carry out calculations for more complex roof structures.
Based on the basic ratios, it is easy to divide into triangles and calculate the hip roof
For example, even a hip or mansard roof that seems so “sophisticated” can be divided into a set of triangles, and then all the necessary dimensions can be consistently calculated.
Dependence of the dimensions of the attic room on the angle of inclination of the roof slopes
If the owners of the future house plan to use the attic as a functional room, in other words, to make an attic, then determining the angle of the roof slope acquires quite practical significance.
The greater the slope, the more spacious the attic
There is no need to explain much here - the above diagram clearly shows that the smaller the angle of inclination, the tighter the free space in the attic.
To make it a little clearer, it is better to carry out a similar scheme on a certain scale. Here, for example, is what an attic room will look like in a house with a pediment width of 10 meters. It should be borne in mind that the ceiling height cannot be lower than 2 meters. (Frankly speaking, two meters is not enough for a living space - the ceiling will inevitably “press” on a person. Usually they start from a height of at least 2.5 meters).
For example, a scaled diagram of the attic
You can give the already calculated average values of the room obtained in the attic, depending on the angle of inclination of a conventional gable roof. In addition, the table shows the lengths of the rafters and the area of the roofing material, taking into account 0.5 meters of the roof eaves.
| Roof angle | Ridge height | Ramp length | Useful area of the attic space per 1 meter of building length (with a ceiling height of 2 m) | Roofing area per 1 meter of building length |
| 20 | 1.82 | 5.32 | No | 11.64 |
| 25 | 2.33 | 5.52 | 0.92 | 12.03 |
| 30 | 2.89 | 5.77 | 2.61 | 12.55 |
| 35 | 3.50 | 6.10 | 3.80 | 13.21 |
| 40 | 4.20 | 6.53 | 4.75 | 14.05 |
| 45 | 5.00 | 7.07 | 5.52 | 15.14 |
| 50 | 5.96 | 7.78 | 6.16 | 16.56 |
So, the steeper the slope of the slopes, the more spacious the room. However, this is immediately reflected by a sharp increase in the height of the truss structure, an increase in size, and therefore the mass of parts for its installation. Much more roofing material will be required - the coverage area is also growing rapidly. Plus, we must not forget about the increasing “windage” effect - greater exposure to wind loads. The last chapter of this publication will be devoted to types of external loads.
For comparison, a mansard-type roof provides a gain in usable space even at a lower height
In order to neutralize such negative consequences to a certain extent, designers and builders often use a special mansard roof design - it has already been mentioned in this article. It is more difficult to calculate and manufacture, but it provides a significant gain in the resulting usable area of the attic space with a decrease in the overall height of the building.
Dependence of the magnitude of external loads on the angle of inclination of the roof
Another important application of the calculated roof pitch angle is determining the degree of its influence on the level of external loads falling on the roof structure.
There is an interesting relationship here. You can calculate all the parameters in advance - angles and linear dimensions, but in the end you always end up with detailing. That is, it is necessary to determine from what material the parts and assemblies of the rafter system will be made, what their cross-sectional area should be, the location pitch, the maximum length between adjacent support points, methods of fastening the elements to each other and to the load-bearing walls of the building, and much more.
This is where the loads experienced by the roof structure come to the fore. In addition to your own weight, external influences are of great importance. If we do not take into account seismic loads that are unusual for our region, then we should mainly focus on snow and wind. The size of both is directly related to the angle of the roof to the horizon.
Snow load
It is clear that over the vast territory of the Russian Federation, the average amount of precipitation falling in the form of snow varies significantly by region. Based on the results of many years of observations and calculations, a map of the country’s territory was compiled, which shows eight different zones according to the level of snow load.
Map of distribution of zones in the Russian Federation by snow load
The eighth and last zone is some sparsely populated areas of the Far East, and it need not be particularly considered. The values for other zones are indicated in the table
| Zonal distribution of the territory of the Russian Federation by average snow load | Value in kPa | Value in kg/m² |
| I | 0.8 kPa | 80 kg/m² |
| II | 1.2 kPa | 120 kg/m² |
| III | 1.8 kPa | 180 kg/m² |
| IV | 2.4 kPa | 240 kg/m² |
| V | 3.2 kPa | 320 kg/m² |
| VI | 4.0 kPa | 400 kg/m² |
| VII | 4.8 kPa | 480 kg/m² |
Now, to calculate the specific load for the planned building, you need to use the formula:
Рсн = Рсн.т × μ
RSN.t – the value that we found using the map and table;
Μ – correction factor, which depends on the slope angle α
- at α from 0 to 25° - μ=1
- at α more than 25 and up to 60° - μ=0.7
- when α is more than 60° , the snow load is not taken into account, since the snow should not be kept on the plane of the roof slopes.
For example, a house is being built in Bashkiria. The planned slope of its roof is 35°.
We find from the table - zone V, table value - Рсн.т = 3.2 kPa
We find the final value Рсн = 3.2 × 0.7 = 2.24 kPa
(if the value is needed in kilograms per square meter, then the ratio is used
1 kPa ≈ 100 kg/m²
In our case, it turns out to be 224 kg/m².
Wind load
With wind load, things are much more complicated. The fact is that it can be multidirectional - the wind is able to exert pressure on the roof, pressing it to the base, but at the same time aerodynamic “lifting” forces arise, tending to tear the roof away from the walls.
In addition, wind load affects different parts of the roof unevenly, so knowing only the average level of wind load is not enough. The prevailing wind directions in a given area (“wind rose”), the degree of saturation of the area with obstacles to the spread of wind, the height of the building and surrounding structures, and other criteria are taken into account.
An approximate procedure for calculating wind load is as follows.
First of all, by analogy with previously carried out calculations, the region of the Russian Federation and the corresponding zone are determined on the map.
Distribution of zones in the Russian Federation by wind pressure level
Next, using the table, you can determine the average value of wind pressure Pwt
| Regional distribution of the territory of the Russian Federation by level of average wind load | Ia | I | II | III | IV | V | VI | VII |
| Table value of wind pressure, kg/m² (Рв) | 24 | 32 | 42 | 53 | 67 | 84 | 100 | 120 |
Next, the calculation is carried out using the following formula:
Рв = Рвт × k × c
Pwt – tabular value of wind pressure
k is a coefficient that takes into account the height of the building and the nature of the area around it. It is determined from the table:
| Height of the building (structure) being constructed (z) | Zone A | Zone B | Zone B |
| no more than 5 m | 0.75 | 0.5 | 0.4 |
| from 5 to 10 m | 1.0 | 0.65 | 0.4 |
| from 10 to 20 m | 1.25 | 0.85 | 0.55 |
| from 20 to 40 m | 1.5 | 1.1 | 0.8 |
The table shows three different zones:
- Zone “A” is an open “bare” area, for example, steppe, desert, tundra or forest-tundra, completely exposed to the wind influence of the coast of seas and oceans, large lakes, rivers, and reservoirs.
- Zone “B” - territories of residential villages, small towns, wooded and rough areas, with obstacles to the wind, natural or artificial, about 10 meters high.
- Zone “B” is the territory of large cities with dense buildings, with an average building height of 25 meters and above.
A house is considered to correspond to this particular zone if the specified characteristic features are located within a radius of no less than the height of the building h, multiplied by 30 (for example, for a house of 12 m, the radius of the zone must be at least 360 m). For building heights above 60 m, a circle with a radius of 2000 m is assumed.
c - and this is the same coefficient that depends on the direction of the wind on the building and on the angle of inclination of the roof.
As already mentioned, depending on the direction of the impact and the characteristics of the roof, the wind can produce multidirectional load vectors. The diagram below shows the wind impact zones into which the roof area is usually divided.
Distribution of the roof of a building into zones when calculating wind load
Please note that an intermediate auxiliary quantity e appears. It is taken equal to either 2 × h or b , depending on the wind direction. In any case, the smaller of the two values is taken.
The coefficient c for each zone is taken from the tables, which takes into account the roof slope angle. If for one section both positive and negative coefficient values are provided, then both calculations are carried out, and then the data are summed.
Table of coefficient “ c” for wind directed into the roof slope
| Roof slope angle (α) | F | G | H | I | J |
| 15 ° | — 0,9 | -0.8 | — 0.3 | -0.4 | -1.0 |
| 0.2 | 0.2 | 0.2 | |||
| 30 ° | -0.5 | -0.5 | -0.2 | -0.4 | -0.5 |
| 0.7 | 0.7 | 0.4 | |||
| 45 ° | 0.7 | 0.7 | 0.6 | -0.2 | -0.3 |
| 60 ° | 0.7 | 0.7 | 0.7 | -0.2 | -0.3 |
| 75 ° | 0.8 | 0.8 | 0.8 | -0.2 | -0.3 |
Table of coefficient “ c” for wind directed to the gable part
| Roof slope angle (α) | F | G | H | I |
| 0 ° | -1.8 | -1.3 | -0.7 | -0.5 |
| 15 ° | -1.3 | -1.3 | -0.6 | -0.5 |
| 30 ° | -1.1 | -1.4 | -0.8 | -0.5 |
| 45 ° | -1.1 | -1.4 | -0.9 | -0.5 |
| 60 ° | -1.1 | -1.2 | -0.8 | -0.5 |
| 75 ° | -1.1 | -1.2 | -0.8 | -0.5 |
Now, by calculating the wind load, it will be possible to determine the total external force impact for each section of the roof.
Rsum = Rsn + Rv
The resulting value becomes the initial value for determining the parameters of the rafter system. In particular, in the table below, you can find the values of the permissible free length of the rafters between the support points, depending on the cross-section of the beam, the distance between the rafters, the type of material (softwood) and, accordingly, the level of total wind and snow load.
| Wood type | Rafter section (mm) | Distance between adjacent rafters (mm) | |||||
| 300 | 400 | 600 | 300 | 400 | 600 | ||
| total load (snow + wind) | 1.0 kPa | 1.5 kPa | |||||
| Premium quality wood | 40×89 | 3.22 | 2.92 | 2.55 | 2.81 | 2.55 | 2.23 |
| 40×140 | 5.06 | 4.60 | 4.02 | 4.42 | 4.02 | 3.54 | |
| 50×184 | 6.65 | 6.05 | 5.28 | 5.81 | 5.28 | 4.61 | |
| 50×235 | 8.50 | 7.72 | 6.74 | 7.42 | 6.74 | 5.89 | |
| 50×286 | 10.34 | 9.40 | 8.21 | 9.03 | 8.21 | 7.17 | |
| I or II grade | 40×89 | 3.11 | 2.83 | 2.47 | 2.72 | 2.47 | 2.16 |
| 40×140 | 4.90 | 4.45 | 3.89 | 4.28 | 3.89 | 3.40 | |
| 50×184 | 6.44 | 5.85 | 5.11 | 5.62 | 5.11 | 4.41 | |
| 50×235 | 8.22 | 7.47 | 6.50 | 7.18 | 6.52 | 5.39 | |
| 50×286 | 10.00 | 9.06 | 7.40 | 8.74 | 7.66 | 6.25 | |
| III grade | 40×89 | 3.06 | 2.78 | 2.31 | 2.67 | 2.39 | 1.95 |
| 40×140 | 4.67 | 4.04 | 3.30 | 3.95 | 3.42 | 2.79 | |
| 50×184 | 5.68 | 4.92 | 4.02 | 4.80 | 4.16 | 3.40 | |
| 50×235 | 6.95 | 6.02 | 4.91 | 5.87 | 5.08 | 4.15 | |
| 50×286 | 8.06 | 6.98 | 6.70 | 6.81 | 5.90 | 4.82 | |
| total load (snow + wind) | 2.0 kPa | 2.5 kPa | |||||
| Premium quality wood | 40×89 | 4.02 | 3.65 | 3.19 | 3.73 | 3.39 | 2.96 |
| 40×140 | 5.28 | 4.80 | 4.19 | 4.90 | 4.45 | 3.89 | |
| 50×184 | 6.74 | 6.13 | 5.35 | 6.26 | 5.69 | 4.97 | |
| 50×235 | 8.21 | 7.46 | 6.52 | 7.62 | 6.92 | 5.90 | |
| 50×286 | 2.47 | 2.24 | 1.96 | 2.29 | 2.08 | 1.82 | |
| I or II grade | 40×89 | 3.89 | 3.53 | 3.08 | 3.61 | 3.28 | 2.86 |
| 40×140 | 5.11 | 4.64 | 3.89 | 4.74 | 4.31 | 3.52 | |
| 50×184 | 6.52 | 5.82 | 4.75 | 6.06 | 5.27 | 4.30 | |
| 50×235 | 7.80 | 6.76 | 5.52 | 7.06 | 6.11 | 4.99 | |
| 50×286 | 2.43 | 2.11 | 1.72 | 2.21 | 1.91 | 1.56 | |
| III grade | 40×89 | 3.48 | 3.01 | 2.46 | 3.15 | 2.73 | 2.23 |
| 40×140 | 4.23 | 3.67 | 2.99 | 3.83 | 3.32 | 2.71 | |
| 50×184 | 5.18 | 4.48 | 3.66 | 4.68 | 4.06 | 3.31 | |
| 50×235 | 6.01 | 5.20 | 4.25 | 5.43 | 4.71 | 3.84 | |
| 50×286 | 6.52 | 5.82 | 4.75 | 6.06 | 5.27 | 4.30 | |
It is clear that when calculating the cross-section of the rafters, the pitch of their installation and the span length (the distance between the support points), indicators of the total external pressure are taken for the most loaded sections of the roof. table , these are G and N.
To simplify the task of calculating the total load for a site visitor, below is a calculator that will calculate this parameter specifically for the most loaded areas.
Calculator for calculating the total, snow and wind load to determine the required rafter section
Go to calculations
So, it is difficult to underestimate the importance of correct calculation of the angle of inclination of the roof, the influence of this parameter on a number of the most important characteristics of the rafter system, and the entire building as a whole. Although carrying out real architectural calculations, of course, is largely the prerogative of specialists, the ability to navigate basic concepts and carry out simple basic calculations will be very useful for every competent home owner.
And at the end of the article - a video lesson on calculating the rafter system of a conventional gable roof:
Video: calculation and installation of a gable rafter system
Determining slope during construction work
Roofing specialists are often faced with the need to measure roof slopes. Knowing these parameters allows you to choose the type of materials that will be used, check with the recommended values for buildings, and choose the method of roofing work.
In order not to perform complex mathematical calculations every time, a special tool was developed called an inclinometer. This device is quite simple. A special frame is attached to the rail, inside which the pendulum is fixed; it has a weight and a pointer. The rail is installed in a horizontal position on the roof section being measured and the numerical value of the slope is determined on the scale using the indicator.
If you know the value of the roof slope in degrees, you can convert it into percentages using special tables. They already contain percentage values for each angle from one to forty-five degrees.
Tips in the article “Types of laminate installation” here.
How to cut rafters at the right angle and the right size, watch the video:
What factors influence the choice of roof slope?
Despite the fact that humanity is constantly developing and no longer depends on natural circumstances, it is still these conditions that often influence the choice of inclination.
Atmospheric precipitation, the accumulation of which threatens roof failure or the appearance of dampness and fungus.
If constant rains, downpours, thunderstorms and snowfalls are common in a given region, then the roof slope should be increased. Quickly ridding the roof of water is the key to the longevity of the structure.
In regions with strong winds, such as the steppes, it is more important than ever to find a middle ground. The wind can simply overwhelm a roof that is too high, or tear off a flat one.
The most optimal roof slope is from 30 to 40 degrees. In regions with strong gusts of wind - from 15 to 25 degrees.
When choosing a roof slope, it is imperative to take these two serious factors into account. Having understood this issue, further work on the flooring will be significantly simplified.
According to GOST and SNiPs, which are in force on the territory of the Russian Federation, the roof angle should be measured only in degrees. In all official data or documents, only degrees are used. However, it is easier for workers and builders “on the ground” to navigate in percentages. Below is a table of the relationship between degrees and percentages - for more convenient use and understanding.
Using the table is quite simple: we find out the initial value and correlate it with the desired indicator.
There is a very convenient tool for measuring called an inclinometer. This is a rail with a frame, in the middle there is an axis and a division scale, to which the pendulum is attached. At a horizontal level, the device shows 0. And when used vertically, perpendicular to the ridge, the inclinometer shows a degree.
In addition to this instrument, geodetic, drip and electronic instruments for measuring slope are also widely used. The degree of slope can also be calculated mathematically.
To calculate the slope angle, you need to find out two values: B - vertical height (from the ridge to the eaves), C - position (horizontal from the bottom point of the slope to the top). When dividing the first value by the second, A is the slope angle in degrees. If you need a roof angle percentage, refer to the table above.
Specifics of flat and pitched roofs
Flat floors are not represented by a purely horizontal surface, no matter how misleading its name may be. The construction azimuth in this situation also has a slope, although not significant - its minimum value should be 3 degrees.
NOTE!
There is one nuance that must be taken into account when designing a flat surface. A prerequisite is the installation of drainage funnels, the walls of which will tilt by 1.5 degrees.
As for the optimal values for flat roofing, the slope of a flat roof fluctuates around 5-7 degrees . This is due to the fact that roofs with an angle greater than 10º can hardly be called flat. In turn, 12-15 degrees in most situations is already interpreted as the minimum threshold for sloped surfaces. The optimal values are wide enough.
The optimal roof angle for snow melting is 40-50 degrees.
Flat roof slope
For example, for single-pitch awnings a range of 20 to 30 degrees is assumed, and in the case of gable awnings this figure rises to 45º. It’s just that this volumetric interval largely indicates the individual characteristics of the roof type and climatic features.
CAREFULLY!
If the azimuth is small, the joints must be treated with frost- and water-resistant sealant. If the indicator is 15 degrees or higher, then the corrugated sheeting should be laid with an overlap of 200 mm, and if the roof slope is less than 15º, the overlap increases by two “waves”.
Which roofing material to choose
Roof coverings vary in structure, strength, and price range. Yet the most important criterion for choosing a material is its structure. The rougher the surface, the longer precipitation will linger on the roof.
There are several types of roofing material that affect the determination of the amount of slope.
- Roofing from roll bitumen materials is used with a minimum roof slope of 0 to 3 °. Roll roofing is quite easy to use and has several advantages: flexibility, strength, thermal insulation.
- With a roof slope of 4° or more, a seam roof is used, which has an increased degree of wear resistance and strength. This is due to the fact that this material consists of polymers.
- Slate coating is usually used from 9 °.
- Various types of tiles (ceramic, bitumen, metal and cement-sand) are used if the angle of inclination exceeds 11 °. Tiles, in particular metal ones, are one of the most popular types of roofing today, since their use is possible in various climatic conditions.
- Above 39°, wooden roofing is usually used, but such material requires constant attention and proper care.
In order for your roof to be built correctly and last a long time, it is not necessary to seek the services of specialists. It is enough to correctly calculate the angle of inclination of the slope and select the appropriate material.
Watch the video and find out what the roof should be like
When creating design documentation, very often the slope is indicated not in degrees, but as a percentage. This allows you to avoid problems with the installation of the finished structure.
The slope in degrees is calculated for steep roof slopes, so it will be more convenient. But when we are talking about a small angle, then using percentages to indicate the slope value will help to avoid errors in calculation and installation.
To find out the percentage value of the slope on a plot of land, you can use the following methods:
- The simplest and most accurate way to determine the slope angle is leveling. Using a special device, all the necessary quantities are measured and simple calculations are made using a simple ratio. The height difference is divided by the distance, then the result is multiplied by 100%. Modern levels are equipped with built-in memory, which greatly facilitates the work of measurers;
- You can measure the slope on your own site without using expensive equipment. Site plans or topographic maps often indicate elevations. These places are marked on the land plot, pegs can be used for this purpose, then the distance between them is measured with a surveying compass. Mathematical calculations are made according to the same scheme as when working with a level;
- Using the interpolation method, the percentage slope value can be calculated from the topographic map. To do this, the difference in elevations is also determined, which is divided by the distance and multiplied by 100%.
Dependence of the slope angle and the type of roofing material
We have already mentioned two types of roofs: flat and inclined. But it should be noted that flat roofs also have their own angle, which varies in the range of 0-5°. Pitched roofs are divided into two subgroups (the division is conditional):
- with a slight slope - from 6 to 30°;
- with a steep slope - more than 30°.
Distribution of roofing materials according to the steepness of the slope Source belhouse.by
Each type of roofing structure has its own advantages and disadvantages. For example, flat roofs cover a small area, which allows you to save on roofing material (its quantity). But at the same time, such a design will require enhanced waterproofing. Steep slopes mean trouble-free convergence of atmospheric precipitation, but the structure has a high windage capacity, which will require its construction to strengthen the rafter system.
Considering this, it is necessary to strictly approach the choice of roofing material. Their manufacturers must inform consumers at what minimum roof slope they can be used. The photo below shows a diagram of the distribution of roofing materials at the corners of the slopes.
As can be seen from the diagram, roll materials in the form of roofing felt or roofing felt are usually used on flat roofs. Although there are no contraindications to the use of sheet or slab products: slate, corrugated sheets, sheet iron assembled using the seam method. But it is better not to use piece roofing material on roofs with a slope of less than 15°. There is a high probability of water penetration through the joints of the coating elements.
The value of the roof angle in degrees and percentages in relation to the type of roofing material Source remotvet.ru
Slope calculator
Slope calculator
will help you calculate the slope, elevation or distance at the right time without any problems.
The calculator can calculate the roof slope
.
pipeline slope
.
slope of the stairs
.
road slope
, etc. It is also possible to calculate the elevation between points or the distance from point to point (useful in geodesy).
Operating procedure:
1. Select the value that you need to calculate2. Select in which unit of measurement you want to set/calculate the slope (3 types to choose from: degrees, ppm, percent)3. Set the 1st unknown4. Set the 2nd unknown5. Click the “Calculation” button
For reference:
- slope in degrees is calculated using the tangent of the angle:
tgx = h / L
- slope in ppm is calculated using the following formula:
x = 1000 * h / L
- slope in percentage is calculated using the following formula:
x = 100 * h / L
Slope calculator
created as an addition to the main online calculations on the site, and if you liked it, then do not forget to tell your friends and colleagues about it.
What indicators affect the slope of the stairs?
As has already been noted more than once, the slope of the stairs is influenced by the width and height of the steps. Low steps and a wide tread provide a flatter, but at the same time more bulky design, respectively, higher and narrow steps allow you to use less space, since the maximum angle of rise of the staircase increases.
It is believed that the optimal step height is 15-18 cm . A higher value leads to difficulties when moving, and a lower value leads to inappropriate enlargement of the structure.
The width of the tread directly determines the effective depth of the steps. It is selected based on the average step length of users and the technical capabilities of the room. Recommended width 27-30 cm .
Almost all design features of the product are determined by GOST 23120-78 “Flight stairs, platforms and fences”.
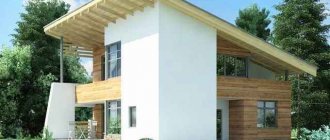
Roof slope and its importance in building houses
Driving past populated areas, we often look at the roofs of houses and buildings. Some resemble the steep slopes of Elbrus, others resemble the sloping slopes of the Far Eastern hills. Why do the floors have such different slopes? The slope of the roof contributes to the rapid removal of precipitation from the territory of the structure and is measured by the angle between the plane of the roof slope and the horizon plane. The greater the slope angle, the steeper the roof, and vice versa, as it decreases, the roof becomes more sloping or flat until it becomes horizontal. Architectural professionals measure this angle in degrees (º), percentage (%) or numerical ratio. If the angle is very small, then use the measurement in ppm (hundredths of a percent). For reference: 1º - 1.7%; 1% - 34′ 20″.
The slope of any roof is a very important element. Its value is calculated depending on the climate and the roofing material used.
The slope of the plane of any part of the roof is a very important element in house construction, and its value is selected depending on the climate and the roofing material used. It affects its reliability, tightness, the possibility of drainage, and therefore the durability of the building as a whole. To correctly select the roofing material, as well as to calculate its consumption and the height of the structure, you need to know how to calculate the roof slope.
Roof angle calculator - a brief summary of the calculations
The roof slope calculator is used to calculate both the roof slope angle and missing roof data - projection, height, length and roof slope angle. Visually, where and what values can be seen on the calculator drawing located under the calculation form.
To calculate the roof slope angle or data, it is enough to indicate only two known values
, and the remaining values (if any) can be used for verification.
Calculation of slope for an apartment
To install a sewer system for a sink, washbasin and bathroom, you need to choose pipes with a diameter of 40-50 mm. There should be a slope of no more and no less than 2.5-3.5 cm per meter. The minimum value of the slope coefficient per meter is 0.012, and the standard value is 0.02. For a toilet, the required slope is 85-100 mm, and for a common riser - 100 mm. To calculate the slope coefficient, the formula is used:
V*√(H/d)>K,
where K is the coefficient for plastic and glass pipes 0.5, and for others 0.6,
N is the coefficient of how quickly the pipeline fills,
V is the speed of fluid movement along the line,
D is the internal diameter of the pipe.
To correctly set the level of inclination of the pipe in the apartment, it is enough to use a regular ruler.
How to calculate occupancy levels
For plastic and cast iron pipes, it is mandatory to calculate the level of water filling. Thanks to this indicator, you can find out at what speed the water should move so that it cannot become clogged. And of course, the exact value of the slope per meter depends on this indicator. To calculate the filling rate, you need to divide the water level in the pipe by the diameter.
The minimum indicator according to SNIPA is 0.3, and the maximum is 1. But, in practice, this occupancy rate is in the range of 0.3-0.6. It is the optimal one.
The influence of the angle of inclination on the volume of the attic room
If a house is being built with an attic, then the angle of inclination of the slopes acquires practical significance. And here the relationship is direct, that is, the larger the angle, the larger the volume of the attic. To make it clear, this is clearly visible in the photo below.
The ratio of the angle of inclination of the slopes to the volume of the attic room Source legkovmeste.ru
Here's an example based on the top picture. Here you can clearly see that the height of the room depends on the roof slope parameters. It should be taken into account that the optimal height should not be less than 2.5 m. This means that the angle of inclination of the attic slopes should be at least 25°. But please note that with this arrangement of roofing elements, the volume of the room is not taken into account. That is, the width of the room will not be more than 3 m. This despite the fact that the width of the house is 10 m. It turns out that only 30% of the space is used.
This means we need to increase the angle value. And the larger it is, the larger the usable area of the attic. But there is another side to the coin. By increasing the angle, the height of the ridge increases. And this is the cost of building materials for the construction of the roof, plus an increase in the windage of the structure. Therefore, it is very important to find a middle ground. For example, 40° practically solves all problems.
To get away from these problems once and for all, builders have long been using a completely different design. It is complex both in construction and in calculations, but this option solves the problem of usable area of the room without increasing the height of the roof.
Mansard roof design Source ok.ru
What should the slope be?
How to understand what a pipe slope is? In SNiP it is written in fractions - in the form of decimals. It will look like this: 0.03 or 0.008. The numbers are deciphered as follows: this is the difference in heights of the two ends of a meter-long piece of laid sewer pipe. The number 0.03 means that one end of the meter pipe is raised by 3 cm. Accordingly, the number 0.008 means that one edge is raised by 0.8 cm or 8 mm.
Recommended slope of sewer pipes of different diameters (50 mm, 100 mm, 150 mm)
The pipeline is usually much longer than one meter. You can calculate how much higher one end should be than the other by multiplying the selected slope by the length of the pipeline. For example, we will lay a sewer with a slope of 3 cm/m, its length is 25 m. This means that its far end will be lowered by 3 cm * 25 m = 75 cm.
Dependence on pipe diameter
Sewage systems are divided into internal - installed in an apartment or house, and external - which are laid on the street. In both cases, it is necessary to maintain the required slope of the sewer pipe. When they say this, they mean the indicator recommended by sanitary standards. It depends on the diameter of the pipes used: the smaller the cross-section, the greater the slope must be given.
| Diameter of sewer pipes | Normal slope | Smallest allowed |
| 50 mm | 0.035 (3.5 cm) | 0.025 (2.5 cm) |
| 100 mm | 0.02 (2 cm) | 0.012 (1.2 cm) |
| 150 mm | 0.01 (1 cm) | 0.07 (7 mm) |
| 200 mm | 0.008 (0.8 cm) | 0.005 (0.5 cm) |
The table shows the slope of the sewer pipe, which will ensure normal operation of the system. If for some reason it is not possible to make the required slope angle (this happens in areas with complex terrain), the slope angle can be reduced to the specified limit norm. The chance of getting problems increases, but not much.
What to do if the slope is greater than required
Sometimes it is not possible to make the required slope - conditions vary. In this case, there are two solutions:
- Lay the pipe as best you can (but the difference per meter should not be more than 15 cm per meter) and hope that everything will work. If there is a large slope, it is recommended to install tees with upward bends on the route after a while - so that it is possible to clear blockages. The likelihood of their formation at large slopes of the sewer pipe is high.
- Lay the pipe with the recommended slope in such an area where this is possible, then install a drop well, and again take the pipe out of it at the required slope. Several such wells may be needed.
The first option is a cheaper device, but it involves frequent blockages in the pipes. Of course, with intensive use of sewerage (large amounts of water), there may be no problems, everything can work without problems. But this is rather an exception. By the way, when using plastic pipes, the likelihood of blockages becomes lower - they have smooth walls, on which precipitation rarely forms. The second option is more expensive and labor-intensive, but it guarantees the functionality of the system.
Regulatory requirements for slopes
When designing streets in populated areas, it is necessary to comply with the requirements for minimum and maximum longitudinal and transverse slopes. Slope values are given in ppm.
The transverse slope of the roadway of streets and squares is taken depending on the type of road surface:
— asphalt concrete and cement concrete – 15 ‰ – 25 ‰;
- prefabricated concrete and reinforced concrete slabs, cobblestone pavements - 20 ‰ - 25 ‰;
- crushed stone and gravel - 20 ‰ - 30 ‰;
- cobblestone pavements - 20 ‰ - 35 ‰.
During construction and reconstruction in cramped conditions, transverse slopes can be increased by 5 ‰.
Transverse and longitudinal slopes of parking spaces on parking lots and parking lots are accepted in the range from 5 ‰ to 40 ‰.
The transverse slope of parking spaces in parking lots adjacent directly to the roadway may be increased to 60 ‰.
Minimum longitudinal slope on streets with surface water drainage
on trays along the roadway, you should take:
- for asphalt concrete and cement concrete pavements - 4 ‰;
— for other types of coatings — 5 ‰.
If drainage trays are not provided along the roadway, then the value of the minimum longitudinal slope is not standardized, and it is ensured by transverse slopes.
Longitudinal slopes on sections of streets with traffic of buses, trolleybuses and trams should not exceed:
— 60 ‰ — with stopping points and curve radii in plan of 250 m or more;
— 40 ‰ — with stopping points and radii of curves in plan from 100 to 250 m;
— 40 ‰ — without stopping points with horizontal curve radii less than 100 m.
Methods for calculating percentage slope
To find out the percentage value of the slope on a plot of land, you can use the following methods:
- The simplest and most accurate way to determine the slope angle is leveling. Using a special device, all the necessary quantities are measured and simple calculations are made using a simple ratio. The height difference is divided by the distance, then the result is multiplied by 100%. Modern levels are equipped with built-in memory, which greatly facilitates the work of measurers;
- You can measure the slope on your own site without using expensive equipment. Site plans or topographic maps often indicate elevations. These places are marked on the land plot, pegs can be used for this purpose, then the distance between them is measured with a surveying compass. Mathematical calculations are made according to the same scheme as when working with a level;
- Using the interpolation method, the percentage slope value can be calculated from the topographic map. To do this, the difference in elevations is also determined, which is divided by the distance and multiplied by 100%.
Converting percentages
1
Move the decimal point two places to the left.
This will convert the percentage to a decimal. If a percentage number does not have a decimal point, feel free to place it after the last digit, for example, 75% = 75.0%. Move the decimal point two places to the left to convert a percentage to a decimal—this is the same as dividing a number by 100. For example:[1]
- 75% = 0,75
3,1% = 0,031
- 0,5% = 0,005
2
Express percentages as a fraction of 100.
You can write percentages as a fraction with a denominator of 100, with the numerator being the percentage number. Then you need to simplify the resulting fraction (if, of course, this is possible).
- For example, 36% = 36/100.
To simplify a fraction, find the largest number that divides both the numerator and denominator. In our example, this number is the number 4.
- Divide both the numerator and denominator by the number you find. In our example you will get: 36/100 = 9/25.
- To check your answer, divide the numerator by the denominator: 9 ÷ 25 = 0.36, and then multiply the result by 100: 0.36 x 100 = 36%. The resulting number must be equal to the percentage number.
3
Get rid of the percent sign.
By converting percentages to a fraction or decimal, the percent sign (%) is no longer needed. Remember that a percentage is a fraction of 100, so if you forget to remove the percent sign after converting to a decimal, it means your answer is a fraction of 100.[2]