Often after repairs, pieces of ceiling plinth remain. They can be used to make a beautiful frame for a picture or family photo. They are made of polystyrene foam. It is perfect for creating a model that can be hung on the wall.
You can make a frame from the ceiling plinth yourself, from the remnants of the plinth after repair.
Polystyrene foam is a very light material, and therefore a frame made from it will be light, durable and reliable.
What will you need?
During the work, you may need different materials and available tools. This depends on the type of frame being made. The main material will be ceiling plinth made of polystyrene foam. The foam plastic analogue is not suitable for frames; it is not dense enough and can break under light load.
Good frames are made from polyurethane plinth . It is wear-resistant, has optimal flexibility and cuts perfectly. Its only drawback is the high price.
In addition to the baseboard itself, you may need:
- cardboard, ruler, sheet of A4 paper;
- universal polymer glue (PVA, “Moment”, “Dragon”, hot);
- sharp stationery knife (scissors or hacksaw);
- construction (gypsum or acrylic) putty and spatula;
- brush, varnish, acrylic (water-based) paint;
- nylon thread;
- pencil or marker for marking.
In addition, you cannot do without a miter box - a special carpentry tool for perfectly cutting the plinth at the desired angle.
Frames can only be made from ceiling plinth. Some products are glued to wooden frames and mounted on a thick cardboard base. Therefore, not only the necessary tools and materials differ, but also manufacturing technologies.
Some people use plywood or boards 4-8 mm thick in their work. It makes a practical basis for framing photographs or paintings. When working with this raw material, you cannot do without a jigsaw or saw. Other available materials include a sponge (foam rubber sponge) for paints and newspapers.
This is interesting: Wallpaper for a children's room
Making a photo frame from wood
A wooden photo frame looks even more solid. Moreover, you don’t always have to go to the construction market to get the material - the original frames are made from branches. But the processed planks, of course, look great. Materials and tools:
- wooden planks of arbitrary size (to the author’s taste);
- PVA glue (but carpenter's glue will also work);
- hammer, nails;
- glass;
- blowtorch;
- a wooden block wrapped in sandpaper.
Making a wooden photo frame yourself is not difficult.
- You need to prepare 4 strips with notches in the connection areas. These planks must be well sanded.
- Glue is applied to the recesses of two planks, then they are folded into the shape of a frame, and small nails are nailed.
- The joints and end sides should be treated with a blowtorch. This type of work is recommended to be performed in the fresh air.
- The front side of the photo frame is also processed with a blowtorch.
- Now you need to take the glass and make markings on it for the future photo. According to this marking, glass is cut out for an almost finished product. The cuts are secured with sandpaper, which is fixed on a wooden block.
- The glass is secured on the reverse side with self-tapping screws. To ensure that the frame hangs securely on the wall, string is fixed in the right place.
- The finished frame can be coated with stain or varnish.
A frame made of twigs can turn out even more cute. The easiest way to make it is a thick cardboard base, to which the same base will be attached, only with a cut out core (as in the example above). Prepared branches are fixed to the side and horizontal cardboard edges of the frame using hot glue. They should be approximately the same diameter and length. If the making of the frame is timed to coincide with the New Year, the twigs can be made snow-covered (ordinary salt, which is sprinkled on the base of the twigs on the glue, will help).
What to consider?
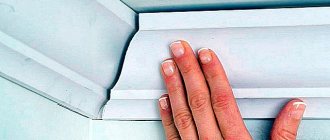
When making your own frame from ceiling plinth, you need to take into account several nuances. Remember: regardless of the type of baseboard, it has a relief. It is not enough to cut it at an angle of 45 degrees; you need to know how to hold the plinth correctly, otherwise you will not be able to achieve perfect joints. This is not a problem if there is a miter box in the house, but when there is none, the situation is different.
In this case, you need to hold the plinth perpendicular to the floor while cutting (it needs to be placed on its edge). In this case, the cut on the front side is slightly narrower than at the base of the baseboard. To do a quality job, you need to practice cutting corners before cutting. Correction risks the fact that instead of a rectangular frame, you may end up with a skewed trapezoid with angles of different sizes and gaps at the joints.
If the plinth has a certain pattern, the size of the frame may differ from the desired one, because you will have to adjust the pattern in the corners. If this is not taken into account, the pattern will not match and the aesthetics of the frame will suffer. If the plinth is geometric in shape without a pattern, only the recesses need to be adjusted. Therefore, the cut must be the same; its angle cannot be changed.
Frames are made in different ways, but to make them well, it is better to use a template. You can use either a base or paper with a lined cutout for the inside of the frame. This will avoid distortion when gluing parts and adjusting joints. As for the joining seams, they should be minimal.
To ensure a high-quality frame, use a plinth of identical width. Even in a store it may differ by a few mm. You need to choose the same molding from the same batch, comparing them with each other. Different widths may affect the joining and joining of the pattern. If the molding is different, it will not be possible to connect it without visible defects.
Tools and materials
Before you start working, think over the design of your crafts. Skirting boards or moldings can be purchased at any hardware store. Trimmings and pieces are also suitable for work, but novice craftsmen are better off buying new ones.
Suitable materials
You can choose a molding decorated with a textured pattern or smooth. Any materials from which skirting boards are made are suitable. But their different properties must be taken into account.
- Styrofoam is cheap and suitable for beginners, but it crumbles and breaks easily.
- Expanded polystyrene is one of the types of foam plastic. Its reliability is better and its price is higher.
- Polyurethane is durable, wear-resistant and cuts well. Flexible skirting board options allow you to create products of any shape. But it has a high cost.
- Wood is also an expensive material. Working with it requires professional training.
The choice of material for a baguette depends on what kind of picture you are going to place. Fragile foam plastic is suitable for small and light photographs, and polystyrene foam, polyurethane and wood are suitable even for oil paintings.
Tools
In addition to the basic material, you will have to purchase:
- sharp construction or stationery knife;
- miter box;
- hacksaw;
- universal quick-drying glue;
- ruler;
- pencil for marking;
- cardboard;
- acrylic or water-based paints;
- putty.
Design secrets
Decorative frames help visually differentiate between different finishing materials. For example, you can successfully separate the painted area from the wallpapered area. Combining materials can become an additional element of interior design.
Wallpaper in a frame will fit perfectly into any room design and can easily replace ordinary paintings on the walls.
At the same time, it is important to correctly combine the design of the frame and the internal content of the picture. For example, embossed silk wallpaper will look great in a wooden frame, which can be complemented with exquisite inlays
If the monochromatic color of the wallpaper in a minimalist interior seems too boring, try complementing it with neat floral canvases to match.
When implementing one of the fashionable design ideas in your home using photo wallpaper frames, use recommendations from designers for the perfect result:
- To create an intricate pattern, you will need to first mark the surface using a construction pencil;
- Moldings are painted immediately before pasting;
- White panels will help visually expand the space;
- It is necessary to organize support for frames and skirting boards in several places in the room;
- In large rooms you can safely use wide and massive options, but for small spaces it is better to choose narrow and straight solutions.
Types of ceiling plinths
There are several varieties of decorative ceiling friezes from which you can easily build a frame for a mirror. First of all, the plinth differs in the material it is made of:
- Polyurethane is a strong, durable, resistant to mechanical stress, environmentally friendly material, not exposed to moisture, flexible and easy to use. Polyurethane baguette is one of the best materials for frames, as it is easy to cut and holds the paint layer well.
You can make a frame for a round or oval mirror from a polyurethane plinth.
- PVC profile is the most affordable and varied material in shape and texture. A novice craftsman can successfully handle the work of making and attaching a frame for a mirror of any size from plinth with his own hands. A frame made of a frieze imitating natural stone or luxury wood will be an excellent decoration for the mirror and complement the interior.
- Wooden plinth is one of the most popular materials for making a frame, but working with wood requires experience and certain knowledge. Not all types of wood are equally easy to cut, process, or paint, so it is better to order a wooden frame from a workshop.
- Polystyrene is an environmentally friendly, not susceptible to moisture, but fragile material that can break during operation.
- Gypsum plinth has a variety of finishes, but is only suitable for stationary mirrors, and it is almost impossible to cope with the work without the help of a specialist.
USEFUL INFORMATION: Selection of colors in the interior of the apartment
- Metal plinth is an ideal material for finishing a mirror in a modern or minimalist style, but it is quite heavy in weight and difficult to work with, especially for non-professionals.
Conclusion
As you can see, making skirting boards with your own hands is not a difficult task, and if you also use your imagination, you can use such products to make your home a real palace, full of decorative items. Gypsum is a simple and inexpensive material that has served us for hundreds of years.
Decorative items made from it have not lost their elegance to this day in old castles and palaces. So why don't we take advantage of this? After all, today at home everyone can assemble a tool to work with this material.
Don't waste a moment, make your home more beautiful. And the video in this article will inspire your imagination with visual information, watch it!
Beautiful examples
We offer several examples of beautiful design of ceiling plinth frames, made with your own hands from leftover building materials and improvised means:
- an example of designing frames for interior decoration in the style of a rural outback;
- laconic frames for decorating the wall in the bedroom;
- vintage frame with flowers, made in white;
- picture frames made to match the moldings;
- frames to accent the walls of the dining room;
- photo frames as living room wall decoration elements;
- laconic panel frames for decorating a recreation area.
The following video shows how to make a picture frame from ceiling plinth.
This is interesting: Scandinavian style bathroom 13 photos
Where to begin
Like any business, collecting photo frames begins with choosing consumables and manufacturing techniques. As the master classes show, photo frames are most often made:
- made of wood,
- all kinds of paper,
- cardboard
DIY wooden photo frame
But this is just the tip of the iceberg. The imagination of craftsmen is limitless, and for them a photo frame made of paper is a long-past stage. They work with literally everything they can get their hands on:
- plastic;
- polystyrene foam;
- matchboxes;
- pencils;
- CDs;
- straw;
- twigs;
- fabrics;
- test.
Photo frame made of pencils
Let's try to understand the intricacies of making the most interesting options.
Preparatory stage
Ceiling plinths differ not only in design, but also in the materials from which they are made. The most affordable ones are skirting boards made of polystyrene foam (expanded polystyrene). They are inexpensive, sold at any hardware store and do not require special skills to operate. Their main disadvantage is that they are fragile. They are easy to damage during operation and further use.
Use ceiling plinth for the frame.
Polyurethane is a more durable material. It bends perfectly, is easy to cut and is resistant to external influences. Ceiling plinth made of plastic (PVC) is convenient to use due to the variety of textures. They often imitate stone or wood, which is convenient and eliminates the need for additional decoration.
Making a frame will require less financial investment than purchasing it.
Wooden plinth is often used in the manufacture of frames, but working with it requires skill and experience. Gypsum is used to make skirting boards with a variety of finishes. They are heavier and suitable for decorating stationary mirrors. But a specialist must work with it.
You are free in your imagination and can create a unique product.
A metal baseboard will fit well into a modern style, for example, hi-tech. A frame made from it will be heavier, and it will also be difficult to work with, especially for a beginner. Once the plinth has been selected, we proceed to measurements. Let's decide on the size of the mirror and the future baseboard.
Preparing materials
To create a frame for a mirror from a regular ceiling plinth, you will need some more materials:
- plywood;
- glue;
- putty;
- paints and varnish;
- other items for decoration.
Plywood is convenient to use as a base. A mirror is attached to it using glue or special clamps, and then a homemade frame.
The plywood will serve as the base for the mirror.
You need to think in advance about how to fix the future mirror on the wall. To do this, we will make holes in the protruding parts of the plywood and pass the cord through them, or use special fasteners.
If you are working with a floor mirror, then skip this step.
Required Tools
To work with ceiling plinth you will need:
- marker or pencil;
- miter box, if available;
- ruler, square, protractor;
- a knife and a hacksaw for metal, it will allow you to make a more even cut, unlike a hacksaw for wood.
Large massive frames
Before fixing a large mirror, it is better to decorate it with a rich, luxurious frame with an unusual intricate pattern.
As a rule, mirrors of rectangular or square shape are framed with a wooden frame, since it is almost impossible to bend a solid material with your own hands without additional processing. To make a wooden frame you will need a small set of tools and minimal carpentry skills.
First you need to make four parts on each side of the product. To properly and accurately connect the corners, you need to cut the platbands to a certain angle of 45 degrees. Please note that the edge size inside should be at least ten millimeters shorter than the side of the mirror.
From the underside of the planks, we cut out a small recess to accommodate the canvas. You will need special corners that will firmly hold the canvas and form the angle of the frame.
The plinth for ceilings perfectly imitates wood, and it is much lighter in weight category. It is recommended to start work by attaching the mirror to a plywood sheet or chipboard in order to achieve a more reliable fixation of the fastener to the wall.
We cut out each side of the frame in the same way as the wooden version, aligning the corners correctly. But the size of the inner edge must exactly match the length of the side of the mirror. You can connect all the parts quite easily using a glue gun.
It is recommended to apply a thin layer of thin putty to the frame. After waiting for the product to dry completely, you can begin to design a baguette for the mirror.
The effect of an old luxurious piece of furniture will be given by golden paint, which is applied with a regular sponge in strokes. Such a frame will be light in weight and unique in its design.
If the interior of a residential building has stucco details, it is wise to use a similar decoration for the mirror. The building materials market offers a wide range of decorations made of gypsum or plastic materials, which can later be turned into an amazing picture.
The base should protrude beyond the edge of the canvas and be painted in a light, white or colored shade. Having secured the canvas, the stucco molding is attached along the entire base of the passe-partout using silicone glue.
Decor features
A great idea to decorate both a large and medium-sized mirror is to build a frame for it. And an excellent material for the frame is the ceiling plinth, or the so-called fillet. With this cheap material you can turn an ordinary mirror into a work of art.
You will need:
- roulette;
- marker or simple pencil for marking;
- knife or hacksaw for metal;
- miter box;
- wood glue or “liquid nails”;
- special putty for wood;
- varnish or acrylic paint.
Work process:
- We measure the mirror.
- We make marks with a marker on the corresponding parts of the baseboard.
- We place the fillet in order in the miter box and cut it according to our marks at an angle of 45 degrees.
- We check the symmetry of the cuts by applying the fillet to the mirror.
- We glue together all the parts of the structure.
- When the glue has completely dried, you need to apply a little glue along the mirror edges and connect it to the structure.
- The gaps formed between the joints are filled with putty.
- We cover our frame with varnish or paint.
A frame made from ceiling plinth is suitable for both a mirror in the hallway and other rooms.
How to make frames: step-by-step instructions
To create a decent frame for your images, you must follow the following sequence of actions:
- Strengthen the rear wall of the structure.
- Prepare blanks for the future frame.
- Glue the finished parts together.
- Finish the corners.
- Paint the finished product.
- Glue the frame to the base.
Reinforcing the frame with cardboard
The backing will give rigidity to the structure and also allow you to change pictures or photographs.
- Cut a rectangle out of cardboard the size of the future frame.
- In a white sheet of paper, make a window 5 mm smaller than the image (on each side).
- Insert a picture between two parts.
- Glue the edges of the cardboard and sheet.
The white sheet can be replaced with a second cardboard with a window. The frame is glued onto posters and canvases without a backing.
Preparation of skirting boards and gluing
Cutting and gluing skirting boards must be done carefully. The design result depends on this.
- Measure 4 pieces of plinth.
- Using a miter box and a hacksaw, cut 45 degree angles.
- Straighten the cut.
- Glue the parts together.
- Mask defects with putty or sealant.
- Sand the joints with fine-grit sandpaper.
- Dry at room temperature for at least 24 hours.
Painting
When the frame is completely dry, it can be decorated. This process requires care and creative imagination.
- Prime with diluted glue.
- Dry.
- Cover with your chosen interior paint.
- If desired, decorate with other shades.
- Let it dry.
- Cover with clear quick-drying varnish.
Coating with metallic paint that imitates gold, silver, bronze or copper looks very professional.
Making without a miter box
To make a frame without a miter box you will need:
- mirror;
- fibreboard (fibreboard) according to the size of the mirror;
- ceiling plinth;
- glue for mirrors;
- putty;
- molar tape;
- acrylic lacquer.
Work process:
- We outline the mirror on the fiberboard, leaving space for the fillet at the edges.
- We measure and cut the ceiling plinth to the size of the mirror.
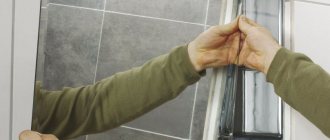
- We glue the mirror and fillet to the fiberboard using special glue.
- After everything is glued, we paste masking tape between the mirror and the baseboard to pre-protect the mirror.
- Now we fill the gaps that form between two perpendicular fillets.
- Apply acrylic varnish to the frame on top. The color of the varnish is up to you. After the varnish has dried, remove the tape. And the frame is ready!
How to do it?
It’s not difficult to make a picture frame from ceiling plinth with your own hands. You can make a decent frame from the ceiling plinth yourself in different ways. Depending on the type of product you will have to:
- strengthen the back wall of the frame;
- prepare blanks for the future frame;
- assemble the frame and process its joints;
- paint the frame and glue it to the base.
At the very beginning of the work, it is necessary to measure the painting or photograph for which you plan to frame it. You need to prepare your workplace , after which you can start working.
We offer a universal option for making frames that can be placed on the wall of any room. This type of frame has a backing and is suitable for framing paintings and photographs of various sizes. The work consists of creating the base and decorating it.
Step-by-step instructions consist of a number of sequential steps.
- Measure the size of the photograph (painting), give an allowance for the frame itself (exactly along its width), and cut out the backing from thick cardboard.
- Take the plinth, measure it to size and cut it using a miter box or a hacksaw at an angle of 45 degrees.
- They carry out a “fitting” and, if necessary, trim the corner joints.
- The parts are glued together, and after drying, gluing defects are masked using putty or silicone sealant.
- Excess material is removed immediately, without waiting for it to dry. It will be more difficult to remove it in the future.
- After drying, they begin priming the frame with diluted glue, which is necessary for better adhesion to the paint.
- When the primer has dried, begin painting the baseboard. Depending on the desired effect, it is decorated with a brush or a foam sponge (sponge).
- After the paint has dried, the frame is coated with a layer of varnish.
- Take the selected image, straighten it, and then pin or glue it to the base.
- The parts of the base with the image and the frame are combined into a single structure. The product can be hung on the wall.
You can make a frame without a base . Such products are now in great demand among those who use them to create collages from the frames themselves. The technology for their implementation is even simpler. The main difficulty will be in cutting the skirting board perfectly at the correct angle. The manufacturing technique itself is extremely simple:
- prepare a plinth of the required size with allowances for cutting edges;
- determine the dimensions of the frame, and then cut off the excess length of all 4 parts;
- the parts are glued together, then dried and, if necessary, the flaws are corrected with white putty;
- after that they are painted and decorated in accordance with the design idea.
Depending on the type of product, it is made with hangers or supplemented with holders for placement on a table, shelf, or rack.
Volumetric vintage design
Ceiling plinth blanks are cut at an angle of 45 degrees; after gluing the frame, it can be painted with acrylic dyes and varnished.
How to make a three-dimensional frame? You can make a vintage design with your own hands. Skirting boards can be angular, which are attached between the wall and the ceiling, and wall-mounted, flat on the reverse side.
They come with or without patterns. You can combine different types to make a voluminous vintage frame.
Materials and tools:
- ceiling plinth;
- miter box;
- hacksaw;
- polymer glue;
- acrylic paint.
You need to take a corner copy. The tip is sawed off and the first corner is formed. It lies in the miter box in this way: one part is located horizontally, the other vertically.
Measure the required length from the first corner and cut at an angle. The second plank of the same dimensions is made in the same way. You must work very carefully and try to accurately observe all dimensions.
Then two smaller strips are cut out. The parts are glued together. Each corner is smeared with glue, aligned and held for a long time for better gluing.
The corner specimen turned into a kind of cup. Now you need to make the edging of this cup from a wall copy.
Take a wall plinth and cut it on a miter box. At the same time, it lies in the same plane.
Cut off the tip of the part and form an angle. Measurement is taken from the corner. During the work process, all blanks are constantly tried on the cup. Cut off the opposite corner. This is how 4 sides of the cup edging are made.
Apply glue to the upper side of the cup. A border is placed on top. All elements are carefully adjusted to each other so that there are no gaps.
After this, all the elements are glued together. The result is a voluminous stained glass frame. Its depth is 4 cm.
Then the product is painted with gold acrylic paint. The picture can be attached to your product using small screws or the structure can be glued to the picture.
This way you can make frames of various options, with different finishes. Use all your skills, creativity and imagination. Your favorite photos or paintings will delight you with their beauty in these excellent frames.
We will need:
- plywood or other board approximately 4-8 mm thick; - ruler; - pencil; - jigsaw or saw; - ceiling plinth; - knife; — yacht varnish and brush; - gypsum putty; - artistic acrylic paint; - sponge for acrylic paint; - glue; - push pins; - newspapers.
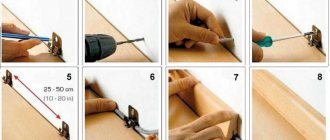
Robot stages:
1. The first thing you need to do is measure what size frame you need. To do this, you need to add a few centimeters to the size of your product, photograph or painting (depending on the width of the plinth). 2. On the plywood, draw the perimeter of the future frame with a pencil.
Using a jigsaw (saw), cut out the base for the frame. It is best to do this job outside or cover the floors with newspaper, as there will be a lot of sawdust flying around and it will be difficult to clean it from the carpet and other surfaces in the room.
3. Cut the ceiling plinth into 4 sections, which will correspond in size to the cut frame. Be careful and careful, the baseboard is made of quite fragile polystyrene foam. The cut should be made with a sharp knife on a flat surface, without pressing hard on the surface of the baseboard.
4. Place all the cuts on a plywood base and mark on the plinth how much needs to be cut so that the corners meet evenly and without large gaps.
5. Place the prepared sides of the future frame together and check whether they correspond to the size of the base and the picture.
6. For ease of use, the plywood base should be coated with several layers of yacht varnish. This will protect your product from dust and deformation.
7. Cover a table or other surface with newspapers. Lay out the plinth as it will be located on the future frame.
Cover areas where the baseboard does not meet with gypsum putty. This will also help to firmly secure the baseboard together.
8. You need to work with putty very carefully. It is important not to damage the pattern of the plinth itself and at the joints (at the corners) try to connect and continue the pattern. Leave the baseboard with putty to dry overnight. Don't worry if the putty appears a little yellowish at first; dry gypsum putty will turn pure white.
9. We proceed to the coloring stage. Prepare for yourself acrylic paint of the required color, a sponge (a sponge is the best choice for painting ceiling plinths with various patterns, as it does not leave streaks and simplifies painting) and a palette (instead of a palette, you can use a small lid or saucer).
If you have a limited amount of paint and you are worried that there may not be enough of it, then acrylic paint can be diluted with regular PVA glue in a 1:1 ratio. To achieve the best effect and brightness, it is best to paint the frame in two layers. The paint will dry in no more than 2-3 hours.
10. Secure the picture to the base using glue or pushpins.
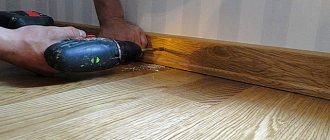
11. Glue the finished frame to the plywood base and leave to dry.
12. Make a loop on the back wall and... Voila! The painting on the wall is ready!
Nothing can decorate the interior of an apartment so much, bringing a touch of warmth and home comfort, like things and decorative items that were made with your own hands. When looking at the remnants of nice fillets left after repairs, the thought that probably comes to the minds of many needlewomen is that they can be used not only for their intended purpose. That is why in this article we will tell you how to make a picture frame with your own hands from a ceiling plinth.
General provisions
Frames have been used to highlight the contents of paintings for hundreds of years. Beautiful design allows you to highlight and present a work of art in a more favorable light against the background of the wall and surrounding furniture.
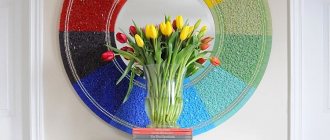
Incredibly beautiful frame made of ceiling plinth for a mirror
DIY frames from plinth for photos
DIY frame from ceiling plinth for TV
Frame made of plastic skirting boards with tapestry
DIY picture frame - wood, metal, polystyrene foam
From this article you will learn that a simple ceiling plinth can be used for a completely different purpose, and with your own hands, using improvised means, you can create a real miracle! Ceiling plinth will help you make the interior of your house or apartment original and beautiful without extra costs. Yes, you read that right, that’s right. Few people know, but this simple and cheap material at first glance can become an original element of the decor of your home. Now you will learn how to make a frame for a picture, or maybe even a beautiful family photo, from an ordinary plinth. It all depends on your imagination and the characteristics of the surrounding space of your apartment or country house.