The plinth is traditionally the final element when decorating the flooring. But it not only gives it the ultimate neatness, but is sometimes also capable of performing a number of functional tasks. The traditional material from which skirting boards have been made since ancient times has been and remains wood. It is ideal for framing any floor covering, and sometimes is the only option that can harmoniously combine the finishing of walls and floors.
Installation of wooden plinth
Installation of a wooden plinth can be carried out in different ways, depending on its shape and additional functions that it is intended to perform. Thus, this design element is intended not only to give an aesthetic appearance to the room, but also to protect the junction of the wall and the floor, as well as the edge of the floor covering from the free penetration of water, the accumulation of dust and small debris. In addition, very often a plinth is an excellent device for masking laid cables.
The main purpose of skirting boards
You can understand the practicality of a wooden floor plinth only after studying the main tasks performed by this element after installation:
- The most important task is to close the expansion joints between the floor covering and the walls. Almost every floor covering is laid with a slight indentation from the wall so that the material does not deform, expanding as the temperature rises and the humidity conditions in the room fluctuate. Naturally, any seam can spoil the room in the photo and during visual inspection, but the plinth will organically combine with the coating and close the gap.
Mounting methods
Depending on the material from which the skirting boards are made, as well as on the type of flooring, there are several ways to install these elements.
They differ from each other both in the method of fastening and in the fasteners used.
Using dowels
In this case, you need to screw the baseboard not to the floor covering, but to the wall. This is due to the fact that many materials used for flooring can expand and contract during use, so if a baseboard is attached to them, it will become deformed.
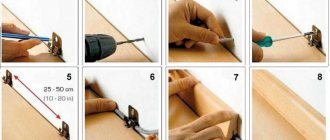
Most often, these elements are attached to a concrete or brick wall using dowels and screws:
For clips
Often plastic skirting boards and strips made of other materials are attached to special fasteners, which allows, if necessary, to quickly and easily dismantle them.
The work is performed in the following sequence:
On glue
Can be installed using glue or liquid nails. This can be done in the case when you do not plan to dismantle these elements, since you will no longer be able to remove them without damage.
Glue for baseboards “Instant Grip” or “liquid nails” is applied in drops to the plank in increments of 40-50 cm, after which the element is pressed tightly against the wall, held slightly and a strong fastening is obtained.
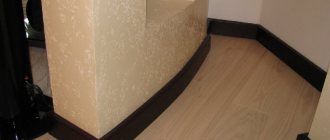
Thus, you can attach it directly to the wallpaper , then it will be easier to dismantle it. Using glue, you can install these elements on curved walls, but before that, a leveling strip is fixed to them.
Without splice application
We looked at installation with corner elements, but you can do without them.
First, the ends of the planks that are placed in the corner are cut off at an angle of 45 degrees using a miter box, after which they are mounted end-to-end, and the joints are covered with a decorative strip.
Installation of skirting boards with cable duct
In this case, fastenings can be done using one of the described methods, but before starting work, remove the strip covering the cable channel from the baseboard, install it, install the cable and close the strip.
Advantages and disadvantages
Due to the following advantages, installing a wooden floor plinth is necessary in any room:
- Wood planks, no worse than other materials, will cover any defects in the coating of walls and floors in the room. However, this advantage comes with a nuance: the dimensions of a wooden floor plinth do not exceed 1.8 centimeters in thickness, then it will be quite difficult to close a wider gap with its help (read: “What sizes of plinths are suitable for the floor - examples of choice for different rooms”). In this case, you should choose plastic products. As for closing defects located far from the joint, a wide wooden baseboard for the floor can reach a height of 8 centimeters or more.
- Like any wooden element, the plinth looks original, but you cannot overdo it with the design of the room. So, for example, wood combines rather poorly with tiles on the floor and plasterboard on the wall. As for finishing joints for laminate, parquet, linoleum and other coatings with a similar texture, the baseboard will not stand out in the photo or during visual inspection. On the contrary, it will create the impression of a continuation of the floor, or will create an original distinction between the floor and the walls.
Wooden skirting boards are not ideal elements for finishing a room, and then their disadvantages should be pointed out:
- Wooden skirting boards do not have such a modification as a built-in channel for laying wires. Channels are not made in the baseboard structure because the strength of the entire structure will decrease. Accordingly, it will be necessary to groove the walls or attach cable ducts on top, which will significantly reduce the aesthetics of the room’s decoration.
- Before attaching a wooden baseboard to the floor, you need to take into account the unevenness of the wall. Wood does not bend at all, and therefore gaps between the wall and the baseboard are inevitable if the ceiling is poorly aligned.
- The cost of wooden skirting boards is higher than that of polyvinyl chloride. Moreover, we are not talking about noble wood, but about the most common one. The price decreases if the manufacturer applies an oak or ash layer to cheap types of wood, but the presentability increases.
- Without special treatment and impregnation of wooden skirting boards, they are not suitable for use in conditions of high humidity.
A few words about tools and materials
Floor skirting boards are now made of wood or polyvinyl chloride (PVC), in other words, plastic. For ceiling fillets, the list is a little longer:
The range of ceiling plinths is much wider than that of the floor type.
- Polyurethane - these skirting boards have good elasticity and can bend around radial and other curved surfaces, but in any case they need to be trimmed to precise angles;
- Foam plastic is the simplest budget option, the price of foam skirting boards is low and they are very easy to cut;
- PVC - the principle is the same as that of floor skirting boards, but the model range is much wider;
- Wooden - similar to floor ones, only here there are also wide models;
- Gypsum - with the advent of polyurethane and foam plastic, gypsum ceiling fillets faded into the background, firstly, they are heavy, and secondly, fragile. But to be fair, they are worth mentioning.
Since it is impossible to correctly cut the ceiling plinth and its floor counterpart without a good tool, we will dwell on this issue in a little more detail.
The best, almost ideal tool for trimming any skirting boards and more is a miter saw with a rotating bed. The high-speed disc makes smooth and precise cuts, and the bed in these units rotates to any angle. The only problem is the serious cost of this tool.
A miter saw is an almost ideal tool for cutting baseboards and more.
It is believed that one of the best hand tools for precision cutting of small blocks is a back saw. In principle, this is true, but I’ll tell you honestly, it’s not easy to find a really high-quality saw, even with the current assortment. If you decide to buy such a tool, then take a saw with a fine tooth.
An abrasive saw is convenient when working with a miter box.
Theoretically, foam and polyurethane can be cut with any sharp and durable knife. But at the same time you need to have a steady hand and at least a little experience in cutting foam. Plus, cutting wide fillets with a knife is very problematic.
Without experience, making a clear cut with a knife is very problematic.
Personally, if I don’t have a crosscut tool, I only use a hacksaw. It is suitable for cutting absolutely any material, from foam to wood. By the way, people often ask the question of how to cut a plastic baseboard for the floor, so take a hacksaw for metal and you definitely can’t go wrong.
For cutting skirting boards, a hacksaw is considered one of the best tools.
Selection of wooden skirting boards
In addition to considering the sizes of skirting boards for wooden floors, it is necessary to select these elements according to the following criteria:
- It is very important that the wood has a moisture content of no more than 20 percent, since as this value increases, the risk of deformation of the material increases.
- The top of the plinth should be perfectly smooth, without roughness or layering. If wood fibers stick out from the structure, then the material is poorly dried and it is not worth purchasing the product.
- Particular attention should be paid to knots on the surface of the baseboard. They may fall out of sanded wood, which means the aesthetics of the decorative element will be reduced.
To fasten a wooden plinth to the floor without difficulty, you should buy the exact amount of material in advance.
The purchase is carried out as follows:
- The perimeter of the room is measured.
- The width of the doorways is subtracted from the resulting value.
- Now about 10% is added to the obtained value for waste, the formation of which is inevitable when cutting planks.
- The resulting value is rounded up to the nearest whole number.
Fastening with self-tapping screws
Using screws or self-tapping screws to fasten a wooden baseboard allows you to get a strong connection without any gaps. Installation is carried out in the following sequence:
Similarly, you can attach the profile with finishing nails if you use wooden dowels instead of plastic dowels. In this option, the attachment point will be almost invisible, but the base for the chopik must be strong (concrete, brick, stone).
Types of floor skirting boards
We are not talking about shape and assortment, but about materials. The installation of skirting boards often depends on the material. Some installation methods are not compatible with all. So, floor skirting boards are made from four types of materials:
- wood;
- MDF;
- plastic;
- metal
There are different floor skirting boards, as well as methods for installing them.
Metal skirting boards are often installed in offices, although in ultra-modern high-tech, loft, and minimalist styles they may also be appropriate in an apartment. But, most often, wooden products are used in an apartment or house. In recent years, MFDs and plastic have also become popular. They are easier to match to the color of the flooring or door, because they are often made using the same technology.
How to cut skirting boards at inner corners: step-by-step action plan
Begin installing the skirting boards in one of the corners. If this is your first experience, choose the part of the room in which something will stand. Not always, of course, the first pancake is lumpy, but still it’s better to play it safe. To make a neat corner on the baseboard, work slowly. One was sawed off, checked, adjusted. Let's move on to the next one. It is better to fasten after two adjacent corners have been assembled. But you shouldn’t delay the assembly too much either.
Trimming skirting boards in corners requires certain skills. But by making a few joints yourself, you can beautifully design complex angles
How to use a miter box to cut baseboards? Place the device in front of you, preferably on a table, but it can also be on the floor. It doesn’t matter which way you turn it, it’s symmetrical. Insert the bar into the profile and turn it so that it will stand against the wall. When cutting down a floor plinth in a miter box, the “wall” is the wall that is farthest from you. Once again: firmly press the baseboard strip against the back wall in the position in which it will be installed. Insert a hacksaw into the required slots. You can start sawing.
First joint in the room
The first strip of the baseboard should be cut as close to the edge as possible. Carpenters have their own jargon and they say to "cut" a corner. It doesn’t matter what you call it, it’s important that we set the bar in the miter box so that we can make the cut at the very beginning. We push the bar a short distance beyond the cutting line, for starters maybe 1-2 cm. Cutting off a smaller piece is more difficult, so save the savings “for later,” when you have at least some skill.
In the miter box, we place the floor plinth against the far wall “facing” ourselves. This makes it easier to check whether you are cutting/sawing correctly
Next, you need to make a corner on the baseboard like this:
- We place the plinth in the miter box and press it against the wall opposite to us. We set it in its mounting position - as it will stand against the wall.
- We insert the hacksaw into the required slots (see the picture below).
- We move the bar so that it extends slightly beyond the cutting line.
- Let's cut it off.
- We take the second piece of plinth, repeat the same operations, but change the position of the saw on the miter box to the opposite. We insert the bar on the other side. Be careful here, otherwise you will have to redo it several times, as the connection will not work.
How to properly cut a floor plinth in a miter box: for external and internal joints
We received two sections sawn down for joining in the inner corner. To make the joint perfect, we try on the parts in place. Most likely, there are some flaws. Take medium-grit sandpaper and remove everything that interferes with joining. Then using fine grain we achieve a tight joint without cracks or gaps.
When connecting skirting boards in a corner, use transparent silicone sealant. Before installing the fasteners, a layer of silicone is applied to the cut. Immediately after the plinth is fixed, we remove the excess that appears on the outside. Clean until the surface is completely clean. This method of connecting skirting boards in the corners looks more neat and does not get clogged with dirt and dust.
How to file a corner of a plinth at the required distance
The second and all other corners of the baseboards must be done at a certain distance. If the next corner is again an internal one and the distance to it is less than the length of the plank, we use the same fragment that already has a notch on it. We measure the distance using a tape measure - strictly from corner to corner. Then this distance is laid out on the bar using the same tape measure. We align the beginning of the measuring tape with the protrusion, measure the required distance, and make a mark with a pencil. This will be the starting point for the cutting.
You need to know at what distance to cut
The plinth with the mark is placed in a miter box, and the desired cutting direction is selected. The dash can be combined with a hacksaw blade or with a slot in a miter box. Whichever is convenient for you. Cut off. This segment must be “tried on” in place. If both corners rest against opposite walls or the gap is only 1 mm, everything is fine. You can cut a second strip from a new piece to form a joint. And again we remove the flaws with sandpaper.
If the length of the wall is greater than the length of the baseboard strip, take a new strip. We will cut the second corner on it. It is important not to make a mistake in which direction to cut. Having installed both planks along the wall, mark the junction on one of them and make a straight cut. There are also slots in the miter box for straight cutting. So there won't be any problems.
How to connect two skirting boards in a straight line
But a straight joint does not always look perfect, and during operation it often diverges, forming a visible gap. If you wish, you can cut two strips at an angle (any angle).
To do this, first cut off the edge of one plank at an angle and mark the joint on the second one. The mark is placed on the side of the plinth that is pressed against the wall. Using this mark, we saw off another section, without changing the position of the saw relative to the miter box, but inserting the bar on the other side. The joint is made obliquely. He's more careful. The difference is especially visible on wooden skirting boards and MDF. Once again, polish the cut using sandpaper.
Making an external joint
In apartments or houses there are not only internal corners, but also external ones. In this case, first cut the nearest inner corner and finish it. When it is ready, you can make an outer corner on the baseboard. We put the bar in the corner as it should be. In the place of the outer corner, use a pencil to make a mark exactly at the point of rotation.
How to make an outer corner of a skirting board
Next, we transfer the bar to the miter box and select the appropriate position. To avoid mistakes, always imagine how the plinth stands against the wall and what you should get.
We cut the second section at 45 degrees so that it joins the already finished one. To do this, change the position of the saw to the opposite and insert the plinth on the other side.
Determination of quantity
First you need to determine the required amount of plinth boards and fasteners. The total length of the room should be divided by the length of one segment of the baseboard. But it is almost impossible to determine the exact amount. Sometimes the amount of waste can reach two hundred percent.
In order to calculate the required amount of plinth boards as accurately as possible, it is necessary to determine the texture and shape of the source material. Planks made from different types of wood will vary in length. Then you need to calculate the required number of whole planks and the number of smaller segments, then add up the indicators and calculate their total number. At the end you need to add five to ten percent for the margin.
Aligning walls and measuring corners
It is necessary to level the walls, otherwise it will be impossible to fix the new skirting boards as needed. This is especially important to do during renovations in block and brick multi-storey buildings.
Before installing the plinth, it is important to level the walls
Measure the angles using a tape measure and a building square.
Cutting and preparing skirting boards
You need to take a good miter box and secure it well on the surface where it will be cut. Then the blank for the plinth is very firmly attached to the miter box with special clamps. If the workpiece is loosely secured, the plinth board will slide. In this case, cutting it correctly is almost impossible.
Then you need to drill holes for the screws in the baseboard board, and then screw them in. In order to disguise the caps, the holes are sealed with wood choppers five to six millimeters high. All details must be combined in texture and color.
Next, drill holes for the dowels. Then the plinth drilled for the screws must be leaned against the wall to mark the location of these holes on it. Mark with a hammer and a long nail. If the diameter of the screws is the same as that of the dowels, then you can drill right away. It is always necessary to take into account what material the wall is made of, as well as the presence of voids in the masonry, which can sometimes be found in brick houses.
How to make an angle on a plinth more or less than 90°
Not all angles are exactly 90 degrees. If the deviation is small, the cracks can be removed using sandpaper. In other cases, you will have to mark and cut taking into account the real degree. The main task in this case is to find the point on the floor where the two skirting boards will join.
Let's start by explaining how to properly cut an outside corner if it is not 90 degrees. We take the plank, place it against the corner on one of the sides, press it tightly against the wall - as it should stand. Draw a line on the floor along the bottom edge of the baseboard with a pencil. We apply the bar to the other side of the corner and do the same. The intersection of the two lines will be the joining point of the two baseboards.
How to join a plinth if the angle is less or more than 90 degrees
Now we attach the baseboard strip again and set it the way it will be attached. We make two marks: at the top at the very turn, at the bottom at the place where the straight lines we drew intersect. Now the important task: we need to make a cut along these marks. If you have a miter saw or a miter box with an adjustable saw angle, set it up and cut it. If not, carefully cut with a hacksaw. To avoid confusion, you can use a pencil to draw a line along which you need to cut. Similarly, mark and cut off the second part. We finalize the connection of the baseboards with sandpaper.
Few professionals process joints with sandpaper - this requires time and additional labor. But if you join skirting boards in the corners of your own home, with your own hands, you definitely want everything to be beautiful. This is why this manual finishing is required.
With an internal corner of a non-standard size, everything is exactly the same. Place the plinth in the corner and draw a straight line on the floor. Let's do it on the other side. We transfer the intersection point to the planks.
How to attach a plinth to a wall: what methods are there, their advantages and disadvantages
Before installing skirting boards, it is advisable to take care of improving heat and sound insulation. There is sound insulation on a self-adhesive basis, it is sold glued to sheets. You can find it at a hardware or auto store. Before attaching the baseboard, glue strips of sound insulation to its lower part. The strips must be glued with some gap so that air can circulate. With sound insulation it will become much quieter, the effect will be especially noticeable with laminate.
Fastening with clips. It's not noticeable, but you have to look at how well the clip holds
There are three ways to attach skirting boards:
- On screws or nails, on dowels.
- Gluing.
- On clips or mounting plates.
All three methods are not ideal. Everyone has pros and cons. Two methods - fastening and gluing - can be used both for fastening to the wall and to the floor. The clips are only used to attach to walls. Let's look objectively at all the methods of attaching skirting boards. This way you can choose the best one for each specific case.
Fastening with clips
If the design of the veneered plinth requires fastening with clips and the walls are flat, this method will be an excellent solution. Firstly, no fasteners are visible. Secondly, it is easy to install and dismantle. Thirdly, the design of the clips often includes a cable holder. The connection of the plinth with the fastening element is strong and reliable.
The sequence of operations is as follows. Places for installing clips are marked. A hole is drilled in the wall using a puncher or drill into which the dowel is driven. Using a self-tapping screw or dowel-nail, the mounting bracket is fixed to the wall. Simply press the plinth on and the installation is complete.
Through: with screws or nails
Fastening with screws or dowels is called through. The baseboard is drilled through, part of the fastening goes into the wall/floor. The hat remains on top. From the point of view of fastening reliability, this is an excellent method. From an aesthetic point of view - dubious. The fastener caps, if not covered with anything, can be very noticeable.
Through fastening of an MDF plinth to the wall is reliable, but not always aesthetically pleasing
On the plus side, if necessary, the planks can be removed without much damage to the wall and the baseboard itself. Especially when installed with screws or dowels. They are unscrewed normally and then put back in place. And another advantage - you can more or less normally press the plank against curved walls (with a curvature of 4-5 mm). There are practically no other options. To improve aesthetics, you can try to disguise the fasteners and make them less noticeable. But the specific method depends on the material and will be described in the appropriate section.
READ ALSO: How to choose a welding machine: advice from a professional. What is the best inverter welding machine to choose for your summer cottage and home?
If we are talking about plastic skirting boards with a cable channel, then there are no disadvantages associated with protruding fastener heads. The hats will be hidden under the lid.
Holes are drilled in the cable channel. After tightening the screws, the cable channel will be closed with a lid.
Conclusion
All three methods I described work; the choice depends on what tool you have and what your professional skills are. If after watching the video you still have questions, welcome to the comments, I’ll help in any way I can.
If you are not confident in your abilities, then for both floor and ceiling plinths there are joining elements that allow you to do without trimming.
Source
On glue
Gluing skirting boards to the wall works well, but only if the walls are level. Smooth - this is with a maximum deviation of no more than 1-2 mm. Otherwise, you will need to fix the “problem” areas at least until the glue sets. This is at least several hours. Holding with your hands is too problematic. You can try to prop it up with something heavy, but it doesn’t always work. Another drawback is that if you need to remove the baseboard, it will be very difficult to do. Either with a piece of trim, or plinth in pieces.
Glue and all necessary components for installing plastic skirting boards
Glue for gluing floor skirting boards - “liquid nails”. When choosing, consider the material of the baseboard and wall/floor. The instructions must indicate both materials to be glued. Also look at the setting time. It is critical for walls that are not too smooth, otherwise you will be stuck in problem areas for a long time.
You can use silicone or acrylic sealant instead of glue. It is better if it is not rigid after polymerization - it remains elastic. For example, Silicone-Acrylic Sealant 420. Also make sure that it is compatible with both surfaces. Why is elastic sealant better? Because when it is necessary to remove the baseboard, the semi-rigid mass can be cut with a knife. And this despite the fact that it holds well even on curved surfaces.
Extruded polystyrene foam production: production line
Thanks to extrusion processing, the foam is obtained with an excellent closed porous microcellular structure. This technology improves its physical and mechanical characteristics with fairly low water absorption. This explains its durability and operational efficiency.
Let's look at the main technical characteristics of polystyrene foam:
- Strength.
- Thermal conductivity.
- Moisture resistance.
Preparation of glue
The dry mixture must be diluted according to the instructions on the package. It is better to cook in small portions so that it does not have time to dry out.
For the first stage of work (gluing the reinforcing mesh), it is better to dilute the mixture somewhat thinner than indicated in the instructions. It is better to mix the glue in two stages: mix, let stand for 5 - 10 minutes, and mix again.
Types of finishing mixtures
Plastering work involves leveling and protecting the surface with a small layer of a special mixture. The difference between mixtures for expanded polystyrene is that they contain substances that penetrate well into the porous structure of the foam. Such mixtures can be used for interior work and exterior facade finishing.
There are two main types of plaster mixture for polystyrene foam: mineral and acrylic.
- consists of a mixture of cement, lime and mineral aggregates;
- resistant to precipitation and temperature changes;
- has a high level of adhesion;
- service life is about 10 years.
The main disadvantage of this type is that it is not very elastic and over time the façade may become covered with cracks.
- consists of a mixture of acrylic resins and minerals;
- elastic;
- resistant to atmospheric conditions and temperature fluctuations;
- has a high degree of adhesion;
- service life up to 25 years.
The main disadvantages of this type of mixture: high price and ability to absorb dirt.
Why is EPS an ideal option for insulation?
The process of obtaining this type is called extrusion (from the word “extrude”). When exposed to polystyrene granules, the structure of the material changes completely, and not inside isolated cavities. As a result, many microbonds are formed that connect the substance and make it so strong. The original technology for producing polystyrene foam has led to the emergence of a new type of material with unique properties.
Features of extruded foam:
Integrity and strength
A good connection of cells made the material light, but at the same time dense and resistant to any impact. The microscopic cavities inside are filled with gas, which creates an air barrier. Comprehensive protection will not allow moisture from the street to seep through the wall cladding.
Low compliance
Foam retains its original condition even under the harshest conditions. It does not get wet from water and steam, does not conduct precious heat outside well, and is practically not affected by frost. Fungi and bacteria will also not be able to gain a foothold on the surface. Façade cladding 3 cm thick will replace a similar 10 cm thick wooden finish or 25 cm gas-block trim.
Safe for humans
During work, gloves and a mask are needed only for the convenience of the builder. No toxins or toxic fumes are released. The material also does not affect health in any way during its use, which is why it is sometimes used in medicine and the food industry.
The light weight of the material allows you to insulate the house alone, without burdening your friends or going broke by calling a construction crew. For all its strength, foam layers can be easily cut with a regular knife.
Pro tip: For DIY projects, choose foam that is impregnated with fire retardants. These are special substances that prevent combustion. Treatment is very important because polystyrene foam is a highly flammable material. Packages with sheets that have undergone the procedure are marked with the letter C.
Puttying solid wood baseboards
Puttying of a wooden baseboard before its installation is carried out in cases where the products are of low quality and require a kind of cosmetic repair. Such skirting boards are usually prepared for painting.
Surface defects on low-quality wooden skirting boards must be eliminated by puttying.
Before starting work, the baseboard must be thoroughly cleaned of dust and oil stains. Dry dirt is removed with a damp cloth or sponge. Absorbed contaminants will have to be treated with a solvent.
If the products are being prepared for painting, then the shade of the putty mixture does not matter. When planning to cover the baseboard with translucent varnish, the color of the material will certainly match the shade of wood.
As a rule, putty takes on a lighter shade when it dries, and this must be taken into account when selecting it. In order not to redo the work, it is recommended to check its color in advance by applying it to a small area of the baseboard and waiting until the repair compound has completely dried.
If the wood is puttyed before the subsequent application of varnish, then the putty is applied in two and sometimes three layers in order to finally even out the surface both in color and to eliminate all identified defects.
The first layer covers deep dents, cracks, as well as depressions left by fallen knots. If the damage is quite deep, putty is applied to it in several stages, waiting for each layer to dry. When the top layer of putty has dried, the filled indentations are sanded with fine-grained sandpaper.
Then the putty is applied in a thin layer to the entire surface of the baseboard, dried and also sanded.
The result of the work should be a perfectly smooth surface of the product.
Veneered plinth does not require puttying, as it always has a smooth front surface.
Rating of popular materials for baseboards
| Photo | Name | Rating | Price | |
| #1 | Polymer PVC skirting boards | ⭐ 98 / 100 | More details | |
| #2 | Wooden skirting boards | ⭐ 97 / 100 | More details | |
| #3 | MDF skirting boards | ⭐ 96 / 100 | More details | |
| #4 | Polyurethane skirting | ⭐ 92 / 100 | More details | |
| #5 | Metal baseboard | ⭐ 91 / 100 | More details |
Each of the types of skirting boards, if they are divided according to the material used to make the materials, differ in their characteristics and have their own “sets” of advantages and disadvantages. To determine the choice of the most suitable option, you should consider each of them in more detail.
Polymer PVC skirting boards
There is a wide range of models of PVC skirting boards. They can also differ in size, design features, fastening method, rigidity, surface decoration and profile pattern:
- Rigid skirting boards, installed against a perfectly flat wall, can have an affordable price (budget option) and a smooth glossy surface.
- Rigid, more expensive options have a surface that very reliably imitates the textured pattern of wood or other natural materials.
- Some models are equipped with a rubber elastic edge along the entire length of the product, which ensures a good fit to horizontal and vertical surfaces - no micro-cracks are left for dust along the floor and wall.
- Flexible skirting boards are called edging. They are used to frame rooms with curved walls;
- White skirting boards intended for painting. They are made of foam plastic, thanks to which the products adhere well to surfaces.
A PVC skirting board can sometimes hide a whole “tail” of various power and signal cables.
What is good about plastic skirting boards, and what are the complaints about it?
pros
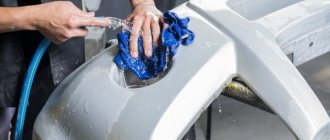
- Attracts inertness to moisture, as well as resistance to detergents; Such skirting boards are not afraid of wet cleaning.
- Almost all PVC skirting boards are equipped with convenient cable channels.
- Manufacturers always think of ways to conceal the baseboard to the wall.
- The consumer is pleased with the variety of models both in configuration and in appearance.
- For plastic skirting boards, various connecting elements are necessarily offered, allowing you to carefully connect the plans, external and internal corners at turns.
- An important advantage is the quite affordable cost.
Minuses
- Such products cannot in any way be called resistant to mechanical stress. Cracks and chips, scratches and dents may appear on the surface of the baseboard. In a word, their life is usually not very long.
- Cheap plastic products may have an unpleasant chemical odor that does not dissipate for a long time.
PVC plinth
Wooden skirting boards
Wooden decorative strips for framing the floor surface can have different configurations, differ in quality and external coating.
Nowadays, ordinary inexpensive skirting boards, known to Russian consumers since Soviet times, are still being produced. They often have a rather rough surface, so before painting they require additional processing - grinding, sometimes even with preliminary filling of defects, and then, after cleaning - priming. As a rule, inexpensive types of wood are used to make such skirting boards, and often low-grade lumber.
Ordinary wooden baseboards, tinted with stain - there is still a lot of work to be done on them.
Of course, in addition to such products, high-quality goods are also on sale - skirting boards made of expensive wood species such as ash, oak, beech and others.
They are sold in a well-finished pure form or may even be coated with a special oil, wax or varnish. Another option is veneered products. Such products, of course, have a fairly high cost.
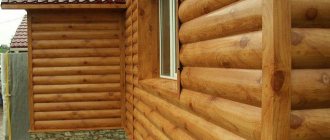
Wood products look great with any floor covering and are probably suitable for any wall decoration.
Wooden baseboards with cable duct
“Clean” wooden skirting boards made from noble species can be preserved in their original form, since many of them have a beautiful textured pattern - just cover them with wax or varnish. If necessary, the planks can be painted in the desired color, harmonizing with the shades of the walls and floors.
Wooden products are produced in different dimensional parameters, since there are no standards for this type. They are given various profile configurations; channels for laying home communications cables can be milled inside.
Probably, as a summary, we should especially highlight the advantages and disadvantages of wooden skirting boards:
pros
- Durability and long service life, no less than 15÷17 years. By and large, at home, with proper care, nothing particularly threatens a wooden plinth, and its service life can be calculated for many decades.
- To fix products on the wall, you can use different fastening methods, whichever you find more convenient.
- Wide variety of shapes and design options. In principle, you can order your own version of the relief and decoration of the plinth from a good carpenter.
- The natural purity and beauty of wood is also a clear plus.
- There is always the possibility of repairing individual sections of the frame.
Minuses
- High cost when it comes to high-quality skirting boards made of noble wood.
- If wood is insufficiently treated with protective compounds (or in the complete absence of such treatment), it is susceptible to rotting, fungal attack and insect damage.
- There are practically no connecting decorative elements for wooden products, so their joints will have to be adjusted very carefully.
Wooden plinth
MDF skirting boards
Framing strips made from MDF are well suited for floor coverings such as parquet or solid wood, laminate or natural parquet.
MDF skirting boards for painting
Manufacturers sell a wide selection of MDF skirting boards:
- Products prepared for further painting at the owner's choice.
- Already painted or tinted skirting boards that do not require the application of paint and varnish.
- Skirting boards laminated with polyurethane film, plain or with a textured pattern.
MDF plinths can have a smooth or profiled front side. The dimensional parameters of MDF products depend on the manufacturer and can be different, for example, height can reach 150 mm, thickness 20÷25 mm, and length - 3000 mm.
MDF plinth installed on a profile strip mounted on the wall and equipped with one wide cable channel
Skirting boards made from this material can be mounted on the wall in different ways and equipped with one or more cable channels.
Let's look at the “PRO” and “CONTRA” of these products.
pros
- MDF has enviable resistance to mechanical stress.
- Wall mounting can be done in various ways.
- There is a considerable variety of decorative cladding for MDF skirting boards on sale.
- Long service life - they are not inferior to wooden ones in this matter, and in terms of resistance to rotting and damage by insects - they also win.
- For installation of such products, you can select connecting fittings.
Minuses
- Many are put off by the rather high cost of such products.
- Low resistance to moisture - the planks may begin to swell.
- Over time, cracks and dents may appear on the baseboard coating, which can easily be treated with “cosmetics”.
MDF plinth
Polyurethane skirting
Polyurethane is a material that has some characteristics superior to elastic rubber. It is positioned as a separate type of polymer. Floor skirting boards can be made of rigid or semi-rigid polyurethane.
Example of a polyurethane floor plinth
Polyurethane skirting boards can have increased strength or remain flexible if they are chosen to frame the flooring in a room with complex shapes. This type of plinth can be smooth profiled (like wood or MDF), but very often the products are decorated with decorative relief. Most often, polyurethane skirting boards are produced in a white base color, that is, they are intended for further painting.
Polyurethane plinth with gilded relief pattern - after installation and decoration.
The relief pattern is often covered with gold paint, which gives the design of the room a special charm. Naturally, this technique is used only if it suits the interior style chosen for the room.
What can you say about the advantages and disadvantages of PU skirting boards?
pros
- Positive qualities include high mechanical strength and moisture resistance.
- It is possible to install it with glue or with special fasteners.
- Possibility of self-decoration after installation.
- Quite reasonable price for the products.
- Long service life - about 15÷20 years.
Minuses
- Products of insufficient quality may have an unpleasant chemical odor.
- Quite often they note the lack of choice of connecting fittings for these skirting boards. Therefore, their edges at the joints have to be adjusted very carefully.
polyurethane plinth
Metal baseboard
Metal plinths are used in modern minimalist interiors. Products are most often made of stainless steel, aluminum or brass, so they are quite resistant to damage. both to wear and moisture.
Metal (aluminum) plinth
If necessary, metal slats are coated with powder enamel or anodized. In addition, the metal surface can be decorated with a polyurethane film with a pattern that imitates the structure of one of the many natural finishing materials.
pros
- High resistance to moisture, household chemicals and wear.
- Durability of products - service life is usually at least 30 years.
- To fix this plinth, different methods are used - self-adhesive tape, brackets, profile strips.
- Consumers are offered a wide selection of connecting fittings;
- Quite a wide range of models.
Minuses
- Strong mechanical stress may leave scratches and dents on the surface.
- Some monotony in forms and design.
- The high cost also does not help popularity.
metal plinth
Varnishing or painting wooden baseboards.
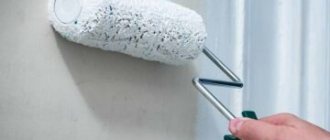
If painting is planned after fixing the baseboard to the wall and sealing the fasteners, then it is necessary to stick masking tape along its upper and lower lines, which will protect the decorated surfaces from paint or varnish.
Before applying varnish or paint to the putty baseboard, it should be wiped with a slightly damp cloth and wait until it dries completely.
The varnish is usually applied in two and sometimes three layers using a soft brush. If only certain areas of the surface are covered with putty, it is recommended to prime them before painting. After this treatment, the surface absorbs less varnish and paint, which allows you to achieve normal consumption and also obtain an evenly painted surface. The applied primer should dry well, forming a kind of film on the wood, thanks to which the painting process will be easier.
The first layer of varnish is applied in an even thin layer and left until completely dry. At this time, you should not open the windows in the room or allow drafts, otherwise dust may get on the wet varnish, or air bubbles may form in its layer, which will reduce the quality of the varnish.
If paint is used for decoration, then after applying it, the surface must be carefully inspected. There should be no unpainted areas or, conversely, accumulation of paint on it. If such defects are found, they must be carefully corrected - you can use a sponge to collect excess paint, and use a brush to eliminate unpainted areas.
Sequence of work when painting carved wooden plinths
If the plinth is decorated with carved relief, then it is necessary to paint it to its full depth - this process is carried out with the edge of a brush or a sponge with paint applied to it. The sponge is applied to the relief and pressed lightly. The paint squeezed out when pressed will fill all the recesses of the three-dimensional pattern. The entire terrain is processed in the same way.
Paint is usually applied in two layers.
A little bit about everything
Modern woodworking technologies make it possible to produce wooden radius, curved bent narrow and even high and wide plinths from valuable species, including bamboo. If you install the baseboard with your own hands, in order to bend it a little, you can steam the strip with hot steam, but if installed incorrectly, such a whip can become deformed.
To make the interior complete and harmonious, try to choose skirting boards from the same material as the floor. But if you are a supporter of natural materials, you can choose at least 5 very similar options for wooden baseboards for any floor covering. If you have doubts about the choice, then buy a profile that matches the color of the trim; such a design solution will only emphasize the thoughtfulness and originality of the interior.
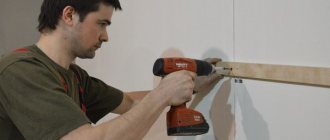
Be sure to watch the video on how to attach a wooden plinth; expert advice will help you avoid common mistakes when installing a profile with your own hands.
How to cut and join a plinth?
To make the plinth look aesthetically pleasing, it is equally important to cut and join it correctly. If the manufacturer provides special connecting and corner elements for the installation of plastic skirting boards, then when installing wooden products they are not used, which complicates the work somewhat - you have to achieve everything yourself.
It is impossible to saw off the edge of the plinth at a certain angle, and most often it is 45 degrees, without a special device. Therefore, the master should have a miter box at his disposal.
Three working methods for trimming skirting boards
For floor and ceiling skirting boards, the cutting instructions are almost the same. But if on the floor a crooked corner can be covered with something, then on the ceiling this is already a problem, so we will pay more attention to how to cut the ceiling plinths.
Method number 1. Classic miter box
The classic miter box is a U-shaped box with slots in the opposite sides. A piece of suitable size is inserted into this stock and sawed off with a hacksaw through the slots in the sides. The idea is not new, the tool is already several hundred years old, but despite its simplicity, not everyone knows how to correctly cut the corner of a ceiling plinth using such a miter box.
Not everyone knows how to cut a ceiling plinth in a corner using a classic miter box.
Tip: when trimming, ceiling plinths are applied to the side of the miter box that is closest to you, and floor plinths, on the contrary, should be applied to the side of the tool farthest from you. This is not a dogma, but it is much easier to work this way.
It is easier to work with floor plinths, since the miter box lies on a horizontal plane, it is easier for you to orient yourself in the position of the plinth. People most often make mistakes when cutting ceiling fillets; they simply insert them into the tool incorrectly. There is a simple but important rule here.
Important: the side of the ceiling fillet that touches the wall should be directed to the upper edge of the side of the miter box, and that part of the plinth that borders the ceiling should be placed on the bottom of the miter box.
Scheme for trimming skirting boards.
As you know, a corner has 2 sides, so in order to make fewer mistakes, train yourself to place the bar that will be mounted on the right side of the corner in the miter box on the right, and the bar that is attached to the left in the miter box on the left. The intricacies of using a classic miter box are described in detail in the video in this article.
How to properly trim the inner and outer corners of a ceiling fillet.
In addition to the classic U-shaped miter box, there are two more types of similar designs - a professional and a rotary tool. As for the professional option, only masters use it. The device is quite bulky, but it rotates at any angle and has a hacksaw that can be locked in the desired position.
Professional miter box with the ability to fix a hacksaw and workpiece.
The rotating device can easily be called a “pocket” miter box. The only advantage here is the ability to clearly fix the angle of rotation of the bar. On the one hand, it’s easy to work with - set the corner, apply it to the baseboard and cut it off. But on the other hand, you need to get used to such a tool; if you do not have experience working with a hacksaw, then you should not take a rotary miter box.
How to work with a rotary miter box.
Advice: when choosing a classic U-shaped miter box, first of all, do not buy Chinese products. And secondly, try to buy models with the ability to rigidly fix the part inside; one of these models is shown in the photo below.
A miter box with the ability to fix the part inside is much more convenient to work with.
Method number 2. Trimming according to a template
Most often, both ceiling and floor skirting boards need to be cut at 45º. If there is no specialized tool nearby, then an improvised miter box can be drawn on a piece of notebook paper. From the school geometry course we know that the diagonal of any square in relation to the base has an inclination angle of 45º.
You can set the 45º angle by attaching the plinth to the diagonal of the square.
Next you need to draw a square and draw 2 diagonals in it - this will be the required 45º. All you have to do is correctly attach the plinth to the leaf and mark. True, in order to cut the plinth smoothly without guides, you need a good eye and a steady hand.
Method No. 3. Applied universal
Trimming at 45º is a common option, but what if you need a different angle and only have a hacksaw and a pencil? It turns out that there is a very simple way out of this situation. Plus, this method is universal, it is suitable for both external and internal corners.
Moreover, I can assure you that those angles that visually seem straight, in fact have deviations of a couple of degrees. As a result, you buy a good tool, cut at exactly 45º, and when joining, a gap appears between the baseboards. Here this problem disappears. And then, using an example, we will look at how to cut the ceiling plinth in the inner corner.
| Illustrations | Recommendations |
| Stage 1. Take a fillet, place it on one side of the corner and use it to draw 2 lines, along the wall and along the ceiling.
| |
| Stage 2 . Do the same on the adjacent side of the corner. | |
| Stage 3 . If you draw a diagonal from the intersection of the lines on the ceiling to the inner corner, you will get the desired cutting line. | |
| Stage 4 . Next, take the tool and cut along the finished markings. If you are comfortable with a hacksaw, then the baseboards should fit together perfectly. | |
| Outer corner . As I already mentioned, you can trim the outer corner using exactly the same technology. |
Important nuances
If you tried your best, but a small gap at the joint still “came out,” do not be discouraged. In wooden fillets, such a gap can be easily covered with furniture wax. To fill a gap on baseboards made of polyurethane, foam, plastic or plaster, putty is perfect. Naturally, the color of the composition must match the color of the baseboard.
All cracks in the area of the ceiling fillets are sealed with putty.
Wide ceiling fillets are certainly beautiful, but they can only be mounted on perfectly flat walls. If the plane of the wall in relation to the ceiling is wavy, then it is better to buy narrow polyurethane fillets, they are elastic and will smooth out this drawback.
A wide fillet requires perfectly smooth walls.
The most questions arise about how to cut wallpaper to fit the ceiling plinth. There is nothing complicated here: the wallpaper is glued with a slight overlap on the baseboards and when the wall is completely glued, take a large spatula, place it in the corner and cut off the excess along the blade with a knife.
How to cut wallpaper to fit a ceiling plinth with your own hands.
How to attach a plinth to a plasterboard wall
There should be no problems with gluing - plasterboard walls are usually smooth. But when using fasteners - self-tapping screws - there are nuances. The most important thing is not to twist it so that the plaster does not burst. There are a few more points.
- If a starting profile is running along the floor, there can be no problems, but you need to use self-tapping screws for metal, and of good quality.
- Try to get into the racks. They should be located every 60 cm, which exactly coincides with the fastener installation standards.
- If there are no studs (gypsum board is glued, for example), you can either try to use longer self-tapping screws to secure it into the wall material, or use special self-tapping screws for drywall. They can be plastic or metal. Both are normal. They differ from ordinary ones in that their carvings are much deeper. Due to this, the load is distributed over a large surface.
- If necessary, you can use special butterfly dowels.
The difference between a self-tapping screw for gypsum boards (top) and a regular self-tapping screw for metal
In general, how to attach a plinth to a gypsum board depends on how it is mounted. It also depends on what kind of plinth you are attaching.
Choosing the right tool
When completing repair and finishing work indoors, every specialist asks the question “how to cut plastic skirting boards”
The answer depends on how important the quality of the resulting edge is
If the quality of the edge is not particularly important, but the speed of work is important, then many builders and finishers use an angle grinder.
The thickness of its disk is such that the cutting line will be quite wide, but the edges will not always please the owner with their quality. However, with the help of this tool you can complete a fairly large amount of work in a short time.
The grinder will leave a smooth edge
You can even cut the floor plinth with metal scissors if there is no other tool at hand. Such manipulation cannot be called convenient, but if necessary, the master can easily cope with the task.
In any case, the cutting tool must meet certain requirements, including:
Useful little things
How to connect a plinth at an angle of 135 degrees when decorating an outer corner? It is enough, using a miter box, to cut one of the planks at an angle of 45 degrees. The second strip remains cut at a right angle (90 degrees). 90+45=135.
How to glue plinths in rounded corners? The elasticity of foam plastic or polyurethane does not allow the adhesive seam to hold the planks until the glue sets.
It is enough to tighten the pasted and pressed plinth with masking tape. The tape is removed after the glue has dried.
How to round the baseboard on the floor when decorating curved walls?
- MDF and PVC planks can easily withstand bending with a radius of up to 2 meters without dangerous stresses;
Tip: For greater flexibility, PVC can be preheated by soaking it in a hot water bath for 2-3 minutes or using a hair dryer.
- The array is cut into pieces 5 - 15 cm long (depending on the curvature of the wall) and cut at the joints using one of the methods described above;
For PVC skirting boards with a small turning radius, connecting profiles are used.
- In addition, a thin solid wooden plinth can be bent on a template or directly on the wall after steaming in a steam chamber or boiling in boiling water. Steaming should take half an hour for every inch (2.5 cm) of thickness.
Simplifying your work: professional miter box for cutting
To cut profile strips, use a convenient and practical device made of plastic, metal or wood - a miter box. This accessory can be sold separately or as a set with a rotary hacksaw.
For household purposes, a plastic miter box originally from the Celestial Empire is quite sufficient.
The device has grooves for cutting shaped elements/boards/planks and other things at angles of 45, 90 degrees. Professional rotary miter boxes with a hacksaw allow you to set the cutting direction at almost any angle. For obtuse or sharp corners, this feature is very useful.
It’s not difficult to figure out how to make a corner on a ceiling plinth with a miter box: just place a strip in the tray and use a hacksaw to cut it at the desired angle.
Important: when working in a miter box, you should ensure a sufficient distance from the cutting blade to the hacksaw holder or use a saw without protruding parts that freely fits into the groove of the miter box with its entire plane.
When using this device, the plinth is cut taking into account the type of corner being formed - external or internal.
If you need to join the plinth along the length (for a long corridor, large rooms), you can also use a miter box and cutting at an angle: in this case, joined oblique cuts sometimes look neater and more harmonious than straight ones (perpendicular to the axis of the product).
Polyurethane skirting
Polyurethane is a polymer from the group of elastomers. It differs from PVC in higher impact strength, resistance to temperature fluctuations and durability.
Skirting boards of increased hardness or flexible (flex) are made from polyurethane. They can be painted in any color, washed, and installed near heating devices without fear of deformation from heating.
Docking does not require plugs, corners or other fittings. Fastening is carried out using special glue. Polyurethane moldings are not cheap, which is compensated by their long service life and good technical and decorative qualities.
Polyurethane
Polyurethane skirting boards are the most expensive products. The high cost is due to a large number of advantages, including excellent resistance to moisture, high mechanical strength, reliability and elasticity. For most situations, this option will be optimal.
However, there are exceptions - polyurethane does not withstand temperature changes well. If you place such skirting boards in the kitchen near the stove, then over time the polyurethane will deform and crack. The cutting of such fillets is carried out with a special knife, and no complications arise during the work.
Duropolymer plinth
One of the latest developments from companies producing stucco and decor is duropolymer plinth. The new product is a product made of high-density polystyrene foam.
Duropolymer strips have increased wear resistance, strength, safety and biological passivity. Installed in rooms with high shock loads.
The properties of duropolymer are similar to polyurethane. Installation is carried out using glue or self-tapping screws. The service life is at least 10 years.
Metal baseboard
Light shiny metal looks impressive in a modern interior. Skirting boards made of anodized aluminum or chrome-plated brass have mechanical strength, wear resistance, are easy to maintain and very durable. Used primarily in high traffic areas.
Profiles are available in various metal shades and gloss levels. Almost all provide hidden cable routing, and some models include LED backlighting.
The cost of installing metal skirting boards is higher than plastic or wooden ones, since sufficient experience and skill in working with the material is required. Installation of metal strips is carried out using glue. If the profile is massive, guides are used. Metal cutting tools are used for cutting; corners and joints are formed with special elements.
Mounting features
Depending on the material from which the plinth is made, one or more of the described methods for installing the specified elements is used.
Installation of plastic plinth
It is necessary to dose the glue correctly and try not to smear the floor covering.
If you want to securely fasten, use self-tapping screws . Although this is a lengthy process, it is the most reliable.
First, holes are made in the plank at a distance of 50-60 cm, then it is placed against the wall and the places for the dowels are marked. In the marked places, holes are made into which dowels are inserted, after which a strip is applied and secured with self-tapping screws.
If the strips do not have a cable channel, then the caps of the screws are closed with special plugs, which the craftsmen recommend gluing, and if there is a cable channel, then they will be closed with a special strip.
Plastic plinth can be attached to the floor using special clips .
This installation method allows you to dismantle the baseboard, but when using it, the walls must be perfectly flat, and this is not always the case.
Do-it-yourself installation of plastic skirting boards, step-by-step instructions:
Wooden
Installation of wooden plinths is more difficult than plastic ones, since there are no special corners. The corners are butted together and in order to cut the baseboard correctly, you will need a miter box. It's rare that a room has a 90-degree angle, so the adjustment of the planks is usually done locally, and done by hand.
Installation is carried out using self-tapping screws, with a distance between them of 70-100 mm. After marking, screw the screws into the plank so that they appear slightly on the other side, then place the plank against the wall and mark the holes for the dowels. Drill holes, insert dowels and fix the bar.
Installation on finishing nails is carried out using the same technology, but instead of plastic dowels, wooden pins are used. This method allows you to make the attachment points invisible, but it is not suitable for uneven and loose walls .
MDF skirting boards
Depending on whether you plan to remove the plinth after a while or not, you choose the method of its installation. MDF skirting boards are most often installed with glue , but in this case, the walls must be perfectly smooth.
You can fasten such elements using self-tapping screws or clips; the technology for performing the work is the same as in the previous versions.
If you do the installation incorrectly, you can damage both the plank itself and its fastening, so the work should be done carefully and slowly.