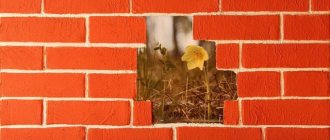
If you think that using brickwork in the interior is an overly brutal and uncompromising way to decorate a room, then take an urgent look at the calendar: you are probably still living in the last century and have completely forgotten about the main design trends of the new century. Brick, like stone and wood, has long been a key trend in the design of both private houses and ordinary city apartments, boldly erasing all style boundaries and persistently appealing to creative freedom (calculator for calculating brickwork walls). However, in the format of interior decoration, of course, an imitation made from popular and inexpensive finishing materials is used, which is more convenient for installation. Many will probably want to make such an imitation of a brick wall with their own hands - especially for you, we offer a detailed instruction article with 4 well-known methods.
- Preparatory stage;
- Selection of material for creating imitation;
- We use tape, wallpaper and paint;
- We use decorative plaster;
- Another option is decorative panels;
- Decorative plaster - stylish and safe;
- What should happen? Examples from interiors;
- Conclusion.
Preparatory stage
It all starts with things that are banal, boring and even a little tedious. Namely, from preparing the wall planned for finishing. This stage should not cause any particular difficulty, but skipping its individual subparagraphs is strictly not recommended. Otherwise, you will then have to pay for your natural desire to save energy and time with no less natural and logical disappointment from the result obtained.
- remove old finishing material;
- carefully scrape off all the scraps that, one way or another, may interfere with you in the future;
- inspect the wall for cracks and irregularities;
- if you notice cracks, then use a hammer and chisel to make them a little wider and fill the holes with a deep penetration primer - this will help prevent the appearance of always unwanted mold;
- carry out the initial treatment of the wall surface with a primer - it is not necessary to achieve a perfectly smooth surface, since after puttying the priming procedure will have to be repeated;
- if the surface is very uneven and there are noticeable defects, then go over the wall with plaster, and also cover the cracks previously treated with primer;
- to achieve a perfectly smooth wall after plastering, it makes sense to use gypsum-based putty - it is not so rough in consistency and will help make the wall flawless, eliminating those irregularities that plaster, for objective reasons, cannot cope with;
- the final touch is re-priming the surface, this time we are pursuing the goal of achieving excellent adhesion to the decorative material that will be used to imitate brick, the treatment must be carried out carefully, generously lubricating those areas that very quickly absorb the solution.
Pros and cons of finishing
Artificial brick has a number of advantages over the original.
Advantages
- It is lighter and thinner, which means it does not take up precious centimeters of space.
- Has good thermal insulation.
- Much simpler installation - just a special glue is enough to attach the parts to the surface.
- Large selection of colors and shades from snow-white to black.
- It can be cut, which is convenient when facing areas of non-standard shapes and corners.
- It lasts a long time, does not fade in the sun, and is not afraid of the effects of household chemicals - this simplifies the care of the surface.
- With such cladding, the wall automatically becomes an accent element.
Instagram @nyako4ka
Instagram @outandout_ru
Instagram @sams.interior
Flaws
There are few disadvantages compared to the advantages.
- It can create a feeling of an unfinished and uncomfortable interior. This happens if you overdo it with rough textures and cold tones - as a result, you can get the feeling of an uninhabited space.
- Not suitable for every style. Indeed, in a strict classical interior such cladding will look strange, but at the same time it has long gone beyond the boundaries of industrial styles. Modern, scandi, boho, eclecticism, minimalism - thanks to the variety of textures and colors, brick finishing can fit into most modern styles.
- An excess of such finishing will visually reduce the space due to the large number of small details, and can also simply dazzle the eye and make the decor too monotonous and boring. To avoid this, you must definitely combine this texture with other materials.
Instagram @pisa_design
Instagram @outandout_ru
- Decoration Materials
How to lay decorative bricks: detailed instructions for flexible and hard materials
Selecting a material to create an imitation
The further course of action directly depends on what material you will use to imitate brickwork. You have a choice:
- wallpaper and paint;
- gypsum;
- decorative panels;
- decorative plaster.
Of all the proposed options, the use of decorative plaster
allows you to obtain the most flawless material in terms of imitation.
However, be prepared for the fact that you will have to tinker a lot. Beauty, as you know, requires sacrifice. And funds, by the way, too. For all other methods, there are questions regarding how convincing the brickwork designed in this way looks. So, the option with wallpaper and paint seems to be the cheapest and most unpretentious, but it takes a lot of time with a rather modest result.
It will be a little easier with decorative panels, but this method works only with a plasterboard surface, which can offer you a perfectly flat surface.
A few words about gypsum
. If you have special silicone molds, you can cast the necessary bricks, dry them thoroughly and lay them out in exactly the same way as craftsmen lay tiles. However, you can do without them. This method of simulating brickwork on a wall will also be discussed below.
Methods for creating a brick wall using ready-made finishing materials
The main advantages of products imitating brick are the absence of pressure on the slabs due to their light weight and small thickness, due to which volume is not stolen from the space. Also, it costs much less than real stone. It is much more convenient and faster to work with it.
Spectacular look of ceramic tiles
There are different options for finishing materials in stores. Among them are several types of tiles, rolled wallpaper, and wide panels. Each decorative element has its own advantages and disadvantages.
The complexity and speed of the installation process differ for each method. Carefully read all the instructions and choose the best option. Be sure to consider the physical properties of materials.
Soft tiles
It leads in ease of installation and processing. It has bright decorative qualities; it is almost impossible to distinguish it from the original texture. Suitable not only for interior rooms, but also for decorating balconies, loggias, terraces, external columns or building walls.
Flexible tiles are available in a wide range of colors
Thanks to its elastic, bendable structure, it is convenient to lay it on rounded surfaces, in corners, for cladding small architectural forms. The product is sold in a variety of colors, which allows you to combine shades in an interesting way and create eye-catching compositions.
Advantages of facing material
Let's consider the advantages of soft tiles and find out the reasons for their incredible popularity among master finishers:
- It is resistant to environmental factors, temperature changes, humidity, pressure
- Gives the surface an aesthetic and stylish appearance
- Additionally protects walls from damage and insulates the room
- Strong and durable, not afraid of impacts, does not crack, does not dry out and does not split
- Not afraid of pathogenic microorganisms, including fungi, mold, parasites
- Not affected by UV rays, does not fade in direct sunlight
- Fits perfectly in inner and outer corners without creases or bubbles
The perfect "fake"
The products are resistant to high temperatures, practically do not burn, and immediately melt and extinguish. This is the most important factor from a safety point of view in case of an unexpected fire.
What you will need
First of all, prepare everything you need:
- Flexible tiles (check the quantity with the sales consultant, having previously measured the area)
- Primer
- Glue
It is best to buy a bucket of ready-made mixture for tiles, which you will not have to dilute and bring to the desired consistency . However, the dry mixture will also work if there are compelling reasons in its favor. Be sure to consult the store about which glue is best to use for working with the selected material, and read the recommendations in the instructions for the tiles.
Universal adhesive for flexible stone
- 2 spatulas : smooth and toothed, 15-20 cm wide. The depth of the teeth of the latter should be 4-8 mm. The first is needed to apply glue to the surface, and the second will help to evenly distribute the substance, which will ensure better adhesion
- Construction level and long ruler (1-1.5 m). If you allow the slightest unevenness or bevel away from the right angle, after just a couple of rows they will become visually obvious. The neatness and perfection of the appearance will be hopelessly spoiled
- Marking cord
- Brush 1 cm wide for finishing tile joints
- Simple pencil and scissors
Installation stages
1At the first stage, carefully prepare the wall. It is leveled, sanded, and cleaned of the old coating.
2Next, they go over it with a primer, which has antiseptic qualities. This will protect your decor from mold and mildew. Provides a more tenacious connection between the tile and the wall.
Wait until the primer is completely dry. They begin to work in a room where the air temperature is not lower than 5°C.
3 Markings are applied to the entire surface with a simple pencil. Be sure to determine the bottom and top row of masonry. Use a ruler and level.
The visual simplicity of tiling corners and outer edges of walls with soft tiles
4 Stir the glue with a flat tool and apply it to an area 1 m wide and 0.5 m high. The layer thickness should be no more than 3-4 mm.
5 Carefully level the adhesive mass with a notched spatula.
6Lay out the first row, working from bottom to top. If the first one started with a whole tile, then the second one is continued with half or a third, depending on the desired type of masonry. Cut the tiles with simple scissors.
7 Gently press the material against the wall and gently smooth it over the entire area.
8Make sure that the distance between the rows is the same. This will keep the seams looking neat.
9Before applying glue to the next area, go over the seams with a thin brush dipped in water. Smooth both vertical and horizontal grooves.
Before starting laying, remove all tiles from the packages and thoroughly mix them together. This way you will evenly distribute the products, the shades of which may vary minimally.
Volumetric panels with imitation brick
Ready-made panels are large in size, so their installation is much faster. They are glued end to end, in rows, like puzzles. They cover a large area of the surface at once, so this cladding can easily be done with your own hands.
Cladding panels with a characteristic check pattern
Types of products
There are different types of panels, depending on the material from which they are made:
- Hardboard (compressed wood waste)
- Fiberboard
- Fiberglass
- Gypsum
- Glass fiber reinforced concrete (cement with glass fibers). Very durable but heavy material
- Polyvinyl chloride (PVC)
- Modified fibreboards (MDP)
Sample of PVC sheet panel
For interior decoration, the last two varieties are most often used. PVC is high-quality plastic, and MDP is wood boards with plastic elements.
Let's look at the advantages of such structures:
- Durability and resistance to environmental influences
- Plastic is not afraid of chemical detergents and is not susceptible to mold or corrosion.
- Easily cleaned from dust, dirt, grease, yellow deposits
- Provides excellent sound insulation
- In case of mechanical damage to a certain area, the block can be easily replaced without destroying the entire masonry
- The material is very light
- Installation technology is simple and fast
- Low prices. Due to the large area, fewer slabs are required
- Optimal material for a room with high traffic, which is subject to changes in temperature and humidity: kitchen, bathroom, loggia, hallway
- Panels can be easily cut with an electric jigsaw or hacksaw
- They perfectly mask unevenness and imperfections of the wall and do not require their preliminary preparation.
- When mounted on a frame, the panel perfectly masks utility lines: pipes, wires, recesses
Cladding the balcony with MDP panels
There are models with insulation, which are supplemented with foam or mineral wool on the reverse side. They are suitable for cladding balconies or cold verandas in country houses.
Wall installation
Depending on the direction of the pattern, the panels are attached to the wall vertically or horizontally directly with screws or self-tapping screws. The sheets are perfectly glued to a flat surface using liquid nails or any other polymer glue. Heavy blocks can be placed on a cement adhesive mass.
There are designs that are installed on special frames that are attached to the wall with dowels. If the surface is not level, you will need a special subsystem of metal slats or wooden beams. Many panel manufacturers sell ready-made frames with hooks on which the blocks are hung.
Sample of fastening to a frame subsystem
If you purchase panels separately from the frame, make sure they match each other so that they can be used for a single installation. It is best to purchase designs from one manufacturer.
Gypsum tiles
It belongs to a variety of rigid facing materials and is considered the most economically advantageous option. It is very light and aesthetically attractive, allowing you to reliably imitate brickwork.
Elegant appearance of gypsum tiles
The disadvantage is the impossibility of decorating in rooms with high humidity, since gypsum is considered a highly hygroscopic rock. However, there are specimens on sale with additional moisture-proof layers on the inside and outside of the stone. These tiles can even be installed in bathrooms.
In addition to ordinary rectangular tiles, you can find shaped specimens in the form of corners, squares, and triangles on sale . Such material must be glued to a composition containing gypsum. To create aesthetic seams, it is necessary to purchase grout, which is used to fill the space between the rows.
Cement tiles
This material is very strong, durable, and resistant to low temperatures. Consists of sand, cement and water. Available in a variety of textures and shades.
By the way, you can make such tiles yourself if you find a silicone mold. Mix the solution with water and two equal parts of sand and cement until the consistency of thick sour cream. Pour it into the mold and wait until it dries completely.
Cement tiles disguised as “wild stone”
Homemade tiles require external decoration, as well as the application of paint or a varnish layer. It can be tinted and a protective coating applied.
Clinker tiles
The most expensive option, but also the most effective. This finish looks expensive, noble, and elegant. The tile has the highest performance qualities.
Impeccable interior with clinker tiles at the head of the ensemble
It is made from natural, plastic clay, which is pressed and fired at high temperatures. The result is an environmentally friendly and natural material that can be used to cover existing fireplaces, stoves, internal and external walls. It will last a long time without losing its bright appearance.
Clinker tiles are decorated in a variety of ways. Its surface can be smooth, rough, glazed or “raw”. There are dozens of colors and textures.
How to properly stick hard material onto a vertical surface
The process of gluing decorative tiles
Solid tiles are mounted on the wall following the same algorithm. Only the type of adhesive composition can differ. Choose the one that is preferable for the material from which the tile is made: gypsum, cement, clay, etc.
Process technology:
The same tools are prepared from the inventory that are listed in the section on installing soft tiles. Add a grinder with a disk designed for cutting stone or a hand-held circular saw.
Due to the severity of the material, the procedure is considered more difficult. It also includes an additional final step for sealing the seams.
1The wall is leveled, cleaned, coated with primer
2Carefully mark with a simple pencil. They mark the upper and lower boundaries of the masonry, calculate the number of rows between them, and draw perfectly straight lines
When calculating the distance between the rows, do not forget about the gaps for the seams. The average thickness of a seam in brickwork is 8-12 mm.
3Prepare the glue
4 Carefully study the instructions for the package with the tiles. Some heavy materials also need to be treated with glue on the inside
5 Apply glue to the wall and level it with a notched trowel
Clinker installation
6Press the tile to the surface for 10 seconds. Start working from the bottom up
Don’t be lazy to check the evenness and symmetry of each row with a level.
7To make identical seams, wooden slats or special calibrators are temporarily inserted between the rows. After the adhesive has set, they are removed and transferred to the next row.
8When the laying is completed, the seams are filled with a special grout. It is placed in a plastic bag with a corner cut off, and carefully squeezed into the hole. Work carefully so that the mixture does not fall on the outside of the tile.
Brick-look wallpaper
Wallpaper with a brick pattern is an inexpensive and labor-intensive way to add charm and sophistication to your interior. They look especially advantageous in the office, kitchen, and hallway. The appearance of the rooms changes quickly and irrevocably.
Wallpaper with this pattern looks stylish and catchy
Please note that if the entire room is covered with wallpaper, such a print will visually reduce the space. Therefore, decoration is only permissible in large rooms.
Wallpaper is glued in the traditional way, without any special recommendations or additional instructions.
We use tape, wallpaper and paint
The need for invention is cunning. This is how this method of imitation can be characterized. Being the easiest way to achieve acceptable results at home, it has several options.
- only paint highlighting horizontal and vertical seams;
- Paintable wallpaper with seams highlighted using tape.
In the first case, you just need to pick up a roller and paint of the desired color. What follows is a matter of technique:
- paint the entire wall;
- make markings over the entire surface into rectangles of a certain size that will imitate brick;
- separate the rectangles with stripes imitating seams;
- highlight the seams with a darker color than the masonry itself.
- we select single-color fiberglass wallpaper and paste it on the wall;
- after a few days, when the wallpaper has dried, we paste horizontal pieces of tape parallel to each other, thus making rectangles with a maximum width of 7 centimeters;
- Again, we glue vertical strips parallel to each other, this time keeping the length of the real brick - a little more than 12 centimeters;
- mix the brick color in water-based paint and paint the entire wall with a roller;
- After 60 minutes, repeat painting and leave the wall to dry;
- carefully tear off all strips of tape;
- You can easily paint the resulting seams with a brush in any color that suits your taste.
This method will certainly take more time, but due to the textural features of the wallpaper, the resulting masonry will become much more expressive and more prominent.
How to paint false bricks
The imitation of masonry can be made in a single color - white, light brown or beige. The most natural look will be imitation of silicate, clinker or red brick. Using the same method, you can update a boring monochromatic plaster coating with imitation bricks or “wild stone”.
If the artificial masonry looks somehow “boring”, you can manually lighten or darken individual blocks. The most attractive look is the combination of fragments that are more different in saturation in one color scheme - milky, terracotta, sand or rocky gray. You can add pigment to the water-based whitewash for bricks on the corridor wall. The surface can be slightly shaded with a sprayer with a bronze or metallic effect.
Depending on the desired effect, coloring is carried out using different devices:
- Spray bottle;
- Spray paint;
- Paint brush;
- Whitewash brush;
- Porous sponge;
- Roller with decorative attachments.
To treat a solid wall, it is recommended to treat it with a primer or special impregnation. Finish coating – acrylic, silicate, any interior paint recommended for decorative plaster (same base).
The most natural look will be imitation of silicate, clinker or red brick.
We use decorative plaster
Of course, this material simply perfectly conveys the features of the brick relief, but it will cause serious difficulties even for a trained person.
- requires special molds;
- DIY production takes an incredibly long time - you are unlikely to be able to cast more than 10 tiles per day;
- It is not always possible to achieve the desired consistency of the gypsum solution, which is why the resulting fragments become very fragile and unreliable.
The best way out is to purchase ready-made bricks in the store, pre-cast according to all the rules. They are even cheaper than ceramic tiles.
In order to secure the plaster to the wall, you will need an adhesive. Laying - similar to tiles:
- apply glue to the back side of the brick with a spatula and press it against the wall;
- check the vertical and horizontal levels;
- for greater naturalness and creating a displacement effect, a new row begins with half of one brick;
- in order to create seams, use small pieces of tiles, which can be easily removed after the glue has set.
Brick-like porcelain tiles
Another reliable material for wall cladding in a bathroom, hallway or loggia. Porcelain tile is environmentally friendly, can withstand high loads, looks noble, and its matte rough surface successfully imitates real brick.
It is considered an expensive type of finishing because it includes the costs of material, careful preparation of the surface and laying of tiles by professionals.
Another option is decorative panels
Have you considered the two methods above, but none of them worked? It is quite possible that using panel finishing will be an excellent alternative. It has certain advantages:
- no special installation skills required;
- you can achieve a beautiful relief.
What will you need?
- polystyrene foam or extruded polystyrene foam;
- sheet of drywall;
- plaster;
- glue.
All manipulations to imitate brickwork on the wall in the required sequence:
- cut strips of 6*12.5 centimeters from a standard polystyrene foam board; it is best to choose a plate with a thickness of no more than 2 centimeters;
- stick them on an already pre-marked sheet of drywall with glue;
- fill the seams with plaster;
- paint the bricks in the shade you want with thick water-based paint;
- fasten the ready-made sheet of gypsum board to the wall according to the standard scheme - with self-tapping screws to the frame;
- repeat the sequence until the entire wall is laid out.
All steps to imitate brickwork on a wall are on video.
The advantages of this method of simulating brick on the wall were discussed above. Let's touch on the topic of disadvantages:
- long monotonous installation;
- polystyrene foam, as well as expanded polystyrene, is very flammable, and therefore is not recommended for use in close proximity to outlets or hot objects;
- When heated, harmful substances may be released into the air.
Otherwise, you can get an acceptable result without any tiling skills, which is very good if the budget for this operation is extremely tight.
Which plaster is best for simulating a brick wall?
Experienced plasterers advise using gypsum mixture, as it is more flexible and easier to work with. In addition, the base white color will allow you to immediately paint the plaster in the desired color, which cannot be done when using a cement-based building material.
- the composition should not contain chemicals or harmful substances;
- the mixture should be elastic, this will make working with the composition much easier;
Important! Clay plaster is absolutely not suitable for such work.
- Make sure that after final drying and hardening the solution does not settle. This may have a negative impact on this type of finish.
In addition to the gypsum mixture, you can use cement-sand plaster. However, give the choice to ready-made compositions for such work.
In order to independently complete the “brick” finish, you do not need to have any special construction skills. The procedure for creating brickwork is very simple and reliable, and the use of putty only makes the master’s work easier.
Decorative plaster - stylish and safe
Decorative plaster to create a brick texture has been practiced for a long time. Today, only gypsum bricks cast in special molds can compete with it in terms of the convincingness of the relief. However, if your hands are not growing from a place that allows you to achieve a perfectly even finish, then it is best to use plaster.
What you will need
- starting plaster for the base;
- construction mixer;
- thick thread to create grooves;
- jointing or carpenter's chisel;
- sandpaper;
- sample of a foam brick 6*12.5 cm.
Algorithm of actions
- after the plaster is diluted with water and brought to the desired thick consistency with a mixer, a layer should be applied to the wall; Using a narrow spatula, scoop the solution from the container and apply it to a wide one - then lean it exactly against the wall, keeping it parallel, and spread the plaster;
- gradually fill the entire wall - there is no need to be overly concerned about evenness, since an overly even relief will seriously affect the naturalness of the artificial masonry;
- using a ruler, measure 6-7 centimeters from the ceiling level and tighten the thread - for this you need the help of at least two more people;
- grab exactly the middle of this thread, pull it towards you and release it - it will hit the wall and form a fairly even groove;
- repeat this operation until you reach the baseboard itself;
- leave the wall to dry for half an hour;
- take the jointing and use it to remove excess material from the resulting horizontal seam;
- vertical seams can be beautifully highlighted with a pre-cut foam brick of a standard size, placing it between the horizontal seams;
- At the same time, do not forget about the displacement of the brickwork;
- a few days after applying the plaster, you can sand the edges of the seams with sandpaper, achieving a harmonious rounded effect;
- the final touch is painting to suit your taste, do not forget about the seams - they need to be highlighted either with a contrasting color, or made a shade darker or lighter.
One of the advantages is the absolute undemandingness of the straightness of your hands, since the naturalness of the masonry is at the forefront, and it, as you know, is far from strict geometry.
Decorative brick finishing in different styles
The native style for brick walls is loft. Here such cladding is an almost obligatory element, but if the building itself does not imply the presence of real masonry, then it can be replaced with a decorative covering.
It is followed by other brutal trends - high-tech and minimalism. In the monochrome interiors characteristic of these styles, it is not the colors that come to the fore, but the textures and relief of surfaces, which is why designers often use imitation stone, concrete or brick in the design of walls.
But decorative analogues are no less often found in Scandinavian, modern and boho interiors. Interspersed with rough material add zest to the design, and the variety of colors allows you to fit the finish into any palette.
Instagram @wedev_studio
Instagram @studio_koda
Instagram @shemyakova_interior
Instagram @stadshem
Instagram @zconcept_interior
White facing masonry is popular today. The result is a discreet, but at the same time interesting, volumetric background that does not weigh down the room and becomes the basis for other bright objects.
Instagram @studeco_design
Instagram @brits.design
Instagram @tanya_korzun
- Decoration
6 unusual ways to fit a brick wall into the interior