Using MDF panels (medium density fiberboard) is one of the simplest and most affordable methods for finishing walls, ceilings and other surfaces, especially when you want to lay a layer of thermal insulation. At the same time, it is quite possible to install MDF panels yourself in a relatively short period of time.
MDF panels for ceiling
Construction materials required for installation of MDF boards:
- tape measure and pencil - needed to mark the places where the sheathing slats are attached and measure the length of the slabs;
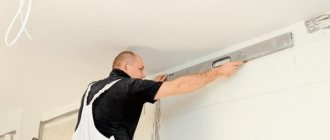
- metal steel corner and building level - to control the evenness of corners, check the verticality and horizontality of mounted parts;
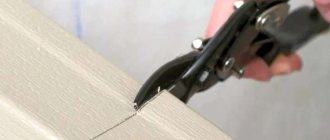
- electric jigsaw or wood saw – used for cutting slabs to the required length or width;
- construction stapler - for fixing panels on a wooden frame;
- drill and screws - for fastening the sheathing bars to the surface;
- drill-driver or screwdriver.
The principle of installing MDF panels on the ceiling
Advice ! Ceiling slabs must be placed strictly perpendicular to the wall with the window opening.
Ceiling panels are mounted on a wooden or metal frame, which consists of slats of arbitrary cross-section with a certain pitch (the distance between the main transverse load-bearing structures). Moreover, the size of the slats, at the initial stage, is not of fundamental importance (any with the same thickness will do).
Before starting work on creating an MDF ceiling, stock up on galvanized metal profiles such as UD and CD, which will be necessary to create a power frame
Methods of fastening MDF boards
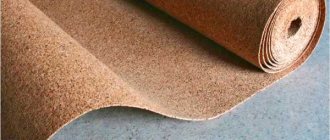
Important ! If you plan to lay a layer of insulation under the sheathing, the width of the batten or wooden block should match the width of the thermal insulation layer.
First of all, you should mark the surface.
Wall marking
Metal frame for MDF panels
Using a building or household level, we mark the perimeter of the room. The distance directly from the ceiling should be approximately 5-10 cm, so that all communications can be placed in the resulting space.
Next, we begin assembling the sheathing. After the metal or wooden slats for the frame have been prepared, the installation of MDF boards will be carried out as follows:
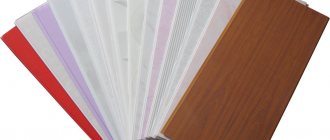
Description of material
MDF ceiling panels can be matched to the design of the tree.
The raw material for the production of the material is the finely dispersed fraction of waste from the woodworking industry. The chips are pressed under high pressure conditions. The process releases a substance that has the properties of glue. It binds waste particles. In the manufacture of the body of the board itself, formaldehyde and other substances harmful to the body are not used, as a result of which the material is more environmentally friendly than chipboard. However, when creating decorative coatings for some types of MDF, melamine resin is used, which cannot be called harmless.
The reliability of MDF fixation is ensured by its greater density compared to chipboard, due to which fasteners are better held in the body of the board. Some time after installing the chipboard, the holes may become loose and the screws may fall out. It is impossible to restore a damaged part; when reinstalled, it will be attached to other places. MDF is a more durable material that can withstand a larger payload.
A decorative coating is applied on top of the slabs. The most environmentally friendly option is natural veneer. When executed with high quality, the surface lined with such products is difficult to distinguish from a solid mass. Such products are excellent for living rooms, but in rooms with humid air (kitchen, bathroom), the veneer may begin to peel off.
Laminated panels are also common. Most often, when making them, melamine resin is applied over a paper patterned coating. Recently, more environmentally friendly products have appeared, where an acrylate composition is used instead.
Installation direction
You should start attaching the slats from the side of the wall opposite the entrance to the room. We fix the first rail at the level of fastening the ceiling elements (but not less than 5 cm) using dowel nails.
Fastening the guide profile according to the markings
Professionals advise first attaching 3 guide profiles, and gluing the last one after joining all the panels
Installation of a frame on the ceiling for IDF panels
After installing the frame, I laid wires in the corrugated pipe to the places where the spotlights were attached
We fasten each subsequent one in parallel with a step of no more than 40-50 cm.
Next, using a metal corner, you should check the horizontalness of the resulting surface. If such a need arises, lay pieces of plywood (laminated wood board), fiberboard or laminate under the sheathing slats.
Fastening the lining to the sheathing
To install MDF panels on metal or wooden sheathing, clamps are used - special devices that are put on the lower chamfer of the tongue and groove and screwed (nailed) to the sheathing. It should be noted that fastening the clamps with self-tapping screws is much easier, and it will hold better. Each clamp requires either one screw or two nails.
The first lining is installed with an emphasis on the adjacent wall, but if from the tongue side it is supported by clamps, then from the chamfer side it can only be secured through the panel. To do this, it is screwed as close to the edge as possible with self-tapping screws, which are covered with a decorative strip when finishing the cladding.
Lining made of polyvinyl chloride (PVC) does without clamps - there is an apron on the bottom of the tongue, which is either nailed to the base with a stapler or screwed with a self-tapping screw. But if both options are possible on a wooden sheathing (staples or screws), then only self-tapping screws should be used for the CD.
In addition, for plastic lining there is no need to screw through the panel from the chamfer side when installing the first board, but there are two options. The first method is when a herringbone type guide (external or internal) is installed in the corner, where the edge of the board is inserted. The second method involves covering the last panel on an already lined wall with an L-shaped profile - the guide simply presses it to the base.
If this is an outer corner, then instead of a herringbone, an F-shaped guide is used, only the outer lining on the adjacent wall is screwed through the body. Then the side of the efka covers the heads of the screws, and around the turn the panel is inserted into the tongue. By the way, if desired, the same method with guides can be used for MDF.
Installation of panels
Attach the first panel (with a comb to the ceiling) to the slats along the entire length using dowel nails, which must be as close as possible to the corner of the room.
Installation of the first panel
Strengthen the other end of the panel using special tools - clamps (fasteners for installing ceiling panels), which are attached to the slats with a construction stapler or small nails.
The clamp is inserted into the groove of the panel, then driven into it with a hammer; it is better to insert the self-tapping screw into the edge of the clamp, and not into its holes (they are for nails, the wide head of the self-tapping screw with PN is too wide)
The joint of the panels is made in the center of the room using an 8 mm plastic H-profile (the thickness of the MDF panel is 7 mm)
The plastic profile is attached to the metal ceiling profile (central strip) with the same screws
We install all other panels on the surface in the same way, inserting the ridge of each subsequent panel into the groove of the already installed one.
The last panel, if necessary, can be cut with a jigsaw to the required size, and then mounted in the groove of the previous one, having previously secured the cut side with screws.
Where are they used?
Panels with a veneered surface are the traditional choice of designers. They are in high demand for the decoration of public and residential premises.
This finish has a wide range of applications:
- panels are used for ceilings and walls with a smooth transition of the pattern;
- to create partitions between different functional areas;
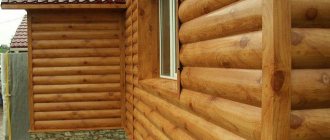
- in a wooden house, the cladding will serve to effectively decorate the area around the fireplace;
- finishing material can be used to frame columns;
- MDF, veneered with beech and oak, is used to decorate the facades of furniture, chests of drawers and cabinets, for interior doors and other interior items;
- due to their immunity to moisture, the panels can be used to cover a bathroom;
- in the living room or hall, the decoration will look presentable, pleasantly indicating the high status of the owner.
Panels veneered with thin wood sheets are perfect for highlighting special places in the house, so they can be used in any area. Along with this, wall and ceiling products are not just decoration - their use allows you to protect the room from extraneous sounds and significantly insulate it.
Decorative skirting boards
After completing the installation of MDF boards, be sure to cover all the joints between the panels with decorative skirting boards. They stick on top of the panels quite easily. Under them you can hide the fasteners that hold the panels. In the same way, glue the baseboards to the corners of the surface where the walls touch the ceiling.
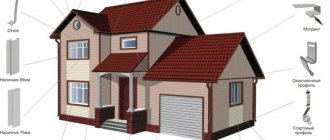
Advantages of MDF boards
- The obvious advantages of MDF boards include not only ease of installation, but also a decent appearance, which, thanks to the variety of colors, allows you to choose models that suit any situation.
- Moreover, they do not require special care and do not require thorough cleaning.
- There is also another important advantage: MDF boards are a completely budget-friendly finishing material.
Disadvantages of MDF panels:
- The panels, as well as the wooden frame underneath them, are flammable substances, so they cannot be used as decoration for escape routes and exits.
- The walls made of MDF boards remain empty, as they are attached to a frame (sheathing). To hang anything on such a wall, you will need to use special long dowel nails.
- MDF panels do not provide a flat, smooth surface. You will always notice small indentations where the panels meet.
- If you make the sheathing step larger than recommended (40-50 cm), then the panels may sag slightly.
Table. Types of MDF panels.
However, despite their shortcomings, MDF boards are in demand among buyers due to their ease of installation, since, for example, installing plasterboard sheets requires skill and dexterity. In addition, one person can work with MDF boards, while installing drywall sheets requires more people.
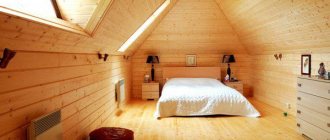
Peculiarities
MDF panels have many advantages. They have excellent noise insulation, which is extremely important for multi-story buildings. These panels hide all the flaws in the ceiling because they are not made of wood, but of fibreboards, which are well compressed and have only one glossy side. Panels can be with patterns or plain. Due to this, you can choose panels to suit every taste, and also create an extraordinary room design. A popular option is panels stylized as natural wood. They are often used in loft, country or Provence style interiors.
Advantages and disadvantages
Like any other materials, this has its pros and cons. Knowing them, you can easily determine which type of panels to choose for which rooms.
MDF panels have received many positive reviews, making them extremely popular:
- They have an affordable cost, which is much lower than that of wood panels. So this option is ideal for those who want to save money, but do not want to do so at the expense of the beauty of the interior or quality.
- They are easy to clean with any means and are also resistant to moisture. To keep the panels well-groomed, you just need to wipe their surfaces.
- The ceilings, finished with MDF panels, have excellent noise insulation and also retain heat well.
- After installation, no additional processing is required.
- Easy to install and therefore everyone can handle this process. Even if one strip is damaged, it can be replaced and this will not require much labor.
- This process is clean, and at most dust will appear.
- The panels fit perfectly into the interiors of any room.
This type of finish also has several disadvantages that should be taken into account when working with them:
- Like any wood, MDF does not tolerate moisture (with the exception of water-resistant panels). As a result, due to exposure to moisture, fungus and mold may appear on the wood. For this reason, it is better not to use them when finishing a sauna or bathroom. The fact is that due to excess moisture they can become deformed. If the ceiling is flooded with water, the material will remain unusable and the repair will need to be completely redone. For rooms with high humidity, the use of PVC panels will be relevant.
- Unlike natural wood, MDF is susceptible to damage from sharp objects. But this is not a problem for the ceiling.
- Highly flammable. For this reason, during installation you should definitely use corrugation for electrical wiring, which will protect the panels from sparks.
Many types of material are used to decorate the ceiling with MDF panels.
Kinds
Ceiling panels have several subtypes. For example, snow-white panels without any finishing are inexpensive. Shiny materials with a glossy surface are more expensive, and each type has certain advantages.
Veneer coated
Such panels are by no means cheap, because in the process of their creation natural wood is used, which is required for the front covering of the material. The appearance of MDF panels is no different from wood products. The color palette and texture imitate wood. But if you look closely, the difference is immediately noticeable. The dimensions of MDF panels for the ceiling are selected depending on the length and width of the ceiling. They will look perfect and serve for a long time in the bedroom or living room. But in the kitchen or bathroom they will quickly lose their original appearance.
Water resistant
Waterproof ceiling panels are equipped with a laminated surface. They are covered with a water-resistant polymer film. Their manufacturing technology is very similar to how laminate is made and therefore they are considered to be as durable as possible. Such panels are made in the form of an artificial coating with imitation stone or wood. Because of their resistance to moisture, many people use the material as kitchen finishing. Compared to veneer, this material is much more practical and cheaper.
Painted
One of the cheapest types of MDF is painted panels. Unlike laminated panels, they are not equipped with a protective film. For this reason, they are often used for decoration in living rooms, where they are easy to care for. These types of panels can be glossy or matte. They have a wide range of colors. These are white, yellow, blue and others. The panels are ideally combined with other materials.
Paper coated
On the front side of such panels there is a paper layer. The material is used in dry rooms, and therefore they are too afraid of moisture. For example, in residential premises or on the veranda. They are easy to install and can be adjusted to fit all ceiling sizes. The panels are extremely popular due to their low cost.
Choice and difference from wall
PVC ceiling panels consist of two sheets of plastic, which are attached using special stiffeners.
Along the length of the sheet there is a large fastening strip on one side and a small fastening strip on the opposite side. The large one is used to fix the PVC sheet to the frame, and the small one is used to adhere the sheets to each other. All parts have a spike on the side, which contributes to greater structural strength. Manufacturers of ceiling panels guarantee that the service life of the product is 10 years.
Ceiling panels are conventionally divided into several types.
By type of connection there are:
- suture - after installation, there is a visible presence of a joint between the individual parts;
- seamless - the joints remain invisible to outsiders.
Depending on the color scheme, several types are distinguished.
- Plain panels are simple, but at the same time practical products; they are resistant to UV rays. They do not change their shade throughout the entire period of operation.
- Lacquered - the surface of such panels is treated with a glossy layer of varnish, which strengthens the panel and also gives it a stylish decorative look. The disadvantages of such models include the appearance of scratches with minimal physical impact.
- With a pattern - a pattern is applied to the outside of the product. Such panels are made from softer plastic, so their price is lower, but their service life is also shorter.
- Laminated - panels imitate natural wood and stone; they are extremely sensitive to sunlight, under the influence of UV rays they begin to crack and lose their consumer properties.
Plastic panels have a number of advantages compared to other finishing materials.
- they last longer than natural materials;
- reliably protect the ceiling from the adverse effects of external factors;
- The material is easy to use, divided into sheet, tile and slatted. it is easy to maintain and electrical wiring can be carried out under it (for example, plaster does not allow wiring to be laid).
Based on their shape, the panels are divided into sheet, tile and slatted.
- Sheet panels, as a rule, are large in size; they are fixed to the ceiling using small nails, and the gaps are sealed with special sealants.
- Tile panels in their design resemble ordinary tiles, are small in size, aesthetically pleasing and easy to use.
- Lath materials look like lining, and they are mounted in the same way using special construction brackets.
Ceiling panels differ from their wall counterparts. Wall ones are much heavier and stronger, since they must withstand additional load (shelves/furniture/other decorative elements). On the contrary, ceiling tiles are thin and fragile. They are light in weight, which greatly facilitates their installation and fixation on the ceiling. At the same time, they are easier to damage, but this cannot be considered a disadvantage - the ceiling experiences a minimum of physical impact, so there is simply no need for the panels to have a dense structure.
Tool for the job
In addition to the usual household tools, you will need a plumb line (it’s easy to make it yourself from a nut, fishing line or thread), a tape measure, a building level and a drill attachment for driving self-tapping screws. You can do without a special screwdriver. You also need a bench square (metal, with legs of different thicknesses). It will be convenient to cut pieces for slopes using it: the thick leg is used as a stop, and leaning on the thin leg, they make the cut.
To cut MDF you need a jigsaw or a hand-held circular saw. The saw is good for its compactness, convenience - it is similar in size and shape to a hair clipper - and versatility. By changing complete circles, you can cut wood, metal, stone. But a saw with a cutting depth of more than 12 mm or more is more expensive than a jigsaw; The thickness of MDF is 16 mm.
Method three - adhesive fasteners
In some cases, there is a need to save space, that is, the lathing will in any case take up several centimeters of the room, but if it is not secured, then this can become a decisive factor when placing furniture or bathrooms. If there is a need to save space, you do not need insulation, and you want to get rid of an additional frame, then use the adhesive fastening method.
There are many types of polymer glue on the construction market and each of them is good, although made by a different manufacturer. But most finishers prefer two options: liquid nails or PVA - this is not only cheaper, but also more convenient. Moreover, it is equally suitable for both MDF and vinyl.
But if with rigid fixation (clasps, staples, nails, screws) you can immediately begin installing the next panel, then fixing with glue requires a certain amount of time so that the lining does not “float”. However, the method itself is quite practical and reliable.
Ceiling tiles
Today there are several types of tiles:
- pressed;
- injection;
- extruded.
The most popular and affordable of them is pressed tiles. It is made of polystyrene foam. Its thickness reaches 8 mm. Its most significant drawback is fragility
When installing, you must be extremely careful, otherwise it will break with one wrong move.
Injection plates are made by heating granules in a specific shape to a high temperature. Almost any design can also be applied. The thickness of such tiles does not exceed 14 mm. It is more practical to use.
Extruded tiles are the most expensive of all types. Its thickness is up to 3 mm, but this does not prevent it from being the most durable of all. It is made by embossing penoplex or extruded polystyrene foam.
Mirror ceiling tiles