Modeling from plasticine is a rather fascinating and educational way of spending time, which allows you to realize almost any ideas and fantasies for creating figures and figurines for interior decoration, children's games and simply peace of mind. However, during the manufacture of various crafts, you may encounter certain difficulties. For example, a situation often arises when there is no material of the required color or shade, which is especially important when sculpting realistic crafts: models of airplanes and military equipment, cartoon elm characters or animal figurines.
But don’t get upset and run to the store for new plasticine, because you can make a lot of the desired color from material of various colors at hand.
Special black
In drawing, this tone is used quite often, so many people are familiar with the fact that it has many shades. If you don’t have the appropriate color scheme at hand, you can create it by mixing existing paints. In this case, most likely, it will turn out dark with one or another tint.
The classic tone is obtained by mixing red, blue and yellow, but you can use not only these colors of the palette. The use of complementary paints will help create one or another shade of dark. A juicy and deep color is obtained by mixing brown and blue.
Black is one of the three basic colors that perfectly absorbs light, unlike white. If we compare it with natural materials, Vantablack carbon has similar properties: it absorbs almost 100% of the radiation that hits it. In ancient times it was believed that it was impossible to reproduce natural coal.
For your information! The matte black tone was obtained using soot from burnt bones. Currently, natural pigments are also used - soot and graphite.
Red in nature
In the color spectrum, red coincides with the minimum frequency of the field visible to our eyes. In the natural environment, this color is found very often. For example, fruits and berries - pomegranate, raspberries, cherries, apples, strawberries. Many of them gave names to various shades of this tone.
Tomatoes contain a natural pigment that gives them their familiar color, but when it is released without reacting with other substances, it produces a purple color. Contemplation of nature often gives artists the basis for creativity, flights of fantasy, and helps to detail the idea on canvas.
Mixing plasticine colors with white or black
When we need plasticine of a lighter shade than we already have, then white plasticine comes to the rescue. We mix it with color.
White color is universal. It can be mixed with any other color.
Try it out for yourself. Take 2-3 pieces of colored plasticine and combine each with white.
In the first case, add less white. It is worth introducing more into the second piece of white plasticine. And so on.
As a result, each time we will get lighter and lighter shades of the main color.
I think it’s clear how to make the main color darker. In this case, we add black plasticine to the colored plasticine.
In this case, there should be less black plasticine than colored plasticine.
What do we get when mixing multi-colored pieces of plasticine?
Primary and additional colors of the palette
What we get when combining plasticine, for example:
- Red and yellow.
- Yellow and blue.
- Blue and red.
The result will be like this:
- Orange.
- Green.
- Violet.
What happens when you mix red, blue and yellow?
Anything can happen here. From mud color to brown. Brown will only work if there is a little more yellow or red plasticine than blue.
Conclusions:
- Some colors (orange, green, purple, etc.) are the result of combining 2 colors.
- You can combine three colors, but do it very carefully.
What to do in order to get plasticine of an even and uniform color
Mixing colors
Often for modeling you want to have plasticine of the desired shade. At the same time, it has a uniform, even and beautiful color. But we don’t have such a shade.
No problem.
- Let's look at the "Color Mixing Table".
- Take small pieces of plasticine for the colors you need.
- Knead them until they have a uniform, smooth color.
- If necessary, again add white, black or colored plasticine to the finished plasticine.
- And mix well again.
Only in this case will the result be a new uniform color of plasticine.
However, you can make “marble plasticine”. But we'll talk about this next time.
Color mixing table.
==============================================================
about the author
admin
How to change color correctly?
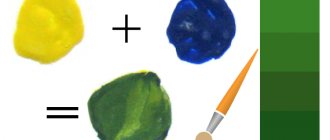
Often, artists are faced with a more difficult task - how to get a green color that is much more interesting than the standard one. To do this, you can experiment. For example, add black - it will make the green darker, like a swamp or coniferous, but in some cases this is necessary. You need to work with black very carefully. Even the smallest drop can make the color look muddy, so add it a little at a time. And white will make the shade lighter. At the same time, the brightness will decrease - the green will appear as if in a fog. The same recommendations apply to other colors.
In pursuit of interesting shades, some begin to add all the colors in a row to green. This is not worth doing. Colors located on the other side of the color wheel can easily ruin everything. That is, if you mix yellow and blue, try not to add red and its shades. Only those who have sufficient painting skills can do this correctly.
Method One: Making Brown from Orange and Blue
If you want a lighter shade of brown, add a little more yellow. Learn what secondary colors are. Secondary colors are created by mixing two primary colors. You can get brown with colored pencils or crayons, but the best way to mix colors is with paints.
In painting, the desired color can be obtained in different ways. For example, put the paint in its pure form without mixing with others, or get the desired color by mixing two or more paints. As a result, cracking of the colorful painting layer may occur. The color obtained from mixing may change - gray, darken.
However, as a result of chemical interaction, the resulting color darkens after some time. Yellow, red and blue colors cannot be obtained by mixing any paints. At the same time, when mixed with each other or mixed with other paints, they give an extremely wide variety of color combinations. So, if you mix green with purple or with orange, which has a reddish tint, then the resulting color will approach achromatic.
General rules for obtaining flesh color
How to make lilac color and its shades: methods and recommendations
To make your skin color close to natural, you will have to try. The basis for its creation is white paint (whitewash), which must be mixed with other shades. You can work with a variety of types of paints: gouache, watercolors, acrylic colors, even pencils, although professionals prefer to use oil on canvas.
There are four main human color types, which are conventionally divided according to the seasons. They depend on the shade of the skin, eyes, hair. The winter color type is lighter than the summer one, the spring one is brighter than the autumn one. But even people with a winter color type have skin that is not pure white: it still has a delicate milky beige tone. Therefore, it is possible to make a flesh color only by giving it a natural “leather” shade, for which the following may appear in the mixture of paints:
- umber;
- sienna;
- ocher;
- cadmium red;
- cadmium yellow and others.
Nuances to consider
Unfortunately, there are no exact proportions for creating flesh-colored paint. Each artist sees this shade differently; moreover, men and women of the same nationality usually have different complexions. Ladies can boast of light, silky skin, while the stronger sex has rougher, darker skin. The shade of the arms and legs is always darker than the tone of the face, and when there is a shadow (for example, from a hat), it must be made even more saturated.
Here are other tips that experienced artists give to beginners:
- If the color seems too dark, do not rush into adding white. This can lead to unevenness of tone, hiding the effect of a three-dimensional image. It’s better to take a brush, wet it, then use strokes to achieve the desired color directly on the portrait.
- You should definitely try the shade you got when mixing in advance on a piece of paper or canvas, and wait until the paint dries completely. Testing will help you avoid problems during your main work.
- Pink tones usually look quite dark on the palette, although they look more natural on paper. If we are talking about watercolors, after drying the pinkish tint will become about 1/3 lighter.
- Human skin in an artistic depiction should consist of several layers, and not be done with a single application of paint. Some shades are used for shadows, others for midtones, and others for highlights. Gradual overlay of tones will save the drawing from possible flaws.
- The first base layer should be made translucent, while adding more white tone in the eye area. This will further help create a greater contrast between the skin and eyes, because the shade of the latter should not be pure white either.
Best color combinations
If the drawing is done on paper, its white color will serve not only as a background, but also as a replacement for white. The paper will shine through the strokes and give the paint the desired tone. You can get the skin color this way:
Color models and color synthesis
Scientists have “derived” two main color models that allow you to create all kinds of tones and shades. Color synthesis involves the use of one of the models:
- RGB, or additive. It involves the superposition of light rays on top of each other in a certain order, with a set intensity. The main range of colors fits into the standard (basic) ones - red, blue and yellow. Additive synthesis is used in monitors, but it will not be possible to make black in the same way as the others. Black, according to RGB, is the absence of reflection.
- CMYK, or subtractive. All tones are obtained by mixing paints physically. Black is created by adding all other tones, and white in this system is the absence of color. This model is used in printing, its main colors are cyan (blue), yellow, magenta (magenta).
Variety of green
The original green is usually presented in all sets; if the required dye is not available, there are no problems obtaining it. Pairing yellow with blue gives the desired green background. But any direction of creativity, be it painting, interior design or another option for decorating objects, requires a wide palette of green. The basic principle of all experiments is to change the proportions of the base colors; white or black dye is used to lighten or darken the background.
Next we will talk about mixing options and the results of the experiment:
- The combination of blue and yellow with a small addition of brown represents khaki. Green with a small amount of yellow forms olive.
- Traditional light green is the result of mixing green and white.
Adding yellow or blue will help regulate warmth. ?Attention! The quality of the starting components affects the saturation of the green color. The more intense the base tones, the brighter the blending result will be. - A yellow-green effect can be achieved by combining yellow and blue in a 2:1 ratio. The inverse proportion will result in a blue-green tone.
- Dark green color is achieved by adding half the amount of black.
- A warm light green background is formed from a mixture of white, blue and yellow paint in a 2:1:1 ratio.
The circle demonstrates a variety of green colors. The base dye is located in the center, followed by the additional component, and then the result of mixing. The last circle is experiments of the resulting tone with the addition of white and black dye.
The next table will become an assistant when conducting experiments.
Color models and mixing rules
You can make black from paints; this is the so-called subtractive model, when the components are physically mixed.
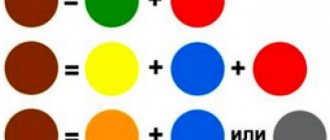
It is used in printing. There is an additive model for creating tone, based on the superposition of rays that are reflected from other objects. This system is used in computer graphics. The options for which colors to mix to make black are as follows:
- Green, red;
- Blue, red, yellow;
- Blue, brown, purple.
You can use almost any paint, regardless of the commercial purpose. At the same time, it is worth understanding that a pure color scheme cannot be obtained by mixing other tones; upon closer examination, some shade will always be noticeable. The result is close to natural, but nothing more.
Advice! The saturation and hue are selected by trial. To do this, additional colors are mixed in the palette in different proportions. The most realistic is the dark color of yellow, purple and blue.
Shades of black
The classic result is difficult to achieve in real conditions, but it is possible to play with shades of black. Artists especially love to do this; various undertones are actively used to give originality to their works. The following shades can be distinguished:
- Slate. Very dark gray, slate was used to create it, which is why the color got its name;
- Anthracite. Shiny and rich, unlike the classic matte, it looks bright;
- Bardadym. This is what the black king was called in the card deck.
Currently, charcoal is classified as soft, medium and rich shades. Soft comes out when a small amount of white color is added to the standard mixture of pink, turquoise and yellow. The middle shade will be obtained by mixing ultramarine, yellow and pink. It would seem that such strange combinations give unexpected results.
A tone close to the traditional one can be obtained by mixing opposite colors, which are located opposite each other on the color wheel. These are green and red, blue and orange, purple and yellow.
Interesting! You can get black color by mixing all the primary colors of the palette. By adding white diluted with water, you can vary the shades of gray.
Now all you need is a palette of paints, a brush and the desire to experiment. Because only through experience can you find out what shades are obtained by mixing certain colors in different proportions.
How to get blue plasticine without blue
When modeling from plasticine, you often have to mix different colors.
In order not to make a mistake with the choice of color, you should first try mixing small pieces. Usually this is enough, but the child is often interested in the question: “What color will you get if you mix...?” To satisfy children's curiosity, we will make a color table. To do this you will need checkered paper, a ruler, a simple pencil, plasticine and a file.
How many flowers to take for the experiment depends on the age of the child. For a 4-year-old child, 4-5 colors (red, yellow, blue, green, white) are enough. The older the child, the more colors you can use. The complexity of the work does not depend at all on the number of colors, but the time it takes depends on their number. For preschoolers, it is better to exclude the color black from the experiment.
1. On checkered paper, draw a grid with 3*3 cells. The number of rows and columns must be 1 more than the number of selected colors.
2. We stick pieces of plasticine into the cells in the top row in the order of the spectrum from warm to cold tones. If your work uses white and black colors, then it is better to place them at the edges of the table.
3. The left column can be entrusted to a child. The colors should follow the same order from top to bottom.
4. To fill the next cells, take pieces of plasticine of the colors that are located in the top cell and in the left column, mix them well and place them in the appropriate cell.
5. Please note that when mixing any colors with black in a 1:1 ratio, shades of black are again obtained. Exactly with the professional joke of artists: “An artist is not afraid of a black cat or a dark streak in life. He knows that there is no black color, there are very dark shades.” It is for this reason that for children under 7 years old it is better not to take this color. The child will very quickly get tired of receiving the same gloomy result. For a child over 7 years old, on the contrary, this will be a valuable observation.
6. You can cut small pieces of plasticine of the same size and invite the child to choose the right colors for each cell. If this task turns out to be difficult, then simply put the pieces in pairs and arrange them in cells. The child will only have to mix them and observe the result.
7. Having reached the end of the table, it is worth drawing the child’s attention to the fact that the colors along the diagonal are the same as they were. For many children this is not at all an obvious fact.
8. An adult understands that the colors in the lower left corner will be a mirror image of the existing ones. However, the baby will almost certainly want to check it out. If such a question arises, do not be lazy to complete the entire table or check at least two or three colors.
Making such a cheat sheet takes a lot of time. Therefore, it is better to do it in good company. If you have 3-4 assistants, you can assign each of them to mix the colors of plasticine in one line. In this case, it is better to make a complete table. If you do it together, you can simultaneously turn on a cartoon, for example “The Fixies. Plasticine".
The finished table must be stored in a file. It will come in handy more than once when making the following plasticine crafts.
Stop by and download free programs for your PC, watch movies online on the movie portal or download a template for dle on the best portal
Source
Universal tables[edit | edit code]
The table below is used in various fields of art, not only in sculpting:
| Example | Required Color | Base Color + Mixing Instructions |
| Pink | White + add a little red | |
| Chestnut | Red + add black or brown | |
| Royal red | Red + add blue | |
| Red | Red + White to brighten, yellow to get orange-red | |
| Orange | Yellow + add red | |
| Gold | Yellow + a drop of red or brown | |
| Yellow | Yellow + white for lightening, red or brown for a dark shade | |
| Pale green | Yellow + add blue/black for depth | |
| Grass green | Yellow + add blue and green | |
| Olive | Green + add yellow | |
| Light green | Green + add white/yellow | |
| Turquoise green | Green + add blue | |
| Bottle green | Yellow + add blue | |
| Coniferous | Green + add yellow and black | |
| Turquoise blue | Blue + add a little green | |
| White-blue | White + add blue | |
| Wedgwood blue | White + add blue and a drop of black | |
| Royal blue | Blue + add black and a drop of green | |
| Dark blue | Blue + add black and a drop of green | |
| Grey | White + Add a little black | |
| Pearl gray | White + Add black, a little blue | |
| Medium brown | Yellow + Add red and blue, white for lightening, black for dark | |
| Red-brown | Red & yellow + Add blue and white to brighten | |
| Golden brown | Yellow + Add red, blue, white. More yellow for contrast | |
| Mustard | Yellow + Add red, black and a little green | |
| Beige | Take brown and gradually add white until you get a beige color. Add yellow for brightness. | |
| Off white | White + Add brown or black | |
| Pink gray | White + Drop of red and black | |
| Gray-blue | White + Add light gray plus a drop of blue | |
| Green-gray | White + Add light gray plus a drop of green | |
| Gray coal | White + add black | |
| Lemon yellow | Yellow + add white, a little green | |
| Light brown | Yellow + add white, black, brown | |
| Fern green color | White + add green, black and white | |
| Forest green color | Green + add black | |
| Emerald green | Yellow + add green and white | |
| Light green | Yellow + add white and green | |
| Aquamarine | White + add green and black | |
| Avocado | Yellow + add brown and black | |
| Royal purple | Red + add blue and yellow | |
| Dark purple | Red + add blue and black | |
| Tomato red | Red + add yellow and brown | |
| Mandarin, orange | Yellow + add red and brown | |
| Reddish chestnut | Red + add brown and black | |
| Orange | White + add orange and brown | |
| Burgundy red color | Red + add brown, black and yellow | |
| Crimson | Blue + add white, red and brown | |
| Plum | Red + add white, blue and black | |
| Chestnut | Yellow + red, black and white | |
| Honey color | White, yellow and dark brown | |
| Dark brown | Yellow + red, black and white | |
| Copper gray | Black + add white and red | |
| Eggshell color | White + yellow, a little brown |
Community content is available under license terms
CC-BY-SA
, unless otherwise specified.
Five ways
Making brown color by mixing other colors.
The most popular ones will be listed below.
Mixing paints
- The first way is to mix the orange and blue components with your own hands.
- The next method involves pairing red with green.
- The third option is to obtain brown from purple and yellow.
- Obtaining the desired color in an additional way.
- Mixing the main spectrum to obtain the desired shade.
Orange + blue
- Let's see how to get a brown paint color and first we get an orange tone and for this the instructions are as follows: we will need red and yellow, where the first is given approximately 90%, and the second - 10% (you can vary a little, depending on the need, but you need a dark orange color). Try to ensure that the output solution is much closer to red than to yellow.
- Pour a little blue into the resulting mixture - its volume will be from 5% to 10% of the total composition, that is, for 90-95g of orange you need, respectively, 10-5g of blue composition. Increase the percentage until the mixture acquires a chocolate tone (if the solution is too light, add a little more blue).
- Please note that you will finally be able to figure out what the result will be only after the film has dried, but in any case, it will be much lighter than in the original state. Therefore, you can do a test on any surface, and then adjust the depth using blue or orange.
Red + green
- Now let's see how to make brown from the paints shown in the top photo - red and green. If you don't have the last shade, you can make it by combining equal parts of blue and yellow paint. You will adjust the brightness by the amount of one or another paint, that is, make the ratio not fifty-fifty, but slightly changing the proportion of one or another component, depending on your need.
- After this, we begin to add the red component to the resulting solution until it darkens to the desired degree.
Purple + yellow
- We continue to look at how to get brown from paints, and in this case we need to mix yellow and purple, but the first may not always be available, so you can make it yourself. To do this, we mix red and blue in equal parts and this way we get a dark, saturated solution of violet (do not forget that violet is located between blue and red in the color spectrum).
- Add yellowness little by little to the resulting mixture, just take your time so that you don’t end up with a too light solution - to do this you need to constantly stir the composition and this way you can control the proportions. For correction, you can slightly change the percentage, but it is best to do this after testing on any surface. The mixture can be used for both mineral surfaces and metal.
Blue + yellow + red
- The fourth way to get brown paint is to spontaneously mix three primary colors, that is, first you pour two equal parts of two of them into one container, and then gradually add a third, getting the shade you need. In this case, the result will not be entirely predictable, since it will be difficult for you to adjust the proportions, but if you are making a solution that is enough for the entire painting area, then this is quite suitable for you.
- Also, to obtain a certain gray-brown or pure tone, you can mix previously obtained more or less dark mixtures, gradually reaching the parameters you need. In such cases, you can still fix what color you get by merging different proportions, but this path is more experimental than practical.
You can mix all colors
- And now we will learn how to make brown paint from all the primary colors available, gradually adding one after another until the consistency required in this case. To begin with, we take two dark shades of blue and green paints, mixing them in equal proportions, and after that we add exactly the same proportion of black. Now, we add the same percentage of red to the resulting solution, and bring this entire composition to a single color - if you do this in large quantities, then the most acceptable result can be achieved when working with a mixer clamped into an electric drill.
- Now all that remains is to find the desired shade, for which we use the yellow component. There is no longer any clear indication of its quantity; simply, the more there is, the lighter the composition will be.
How to make a light brown color from paints, gouache when mixed?
To get a light brown color, you need to give the yellow color a predominance. But! Let us repeat that too much of it will make the color look like ocher. And, of course, it all depends on the desired lordship.
- To whiten the brown color, you need to add white
. Yes, it's that simple. The more you add, the lighter the final color will be. - But don’t overdo it, brown is a warm color and white will neutralize this characteristic. Therefore, introduce very carefully, gradually and in small portions (literally, 1% of the total mass of paints).
- Although adding the previous color will help correct the situation.
The theory of obtaining red shades
Different paint manufacturers produce different shades in one set (of 12 or 6 colors). In addition, paints are of different quality: the brighter and purer, the more shades you can create from them. By mixing two colors, we get a shade that is duller than the originals, and if we mix the two resulting shades, the third color will be even more faded. Speaking about the theoretical creation of shades, we take a graphic model without taking into account the quality and brightness of colors. Knowing it, you will be able to navigate any palette and create the shade of red you need.
The main color is red in the center. There are patches of color around it that mix with it. The second circle of dies is the result of mixing the first ones. Third circle: decreasing the color of the second circle and adding white and black to the result:
How to get other colors and their shades: theory and practice. Click on the icon.
Secrets and nuances of modeling from plasticine
- If you take a soft and warm piece of plasticine, it is much more convenient to work with than cold one. However, the cold one holds its shape very well. If you want to keep a figurine that your child made as a souvenir or you need to take it to kindergarten/school in the morning, then feel free to put it in the refrigerator, or better yet, directly in the freezer. In the morning you will get almost a stone figurine. You can safely take it where it should go.
- Before you start sculpting, hold the piece in your hands for a while. This way it will heat up and become much softer, i.e. It will be much easier to sculpt from it.
- If you need to attach any thin detail to the main figure, and it is already ready, do not rush to do it right away. Let it sit on clean paper for just a few minutes. It will cool down, become much harder and you won’t have to worry about it getting wrinkled while you were attaching it to the right place.
- When sculpting, it is important to remember that plasticine stains objects very quickly and very easily. But he himself gets no worse dirty. Specks of dust, lint, small pieces, etc. stick to it incredibly quickly. For this reason, it is not recommended to sculpt directly on the table (you don’t want to buy a new table or change the tabletop), but neither do tablecloths, napkins, etc. They are also not suitable for this. From them, your piece will very quickly become covered with small lint and other particles. It is best to use a smooth board made of plastic or a thick sheet of pure white paper for sculpting.
- In addition to collecting debris, it sticks very well to your hands. If you have just sculpted some figure or part from, for example, a black piece, you should not immediately start sculpting from a light color. Otherwise, it will almost immediately get a black tint. After working with any color, hands and tools must be washed well and dried thoroughly.
- It washes off hands quite poorly. Even warm water and soap are not enough to remove all traces. After washing, it is important to dry your hands and tools well to remove all traces of water. If you take plasticine with wet hands, then both it and all the crafts made from it will get wet, stop sticking to each other, and the whole figure will simply fall apart.
So, these are all the main nuances of sculpting. Now you can move on to the secrets and rules of mixing colors. On the one hand, the palette of purchased plasticine may seem sufficient. On the other hand, it is very limited. Of course, no one forbids sculpting a bright blue horse (let it be magical, fairytale-like) or a pink elephant, but quite often you need exactly the color/shade that is not in the box. It's quite easy to get it. You just need to mix the colors correctly and below is a palette of mixing rules.
Beige color - general information
Beige, or beige, is a light brown color mixed with a creamy or yellowish tone. Thanks to its neutrality and compatibility with a huge number of shades, beige occupies a special place in the palette. It often serves as a background, but can also focus attention on various elements of design and cut. Bright colors are perfectly revealed on a beige base and become deeper.
According to Feng Shui, beige carries the calmest energy and is recognized as the embodiment of stability and a comfortable life. It is close to human skin tone. It is important to know that beige is not an independent color in the interior - it must always be skillfully combined with other tones, otherwise all surfaces will merge.
- ivory, or ivory;
- sand;
- opal;
- cream;
- light coffee;
- light caramel;
- wheat
There are also tables according to which all tones of beige can be divided into warm (with a hint of brown) and cold (with a bit of gray). Beige goes best with coffee and brown tones, as well as blue, light blue, olive, light green, wenge, burgundy, sandy yellow, lavender, and pink.
What color will you get if you mix red and green?
Typically, if you mix red and green using paints, you can get a brown tone, with the intensity depending on which shade was taken. Red color influences a secondary role: first of all, the contrast of green influences the creation.
Interesting materials:
When can you start buying strawberries? When can you start buying things for a newborn? When can I apply a second coat of oil paint? When can you step on ice? When can you not wear a cap? When can you prune ficus benjamina? When can you prune milkweed? When can you prune faded tulips? When can you detect twins with an ultrasound? When can you omit the multiplication sign?