Most owners of country houses are often faced with the problem of insulating a toilet located on the site. Thus, the question arises: How to insulate an outdoor toilet using scrap materials and at minimal cost?
Due to limited space, as a rule, insulation is used, the width of which does not exceed 75 mm
In general, before choosing a suitable option, it is necessary to decide in advance which part of the building will be subject to insulation: internal or external. Based on this, the most suitable method of insulating an outdoor toilet is selected.
When insulating the internal walls of a toilet, it is important to remember that in conditions of limited space it is best to use insulation that will not take up much space and will ensure maximum stability of the structure from frost, cold and wind. In addition, internal insulation is also supported by the fact that the funds spent on this are significantly less than those that would have been spent on external insulation.
However, in each specific case it is necessary to proceed from the material that was used to build the toilet. For external insulation, a material is used that is laid on top of the walls of the toilet. In this case, it is necessary to choose the appropriate insulation technology. Thus, insulating a toilet in a country house will require significant financial investments, but will provide the best result.
Features of choosing insulation and materials for work
Due to limited space, as a rule, the ideal option for this is the usual mineral slabs. However, in addition to this, you will also need the following materials:
- Rectangular metal slats
. - Film
(it will be needed for waterproofing). - Sheets of drywall
(preferably moisture-resistant). - Fasteners
(screws, profiles). - Putty
(necessary for sealing joints).
To select the required amount of materials, it is necessary to proceed from the actual parameters of the toilet (width and height).
Work process
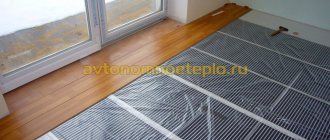
Sprayed polyurethane foam leaves no cracks or gaps, resulting in the best thermal insulation and wind protection.
The first step is to carry out the sheathing using wooden slats. They should be driven in at a distance of 50 cm from each other. Then insulation is laid on them, which is attached with self-tapping screws directly to the sheathing. After the slabs are laid on the walls and ceiling, you can move on to the film. It is used for waterproofing a room, i.e. to avoid moisture getting on the surface of the insulation. Usually the film is attached to the plates using tape.
The final stage remains - landscaping. To hide the slabs, you can use sheets of drywall. They are attached using metal profiles using self-tapping screws. The joints of the connections are covered with putty. After this, decorative tiles or wallpaper can be laid on the walls and ceiling. This completes the thermal insulation of the outdoor toilet. You can read about the insulation of barns and outbuildings on the page.
As you can see from everything described above, this process is very, very labor-intensive, requiring considerable expenditure, both time and finances... But there is an alternative!
High-quality thermal insulation using polyurethane foam
Now, this material has become very widespread due to its versatility and excellent characteristics that distinguish it from other thermal insulation materials. In general, polyurethane foam can be used as insulation for both exterior and interior decoration.
The main advantages of polyurethane foam as insulation for outdoor toilets:
In addition, insulation of a toilet located on the street with polyurethane foam is universal. This is due to the possibility of using polyurethane foam boards. They are frozen forms of polyurethane foam that are used for thermal insulation of a room. Thus, PPU slabs are successfully used, which increases their heat capacity in general.
The main advantages of polyurethane foam boards can be considered the following:
- High density of contact with walls. Regardless of what material the outdoor toilet is made of, the slabs do not form cracks and gaps through which heat loss occurs.
- High resistance to physical stress and deformation. Due to their structure, polyurethane foam boards do not lose their shape throughout their entire service life.
- If installed correctly, the material will not lose its thermal insulation characteristics for 70 years.
- Complete environmental safety.
- If moisture gets in, the insulation will absorb no more than 2% of its mass. The rest of the liquid will not touch the walls of the toilet.
Heating methods
Obviously, installing conventional heating into a separate country restroom is expensive, both in terms of time and money, and in terms of the amount of work. It is much easier to get a heater that runs on electricity. However, when making a purchase, you need to take into account the fact that turning on the device only when necessary will lead to the fact that you will have to plan a visit to the toilet 20-30 minutes before the actual need arises, so that the room has time to warm up.
In other words, a restroom heater must have the following characteristics:
- High level of fire safety;
- Uninterrupted operation in subzero temperatures;
- Maintaining a constant temperature in the room;
- No need for human supervision;
- Low energy consumption.
Today, only two types of heating devices satisfy such conditions - infrared and quartz heaters. The former have long occupied a leading position in the market, as they are distinguished by their compact size, good workmanship, quick heating of the room, and the possibility of long-term continuous operation.
However, infrared heating devices are not suitable for a country toilet, as they are installed on the ceiling. Under the influence of external factors, such as high humidity and temperature changes, wood or any other material from which the canvas is made breaks down and crumbles over time. If this is not noticed in time, the heater could fall on the head of a restroom visitor, causing serious injury. In this regard, there is only one possible way to maintain heat in a free-standing toilet - a quartz heater.
Brief conclusions
Ecotermix 600 is the best material for internal insulation
In conclusion, it should be noted that the thermal insulation of an outdoor toilet is an important process and cannot be ignored. Agree, it is much more pleasant to perform natural needs in a well-maintained, insulated room without cracks or drafts. When choosing materials for thermal insulation of such a structure, it is necessary to proceed from the location of the toilet, its size and the desired result that will ultimately be obtained thanks to the insulation. Well, of course, it depends on personal preferences.
For example, to save space, you can try using sawdust or basalt wool as insulation. Of course, they will not be able to significantly preserve the internal space, and when used as insulation on the outside, they are not particularly distinguished by the increased thermal insulation characteristics that are necessary for a country toilet.
Therefore, it is quite logical that today the best insulation option can be considered the use of polyurethane foam boards, when combined with the installation of polyurethane foam boards (usually the internal walls), the maximum thermal insulation effect can be achieved.
Video about how polyurethane foam is sprayed from Ecotermix:
Prices for our company’s services can be found in the section
Or order a consultation with a specialist at a time convenient for you!
The application is absolutely free and does not oblige you to anything!
A toilet in the country - in the house or on the site - must be available. Well, if we plan to use a country property not only as a vegetable garden, but also as a recreation area, then the presence of an equipped and fairly comfortable latrine should not be discussed at all.
There are things to do - they must be done! It remains to decide what exactly to do and how you can implement the construction yourself. We will talk about this in our article!
Examples of finished projects
One of the simplest solutions for country toilets, which are used everywhere, is the construction of a “birdhouse”. This is the name given to a standard rectangular restroom. Most often it has a pitched roof, which is made of slate. Below you can see a drawing indicating the dimensions of just such a restroom. Among the disadvantages, it is worth noting that the restroom is unstable to loads, as well as the need for additional upholstery material that will eliminate drafts.
If you want something more intricate, then you can build a triangular toilet. It is called a hut. This is exactly what it resembles with its shape. The triangle is one of the most stable shapes, so such a toilet can withstand both wind and snow loads. Unlike the previous option, snow cover will not be able to accumulate on such a latrine. Below is a drawing showing all the dimensions of the restroom. You should not save when choosing the width of the toilet. If you make it too small, then it will be almost impossible to stand up to your full height in the restroom.
A more complex toilet option for making in the country is a diamond-shaped toilet. It is also called a hut. Such a restroom will require significant consumption of building material. But with such a toilet you can be sure of stability even in strong winds. Another solution would be to build a restroom in the shape of a small house. It usually has a gable roof and is constructed from any type of materials.
Varieties
Traditional options
Different types of toilets for dachas require different approaches to arrangement, therefore, before starting work on installing a sewer system, it is worth studying all the available options and analyzing their pros and cons.
So, what can you choose for a suburban area:
- The simplest design is a wooden or plastic-lined booth installed directly above. This option is the least expensive in terms of equipment, but the comfort it provides is very conditional: it’s cold, the wind blows through the cracks, and there’s a bad smell inside.
Note! To partially solve the last problem, it is worth regularly pumping out the cesspool and throwing freshly cut nettle shoots inside. The drug “Sanex” and its analogues also demonstrate good effectiveness.
- A more modern alternative to an outdoor latrine is a dry closet. It usually takes the form of a plastic booth, in the lower part of which there is a waste collection container filled with a sorbent (most often a material based on sawdust).
- The advantages of dry toilets include ease of use and the ability to move from place to place. The disadvantages are the need to regularly replace filling containers (the cost of the service company’s work can be very high). And in winter it’s still quite uncomfortable in such a booth.
Note! A compact dry toilet can be placed in the house itself. Then the problem of cold will no longer be relevant, but you will still have to pay for maintenance.
- A toilet in a country house is the most difficult to implement, but still the preferred option. Naturally, for it to work, it is necessary to connect a water supply to the house, as well as equip a sewage drainage system. How to equip a toilet for a summer house in a house - we will tell you in detail in the next section.
Innovative solutions
If you want to equip a winter toilet (that is, one that can be used throughout the year without the risk of catching a cold), then in addition to traditional solutions, you can also pay attention to modern models.
Some of them are presented in the following table:
| Device type | Operating principle |
| Compost with partial recycling of waste | Peat or a mixture of peat and sawdust is used as a reagent. When interacting with wastewater, the material is effectively composted. In modern models, peat is filled using an automatic dispenser. |
| Compost with full recycling of waste | It differs from the version with partial recycling in the large volume of the waste bin. Long-term storage of wastewater allows for more efficient composting of feces, turning it into a fairly productive organic fertilizer. |
| Separation | During the operation, the liquid and solid fractions are separated. This allows faeces to be recovered for composting and better treatment of wastewater with high moisture content through filtration. |
| Thermal | Waste disposal is carried out by burning it to ash. Combustion is carried out in a special thermally insulating container using an incandescent spiral or an open flame. The main disadvantage of this technology is the high power consumption (up to 5 kW). |
| Freezing | Perhaps the most unusual toilet described in this section. It consists of a container and a container for freezing waste. Deep freezing allows you to avoid the appearance of an unpleasant odor, in addition, almost all microorganisms are destroyed during the cryotreatment process. As a result, fecal matter becomes completely suitable for composting. The main disadvantage is energy dependence. |
As you can see, such devices can significantly optimize the process of removing sewage. At the same time, for their operation it is necessary to have a source of electricity, therefore, when installing them, renting a diesel generator for a summer residence will move from the “desirable” category to the “necessary” category.
Toilet arrangement
Construction of a booth
This section will provide instructions on.
And we will begin with a description of the simplest design - an ordinary booth over a cesspool.
- To begin, choose a suitable location. It is best to install a toilet at a distance of at least 8 meters from residential premises and water sources - this way we will protect the environment from pollution by wastewater filtration products. In addition, it is advisable not to place the booth in a draft or strong wind: it will definitely blow through the cracks, creating some discomfort.
- Next, we proceed to arranging the waste container. To do this, we dig a hole up to 2.5 meters deep and about 1 - 1.5 m wide.
Note! The larger the pit, the less frequently waste needs to be pumped out.
- We strengthen the walls of the pit with brickwork (it is not advisable to use silicate blocks) or concrete rings.
- We add a layer of crushed stone to the bottom, which will act as a drainage cushion.
- We cover the pit from above with concrete slabs or several layers of thick boards, leaving a hole opposite the location of the toilet seat. It is also worth installing a small hatch in the ceiling for pumping out the contents.
Now we make the toilet body itself:
- We assemble the frame from timber with a section of 100x50 mm. The size of a toilet in a country house can be very different, but most often they build booths with a base of 100x100 cm and a height of 2 m.
- We install the frame on the site, deepening its supports into the ground by about 30-40 cm (this reserve in length should be left in advance). It is also possible to concrete the attachment point, but this is done quite rarely, limited to backfilling with soil followed by compaction.
- On the outside, we cover the frame with boards (pine lining is best) or panels made of opaque plastic. We place a sheet of roofing material under the roof (slate, metal tiles, corrugated sheeting).
- We make a toilet seat from boards or thick plywood. The inside can be lined with thick oilcloth to avoid leaks.
At the final stage, summer toilets for dachas are equipped with paper holders, toilet seats and trash cans. The last detail is very important, since toilet paper falling into the cesspool significantly reduces the rate of composting of waste.
Wastewater collection point
Country houses made of block containers of a fairly large size, as well as permanent structures made of timber, brick, etc. can be equipped with an internal bathroom. Of course, usually a fairly cramped room is allocated for this, but in any case, the level of comfort will be much higher than in the most spacious booth on the street.
When designing an internal toilet, you first need to take care of where the waste water will flow.
Here you can use a regular cesspool, but it is better to use a septic tank:
- We dig a trench from the house to the place where waste will accumulate. Its slope should be about 3 - 5 cm per 1 m. We lay a plastic pipe in the trench without a layer of sand through which the drains will move.
- We dig a hole for the septic tank with a depth of about 2-3 m and dimensions of approximately 1.5 x 2 m. Inside, we build two chambers from brickwork, connected by an overflow pipe at a height of approximately 1.5 m from the bottom of the tank.
Note! Instead of brick cells, you can use plastic containers, but in this case the cost of the project will be much higher.
- The bottom of the first container - the settling tank - is sealed with clay or concreted. We fill the second container, which will serve as a filtration well, with about half a meter of coarse gravel.
- On top we arrange a ceiling made of concrete slabs or thick boards covered with a layer of soil. We must install a hatch for inspection and pumping, as well as a ventilation pipe with a height of at least 1.5 m.
Bathroom equipment
Installing a toilet in a country house usually ends with the arrangement of the room itself, as well as the installation of additional equipment.
These tasks themselves are less labor-intensive than anything we did previously, but they also require a responsible approach.
- To begin with, we are renovating the room that we have allocated for the bathroom. To do this, before finishing the finishing work, we bring water and sewer pipes to the installation site of the toilet and sink, securing them to the walls using fixing clamps.
- The floor is tiled and the walls are covered with plastic panels on a wooden frame. This design is quite convenient because it allows you to hide all communications.
- Be sure to leave a ventilation hole under the ceiling. We install a fan in it for forced air exchange.
Note! To ensure air flow, there should be a small gap between the bottom edge of the door and the floor.
- Next, we install the toilet, fixing it to the floor with anchor bolts. To avoid damage to the plumbing, you can secure the base to a base made of wood impregnated with a moisture-proofing compound.
- We connect the water pipes using fittings, connect the toilet flush to the sewer pipe using a cuff. We seal this assembly using moisture-resistant silicone.
The easiest to use are gravity-flow designs, when the toilet is located above the level of the drain into the septic tank or cesspool. At the same time, to increase the efficiency of the system, you can additionally install a fecal pump, which will ensure forced movement of sewage flow to the place of accumulation and decomposition of waste.
Note! An additional advantage of using sewage pumps in the country is that they prevent the formation of ice plugs in sewer pipes even in very severe frosts.
Final stage
To arrange the floor in the toilet, use boards 40 mm thick. Also install a kind of podium where the hole in the cesspool should be placed. To give it a more aesthetic appearance, additionally use a lid from a real toilet.
Ready-made toilets for a summer cottage made of wood
Arrange the roof of the structure from boards 4 cm thick. For waterproofing, use a sheet of roofing material, which is laid on a wooden covering. After this, install slate on the roof. Don't forget to allow for a slight slope of the slope. To do this, make one wall of the toilet 15 cm lower than the other.
Also, be sure to install massive doors that will prevent frost from penetrating inside the outdoor bathroom. Paint the structure itself with regular paint, which will significantly extend its service life.
Conclusion
As you can see, unlike traditional structures with a cesspool, a warm toilet in a country house requires quite a lot of effort at the installation stage. But the result (as well as healthy kidneys!) is worth the time and money spent. So if you decide that it’s time to take your house to a new level of comfort, then carefully study the tips above, as well as the video in this article.
If you decide that your country house should have a real warm toilet, then our article is for you.
Stages of building a warm toilet in the country with your own hands:
- fencing off the room,
- choice of cleaning system,
- design development,
- organization of water supply,
- installation,
- connection.
Choosing a wastewater treatment system
The most common method for summer residents is biological treatment. This method is based on the life process of special bacteria placed in a well or septic tank.
Usually used:
They involve the use of a septic tank - a special container in which the above-mentioned microorganisms decompose the waste of our life. After this, the wastewater enters the soil through the drainage (if the soil does not absorb moisture well enough, then the wastewater goes to the place of filtration, i.e., to the nearest ditch).
It must be taken into account that the septic tank must be at least 5 meters away from the house, and 20 meters from the well. The volume of the septic tank should be three to four times the daily water consumption.
A biological treatment system can be organized in a simpler way - by installing a well made of reinforced concrete rings or one large container:
Pipe laying for home
Installing a sewer system in general and a toilet in particular in a private house involves transporting wastewater to a cesspool/septic tank/collector. To do this we need to lay an underground pipe:
Pipe in a trench
- From the house to the tank we dig a trench at least 70 cm deep. The deeper the pipe is located, the less the risk that its contents will freeze in winter.
- We make the bottom of the trench with a slope of about 2.5 - 3 cm per 1 m.
- We place sand bedding under the pipes. The optimal thickness of the bedding is 10-15 cm.
- We lay pipes (we use only products for external use) and carefully seal all joints.
In my case, the pipe ran in a straight line, but if you need to make a turn or lay a pipeline longer than 15 m, then it is mandatory to install at least one inspection well. I was convinced of the usefulness of such a structure when I had to help clear a sewer in a neighboring area: it is much easier to remove a blockage if there is access to the problem point of the pipe.
- We insulate the pipes using mineral wool or fiberglass, then fill them with soil and compact it thoroughly.
Sewage inlet under the floor
- We pass the pipe outlet into the hole that we left in the wall of the cesspool or septic tank.
- At the entrance to the house, we insert the pipe into the hole in the base and connect it to the internal riser.
System design development
To organize a warm toilet at the dacha, the optimal solution would be to make two containers. In the first of them, the primary decomposition of wastewater will be carried out, and in the second, the final decomposition.
For a homemade cleaning system, you can use containers made of durable plastic. They are sold at paint factories and returnable packaging warehouses. A hole is made in the first container, which will serve as the entrance to the drain pipe. A connection is made between the containers, then a hole for the ventilation pipe, as well as for the drainage outlet.
To install a warm country toilet, ordinary sewer pipes with a diameter of 100mm to 150mm are used. It is most convenient to work with metal-plastic pipes. Their sections are combined with collets and fittings. A tee with a connector is used for input. If you plan to use your warm toilet in winter, then lay the pipes underground one and a half meters (or deeper). It is better to insulate the pipes first.
Sandwich panels for outdoor dry toilets in winter
Sandwich panels are structures made of three layers, with insulation placed in the middle. The result is a winter insulated cabin, in which it is not cold and there are no problems with frozen waste. It would seem like the optimal solution. But there is a nuance, even three.
Sandwich panels are heavy, bulky and expensive. This means that the toilet stall is no longer mobile. Along with delivery, you will have to call movers, which means additional costs. Plus, sandwich panels are expensive.
Conclusion: an outdoor dry toilet made of sandwich panels is for those who are not looking for easy ways. The last option remains - the insulated toilet cabin “VARM”.
Organization of water supply
In order to fully operate a warm country toilet, it is necessary to ensure a constant supply of water to it. There are two options here:
Installation, connection
After all the preparatory work has been carried out, you can begin connecting the system:
Your warm country toilet is ready for use!
Video. At the dacha with your own hands - a piece of our life - a toilet, the best models
Video. City toilet in the country
A warm toilet in a country house is an urgent need that should be designed even before the construction of a house begins, since a person produces such an amount of waste that after some time it will be impossible to stay in this area. Every city dweller remembers with horror the first impression of a toilet on the street, when there were drafts inside at 20 degrees below zero. Therefore, insulation of the structure is mandatory, not only for reasons of comfort, but also hygiene.
Alternative
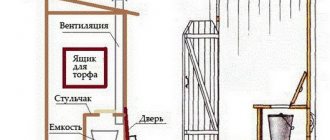
The most expensive cost item when operating a warm toilet in a country house is heating. Is it possible to move away from traditional methods of heating a room? It is possible if you use the old antiquated method of processing sewage. It is based on the natural decay of feces with the release of thermal energy. To do this, you will have to enhance the effect with the help of natural material, which even in a calm state generates heat. This is peat, and such a toilet is called peat.
True, in such a toilet you will have to install a large-volume toilet, or you will have to make a large pedestal, about 100 liters. Peat is poured into it (you can use sawdust). Feces end up in the toilet, where under the influence of bacteria they begin to rot, releasing heat along with peat. In fact, this is the same dry toilet, only in the latter the role of chemicals is played by peat and bacteria in it. But if the dry closet needs to be cleaned at least once a month, then the peat can be changed once a year. At the same time, the resulting rotted sediments are very good fertilizers, one might even say of high quality.
Attention! To remove the unpleasant odor and steam released during the decomposition of sewage, it is necessary to provide the toilet with ventilation. In principle, a high exhaust from the pipe will solve this problem.
In addition to the advantages described above, a peat toilet has other positive aspects.
Where to place a country toilet
Before you build a warm toilet in your dacha with your own hands, you need to familiarize yourself with the basic rules governing the construction of such a structure. Particularly stringent requirements are imposed on structures with a cesspool. According to sanitary standards, the place where the structure is located must meet the following conditions:
There are types of structures that provide for isolation of wastewater from the ground. In this case, some restrictions can be ignored.
Construction of a cesspool
The design of the cesspool depends on the chosen toilet design. If the depth of underground water allows, then the simplest option with a regular pit, the capacity of which depends on the number of people living on the site, will do. For an average family, a volume of 1.2 m³ is usually enough.
The walls of the cesspool must be made as smooth as possible. For the convenience of periodic removal of accumulated waste, the recommended depth of the container is 1 m. To provide access to the pit, a hatch is made inside the structure or several boards are left loose. The hatch can also be located outside the toilet.
If groundwater passes close to the surface of the earth, then a sealed cesspool will be required. To prevent wastewater from seeping into the ground, the walls and bottom of the container are covered with roofing felt, then a cement screed is made and the walls are laid with bricks. You can install a sealed container inside the structure or use it as a regular cesspool.
Installing a powder closet is a less labor-intensive process, since a cesspool is not required. In this case, it is enough to install a storage container under the toilet seat to collect sewage and provide a container for storing peat or sawdust.
Project
The main task before starting to design a building for an outdoor toilet is to choose a place for its installation
This is especially important if the restroom has a cesspool. The toilet should be at a minimum distance of 5 meters from the house
It is advisable to make it larger so that unpleasant odors do not come into the home
Particular attention should be paid to wells or other water storage tanks
It is important that waste does not leak into them under any circumstances. To do this, it is necessary to provide a distance of at least 30 meters
If there are fruit trees nearby, then it is also necessary to maintain a gap of 5 meters to them. It would be convenient to locate the toilet closer to the road from where the sewer truck will approach, but a distance of 5 meters must also be maintained to it. The toilet must be 2 meters or more away from the neighbor’s fence
To do this, it is necessary to provide a distance of at least 30 meters. If there are fruit trees nearby, then it is also necessary to maintain a gap of 5 meters to them. It would be convenient to locate the toilet closer to the road from where the sewer truck will approach, but a distance of 5 meters must also be maintained to it. The toilet must be 2 meters or more away from the neighbor’s fence.
After choosing a place for the restroom, you can decide on the size of the future building. There are several rules that apply to outdoor toilets. For example, the height of the toilet should not be too high. If it exceeds 2.5 meters, then due to the high windage the toilet will simply overturn. If the height of the restroom roof is below 2 meters, then there may not be enough air in it and there will be some difficulties for tall people to visit. In order to make it convenient to turn around, the width of the outdoor toilet should be at least 1 meter. The depth of the toilet is also an important factor in order not to rest your knees on the door, so it is calculated from a minimum value of 1.2 meters. Below is a drawing of a country toilet, which shows all the required dimensions.
Note! For brick latrine buildings, the maximum room height can exceed 2.5 meters without fear of damaging the structure
Toilet base and body
After completing the excavation work, you can begin building the base of the warm toilet. The main requirement for this element of construction is stability. If the structure is located in a windless area, then the base can be installed directly on the ground. If wind loads predominate in the region, then the base is fixed to metal pipes buried in the ground along the edges of the cesspool.
The load-bearing elements of the toilet frame are made of lumber with a cross-section of 100x100 mm and are reinforced with 50x50 mm timber to add rigidity to the structure. The installation of the frame is done in such a way that the main elements and stiffeners are connected in one plane, which will serve as the basis for the outer wall cladding material. The doorway is made of timber of the same cross-section as the load-bearing elements of the building.
A sheathing is attached to the upper part of the structure, which serves to secure the roofing material. To do this, one strip is attached to the front side of the future toilet, and the second, at a certain angle necessary for removing precipitation, is attached to the back. Slate can serve as a roofing material, since the area of the structure is small, one sheet will be enough. Fastening is done using slate nails with specially shaped heads.
The base for the toilet floor is made of timber, and the frame of the toilet seat is made from it. The beams are covered with boards, but some of them are not secured for access to the cesspool.
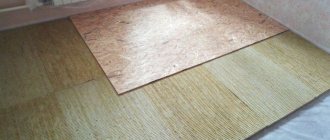
The surface of the toilet walls is formed by covering the load-bearing structural elements with sheet material. For this purpose, plywood, OSB boards or chipboard are used. The frame of the door leaf is sheathed with the same material. Fastening is done using self-tapping screws.
Regardless of the type of toilet chosen, a ventilation device is required. For this purpose, a plastic pipe is used, the upper edge of which must be placed above the roof of the structure.
What to build from
After choosing the specific size of the restroom, you can decide on the material from which the construction will be carried out. His choice will also depend on the expected period of use of the country toilet.
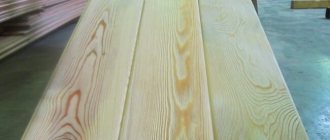
Tree
Wooden toilet stalls are the most common. This is due to the fact that latrines can be built from leftover material that is stored after building a house. The advantages of this solution include:
- high construction speed;
- ease of repair;
- ease of ventilation;
- possibility of moving the structure;
- light weight;
- possibility of independent construction.
It takes about a day to build a toilet box made of wood, taking into account the preparation of all the necessary parts. The main thing in the design of the restroom is the main frame, which consists of a beam measuring 10 by 10 cm. When the frame is ready, it is simply sheathed with available boards. Repairing such a restroom is not difficult. It will be enough to replace the leaky part. Even roofing felt can be used as roofing for a restroom if it is placed at an angle on a continuous sheathing. The wooden structure of the restroom is quite lightweight, so several people can move it to a new place.
Metal
Building a metal toilet will require skills in working with a welding machine. At the same time, it can be built much faster than a wooden version of the restroom. The advantages of such a restroom will be:
- long service life;
- ease of maintenance;
- low project price;
- possibility of movement;
A metal toilet is a base that is covered with one of the roofing materials. Most often, corrugated sheeting or slate is used for this. The first can be secured with self-tapping screws or aluminum rivets.
Blocks
As blocks for constructing a toilet, you can use sand-lime brick, foam block, shell rock, etc. The advantages of just such a project can be considered:
- ease of insulation;
- coolness in the hot season;
- resistance to any type of load;
- presentable appearance;
- long service life;
- ease of shape selection.
Even an inexperienced builder can lay a toilet. There will be an opportunity to practice on the restroom before implementing larger projects. It would be convenient for such a toilet in the country to make a cesspool under it, which will eliminate the need to constantly remove waste. This toilet will cost more than the restroom options above. In addition, for such a restroom it is necessary to take care of a high-quality foundation that can support the weight of the structure.
Insulation of the toilet
Wood is a material that has fairly good thermal insulation characteristics, but to ensure comfort in the toilet in winter, additional insulation is necessary. For this purpose, you can use any thermal insulation material at your discretion - polystyrene foam, mineral wool or sprayed polyurethane foam. The simplest and most inexpensive option is 50 mm thick foam. Insulation of the structure can be done both from the inside of the building and from the outside.
Since the toilet is a frame structure, it is more convenient to do this from inside the room by placing insulation in the cavity formed by the supporting beam and stiffening ribs. Polystyrene foam is a material capable of absorbing moisture, so insulation of the toilet must be done using polyethylene film:
- After covering the outside of the toilet, plastic film is laid over the entire internal surface of the structure.
- The foam is adjusted to size and placed between the frame beams. The material must be adjusted in such a way that there are no gaps between the sheets and structural elements.
- Another layer of film is secured on top of the insulation using small nails or a stapler.
- The thermal insulation layer is covered with decorative sheathing. To save the interior space of the toilet, it is better to choose a material of small thickness.
Insulation of the ceiling and door is done in the same way.
Insulate a dry closet for the winter with your own hands
The first thing that comes to mind for owners of plastic toilets is to insulate them. Forums for summer residents are full of reviews and recommendations from “experts” on how to make thermal insulation yourself.
It would be a stretch to call such a solution good. Firstly, insulating does not mean heating. Insulating materials separate the heat inside from the cold outside and minimize heat loss.
But where does a plastic toilet stall get above-zero temperatures in winter? Unless you put a “breeze-breeze” there. In this case, your comfort is guaranteed by 30-40 percent. After all, you did not take into account one important point - the contents of the receiving tank.
When the temperature reaches 0 °C and steadily creeps down the thermometer, what do you think happens to the waste? They freeze. Moreover, no matter how much you insulate the toilet cabin. But not only that, according to all the laws of physics, liquid waste increases in volume. This means you need to defrost and pump out the contents more often.
Of course, you can experiment and try to defrost a plastic toilet tank yourself. In the vastness of the RuNet you will find tons of advice on how to do this using electricity, hot water and crowbar. In 90 cases out of 100, you will damage the tank, and buying a new one will cost you at least 5,000 rubles.
Conclusion: in winter, a self-insulated toilet cabin is an ineffective solution. Therefore, I suggest you consider the second option.
Internal structure of the toilet
To make using the structure comfortable, the seat for the country toilet is installed on a raised platform in the form of a pedestal. The toilet seat is made of boards or moisture-resistant plywood. The frame is constructed during the construction of the toilet; all that remains is to cover the structure with finishing material and paint it. A hole of the desired configuration is cut in the center of the toilet seat.
The simplest and most inexpensive solution for making a warm seat is polystyrene foam. This material has sufficient rigidity so that it does not deform under the weight of a person. The thermal conductivity of the foam prevents the seat from freezing - even in severe frost, discomfort will be practically not felt. Another advantage of this material is hygiene. Foam plastic can be easily washed and cleaned with modern cleaning agents, without compromising its integrity.
To increase the service life of the inner surface of the toilet, it must be painted or coated with drying oil.
As soon as I bought the dacha, I immediately decided to build a comfortable, warm toilet
instead of the cold and far away old one.
This is important not only for reasons of comfort and hygiene, but also for planning other buildings on the site. When constructing a toilet,
sanitary standards must be observed. The administration of the holiday village advised me in detail on this topic.