The decorative coating is applied to the walls, has dried and is already pleasing to the owner’s eye. But there’s clearly a little missing – the finishing touch. This “smear” is a varnish for decorative plaster, which gives the coating material, along with shine, additional protection from mechanical, chemical, biological, temperature and ultraviolet influences, strength and durability. How to choose the right mixture, glaze a wall, and repair the varnish coating yourself, read on.
Why do you need to varnish plaster?
The surface of decorative plaster, not covered with varnish, wax or paint, has a rough texture with numerous pores. It scatters incident light and breathes, absorbing fumes, odors and fine substances contained in the air through its pores. The exposed surface of the plaster is susceptible to abrasion and scratches. Thin relief protrusions can chip under mechanical stress. Wall varnish creates a durable transparent protective film that fits the texture protrusions, protects the plaster coating from external influences and gives the surface a matte or mirror finish. The plaster solution already contains additives that increase the resistance of the coating to UV rays. However, additional protection will not be superfluous. The glaze material, protecting against ultraviolet radiation, contributes to the long-term preservation of the brightness and richness of the color of the decorative coating. The bactericidal substances contained in it become the first impenetrable antiseptic barrier for fungal and mold spores.
Why do you need to use wax and what types of wax it comes in?
Wax is used to protect the decorative coating from moisture. It is also used to add shine and smoothness. Wax for decorative plaster is mainly used for surfaces that imitate natural stone. In this case, you cannot do without such a coating, because it emphasizes the created decorative effect.
If acrylic plaster was used to create the coating, then acrylic wax should be used for the finishing layer.
The wax itself can be natural or synthetic.
- To give the coating a glossy appearance, natural wax is used.
- Synthetic wax creates a durable matte finish.
Its color is not always transparent, but in any case, with the help of special toners it can be given the desired shade. For the Venetian, only clear wax is used. This is the only way he can emphasize all the features of the decorative material without hiding them under his color. Colored wax is often used to change the shade of the finished coating. And to enhance the finished effect, use wax with shades of silver or gold. This finishing creates a gilded effect and helps imitate a metallic coating.
Transparent wax enhances coverage depth
It is also worth paying attention to the density. If the coating is dense, then the wax should be thick, but if it is porous, then liquid wax will be required. Waxing decorative plaster is done using a couple of basic tools. The material can be applied with a sponge or spatula. It is convenient to apply thick wax with a rubber spatula, and liquid wax with a sponge. Sometimes these two methods are combined, applying the composition with a spatula, and rubbing off the excess with a sponge.
Finish coating manufacturers allow it to be diluted with water by 10%. So you can always get liquid wax from thick wax. In some cases, they manage to dilute the material with water by even 30%. You can only take such a rash step if there is not enough wax for the entire area. It is diluted, increasing in volume, so as not to buy a new one.
You can reduce wax consumption by a third if you apply a deep penetration primer to the finished decorative coating. And after it dries, apply wax. However, this method is not suitable for all textures, and the final result is, to put it mildly, not the most beautiful. At best, you will be left without gloss.
Advantages, disadvantages and useful properties
The varnish layer applied to the decorative coating demonstrates the following advantages:
- increases the strength of the plaster coating and resistance to scratching, abrasion, and impact;
- fixes the color of the finish, preventing fading or changes in quality due to sun rays or other reasons;
- makes it possible to wash and clean walls with detergents;
- relatively high strength;
- easily evenly lays on flat and embossed surfaces;
- easily removed with solvents;
- Water-based compositions are environmentally friendly and harmless.
Minuses:
- the total cost of finishing increases;
- the damaged area cannot be easily repaired without being noticed.
Plaster varnish allows you to wash and clean walls with brushes. It is an independent decorative product if it is tinted, mother of pearl, metal dust or glitter are added.
Victor Semenov:
I advise you to order scraping and sanding of the parquet, then protect the parquet with 3 or 4 layers of acid varnish. The result is a very strong and reliable layer. If you simply do interlayer sanding on a given surface, then you can only use water-based varnish, and not just any one.
Can varnish be coated over another varnish? Applying acid or alcohol varnish to water-based varnish is strictly prohibited! Acid and alcohol varnishes have the ability to dissolve previous layers; if they are applied, the water-based varnish will become cloudy and after some time will peel off: a new sanding of the parquet will be required.
What varnish to coat decorative plaster with?
Types of paints and varnishes are divided according to purpose, base material, and decorative effect obtained as a result of application. Of course, you can use any composition to obtain a varnish coating, but substances that emit harmful fumes when applied and heated are not suitable for decorative plaster indoors. You should choose, knowing the basis of the varnish composition and the conditions under which it will be used.
Acrylic lacquer
The basis of this type of varnish mixture is acrylic resins, or rather, their aqueous dispersion. A milky, water-based liquid that is not transparent, has a homogeneous composition, and contains stabilizing additives. A quick-drying varnish composition applied to the plaster dries to form a durable, transparent, non-yellowing film. Total time to gain strength is 2 weeks.
The composition is odorless and toxic, therefore suitable for residential premises. Available in one- and two-component versions with decorative effects: from high-gloss to matte.
Advantages:
- does not burn;
- has no smell;
- does not turn yellow over time;
- easy to tint;
- environmentally friendly;
- easy to apply.
Types of glitter
Manufacturers offer different varnish solutions that differ in their aesthetic properties:
- glossy compounds with dirt- and water-repellent characteristics. This variety is great for external and textured bases;
- matte varnishes are often applied to embossed surfaces, where naturalness is maintained as much as possible;
- craquelure creates decorative cracks in the plaster, the surface acquires an antique effect;
- pearlescent solutions are used as a finishing layer; they have a very attractive, iridescent, spectacular shine;
- steel, silver, gold varnish mixtures contain pigments of the corresponding color, and are often used either as a base layer of paint, or as an enhancement of shade or patination;
- compositions with a holographic effect create a fantastic, unique appearance of an iridescent surface.
How to prepare the surface for glazing compounds
New plaster must be completely dry before glazing. Dust and lumps remaining after processing are removed from it. Glazing does not require preliminary priming. However, for better adhesion and reducing the consumption of expensive materials, it is possible to coat the plaster with 2 layers of primer with the same base as varnish. If the plaster coating has an old varnish coating, it is removed with special compounds. Surfaces coated with water-dispersed and alkyd paints are cleaned and treated with sandpaper to increase adhesion (after which the resulting dust is removed).
Cement plaster in the bathroom
No registered user is viewing this page.
We design the combined space of the kitchen and hallway: design and zoning rules
Wallpaper for a small kitchen that visually increases the space: 50+ best ideas
Kitchen in the studio: functional interior, thought out to the smallest detail
- Construction and repair
- Foundation
- Roof
- Walls
- Window
- Doors and partitions
- Ceiling
- Balconies and loggias
- Internal structures
- Floor
- Water supply and sewerage
- Heating
- Ventilation and air conditioning
- Gas and energy supply
- Lighting
- Plumbing equipment
- Security and home automation
- Baths, saunas, swimming pools
- Construction Materials
- Decoration Materials
- Tools
- Technique
- Laws and finance
- TechnoNIKOL
- Design and decor
- Apartment
- Bedroom
- Kitchen
- Dining room
- Living room
- Bathroom, toilet
- Hallway
- Children's
- Attic
- Small rooms
- Workplace
- Wardrobe
- Library
- Decoration
- Furniture
- Accessories
- Vacation home
- Landscape
- Redevelopment
- Catalog of houses
- Magazine
- News
- Events
- about the project
- Advertising on the website
- Advertising in a magazine
- Terms of use
- Contacts
- about the project
- Advertising on the website
- Advertising in a magazine
- Terms of use
- Advertising on the website
- Advertising in a magazine
- Terms of use
- Contacts
Are you a professional architect or designer?
IVD. Repair and finishing
Are you a professional architect or designer?
The IVD.ru website is a leading Internet project dedicated to the issues of reconstruction and interior design of residential premises. The main content of the site is the archive of the magazine “Ideas for Your Home” - exclusive author’s articles, high-quality illustrations, practical tips and lessons. A team of professionals is working on the project in close collaboration with famous designers, architects and leading publishing experts.
Glazing tool
To coat decorative plaster with a varnish mixture, use:
- rollers with rounded edges (the best tool for acrylic mixture);
- paint brushes;
- sponge;
- spray gun;
- masking tape to protect nearby structures and sections of walls;
- pieces of fabric.
To prevent the tool used for glazing from hardening, it is thoroughly washed with water after work.
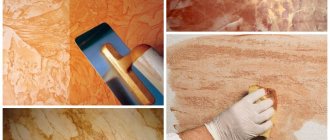
Waxing for protection and shine
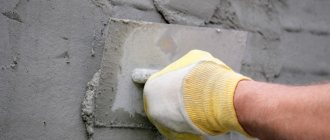
It doesn't matter whether you apply the wax with a spatula, a foam sponge, or a piece of soft cloth. It’s just that compounds with different densities are applied with different tools. The main thing is that after wax has been applied to the decorative plaster, it needs to be rubbed into the surface. You will need a piece of cloth, with which the wax is gently rubbed into the wall until it becomes glossy. The movements should be circular.
The wax is applied with a trowel “to the scrape” in the minimum possible layer
Before applying the material, it is better to make sure that the coating has no flaws, because after this step the defects cannot be corrected. The surface itself should be free of dust, because even small crumbs under a trowel will scratch the surface when applying wax. By the way, some craftsmen like to apply acrylic wax with a metal trowel. In this case, it acquires a shine that cannot be achieved if you use foam rubber or a mitten.
The wax should not be applied in layers, but should be worked from corner to corner. Although the wax dries from 3 to 6 hours (during this time you need to notice all the flaws and correct them), the edges dry much faster. Therefore, you shouldn’t yawn, even though this process is very painstaking.
Polishing the wax is done the day after it is applied. This procedure can be performed with a piece of rag or a sanding machine with a special attachment. As a result, the finished coating will become more shiny.
Application technology
Varnish compositions are capricious and require compliance with conditions during glaze work.
Application conditions:
- The air temperature for applying acrylic varnish for decorative plaster is limited to +10°C to +35°C, humidity – 80%.
- For polyurethane varnish, the air temperature is from +18°C to +25°C, the optimal humidity is 55-60%.
- The area where paint and varnish work is to be carried out is protected from drafts and sunlight.
- The temperature of the varnish composition is from +13°C.
Details
Which composition will be better to use?
When deciding whether to varnish a surface, people ask themselves whether it is possible to coat the surface with decorative plaster? This will depend on which walls will be processed - external or internal, and also what characteristics the finishing surface should have. If the varnish composition will be applied inside the rooms, then you should choose the safest and most environmentally friendly products. As a rule, preference is given to a water-soluble type composition. Water-based acrylic varnish is perfect for these purposes. And if the outer layer of plaster is processed, then varnish products are used that are made with organic solvents. These products are highly resistant to negative weather conditions.
Varnish products can be divided by type of base, and also by gloss level, purpose, technical characteristics, drying time, environmental cleanliness and other indicators. Experts say that almost any type of paint and varnish product can be used to cover a layer of plaster. But in order not to reduce the throughput of the surface, as well as resistance to moisture and breathability, preference should be given to those varnish compositions that are intended specifically for plaster.
If you don’t know what varnish to coat the plaster with, then the best option would be acrylic varnish, which is water-based. It is used indoors, and is also environmentally friendly, non-toxic, harmless to people, and has no unpleasant odor. Acrylic types of compositions have an excellent degree of adhesion and interact well with plastered surfaces, and can also paint ordinary, smooth bases and textured surfaces. Acrylic varnish for the decorative layer of plaster is used to make the finish glossy and visually beautiful. Acrylic products can be tinted with specific and pigment components. Mixtures based on acrylic have a milky tint, and after drying the solution forms a strong, transparent and at the same time elastic film that will not spoil the main finishing shade.
Among the advantages of acrylic products are the following qualities:
- Excellent adhesion to different types of materials.
- High resistance to household cleaning chemicals, ultraviolet rays and humidity.
- Safety because it contains no organic solvents.
- At room temperature, the mixture will begin to dry in approximately 3 hours.
- If necessary, the composition can be diluted with plain water.
- Can be used for stone, plaster, brick, and other building materials.
An acrylic type of varnish for plaster is not the only option. Moreover, the varnish polyurethane composition is very popular. It is typically used to protect mineral types of materials and wood substrates. Polyurethane mixtures have high strength, resistance to moisture, and excellent physical and mechanical characteristics. Water is used as a solvent for a polyurethane-type mixture, due to which the solution is environmentally friendly and can be safely applied inside the room in which people live. It should be noted that not every polyurethane type mixture is suitable for varnishing decorative plaster; you should read the manufacturer’s instructions to ensure the compatibility of the materials.
A separate group of paints and varnishes are façade products. They have maximum protection against aggressive and adverse effects of precipitation, as well as the environment. Facade types of varnishes reliably protect the exterior from rain, snow, fog and temperature changes, as well as from the effects of strong winds and ultraviolet rays. Facade varnishes provide protection against mechanical and chemical influences.
Types of glitter
Manufacturers offer different varnish solutions, which differ in their aesthetic properties (and from them you can choose which varnish to coat the decorative plaster with):
- Glossy compounds that have water-repellent and dirt-repellent characteristics. This variety is perfect for textured and external bases.
- Matte varnish compositions are often applied to embossed surfaces, on which naturalness will be maintained to the maximum.
- Craquelure creates decorative cracks in the plaster, and the surface immediately acquires an antique appearance.
- Pearlescent solutions are used for the finishing layer, and they provide an extremely beautiful, spectacular and iridescent shine.
- Silver, steel, and gold varnishes contain pigments of the corresponding shade, and they are often used either as the main layer of paint, or as an enhancement of the shade (sometimes for patination).
- Compositions that have a holographic effect create an unusual, even unique appearance of an iridescent surface.
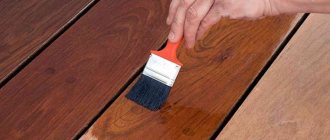
How should you apply varnish to plaster?
Varnishing
Each type of paint and varnish material is suitable for certain types of colors.
If the color contains organic pigments, these colors are not suitable for facade work. The varnish color is added gradually to the container with the varnish material, stirring the composition after adding a portion of the color so that the dye is completely dissolved. When the material is the desired shade, it is checked by doing a test dye. The volume of varnish composition required to cover the entire wall is tinted immediately (with a small margin).
The saturation of the shade when tinting with varnish depends on the number of varnish layers applied and their thickness. On smooth surfaces, the overlap of adjacent varnish stripes without shading will be noticeable when dry. Therefore, working with tinted varnish material is more difficult.
Professionals do not advise beginners to immediately use LCS in organic solvents. It is better to master glaze work on water-soluble materials, which take longer to dry and are easier to color and apply.
In addition to color, varnish compositions are enriched with glitter, metal dust and mother-of-pearl. Everything is simpler here, just mix. Such compositions, diluted with water, are often stirred during operation. Decorative paints and varnishes are final, that is, finishing coatings.
Finished surface painting technology
Application of any new coating is allowed when the previous layer is completely dry. It is easiest to carry out the work if decorative plaster has been done for painting. In this case, the wall is perfectly smooth and we will not spoil the coating. The second coat of paint is applied only after the first has completely dried. This usually takes from 4 to 24 hours, depending on the material chosen and the conditions in which you have to work. In high humidity and low temperatures, the paint can take 2 days to dry if applied in a thick layer.
All surfaces adjacent to the wall should be protected from paint contamination. To do this, apply masking tape around the perimeter of the work area. When there are overhangs beyond the edges, the paint will fall on this tape, and it will come off after the work is completed. The result will be an even and beautiful paint job without affecting adjacent areas. It is better to lay a film on the floor to protect it from paint drops.
Masking tape can also be used to create additional patterns
Painting decorative plaster with a roller is no different from painting regular plaster with a roller. Dilute the paint, pour it into a special tray, dip a roller into it, run it along the grooved surface of the tray to remove excess paint, and then proceed directly to painting the wall. Wiring with a roller is done from top to bottom, and then from bottom to top.
Working only with a roller we get a uniform application of paint. This can easily appear on decorative plaster. If the simplest textures are used, then there is nothing to worry about. But for more sophisticated reliefs this can be critical. That's why some people take a brush, because it can make strokes of any length in different directions. Then the surface can get rid of its monotony, although everything depends on the effect created by decorative plaster. Sometimes it makes sense to apply the first layer of paint with a brush (multi-directional movements), and the second layer with a roller (even vertical movements).
An example of the development of two shades of paint on one coating
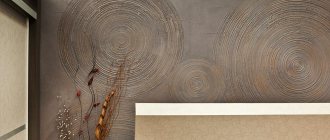
A roller and brush tandem is used to paint a decorative coating with a “rain” type relief. The entire coating is painted with a brush, because it can penetrate into all the grooves, making the pattern one color. After this, use a roller with a small amount of paint to paint the protruding parts with light pressure. The paint simply does not get deep into the grooves. The result is a two-color coating.
A mitten and a sponge are used for a finely textured coating to give it an antique effect by enhancing the deep relief. Painting decorative plaster with a spatula is similar to applying another layer of liquid mortar. This technique is used in very rare cases. Usually a spatula is needed to remove excess paint. For more details about this, watch the video.
Recipe for making varnish for decorative plaster
Making decorative varnish yourself from scratch is a difficult task. It is easier to improve purchased water-based material. How to prepare a decorative composition with glitter for decorative plaster with your own hands is shown in the video.
A too glossy surface of a decorative coating is not always appropriate because it is unnatural. Where the eyes need to be rested, glossy surfaces are unnecessary. A simple technique will help to dull the gloss - diluting the varnish composition with water 1:1. The proportion of water is often smaller - one tenth or one third of the weight of the varnish.
The use of gypsum and its benefits
Building gypsum is obtained from a special type of stone, which itself consists of gypsum particles. Previously, the material undergoes procedures such as burning and grinding into powder form. Next, the base is simply kneaded until a homogeneous mass is obtained. It is better known as alabaster.
The scope of application of gypsum is really wide:
- construction and repair work using paint;
- production of decorative products, for example, figurines;
- as a binding material at an intermediate stage.
For modeling and stucco molding, compositions with a gypsum base are often used. They are indispensable in the production of small architectural forms, pouring decorative tiles and bricks. Iron oxide pigments also participate in the process.
The mixture itself quickly hardens and begins to set. To have time to implement all your plans, you need to work very quickly. The white tint is standard for working substances in this case.
Preparing and using coloring material for the garden and other places should not cause much trouble. Other advantages include affordable prices and a wide range of applications. The positive aspects include environmental safety. The material “breathes”, as if it itself maintains a stable temperature level, which benefits the gypsum.
For interior decoration, many people prefer to use gypsum compounds. They allow you to create real masterpieces that will look good in any interior. For example, in the version of gypsum tiles.
The material is endowed with other additional properties:
- resistance to open fire;
- low weight, lightness;
- simple installation, processing;
- The technology for painting plaster is also simple.
But gypsum bases can manifest themselves in different ways while they are in active use. For example, alibaster itself is afraid of exposure to moisture in large quantities. In general, any powder with this material can be easily dissolved if the surface is poured with at least a small amount of water. The buyer decides how to paint the plaster.
Advantages over wax
Another glaze composition for decorative plaster is wax. Wax compounds, such as those used for Venetian plaster, also protect the plaster finish by forming a durable film. They are applied to the wall in the same way as varnishes, but there are differences between these two types of coatings.
- If the layer is unevenly distributed, the transparent varnish does not form dark spots like wax;
- The wax film is less durable;
- The wax film can only be removed by sanding, while the varnish film is washed off with a solvent;
- Varnish coating is more durable but more expensive.
How to varnish water-based paint?
For interior decoration, water-dispersion and water-based paints are increasingly used. There is no fundamental difference between them, and the only difference is the degree of coverage. To preserve the pleasant color of a surface painted with water-based paint, you can use varnishes. But you need to use formulations with similar characteristics.
Water-based paint comes in different types, so each option requires a separate water-based varnish:
- Water-based acrylic paint requires a preliminary application of acrylic primer and then an acrylic-based water-based paint varnish.
- Silicone-based water-based paint cannot be varnished, since it penetrates deeply into the internal structure of the material.
- Acrylic water-based paint can be treated with medium-viscosity polyurethane varnish. The surface of the walls is easy to clean, the integrity of the coating remains for several years.
- Nitrovarnishes for water-based paint partially dissolve the composition, so they must be used very carefully. In addition, nitro varnishes emit toxins and are best used for outdoor use.
Alkyd varnishes can be used to coat wooden surfaces treated with alkyd enamels. If the wood is painted with water-based acrylic paint, then acrylic varnish is chosen to protect the coating.
The main rule of varnishing technology for various surfaces is that paint and varnish compositions must be included in the same group, that is, have the same characteristics of substances at the molecular level. The use of varnish has both a decorative and protective function, extending the life of products, objects and surfaces.
Care of the treated surface
The main problem with varnished walls is dust settling. A vacuum cleaner can be used to remove dust. Wet cleaning with a sponge and soapy water is also allowed. The walls are cleaned with the preparations specified in the instructions for the varnish.
Manufacturers of LKS produce products for the care of varnished surfaces:
- Clinker concentrators are used 1-2 times a week;
- Removers for removing heavy dirt;
- To renew the varnish, polishes are used 3-4 times a year;
- Reducers based on polyurethane dispersion (no more than once every six months).
Care, removal and correction
Of course, this coating requires special care. Today, you can choose any product from a wide range of products available on the industry market.
Here is a list of means and methods to combat pollution:
- The remover helps remove heavy plaque and long-dried dirt;
- The best way to remove dust is with a vacuum cleaner;
- A cloth soaked in warm water and detergent is needed for regular cleaning of the surface;
- Twice a week, the varnish must be treated with special cleaning concentrates;
- Polyurethane restoratives are used once every six months;
- Polish can restore the glossy shine of the coating.
If after some time you discover that your coating was done in bad faith, you can do the following:
- If gaps are detected, the poorly executed area is subjected to grinding.
- The prepared area is varnished. The main thing is that the layers at the edges are thin.
- A day after the varnish has dried, a glazing compound is applied.
Removing varnish from the surface and correcting application errors
Small flaws can be corrected by waiting 3 days to allow not only the surface of the film to dry, but also the deeper areas of the varnish. Small drips can be carefully cut off with a chisel by turning the tool with the chamfer facing up. Having cut off the scum, it is allowed to dry for a day. Then the coating is sanded with No. 320 sandpaper and the plaster is coated with varnish.
Around the gaps, the surface is sanded without touching the missed area, and varnish is applied, reducing the thickness towards the edges. A day later, after lightly sanding for leveling, a thin layer of glaze material is applied. If the surface has not yet completely hardened, you can correct the mistake by washing out the blemish with a solvent and glazing the area again.
Glazing a decorative plaster coating is a job that is often performed by beginners. To prevent the result from becoming a source of disappointment, you should follow the instructions and follow the advice of professionals. Then you will succeed, and brilliantly executed walls will be a source of joy for many years.
Final Recommendations
In general, the ability to absorb moisture is one of the positive aspects of gypsum. However, the intensity of this process may vary. Thanks to this, veins are formed on the surface, making the texture similar to natural stone. Painting gypsum products is not difficult. You can even do without plaster.
Tinting paste along with water and a brush is all that is needed for the actual painting. How to paint plaster: a color of one or several shades is diluted in water or white paint, mixed and coated with the product.
An acrylic primer or a corresponding type of paint can be combined with water. It is added in an amount of 30-50 percent of the total volume of other substances. Once the first layer is ready, you can use darker shades to go over the rest of the surface. Or use an option where the dye is contained in a concentrated form.
When processing, you can use not only brushes, but also sprayers. Even those that remain from cleaning chemicals or other types of paint.
Painting plaster at home is not such a difficult process. And there will be many advantages. For example, such work is easy to carry out at any convenient time, and the effect is exactly what the buyer needs. He can process every tile and every detail, only based on his personal preferences.
What paint to paint plaster figures (1 video)
Plaster in the interior (25 photos)
In what interior will glitter work?
Glitter paints are resistant to dirt and water, making them suitable for finishing rooms with high humidity or with strict sanitary requirements. With their help, it is easy to achieve the effect of pearlescent shine, golden, iridescent or metallic shine.
In the interior, glitter paint is used to highlight an accent wall or part of it, as well as to create transitions between surfaces.
The most successful design solutions:
- for the bedroom - emphasizing the wall or its separate part at the head of the bed;
- in the kitchen - design an apron that will diffuse light;
- in the living room and children's room - decorating a contrasting wall, free of furniture or located behind the sofa;
- coating with glitter is suitable for cornices, columns, building pillars, and openwork walls.
In what interior will glitter work?
The use of paint with a silk effect, gold or metallic sheen is a strong decorative element that will not leave anyone indifferent. It is worth considering this choice carefully so that the interior does not create too intense an effect. Below are some tips and solutions.
A glossy finish is recommended as an accent, for example by painting one wall:
- in the bedroom you can decorate the headboard of the bed with silk, this will make the headrest more noticeable and give it elegance;
- This is also a great idea in the kitchen or bathroom, a shiny kitchen backsplash diffuses light like a mirror;
- in the living room, a contrasting wall behind the sofa will look very impressive;
- If the room has a building pillar, cornice or openwork wall, there is no need to hide them; a shiny coating from an unwanted structural element will create a decorative highlight.
You can apply interesting patterns to walls or even furniture using a stencil.
Surface preparation
Application of the glazing composition can only be carried out after careful preparation of the walls for working. The preparation process consists of several stages:
- First, you should carefully inspect the walls, identify major defects, and then eliminate them.
- Small defects can be removed with a hard-bristled brush, and then thoroughly clean the surface with a sanding disc and a damp cloth.
- Areas with mold and fungal colonies should be treated with disinfectant solutions.
- Plaster can be applied to the prepared wall, and after the decorative coating has completely dried, you can begin glazing.
- Before glazing, you should wait until the decorative plaster has completely dried. For better adhesion, you can use a primer, but this is not a prerequisite when performing work.
How to calculate consumption?
To save money and correctly calculate the required volume of material, a preliminary calculation is carried out. Based on the cost per square meter, the amount of decorative mixture for the entire treated surface is calculated. You can proceed from the volume spent during rough finishing. The finishing layer is consumed in the range of 2–8 kg . You will need half as much of it as in the original version.
Interior finishing requires about 1–3 kg of mixture per square meter. Facade work for this amount is calculated with a margin. Consumption per square meter is indicated on the packaging. By calculating the area to be plastered, you can calculate the consumption for the entire area.
Affect the amount of mixture spent:
- Quality of building materials . The higher its performance capabilities, the higher the price will be.
- Correctly performed calculations . It is better to double-check your conclusions regarding the volume of plaster several times in a row.
- Prepared surface. In order for the finishing layer to fit perfectly on the wall, it must be cleaned of dirt. This will play a big role in saving material.
- Preparing the mixture. The main thing is to stick to proportions. Information is indicated on the packaging. Each manufacturer provides its own data for calculations, so you need to study them carefully.
- Correct application. It is important to carry out all actions strictly according to the instructions in order to save on the volume of the plaster layer and get an excellent result in the end.
Manufacturers
We bring to your attention the best manufacturers of brick varnishes. The products of these companies demonstrate the ability to withstand high temperatures, precipitation, UV rays and various chemical reagents.
Let’s conditionally put the German brand “Pufas” in first place. This is one of the oldest concerns in the world market of paints and varnishes; today its product range includes over 200 types of finishing materials.
Among the foreign ones, the American one stands out. Among our consumers, varnishes and impregnations for brickwork that create a “wet stone” effect are especially popular.
Speaking about Russian companies specializing in the production of paints and varnishes, let us mention the Neomid STONE trademark (also known under the Neomid brand). Among the required qualities of varnishes and impregnations, we highlight the following:
- Branded matte and semi-matte coating effects.
- Increased protection against moisture.
- Antifungal additives.
I would also like to note that all Neomid STONE products have no toxic odor, which makes them suitable for interior finishing work.
Another domestic manufacturer worthy of mention is. It specializes in the production of heat-resistant varnishes for treating brickwork of stoves, fireplaces, and fireboxes.
And our TOP 5 manufacturers of high-quality paints and varnishes completes. To protect the brick surface, several types of coatings are produced, including “Protexil” and “Epoxol”, as well as “Aquastone” and “Texil”.
Let us note that the above-mentioned Russian companies produce their products based on imported raw materials from such famous and others.
Ecodecor: how to repaint old furniture with chalk paint (step-by-step instructions)
Receive one of the most read articles by email once a day. Join us on Facebook and VKontakte.
In pursuit of a modern and relevant interior, all old furniture, as a rule, goes to the trash. But there are solutions that will help turn old furniture into a modern eco-interior item. This material contains step-by-step instructions from a successful Belarusian artisan, which will clearly show how to breathe new life into old furniture.
You will need: - acrylic enamel, - dry fugue, - colors, - varnish, oil or wax (to choose from), - brush, - foam roller, - masking tape, - sandpaper, - screwdrivers, pliers, - wood glue, - clamps , - laundry soap, - soda ash, - ammonia, - gloves, mask.
For an example of restoration of any old furniture, this material uses an old bedside table.
Shiny surface combined with texture
Shiny paint should not be used only on smooth surfaces. A very interesting effect can be achieved on a wall previously covered with textured plaster. The shine penetrates into imperfections, creating a real work of art that delights in an original way. The light falling on it is refracted many times, which, in turn, makes it avant-garde. In this case, you should avoid large surfaces and carefully select other accessories and equipment. Textured plaster can be painted with either varnish or paint.
Characteristics and Features
The final layer of plaster is called the finishing layer. Prior to this, a huge amount of work is being done to prepare the walls. They are cleaned of dirt and construction debris, then a preliminary putty layer is applied, which evens out differences and obvious flaws. Then the surface is puttied, dried well, a starting layer is placed on this base, on which the finishing layer will adhere.
Attention
The finishing plaster is applied with a thickness of about 2–3 mm. A larger layer is not required, since the surface is already quite smooth, ready for finishing.
Features of the finishing mixture during application:
- fills all unevenness, hides defects, evens out microcracks;
- withstands the slightest mechanical stress;
- transforms the surface, making it even and smooth.
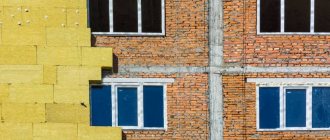
Finishing mixtures can be used for both external and internal work . The composition depends on its purpose: for interior work it does not contain additional components designed to protect the surface from external adverse environmental factors. If the plaster is used for exterior façade work, then such compositions must include protective components against:
- wind;
- moisture;
- insulation properties.
To insulate walls, you need to choose a sand-cement mixture with components that improve plasticity. To protect the house from moisture and wind, take a polymer mixture with an acrylic base.