A modern front door is not only protection from unexpected guests, but also an integral part of your home interior. Gone are the days when the owner was content with homemade metal doors, whipped up in the garage. After all, today factories offer high-quality products for every taste, with a huge variety of colors and shapes. And most importantly, for any wallet size. And along with the door, the question always arises: how to decorate the doorway of the front door.
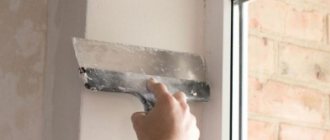
You can, of course, invite a specialist and entrust this matter to him. But if you are an enthusiast and are ready to overcome difficulties head-on, then it is better to take the work into your own hands. Moreover, following simple instructions with photos, you can make slopes for entrance doors no worse than famous craftsmen!
There are several options for finishing door slopes: installing plastic panels, crane panels, plastering the surface. They all have both pros and cons. Therefore, today we will look at the most practical, beautiful and easy-to-install type of slope cladding - plasterboard. So let's get started.
How to make plasterboard slopes or finishing options
For people who easily install drywall with their own hands, the scope of application of such an amazing material is expanding quite significantly. With the help of gypsum plasterboard you can give a perfectly smooth look to the walls and ceiling; you can easily make arches, niches, and cabinets. Even how to make slopes from plasterboard with your own hands will not be a problem.
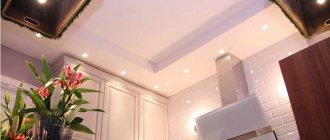
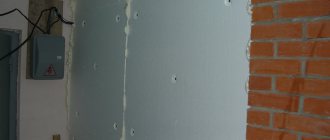
Completely ready option
Further
New design of interior doors: how to draw sketches with your own hands Do-it-yourself accordion interior sliding doors
Installing a lock on interior doors with your own hands
How to make interior compartment doors with your own hands Installing a handle with a lock on interior doors with your own hands Ideas for decorating an interior arch in an apartment with your own hands
Installing interior sliding doors with your own hands How to make slopes for doors. Selecting the material and designing it yourself from start to finish
Today, iron and metal entrance doors in houses have practically become a necessary element - they help a person to feel safe. However, despite the rather menacing appearance, the externally metal door does not look very attractive. In order to correct the situation, the door is finished with MDF panels. At first glance, cladding MDF doors seems difficult. After reading the article, you are convinced that decorating doors with MDF panels with your own hands is not a difficult process at all.
MDF is a medium-density wood-fiber board used for finishing the front door outside and inside. Suitable for cladding doors made of iron, metal and steel - even steel doors with MDF finishing look amazing, impressing the most demanding aesthetes.
Why should you give preference to this particular material?
- Wide choose. Modern manufacturers willingly please the consumer by providing us with numerous options with a variety of colors and textures. It is possible to finish with materials that imitate natural ones - thus, entrance doors with MDF finishing acquire an elegant appearance. Design options are widely presented in the photographs provided by the manufacturer - choose your unique option, completely transforming the appearance of the hallway.
- Durability. Wood-fiber materials will retain their presentable appearance and useful qualities for many years. They perfectly tolerate various mechanical loads and are not afraid of temperature changes and sunlight. Compared to upholstery made from leatherette (easily torn and fading before our eyes), MDF boasts a combination of beauty and practicality.
- Safety. The panels contain absolutely no substances that can harm human health, unlike some other facing materials.
- Easy care. No difficulties are expected - forget about expensive detergents, delicate procedures - you just need to periodically wipe the panels with a damp cloth. In addition, MDF does not absorb unpleasant household odors at all - no additional care is required.
- Ease of installation. It is possible to finish with MDF panels without involving specialists. All you need is the necessary tools and extreme accuracy, then finishing the MDF door will be quick and successful.
- Sound insulation and thermal insulation. The materials will provide you with a cozy, warm hallway - it is possible to add a layer of insulation on the outside.
- Acceptable price. Depends on the specific type of panels, however, in general, they belong to the average price category.
- Possibility to install slopes made of similar material.
Options for manufacturing slopes from gypsum plasterboard
In principle, there are quite a large number of options for making slopes from gypsum. But we will not consider them all - we are more interested in those that are most popular.
We have identified two options for these: attaching gypsum boards with glue to the base and securing them to the frame.
Fastening plasterboard slopes with glue
This is perhaps the easiest option.
- At the very beginning of work, it is necessary to prepare the foundation. This can be done in two stages:
- Clean the slopes from the old coating (plaster, paint, whitewash, etc.).
- Level the base.
- For gluing, a special adhesive for drywall is used, which can be found in any building materials store. It should be applied to the base at a distance of at least 10 cm. Otherwise, if you apply the glue in a continuous layer, you will have to wait a very long time for it to dry.
- If necessary, we insert insulation under the drywall between the window and the gypsum board strip.
Photo diagram of the sequence of work carried out
- Then we glue the cut gypsum boards according to the opening parameters directly onto the base slope.
- After 1-2 days, the glue dries completely and you can safely carry out the rest of the work.
- In particular, seal the holes on the sides with drywall putty.
Installation of plasterboard slopes on the frame
The question of how to make a slope from plasterboard is not much more complicated than this method.
- At the very beginning, we mark the final position of the horizontal and vertical slopes. We minus the thickness of the drywall and make another mark where the fastening of the guide profile will be located.
- It, in turn, is attached with self-tapping screws to the very edge of the perimeter of the window frame. A similar metal profile is attached to the base surface with dowels.
- In order to attach the profile to the window sill, you should use metal screws 25 mm long.
- According to the dimensions we measured, the cut-out gypsum board elements are mounted on the frame using 9 mm self-tapping screws.
- Before starting installation, it is best to blow out the inside of the slope (between the gypsum board and the wall) with foam.
- Then you should putty the side part and the attachment points.
- Then we prime the surface and paint.
As you can see, the process of making slopes from drywall is not very difficult. However, let's take a closer look at the most common type - for a window opening.
How to seal a hole in a wall with bricks
If you decide to move the door to another location, then you need to sew up the opening from the old door. This can be done using different materials.
Brick is a reliable building material that has good sound insulation.
It is used to seal openings in a load-bearing wall or for thick walls in an apartment. In addition to bricks, you will need sand and cement, and you can also additionally use thick wire to tie the structure.
All actions are performed in this sequence.
Before starting work, the opening must be cleared of all remnants of plaster and debris, and the base on the floor must be prepared. To do this, the floor covering is removed so that only the ceilings remain. In the walls on the sides, you need to remove a few bricks in order to later connect them with the masonry.
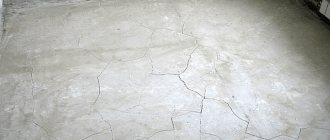
Mix a solution of sand, cement and water, and the proportion of cement should be larger, otherwise the solution will crumble and crumble.
Now you can start laying out the bricks. The bottom row is laid out as usual, and in subsequent ones, each brick is shifted by half a brick from the previous row. Between the rows you need to lay wire or reinforcement to tie the structure. Don't forget about the screed with the load-bearing wall.
The mortar is evenly distributed onto a row of bricks and leveled with a trowel. The mortar is spread not only between the rows, but also between each brick in the row. The thickness of the mortar in the seams should be 1-1.2 cm. After laying out 3 rows, the subsequent ones should be measured with a level.
The bricks must be laid out evenly, and to ensure that the wall does not fall out, a level is applied vertically to it. Brickwork is a reliable structure, with a high level of sound insulation, and is not inferior in strength to load-bearing walls.
Installation of plasterboard window slopes
Our simple instructions for installing window slopes in the form of a step-by-step plan will help you carry out all the work yourself.
Preparing the window opening
- We remove excess polyurethane foam using a knife both inside and outside the room.
- We carefully treat the opening with an antifungal primer.
- We seal the mounting foam with cement mortar. This will not only prevent destruction, but also eliminate through holes that could form where the foam does not fit tightly to the window opening.
Preparation for installation
Which is better: heated floors or radiators?
Warm floorBatteries
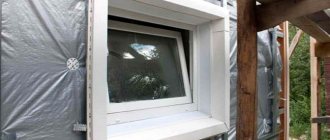
Advice! Pay special attention to the outside of the window. It is worth considering that gypsum board is not suitable for this side as a finish. Here it is better to use sheet polystyrene or plaster. By the way, to seal the slopes with plasterboard in the best way, the first option is preferable, since the slopes will be well insulated from the outside, which will not allow condensation to form on the outside of the wall.
Preparation
First we need a slope corner.
It will allow you to clearly glue a strip of gypsum sheet in a plane and at the same time maintain the level.
- Using tex we screw the corner to the new frame (pictured below). We direct its smaller shelf towards the window. The corner must be screwed around the entire perimeter of the window frame where you plan to install the slopes.
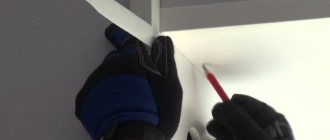
- We prepare GC sheets. To do this, using a straight and long strip and a knife, you need to cut the strip to the desired width. If they turn out to be a little larger, it’s no big deal – then we’ll cut off the excess with a knife or hacksaw.
- Preparing glue for drywall. Each package comes with instructions according to which the glue is diluted in water to the desired consistency. In order to avoid having to hold the strips with your hands for a long time, the glue composition should be thick enough.
Common misconceptions about drywall
One of the main misconceptions is the high risk of fungus appearing in the void that appears under the slopes.
All kinds of fungi and bacteria often appear in places with high humidity and not treated with an antiseptic. A door slope made in compliance with all standards does not pose a threat as a possible breeding ground for fungus.
Advice for everyone! When performing repair or finishing work indoors, it would be useful to treat the walls with a primer with an antiseptic or a special antiseptic composition.
Also, some people do not believe in the strength of drywall. In fact, drywall is a fairly durable material. Of course, with some effort, you can break a metal sheet, not to mention drywall, which is inferior in strength.
Fears about its low resistance to moisture are also wrong - there are special moisture-resistant models from which it is recommended to make plasterboard door slopes. Additional protection from moisture is also provided by putty and decorative finishing of the material.
But the simplicity of working with sheets of drywall and the ease of performing subsequent decorative finishing can significantly reduce repair time. The main thing is to know how to work with this material correctly and strictly follow the instructions.
Slope finishing
So, we have done all the preparatory work - it’s time to start learning how to properly make slopes from plasterboard.
You should start from the top of the window.
- We attach the finished strip to the slope corner using self-tapping screws (3.5 x 25 mm). If you have secured it quite well, then you don’t need to hold it with your hands.
Advice! If the strip width is more than 30 cm, it is best to use a support, or just one. This will be necessary to ensure that the plaster does not come off from the screws.
- In the free space between the strip of sheet and the window opening we insert mineral insulation. This is necessary not only to prevent heat from escaping from the room, but also to reduce the formation of condensation. And this will allow you to perform high-quality work, like making slopes from plasterboard.
- Apply glue to the front edge of the opening. It is necessary to fill the free space to a depth of 10 cm, and it is best to ensure that it is a continuous strip, without gaps.
- Press down the edge of the sheet strip as hard as possible. Using a level or a rod, level it.
- Remove any excess glue with a spatula. Leave to dry.
Advice! In order to find out that the glue has already hardened, just put your hand on the sheet. You will feel this because the glue heats up when it hardens.
Photos of window slopes made by hand
- After the last piece has been glued, you will need to wait a maximum of an hour. And then you can proceed to the next type of work - putty.
Painting
Painting slopes is quite a problematic task, especially when the surfaces are not puttied very well. Therefore, I strongly recommend that you pay due attention to the putty.
The slopes are painted with water-based paint. Matte paint is more suitable for painting
. For high-quality painting with glossy paint, you need to putty the surfaces as efficiently as possible and “eat the dog” when painting the slopes.
No types of brushes are appropriate here, because all the stripes will be visible. Just a roller! A roller with a width of 15-20 cm made of foam rubber or fleecy polyamide, or something similar is suitable. I like foam rubber ones better; they are easy to paint inside corners by simply pressing the roller into the corner. Any paint smudges should be avoided; any drops should be rolled out immediately. Typically, 3-5 coats of paint may be required for excellent results.
We make slopes for the door, possible options
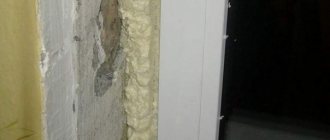
One of the most important aspects of any renovation is the installation of new doors. They are an integral part of the appearance of our house or apartment. At the same time, any, even the most beautiful door, can be ruined by slopes. If the outside of the doors is improved with the help of platbands, then the situation with the inside is much sadder. Here we see concrete, brickwork, fastenings and foam. To hide all these unflattering elements, it is necessary to create slopes.
Before and after creating slopes
It is very easy to make beautiful and reliable door slopes with your own hands. To do this, you need to know all the nuances of this process.
How to seal a doorway after installing the door
After you have installed the door, a sad picture will certainly appear before your eyes - the gap that has formed between the new door frame and the doorway. But don’t despair that your opening doesn’t look entirely attractive. Filling up an ugly, damaged area will not take you much effort or money.
And you can watch how the work on improving the opening is carried out on the Internet in a video. Despite the fact that you do not have much work experience, finishing with your own hands is possible for any person, because the work is not very voluminous and will require from you not so much experience as accuracy and a creative approach.
With the help of doorways, the entire room is perceived, and the perfect finishing of slopes and filling of cracks adds a finished look to your new door structure.
Methods for forming slopes
Door slopes can be made in several ways:
- just seal it with mortar and cover it with plaster. It is considered the simplest method, as it allows for better sound insulation and protection of the door frame. The slope will be monolithic and will not sag. But here it is impossible to open up in terms of design;
Plastered slopes
- finishing the opening with various types of materials. In this situation, the material is attached using an adhesive solution. Here you can use any types of materials, which allows you to create a unique and beautiful design. It is considered the most optimal for execution, as it is simple and effective;
Frameless finish
- manufacturing the frame and covering it with finishing material. This method involves the need to make a frame, and then cover it with your favorite material: plastic, drywall, MDF, etc. As a result, the slope is the most aesthetically pleasing. It is used if the two previous methods are very expensive.
Door slopes can be finished using any of the above methods. In this case, you can use different materials.
PVC panels are the best choice
This option is optimal, because this finish combines an affordable price, ease of installation and an attractive appearance. Manufacturers offer a variety of panel options to imitate natural materials; wood is especially popular. This material has a number of significant advantages:
Environmental friendliness. The surface of the panels has no pores, which prevents the fixation and development of fungi and mold on it
When it comes to the slope of the front door, this is important. Fire resistance. When compared with other popular materials - fiberboard and chipboard, then PVC products have a ignition temperature 100 degrees higher
Even if a fire occurs, the panel emits less smoke than the specified materials, which means it will not create an obstacle to exiting the room. Plus, PVC is a self-extinguishing material. Durability. The panels can withstand intensive use, temperature changes, and repeated washing. Ease of installation - attaching them to the wall will not be difficult even for a novice builder. The doorway takes on a finished look.
Slope options
The main task of the slopes is to give a normal aesthetic appearance to the doorway, as well as to securely fasten the door frame. They can be made from a wide variety of materials. What slopes to make depends only on you. The most commonly used in this situation are:
- plastic slopes;
- slopes from the Ministry of Internal Affairs;
- plasterboard slopes;
- wooden lamella slopes;
- cellulose panels.
Each of these materials has its own advantages and disadvantages. But plasterboard and plastic slopes have proven themselves best. Let's take a closer look at the advantages of drywall, since it is this material that today successfully replaces other types of finishing. Advantages of plasterboard slopes:
- versatility;
- reliability;
- flexibility;
- durability;
- the presence of several sheet options with different performance characteristics;
- speed of installation.
Plasterboard sheets
The best manufacturer of plasterboard sheets today is the German company Knauf. The products from this company are always high quality. They will give your repair reliability, strength and durability. Therefore, plasterboard, better than other types of finishes (including even plastic ones), is suitable for finishing a door reception. But in any case, no matter what types of slopes you decide to install, proceed from their practicality, efficiency and safety for the door frame.
Preparation for installation work
Before finishing door slopes with plasterboard after installing the front door, you should learn a little about the material itself and its features.
Today, drywall is one of the most common materials used for finishing work. It is difficult to find a more suitable material for installing slopes, given its performance characteristics.
And they are as follows:
- The material is very light. Drywall does not create a load on the doorway structure due to its low weight.
- Easy to process. It is cut with an ordinary construction knife, and you can even cut out shaped elements from it.
- Quite durable. Individually, the materials that make up drywall are distinguished by their fragility, but as part of the finished product they can withstand significant mechanical stress.
- Durable. Subject to operating conditions, the service life of drywall is decades, without changing its properties.
- Versatile. Allows you to bring to life even the most complex ideas for decorating a room. The resulting surface is perfectly flat, regardless of the shape of the base.
To the extent that you plan to install door slopes, it is recommended to opt for a moisture-resistant type of drywall. This is especially important when installing slopes in places with high humidity.
To make door slopes from plasterboard, you will need the following kit:
- Tools: spatula, metal brush, sandpaper, brushes, rollers, drill with attachments (or screwdriver), hair dryer, serpyanka, spatula. Depending on the height of the room, a stepladder may be needed.
- Finishing materials: primer, antiseptic, solvent, paint.
- Directly drywall and fastening materials.
Once all the tools and materials have been collected, installation can begin.
Required list of tools
In order to make door slopes as quickly and correctly as possible, you will need the following tools:
- knife and spatula;
- tape measure and pencil;
- building level;
- drill and screwdriver;
- hammer;
- hammer drill with attachments for working with concrete;
- a container in which a sufficient volume of solution can be mixed.
Tools
With this list of tools at your disposal, making slopes will not be difficult.
Problems that may arise when plastering slopes
During the work process, many nuances and questions arise that sometimes interfere with starting or finishing plastering. They may be caused by the following reasons:
- A poorly installed door or window. All operations performed by the contractor must be carefully monitored. If you notice a defect, it is better to correct it immediately. Otherwise, after some time you will have to dismantle the coating to eliminate defects discovered in a timely manner.
- The electrical cable is damaged. In older homes, wiring was often run under the frame of the front door or window. If the wire is damaged, it is better to immediately replace it with a new one to avoid electrical problems in the future.
- The temperature outside or indoors has dropped below the critical level for working with a particular solution. For gypsum mortars, the indicator should be from 10 °C and above, for cement mortars - not lower than 5 °C.
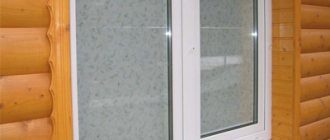
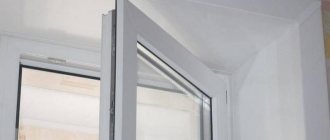
Photo 1. Window slope after installing a new plastic window
Conclusion - the reasons that prevent high-quality plastering must be eliminated and only then work can begin.
Carrying out preparatory work
Before you start making door slopes (plastic, plasterboard, etc.), you should carry out preparatory work. The preparatory stage is universal; it depends on the material and method of forming the door slopes. Let's consider preparing for installing drywall on the frame:
- We cover the door frame with masking tape or regular film. This will prevent damage to its structure;
- we clean out all the irregularities that may interfere with further finishing;
- then you should remove the mounting foam that protrudes above the level of the plaster. To do this you need to use a spatula or knife;
Slope surface preparation
- then you need to make holes in the concrete along the perimeter in 20 cm increments using a hammer drill;
- You need to drive dowels into the prepared holes and screw in screws. They should not be screwed in completely yet. With their help, adhesion to drywall will be much better, and the finishing itself will be faster;
- the working surface is swept away from material residues;
- prime the entire surface of the door slopes.
Note! To finish door slopes, you should use a primer that has deep penetration. It is better to use a surface primer only when the wall is made of loose material or foam concrete. The primer should be applied even if the frame is being formed, as it will prevent the material from crumbling over time. At the preparatory stage, you can lay a power cable for further connection of switches. This must be done when the material will be attached to the solution. When creating a frame, you can route the cable at the time of its installation. Some experts advise that in order for the preparation and further finishing to proceed correctly, display the outlines of the frame structure on the floor. At the installation stage, it will be much easier to navigate using these marks.
Final step: decorative finishing
When finishing the doorway from plasterboard sheets has been completed, you should proceed to the final phase of work: decorative finishing.
At the same time, you should not limit your imagination - drywall can be decorated with almost any materials used for finishing.
The most popular option is regular painting of drywall. The paint color should be chosen based on the overall design. Quite often, white water-based paint with a matte effect is used. The paint is applied using a roller, the corners are painted over with a brush.
The next, not so popular method is wallpapering. It is used to obtain a single ensemble with the walls, if, of course, it is possible to purchase wallpaper with a similar texture and pattern. Otherwise, you should opt for coloring. Or use leftover wallpaper from a previous renovation, if there is enough of it.
In addition, decorating the opening after installing the door is often done using plastic or MDF panels, artificial stone, tiles or textured plaster - the choice depends entirely on the imagination of the master.
Frame installation
Plastic, plasterboard or wooden slopes can be attached to the frame. But for this, the frame itself must be assembled correctly. The installation of a metal frame involves the following operations:
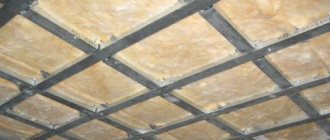
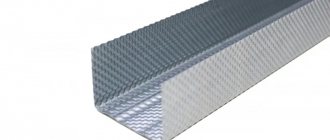
- We prepare the frame elements. These can be metal guides (the same as for finishing walls with plasterboard), wooden slats or bars;
- We attach the guide profiles to plastic dowels and impact screws;
- two profiles or slats should be attached along the entire perimeter;
- profiles or slats must be placed on both edges of the slope;
- to strengthen the structure, fastening bridges should be used, especially at the corners of the structure, at the top and bottom;
- the frame should fit snugly against the door frame.
Ready frame
At the end of arranging the frame structure, you need to lay power cables.
Option 2: installation without initial profile
The first method of fastening the slopes of plastic windows has a disadvantage: the U-profile is very clearly visible after installation. And if you consider that it is sometimes very difficult to choose the colors of the slope and profile...
That is why we recommend making slopes without an initial profile.
A slot in the foam - instead of the initial profile
1. Using a wallpaper knife, make a slot in the polyurethane foam around the window frame. It should be 1 mm wide and 1 cm deep.
2. After constructing the sheathing, insert the panels with a tenon into the resulting nest. And fasten the opposite end with screws as well.
3. If you use panels without fasteners, for example, sandwich panels, you can make the tenon yourself.
To make a tenon, the sandwich panel is first cut across with a wallpaper knife.
And then along - to separate the insulation and the bottom layer. A homemade tenon for attaching sandwich panels is ready!
On the side of the panel that will be adjacent to the window, draw a 1 cm wide strip. Then carefully cut along the line to cut through only the top layer and insulation. Make a slot at the end and remove the “excess”. So, your bottom layer will remain intact. This is what is inserted into the homemade groove.
Otherwise, the technology for installing slopes No. 2 is similar to technology No. 1. So don't get confused.
Have you insulated the slopes well, but the cold is still coming from the windows? So it's a matter of the latter. But don’t rush to change them, because plastic windows can also be insulated. Also on the website you can read about installing a window sill. In the article you will find step-by-step instructions for carrying out the work.
Do you want plastic slopes not to age? Wash them at least once a year – along with the windows. Read more in this article.
Installation of finishing material
Next comes the direct finishing of the frame with plasterboard sheets:
- we measure the dimensions of the guides along the perimeter (three sides) of the slope and cut the sheets to the required sizes;
Drywall cutting
Note! Cut the sheets carefully, following the technology, otherwise the edges will turn out uneven. First you need to cut through the top layer of paper. Then we tap the cut site on the back side to break through the plaster. Now you can cut through the paper on the other side. You should cut from the edges to the center.
- We make the upper guide to cover the entire width of the doorway, since the side slopes will rest on it;
- We fasten the sheets with LM self-tapping screws.
On the frame base you can make additional lighting or install switches in the doorway. If plastic, wooden or plasterboard sheets will be attached without a frame, but directly onto the plaster, then the following should be done:
- Beacon profiles must be installed on the surface that has dried after priming. Using them you can create a perfectly smooth slope surface;
Beacon profile
- beacons should be attached to the solution. It is best to use Knauf gypsum mortar. This solution sets very quickly;
- We install beacons in 2-3 places and check the level;
- then we fill the slope with a solution of cement and sand (the proportion is 1:4). The resulting solution should be thoroughly mixed. This will be easiest to do using a drill with a special attachment. Sometimes gypsum is added to the solution;
- We align the applied solution along the beacons.
Note! The applied cement-sand mortar must dry within 24 hours. On the dried surface you need to apply a layer of Knauf starting and finishing putty. Next, the working surface of the slope is leveled using an abrasive mesh. Now the surface of the door slope is ready for attaching plasterboard or other sheets. To do this, you should select an adhesive solution. The choice is made based on the finishing material you use, as drywall, plastic or wood require different adhesives. As a finishing material, we will consider installing drywall on an adhesive base:
- cut strips of the required size from the plasterboard sheet. It is not recommended to form plasterboard door slopes in separate small pieces;
- Apply the glue in an even layer. The best brands of glue are Knauf, Ceresit or Moment;
- apply glue to the strips of cut sheets;
- Carefully apply the sheets to the slope area and press slightly on it. You need to press until the material rests on the screw heads;
- We check the installed sheet with a level and, if necessary, adjust it to its position. This must be done quickly, until the solution has completely set;
- We seal the seams with putty (Knauf) and install the corners.
The final stage of finishing
Note! If there is a small gap between the sheets, it should be sealed with mortar. At this point, the finishing of the doorway is considered complete. You just need to apply the final touches (paint, stick stucco, etc.), and install trims if necessary. With the help of plasterboard, you can easily and simply make a door slope with your own hands, and the results of the work will delight you for many years to come!
How to treat the surface → Room decoration → How to choose the right paint → Surface treatment technologies → Leveling and finishing the walls → Selecting and applying a primer → Removal from the surface → Stretch ceilings and technologies → Reviews and testimonials
Installation on polyurethane foam
Fastening window slopes with polyurethane foam
You can seal the slope by fixing drywall with polyurethane foam. The sealing is very simple, but it is used if there are few defects on the slopes and the holes are small in size, up to 3 cm. For larger sizes, the defects need to be sealed with foam before installation; the correct method for sealing potholes is using cement mortar or a starting type of plaster. You need to sew it like this:
- Dismantle the old coating, remnants of plaster and foam. Next, large potholes are filled.
- When the holes are dry, polyurethane foam is applied to the drywall from the back side of the material. The foam layer is no more than 1 cm. The material is applied in the form of a snake.
- The plasterboard material is placed on the slope and pressed against it. The pressure on the drywall must be strong so that the foam adheres to the slope.
- After this, the drywall comes off, leaving foam on the slope and finishing material. After 10 minutes the foam will increase in size.
- The drywall is again mounted into the slope and pressed against the wall. If necessary, fix the material with spacers and leave it for up to 24 hours without continuing work.
- The next stage is sealing the drywall seams on the slopes using plaster.
Puttying a window slope
The disadvantages of this design of door and window slopes are quite large. The biggest disadvantage is that the surface will first need to be leveled, otherwise the sheet of drywall will not work. Drywall on slopes may bend during installation. There are voids left on the door/window slope, making the fixation not very reliable. But this is the fastest method for finishing slopes with plasterboard. When a window or doorway is covered with plasterboard, using any described method, the opening is finished with various materials. But before finishing the slopes, you need to do the following:
- The slope is puttyed with a thin layer.
- On the outside of the opening, protection is placed and a corner is formed using a plastic perforated corner, which is covered with putty.
- Another layer of putty is laid down to completely level the surface.
- Finishing material is selected.
Advice! Painting is used for decoration; you can paint it in any color, for example, the color of a door or window, wallpaper in a room, or use standard white paint. Photos on the Internet will help you decide on your choice; a bay window in an apartment in different colors looks very nice.
Painting is not durable, so for part of the slopes a panel type of material is used, for example, plastic for slopes, instead of plasterboard, PVC panels and other materials, this is a good material, made according to GOST, and is distinguished by its durability. The video shows step-by-step work with drywall; you can use the method for doors and windows:
What material to choose for constructing slopes?
There are many options that allow you to make the front door slopes yourself.
Plaster. This finishing material is used everywhere. It must be taken into account that this option has the lowest cost. All work is carried out independently, without the use of special tools. More recently, this method was one of the main ones, but recently its popularity has begun to decline. There are many reasons for this, among which stands out - not the most beautiful visual appearance. Of course, this state of affairs can be easily corrected if you use decorative and textured plaster.
Drywall. The popularity of gypsum boards is only growing. This material allows you to complete all work quite quickly. But this is true for large areas. If you only finish the slopes of the front door from the inside, then there will be a need for additional manipulations. The fact is that during installation, numerous cracks (joints) appear that need to be filled with putty.
MDF panels. This includes laminate flooring. Such products are excellent for finishing work. The panels are installed very simply, the resulting surface has an excellent decorative appearance. But there is one drawback: if the width of the opening is greater than the material used, then it becomes necessary to join. Laminate creates less noticeable seams, but they also impair visual perception.
Natural wood. Of course, making door slopes using natural wood is a rather expensive procedure. But we must not forget that the result is a very beautiful coating that has unlimited durability. If necessary, restoration work can be carried out. All activities must be carried out in compliance with numerous technological nuances.
Laminated chipboard materials. This option allows you to veneer even very wide openings. Many people mistakenly perceive laminated chipboard as exclusively a material for making furniture. In fact, thinner sheets are used for cladding areas adjacent to the front door, which have very impressive characteristics.
PVC panels. Plastic slopes are an option that is more suitable for working with window openings. The fact is that this type of product often comes into disharmony with the material of the entrance structures. Of course, modern technologies make it possible to choose a suitable solution, but this is not always possible.
Decorative stone and brick. There is an opinion that this method is rapidly going out of fashion. In reality, the situation is not so sad. This material allows you to obtain an individual and reliable surface. Please note that laying out the parts will require a lot of time.
Many craftsmen point out that in the future it will be very difficult to complete finishing work on the walls. After all, to work you will have to use a limited set of options
So, for example, cladding with any types of panels will be difficult - they are difficult to fit under the masonry.
Extras. This material is most suitable for mounting slopes on interior doors. A box of such designs assumes the use of this option. Therefore, door manufacturers are developing a whole line of extensions that are completely identical in color and texture to the door leaf.
Reasons for carrying out work
How to finish the slopes of the front door? This question always arises when there is a need for this kind of finishing. There can be many reasons for this work:
Installation of a new structure. This is the most common situation. During installation work, adjacent areas are destroyed. It often happens, especially in old houses, that the old layer of slopes completely crumbles, because they are made of plaster. It must be taken into account that the new door must be installed correctly, without distortions, in order to eliminate subsequent repair work.
The appearance of defects. Over time, any finish becomes unusable. The same situation occurs with slopes, especially if they frame the entrance opening. Cracks, shedding, and traces of mechanical impact appear on the surface
It is very important to assess the situation in time in order to install new door slopes without unnecessary work.
Changing the general appearance of the room. Indeed, new cladding of entrance and interior doors with your own hands is necessary when the design of adjacent rooms changes
Sometimes it seems that the door slope is an area that does not affect the overall appearance of the interior. This is a mistaken opinion, because even such a seemingly insignificant detail plays an important role.
Options for finishing entrance door slopes