Despite the modern abundance of various building materials, wooden houses remain traditional in almost all regions of Russia. From time immemorial, their log houses were erected in both urban and rural areas. Nowadays, the possibilities of using wood have expanded significantly - today, processed timber is widely used for the construction of residential buildings, frame structures made of lumber and plywood or chipboard (OSB) are used.
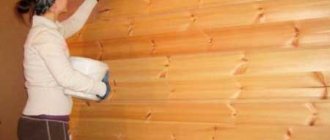
Painting a wooden house inside
Every home owner, when choosing natural wood or materials based on it to build a house, wants it to retain its original qualities for as long as possible. Therefore, painting a wooden house inside, as well as outside, is a mandatory process to create conditions for long-term operation of such buildings. In addition, this significantly expands the horizons in the possibilities of both external and interior design.
Reasons for the need to stain wood
Why is it generally necessary to treat wood with various paints and varnishes? It would seem that the natural texture of wood is attractive in itself, and in most cases there is no particular need to embellish it? And all this is due to the fact that impregnation and painting of wood is capable of preserving its physical and aesthetic properties for the longest possible time, such as integrity, strength, warmth, environmental friendliness of the material and the beauty of its textured pattern.
As you know, the first enemy of wood is moisture, which, when it penetrates the structure of the material, has a destructive effect on its fibers. As a result, they swell and deform, losing elasticity and strength. Inside a house with damp walls, various fumes that are unpleasant for the senses inevitably dominate, which easily permeate the structure of the wood. In addition, dampness always “kicks off” the biological decomposition of wood, causing the appearance of mold and blue stains, which, in turn, in addition to creating an unhealthy atmosphere in the premises, also weaken the strength of the building material.
Paint and varnish products, as well as special protective compounds, are primarily designed to protect wood from negative external influences and preserve its structure from destruction. And, of course, the task is always to preserve the aesthetic texture of the wood unchanged or to decorate it in accordance with the intended interior design.
Paints used for interior work
Painting of timber inside a house is carried out using painting materials that differ significantly in technical characteristics from façade paints. To cover internal wooden walls use:
- Wax. It protects wood well from moisture, increases its service life, gives the surface shine and a pleasant appearance. But the cost of this material is quite high.
- Mastic. The material is used to level the surface. The wood acquires a velvety structure, thanks to which the natural grain of the wood is visually enhanced.
- Varnish. The material makes the surface smooth, but does not allow the walls to breathe. It is better to use it in rooms with low humidity.
- Acrylic, alcohol and oil paints. The saturation of color pigments allows you to eliminate defects, and the variety of color palettes will be a good option for creating an interior of any type.
Each composition solves its own problems, so the choice of material for surface finishing must be carefully considered.
Materials for preparing and painting wood for interior decoration
Solutions for preparing wood for painting
The entire process of preparing wooden interior wall surfaces for painting consists of three stages - cleaning, sanding and treatment with protective agents.
Before moving on to the characteristics of paint and varnish decorative compositions, it is necessary to first consider solutions designed to protect wood from negative influences that destroy its structure, such as high humidity and ultraviolet rays, from damage to the material by various harmful insects, mold, fungus, moss and other parasites representatives of microflora. Some solutions include not only antiseptics, but also fire retardants, which are designed to significantly reduce the risk of wood fire in the event of emergency fire situations.
So, before painting, the wood must be treated with special antiseptic agents.
When purchasing a solution for primary wood treatment, be sure to pay attention to the permissible area of application of the composition
When purchasing one of the protective solutions available for sale in a fairly wide range, you need to pay attention to the packaging label (label). It must indicate the area of its application, that is, a specific composition is intended for internal or external work.
Protective compounds can be transparent, preserving the completely open texture of the wood or giving it a glossy brightness or soft matte finish. However, there are also tinting solutions that make the material one or more shades darker.
There are several types of different solutions that can be intended to protect against various negative influences on wood - these are conventional and biomoisture-protective antiseptics, fire retardants, bleaching and primer compounds. To understand how they differ, it is advisable to consider each of them. This will make it easier to make the right choice.
Prices for wood antiseptic
antiseptic
- Antiseptic solutions are designed to combat fungus and mold that have appeared on wooden surfaces, as well as to prevent the formation of new formations. These compositions, in turn, are also divided according to different criteria.
An example of a high-quality antiseptic with a tinting effect.
So, you can find two types of antiseptics on sale - impregnations and coatings:
— Impregnations are designed to penetrate deeply into the wood structure. When purchasing this version of the solution, you need to carefully study its composition, since some of these treatment agents are very toxic;
— Coating solutions create a film on the surface of the wood and protect it from moisture. They are especially relevant for covering walls in rooms with high humidity, for example, in a bathroom or bathhouse.
Antiseptic solutions are produced on different bases, and according to this criterion they are divided into the following:
— Water-soluble compounds are environmentally friendly, so they are excellent for treating indoor walls. They are usually used under paints that are also water-based. A significant disadvantage of such antiseptics is that over time their protective qualities decrease.
— antiseptics made on an organic basis have high protective properties. However, they are more suitable for the facades of wooden houses, since they contain toxic components and are also unsafe in terms of flammability during application and before drying.
— Oil solutions of antiseptics are most often used for facade surfaces, wooden cladding of a balcony or loggia, especially if the house is located in a region with a harsh climate.
— Combined solutions consisting of oil and high-carbon components are used to treat both external and internal wooden surfaces. Moreover, they are also suitable for rooms with high humidity, providing their surfaces with high-quality protection.
The last option of antiseptics is the most expensive, since, in fact, it becomes a universal remedy used in any areas of construction and finishing.
- Biomoisture-protective antiseptics are used as an effective measure of protection against fungal growths, mold and insects harmful to wood. This type of antiseptic creates a protective barrier on the surface of the wood and also serves as a decorative coating. Therefore, the biomoisture-proof solution can be called universal, since it performs two functions at once.
One of the means for effective bio-moisture protection of wood - but it is more suitable for outdoor work.
Thanks to these properties of the antiseptic, not only money will be saved, but also time for painting. It is these solutions that are in high demand among owners of wooden houses.
- Fire retardants are used to make wood more resistant to fire, that is, material treated with such a composition is able to withstand exposure to open fire for a long time without igniting.
The main disadvantage of wood is its low resistance to fire, and treatment with fire retardants helps reduce the risk of fire.
Fire retardants are divided into two groups according to their reaction to fire:
— One group of solutions contains salts, due to which, when wood is exposed to high temperatures, gases are released that can prevent rapid combustion.
— The second group of fire retardants blocks flames by foaming, which occurs when wood is heated to elevated temperatures and creates a protective coating on it.
More effective fire retardants, according to experts, are those that contain sodium salts, as well as orthophosphoric, pyrophosphoric and tripolyphosphoric acids.
- Biopyrenes are impregnations that combine the functions of both a fire retardant and an antiseptic. Similar solutions can be used to treat walls from the inside and facade.
Binary action impregnation - provides both biological and fire protection for wood.
Due to the fact that this product is a complex consisting of all the components necessary to protect wood, using it you can save some money, time on work and on waiting for several different layers to dry out. solutions. So the costs are likely to be justified.
Biopyrene prices
biopyrene
- primer is another effective protective agent used for preparatory work before painting. These solutions are not only designed to prevent various manifestations and effects destructive to wood - they also create good adhesion between the surface of the wooden wall and the applied decorative layer. Water-based wood primers can be transparent, translucent or opaque. According to this criterion, they are selected depending on what effect is planned to be obtained as a result.
The use of primers greatly simplifies the subsequent process of applying paints and varnishes.
For example, if you plan to paint primed walls with a thick layer of paint, then it does not matter what kind of transparency primer to cover the wood with. In this case, rather, you only need to take into account that an opaque version of the soil will give a smoother surface. Transparent compounds work like impregnation, penetrating the structure of the material and filling its pores, but they do not have the property of creating a protective layer on the surface of the wood.
However, whatever primer is used, it creates a good base for the wood and paint to adhere to.
- Wood bleaching products are used to remove various manifestations from its surface that spoil the appearance of the entire wall - these can be blue, streaks or dark spots. Simultaneously with the removal of the above-mentioned flaws, these compositions also perform a protective function.
When using bleach, you must strictly follow the instructions provided by the manufacturer.
Bleaching solutions can be one- or two-component. The second version of the compositions is combined and mixed immediately before applying them to the wood. The formulation of some of the products provides for them to be washed off after a certain period indicated on the packaging, while others remain on the wood for painting as an antiseptic. Therefore, before purchasing one or another type of bleach, you need to pay attention to the packaging, which contains instructions for using the solution.
Varnish as a protective and decorative agent
As a protective agent for wooden walls, in addition to the above mentioned products, varnish solutions are used, which can also be made on various bases. To know which of the existing varnishes are suitable for indoor use, you need to consider each of them in more detail:
Varnishes are one of the best means for protecting and at the same time decorative coating of natural wood.
- Acrylic varnish consists of polyacrylates and is organic or water based. The solution is an environmentally friendly product without a pungent odor, and therefore it is often used to cover the surfaces of not only wooden walls from the inside, but also furniture.
Acrylic varnish - fits perfectly on the surface of wood, but, unfortunately, is not resistant to abrasive loads.
However, it must be taken into account that the layer formed by this type of varnish is not highly resistant to abrasion. This means that the coating will have to be updated quite often, and this is especially true for furniture accessories.
- Polyurethane varnish is made on a water basis, but despite this, it has high strength characteristics, including abrasion resistance. The composition of this protective agent is environmentally friendly and almost completely odorless after drying, so it is perfect for application to wooden walls inside the house.
Polyurethane varnish is highly resistant to abrasion - it is suitable even for wooden floors.
Some experienced craftsmen recommend adding hardening agents to the polyurethane solution to extend the life of the finish. Due to its high strength characteristics, this varnish is often used to cover wooden floors and parquet, so it is also fully suitable for walls. However, the price of these products is quite high, and this factor is the main disadvantage of this material.
- Alcohol varnishes and polishes can create a durable glossy layer on the surface of wood. However, despite their high strength, compositions based on this basis are not resistant to moisture, so they cannot be used to cover walls in bathhouses, loggias and balconies, as the coating layer will begin to peel off.
Varnishes are made based on natural resins, so their prices are quite high. This circumstance, coupled with low moisture resistance, determines that such compositions are not in high demand.
- Nitrocellulose varnishes consist of organic solvents and cellulose nitrate with the addition of synthetic resins to the solution.
Nitrocellulose varnishes are durable and quick-drying, but extremely flammable and have a strong odor until completely cured.
This type of varnish is divided into two varieties:
— One of them is intended for preparatory work, that is, it creates the basis for the outer layers.
— The second one is itself a decorative coating.
They are distinguished by the digital markings applied to the packaging. Typically, preparatory solutions have the property of drying quickly - this quality is provided by the manufacturer to avoid delays in the work. Therefore, when purchasing this composition, you need to pay attention to the instructions printed on the packaging with varnish.
Nitrocellulose solutions create a fairly durable coating layer on the surface of wooden walls, which is transparent and therefore does not change the natural color of the wood. Therefore, if you intend to preserve the beautiful textured pattern of the internal surfaces of wooden walls, then this type of varnish is well suited for this purpose. True, it is necessary to work with such compositions with special caution - they are extremely flammable in their uncured form (before the nitro solvent evaporates), and will emit a pungent odor before drying.
- Oil varnishes are made on the basis of artificial or natural resins; in addition, they also contain modified natural oil, driers and solvents. Varnishes of this type penetrate well into the wood and form a durable protective layer on its surface, giving the wood a warm ocher tint.
The solutions are well suited for interior finishing work; they cover wooden walls, floors, and furniture.
- Alkyd varnish is made on the basis of glyphthalic or pentaphthalic resins, to which driers are added. Since this type of varnish contains oils used as solvents, they are also often called oil-based. However, the alkyd version of varnish differs from oil varnish in its higher physical, technical and operational characteristics, so it is successfully used not only for interior but also for exterior decoration.
Some of the most popular and affordable varnishes are pentaphthalic-based alkyd varnishes.
In addition to alkyd varnishes, alkyd-urea solutions consisting of alkyd and amyl-formaldehyde resins are also available for sale. This type of varnish can be called two-component, since its drying is only possible when acidic hardeners are added to the mixture. This varnish is mixed immediately before applying it to the surface of the wood, since after preparation the solution remains suitable for a very limited time, and after it has hardened it will no longer be possible to dilute it.
This type of varnish is easy to apply and, after hardening, forms a durable protective layer on the surface that is highly wear-resistant. Thanks to this property of alkyd-urea varnish, it can be used not only for covering walls indoors, but also for covering parquet.
Paints for finishing wooden walls
In order to paint the inside of a wooden house, paints made on any base are suitable. Nowadays, various types of this material are presented in specialized stores in a very wide assortment. And one of the most important criteria when choosing a composition should be its safety, that is, the paint should not emit harmful toxic substances both during its application and during use of the premises.
Therefore, when purchasing any paint and varnish material, you need to pay attention to its characteristics, which should be presented on the packaging. In addition, it is recommended to obtain information from a sales consultant.
So, in specialized stores today you can find the following paints for finishing wooden surfaces:
- Water-based compositions are quite popular, since with their help you can cover the wood with a thick layer of paint, or you can make it translucent, thereby preserving the textured pattern of the wood. If the latter option is chosen, the paint must be diluted with water to the required consistency.
Water-based paints are attractive due to their low price and versatility, but are not durable - they cannot withstand abrasive loads.
Water-based solutions are distinguished by the absence of a sharp unpleasant odor and the fact that they do not emit toxic fumes harmful to humans. Therefore, they can be safely called an environmentally friendly material. The layers applied to the prepared surface set well and dry quickly, but are inferior to varnishes in their strength and wear resistance.
Prices for silicone paint
silicone paint
- Silicone paints are a solution of silicone resins, and thanks to them, they create a reliable and durable coating on the surface of wood. The paint composition has excellent technical characteristics, it is inert to mechanical stress and has good vapor permeability, that is, it allows wooden walls to “breathe”.
Some of the most durable and practical to use are silicone paints.
Moisture-resistant silicone film is resistant to abrasion and ultraviolet radiation. The applied coating is distinguished by enviable durability and is not only protection for the wood, but also a way to hide some flaws on its surface. The coating does not crack when the walls shrink, as it has good ductility.
- Silicate paint compositions are made from “liquid glass”, and therefore have a large number of positive characteristics. They are highly resistant to ultraviolet rays, high humidity, low and high temperatures, as well as open fire.
Silicate paints have a very beneficial effect on the atmosphere in the house, due to their environmental friendliness and high vapor permeability.
Silicate paint is an environmentally friendly product, since it does not contain substances harmful to humans and does not emit toxic fumes. Therefore, this type of material is excellent for covering internal surfaces, not only wooden ones, but also those made of other materials. Considering all the characteristics of this finishing material, we can conclude that it is well suited for rooms where conditions may arise that increase humidity, for example, an unheated balcony or veranda.
True, silicate compositions are completely incompatible with finishing solutions made on a different basis. That is, in case of repainting, it is necessary either to use silicate paint again, or to clean the surface to the very base.
- Acrylic paints are water-based, but have characteristics that exceed those of oil-based compositions, and therefore are able to provide reliable protection to wood and preserve its natural color. Due to their elasticity, paints have excellent adhesion to surfaces; they do not deform or crack.
High-quality acrylic paints are an excellent solution for interior decoration.
Paint can be used to paint both internal and external surfaces of a building.
- Alkyd enamel is used for painting both facades and interior wall surfaces. It creates a protective glossy or matte layer on the wood, making it smooth and aesthetically pleasing.
However, this composition also has its drawback - over time, alkyd white enamel turns yellow, and paint that has color fades, so to paint walls, for example, a balcony located on the sunny side, or that constantly receive a “portion” of sunlight, use it is not recommended.
- Oil paints have a considerable number of advantages over other compositions and are suitable for both internal and external coating of wooden surfaces. High-quality solutions are highly resistant to external mechanical influences and high humidity.
The obvious disadvantages of oil-based paint compositions include their long drying period, low resistance to ultraviolet radiation (over time, the coating begins to crack and peel) and air tightness. This type of paint is most often used to cover facade surfaces, but even then - with fairly frequent updating of the finish.
- Natural wax paints or liquid wax are made on a linen base and have been used to coat wood for decades, so they can be called a traditional material. Wax is well absorbed into the wood structure, making it waterproof.
Wax paints - create a pleasant matte wood surface, well protected from moisture penetration.
The solution can be transparent or tinted. If you plan to preserve the original color of the wood, then choose a transparent wax option, and if you need to darken the wooden walls, then you should use a tinted solution. Wax paint is easily applied to the surface, but acquires the chosen shade only after complete drying. Therefore, it is recommended to first apply a similar composition to a small area of the wall and wait for it to dry to make sure that the optimal paint tone is chosen.
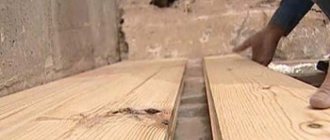
How to paint profiled timber
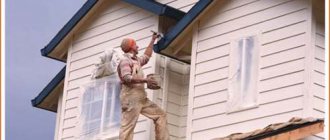
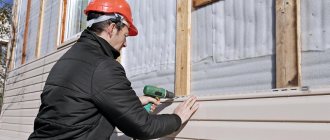
Profiled timber is a material that is often used in the construction of wooden buildings. It has good workmanship. Painting the facade of a house made from this material has its own characteristics.
Since profiled timber undergoes additional grinding in production, it has a smooth surface. Therefore, there is no need to carry out preparatory work to level the surface. But you will need to treat it with an antiseptic as quickly as possible so that the fungus does not settle.
Applying a primer is essential as it allows the paint to bond better to the surface. It is better to paint laminated timber with oil or acrylic paint. You should not use water-based compounds, as numerous stains remain on the surface.
It is worth saying that you should not delay with the facade work of wooden houses, as they can quickly lose their attractiveness. Paint not only allows you to preserve the natural beauty of a wooden frame, but also protects you from the harmful effects of precipitation and microorganisms.
Useful recommendations for purchasing paint and painting
When choosing and purchasing paint for the interior decoration of wooden walls, it is very important to pay attention to the date of manufacture of the composition and the availability of certificates confirming its quality and sanitary compliance. If the seller cannot provide documents for the product, and the production date is not stamped on the packaging, but is written on paper and pasted on top, so to speak, interrupted, then it is recommended to immediately refuse to purchase such paint, especially if a fairly expensive version is purchased.
The fact is that if the paint is expired or frozen, then it may simply not lie on the surface, even if it is well prepared, and you can determine the quality of the composition only by opening the package and trying to apply it to the wood. For example, it will not be possible to paint anything with a frozen solution, since the paint will most likely curdle and have the consistency of liquid cottage cheese.
High-quality paint should spread easily over the surface of the wood, while having high hiding power
If the paint is of high quality, it will be easily applied to the surface, which means that painting the walls can be done by a person who has never even performed such repair work before.
Next, it is worth considering those factors that will directly affect the final finishing result.
- First thing to note. It is a common phenomenon that many homeowners, when doing their own renovations in a house or apartment, are careless about the preparatory stage of work, since they consider it unnecessary. However, if the base for the decorative coating is uneven and untreated with protective agents, you should not expect the desired result. In addition, after a short time, even defects that are invisible immediately after completion of the work will begin to appear, for example, such as blue discoloration, blackness of the wood, or “resin pockets” near knots. Therefore, the preparatory process must be considered mandatory and carried out as efficiently as possible.
- When treating wood with one of the protective compounds, it is necessary to very carefully process the end parts of logs or beams if they face the rooms. If the walls of the house are covered with clapboard, then its side surfaces should also be carefully treated with antiseptic solutions.
- All protective and coloring compounds are applied to wooden surfaces in thin layers along the grain, otherwise their absorption into the wood will be uneven, which will negatively affect the overall appearance.
This simple “improvement” from ordinary rubber rings will greatly simplify the process of applying paint with a brush from a can.
- To ensure that there is no excess paint on the brush, and that it does not flow, but lies flat, it is recommended to use a simple device consisting of two stationery or ordinary rubber bands. One of the rubber bands is put on the bottom and top of the can, and the second along its diameter. The second elastic band will hold the first one, preventing it from sliding to the side.
After dipping the brush into the paint, press it against the stretched rubber band, leaving excess solution in the container.
- When applying paint to the surface of wood, do not try to cover it with a thick layer at once, as the painting will turn out sloppy. If you plan to get an opaque surface, then you should apply the paint in several thin layers, each of which should be applied after the previous one has completely dried.
- When painting walls covered with wooden clapboards, it is best to apply the final top coat starting at the top and gradually moving down - this method will help make the surface of the wall smooth.
- Paint can look different in a can and on the wall, so it is recommended to do a test paint job, that is, apply the solution to a small section of the wall in an inconspicuous area. It is best to choose the lower corner part of the surface.
- In order for the decorative layer to lie evenly on the surface, experts recommend adding a color to the primer that is one or two tones darker or lighter than the base color.
- The optimal temperature for painting surfaces is 22÷25 degrees. You should not carry out this process in hot weather, as the paint will dry too quickly and therefore unevenly. If the temperature is too low, the fluidity and hiding power of the compositions deteriorate, and the drying period increases.
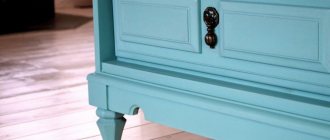
With bright window frames
Windows are traditionally considered the eyes of the house.
Frames, shutters, and slopes give the facade a finished look and make it more neat. Traditionally, window frames are white, less often they leave a wood grain or are darkened. Painting the trims red, purple, yellow is a bold move, but very interesting. At a minimum, the facade will attract the eye.
Step-by-step instructions for painting a wooden wall indoors
By adopting all the little tricks listed above, it will be easier to cope with the preliminary stage and painting the walls. Having prepared all the tools and workplace necessary for the process, you can proceed to the finishing itself.
The “lion’s share” of the total amount of work in the process of painting wooden walls is always occupied by the preparatory stage
The main part of the work is preparing the surface for painting, which is why they require a more detailed description.
| Illustration | Brief description of the operation performed |
| For preparation and painting, you need to have at your disposal some of the tools shown in the illustration. In addition to them, you will need a grinder with replaceable abrasive paper blades and, possibly, a grinder with an iron brush. If the wooden wall has an old coating, you can use a hair dryer and a scraper (trowel) to remove it. | |
| The first step is to clean the surface of the old paint coating (if there was any). To do this, the paint layer is heated until it softens and peels off from the wood, and then is removed with a scraper or spatula. This work is quite time-consuming and labor-intensive, but it must be done efficiently, otherwise the remaining paint will appear through the new decorative layer as unaesthetic irregularities. | |
| If the wall does not have an old coating in the form of a paint layer, but has acquired an unrespectable appearance during use, or wallpaper has previously been glued to it, its surface must be thoroughly cleaned by removing the top thin layer of wood. | |
| Restoration of such a surface is carried out using a grinder, on which a brush with soft metal bristles is installed, and then a grinding machine with first coarse-grained (P80÷P120) and then fine-grained (P150÷P180) sandpaper attached to it. In addition, cleaning the wall or its individual areas protruding above the general surface can be done using an electric plane. | |
| When the wood is cleaned, its surface should be sanded with a fine bristle brush or sandpaper. In the case where a wall made of new wood is being prepared for painting, it also needs to be sanded smooth. Cleaning and polishing difficult places, for example, between two logs of a log house, can cause a lot of difficulties. But here, as they say, there’s nothing you can do—you’ll have to “sweat” if you want to get a high-quality result. | |
| If you don’t have a sanding machine, you will have to sand the walls manually - this is a very difficult and time-consuming process, so it’s still better to purchase a specialized tool, since it will come in handy more than once in a wooden house. The sanded surface must be cleaned with a vacuum cleaner to remove any dust generated during the sanding process. | |
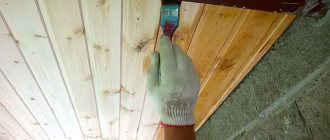
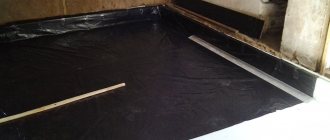
| The dust-free wooden surface is then coated with one of the selected protective agents - it can be an antiseptic and fire retardant, or one of the compositions described above. This operation can be carried out using a roller, a wide brush or a spray gun, depending on the topography of the wall and its area. If it is log, then the work will go faster if you carry out this process using a sprayer. At the same time, we must not forget about the need for increased precautions - many protective primers are very toxic before absorption and drying. | |
| As a preparatory, and sometimes even the main decorative layer, one of the types of varnish is used, which is applied with a wide soft brush. | |
| If, after the primer has dried, you plan to apply paint or a dark tinting varnish to the surface, then you should protect the ceiling from contact with the solution. To do this, it is recommended to stick masking tape onto the ceiling along the upper edge of the wooden wall, which can be easily removed upon completion of the work and will not damage the plastered or painted ceiling surface. | |
| To paint wooden walls, you will definitely need a soft brush and roller. The roller will significantly speed up the work, as it covers a large area of the wall at once and evenly distributes the paint solution over it. True, this is only possible on flat surfaces - when painting a log wall, a roller will not be a great help. | |
| A brush is needed for painting hard-to-reach places, for example, corner areas or horizontal joints between logs. It is recommended to paint in two or three approaches, but each layer must cover the entire area of the wall, otherwise the paint will lie unevenly. Each subsequent layer is applied only after the previous one has completely dried. |
So, the process of painting wooden surfaces in a house is a very labor-intensive, large-scale task, which, however, any owner must cope with. And for successful work, in addition to your own desire, you must:
- Have the necessary tools of good quality.
- Select and purchase high-quality primers and paints for preparing and painting surfaces.
- Carefully, without simplification, carry out all the preparatory processes, without convincing yourself that “it will do.”
- Do the painting without rushing and without trying to complete it in one go, that is, do not apply the paint in one thick layer - this approach will result in nothing but drips, overuse of paint and a sloppy surface.
If you strictly adhere to all these conditions, the coloring will definitely turn out the way it was originally intended, that is, neat and uniform, and the finish will last as long as possible.
And at the end of the publication, we invite you to watch an informative video in which the master tells and shows how to properly paint the inside of the walls of a house made of natural wooden beams.
Preparing for painting
Before painting a timber house, you need to prepare its surface. Main stages of preparation:
- cleaning from dirt or old paint;
- removing significant irregularities using an electric planer;
- thorough sanding of the wood surface;
- removing settled dust, dirt and shavings from the surface of the timber using a construction vacuum cleaner. Pay special attention to joints and cracks.
Sanding the walls of a timber house before painting Photos from open sources
High-quality preparation of timber walls for painting is a necessary condition for creating a durable coating. Violation of technology can lead to peeling paint, wood damage by pests, rot, and mold.
Black color on the facade
The black decoration of the façade of the house is undoubtedly a bold step, indicating the originality and extravagance of the owner. This building has a special style and does not go unnoticed. It may seem that black will make the decoration gloomy and cold, but in combination with white frames and doors, dark facades look very cozy.
A wooden house painted black places special demands on the surrounding landscape. The design of the site should be in harmony with the restrained, often minimalist style of the building. Colorful flower beds and homemade garden sculptures made from recycled materials are strictly contraindicated.
Landscape camouflage
You can achieve maximum unity with the natural environment by painting your house in the color of the surrounding foliage. In summer, green facades look wonderful, with the onset of autumn - yellow and orange.
For greater harmony, you can add natural stone to the facade decoration, and it is better to leave the tiles as inconspicuous as possible.
"Silvering" of the facade
Facades finished with pine boards have a number of features. Under the influence of direct sunlight, hygroscopic substances, so loved by mold and fungi, are washed out of the top layer of wood. The surface of the facade first darkens, and a little later acquires a silvery tint. You can speed up the “silvering” process by regularly treating the boards with leaching solutions.
Dollhouse effect
If you want to add a little magic and spontaneity to the exterior, choose pink, soft blue or purple paint. White frames, platbands, support pillars, and railings will add even more doll-like quality.
Carved roof decorations and patterned balusters on the porch will add lightness. The updates will definitely appeal to its little inhabitants, and sometimes it’s useful for adults to be transported back to childhood.
Pastel shades
Warm pastel shades, in comparison with bright colors, do not tire the eye so quickly, so they are more often used in the exterior decoration of residential buildings. Delicate yellow, mint and milky shades fade more slowly in the sun and harmonize equally well with summer greenery and snowy landscapes.
When choosing materials for exterior decoration, it is important to remember the uniformity of style. The color of the walls should be in harmony with the roof and the shade of additional elements. It is much easier to choose tiles for facades in pastel colors, which are traditionally dark in color.
Hand painted
For many, updating the façade is an opportunity to show their individuality. The exterior does not have to be boring and restrained. If your soul requires color, brightness and experimentation, it’s time to take up your brushes. As a source of inspiration you can use:
- National painting;
- Geometric and floral patterns;
- Abstract impressionist paintings, etc.
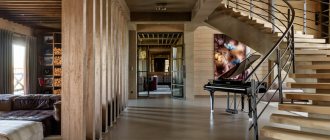
Monochrome
Houses with the same color of facade and roof look unusual. The tone may be slightly different, or it may be completely the same. It is better to choose a shade from a palette of dark and deep colors.
Plain facades always harmoniously coexist with the lush greenery of the surrounding landscape. The house becomes a stylish and spectacular accent that attracts the eye.
White base
White color both indoors and on the facade looks neat and aesthetically pleasing. The building looks fresh, and the decoration is in harmony with the entire palette of surrounding shades. Often trims, doors, railings and other decorative elements are painted white.
Exteriors look interesting, where white is given not an auxiliary, but a leading role. This option is ideal for houses with few windows; it makes the space brighter and more comfortable.
Snow-white facades become especially harmonious in combination with contrasting dark tiles. Black window frames add style and originality.
Companion colors
The slogan “The more the merrier!” It is extremely rarely combined with the idea of high-quality and stylish design, but sometimes experiments with multi-colors still bring successful results. Using a little imagination and knowledge from the field of color, you can turn a wooden house into a real art object. You should choose one color as a basis, and take several neutral or related shades to accompany it.
Bright, cheerful colors, skillfully combined with each other, add liveliness and originality to the exterior.