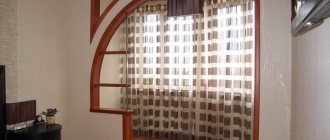
Ceiling curtain rods allow you to secure the fabric directly from the ceiling level.
This type of curtain fastening will be good for small apartments with low ceilings. In addition, if you have plasterboard structures on the walls, then this mount will be the best option. Using a ceiling cornice, you don’t have to worry about the weight of the selected curtains.
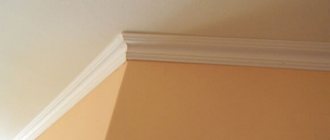
Ceiling cornice
The advantage of such curtain rods is their low cost and high quality. They are not afraid of moisture, unlike wooden cornices. They are very easy to care for and are not afraid of chemicals.
We cut off and join the ceiling plinth in the corners.
Let's prepare a tool: a stationery knife, a pencil. A miter saw (manual or electric) will be needed for massive skirting boards with a height of one hundred millimeters or more, or polyurethane ones. Polyurethane ceiling plinths are very expensive, and not everyone wants to spend money on them. It is useless to use a hand miter box, because it gives a large error to the plinth at the cut point. We rest the ceiling plinth (cornice) in the corner, simultaneously pressing it against the ceiling and wall. We trace the ceiling plinth from the corner along the wall and ceiling.
The length of the lines should be slightly greater than the height and width of the plinth in section. Then we rest the baseboard against the same corner, but press it against the other wall. We also trace along the ceiling with a pencil. There was a cross on the ceiling, dividing the corner in half.
Now we will transfer the marks to both baseboards, pressing them to the same lines.
Cut off the ceiling plinth (cornice). I cut the ceiling plinth by pressing it flat with my hand.
If you don’t have enough experience, I recommend focusing on it. We will need a small flat board, a piece of timber, two wood screws, and drills. Let's take a piece of laminated wood board 400 mm long and 300 mm wide. I will cut a part from it 50 mm wide and 200 mm long. instead of timber. I will screw this part approximately in the center and pre-drill it. The emphasis is ready.
Let's measure the height of the plinth in section. (The dimensions of the ceiling plinth (cornice) are almost always indicated on the reverse side).
Let's measure this size, draw a line with a pencil on that part of the stop, the size of which is 50x200 mm.
We apply the ceiling plinth to the stop. We cut off the corner along the rizka, which was transferred from the ceiling to the plinth earlier.
We perform the same operation with another plinth. We check the coincidence of the corners and glue the baseboards.
Conclusion
Ceiling plinth is not only beautiful, but also useful. The fact is that the human psyche is designed in such a way that rounded shapes calm us down. And sharp corners and sudden changes are annoying. Now you can independently turn your home into a quiet, cozy nest.
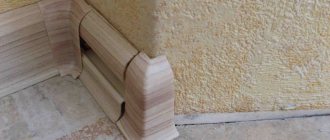
Using fillets in the living room.
And when asked how much the work costs, you can proudly answer that you did everything for nothing, and with your own hands. Do it with pleasure, and our site will help you.
How to glue foam ceiling plinth for painting.
Use this method if you are going to make a new ceiling painted with water-based paint, glue new wallpaper or paint walls. Before gluing the foam ceiling plinth (cornice), you need to putty, then sand the walls and ceiling. In other words, prepare the surface completely for painting and wallpapering. Among the tools, we will need a spatula with a width of one hundred millimeters, a brush with a width of twenty to forty millimeters, a small jar of water, a pencil, a mixer, and a drill. Having prepared the baseboard for the first corner, prepare the glue. We will need some sheetrock mineral finishing putty (gypsum putty cannot be used), and some PVA glue. Approximately 500 ml is required for the perimeter of one ceiling. solution. Add glue to the putty, stir, bring to the state of liquid sour cream (approximate proportion of 0.5 liters of putty # 0.2 liters of glue). Apply the putty to the ceiling plinth with a spatula along the glued plane in a layer of two millimeters.
A layer that is too large will drip, be squeezed out too much when gluing, and will cause unnecessary inconvenience. We begin to glue the ceiling plinth. We glue the cornice, greased with adhesive solution, into place. We press into the center of the baseboard with our fingers along the entire length.
The excess solution will be squeezed out. We collect the main part of the solution with a spatula, running it along the baseboard. Wipe off the remaining solution with a brush moistened with water.
We lubricate each cornice with the solution from the end. The end joints almost always do not match. After installation at the ends, we eliminate the imperfections with a spatula and putty. In the corners, remove excess adhesive mixture with your finger, and remove the remaining residue with a brush moistened with water.
After painting, the baseboards will look perfect, in one piece.
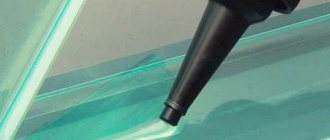
Gluing cornices using sealant
Installation of baguettes can also be done using sealant. It is applied in the same way as glue, the product is fixed for 30 seconds so that it is well fixed. Remains of adhesive-sealant are removed with a clean rag. After installation is completed, all cracks are sealed and the fillets begin to be painted. At the final stage, wallpaper is glued.
Tip: to conveniently squeeze the glue out of the tube when installing moldings, use a special gun.
Fastening the ceiling plinth with sealant in stages
How to glue a foam ceiling plinth (cornice) under a suspended ceiling.
Let's consider two options. First we will glue it to walls with putty, then we will glue it directly to the wallpaper.
It is necessary to glue the ceiling plinth made of foam plastic under a suspended ceiling and walls with putty using a solution of PVA glue and sheetrock putty. We discussed the preparation of the solution earlier. So let's prepare, cut the cornice. You only need to glue the foam plastic ceiling plinth to the wall. We do not lubricate the part of the plinth adjacent to the suspended ceiling with the solution. After installation, we fix each cornice with screws. Drill holes into the very bottom of the cornice. Next we need fasteners that will press the cornice from the outside. White plugs with a larger diameter washer work well. I recommend plugs with a diameter of 8 mm and a length of 45 mm. I recommend self-tapping screws for plugs with a diameter of 5 mm. 45 mm long.
Self-tapping screws with these parameters are usually yellow (yellow zinc). Also, screws with plugs are sold as a set. After installation, fill the holes with screws with putty 2 or 3 times. Collect excess solution with a spatula and wash away the residue with a brush and water. Before painting, insert paper strips between the baseboard and the ceiling.
Remove the paper strips immediately after painting before the paint sticks to the paper.
We begin to glue the foam plastic ceiling plinth onto the walls with wallpaper and suspended ceiling. It happens that for some reason a suspended ceiling is mounted on walls with wallpaper. This complicates the installation of the cornice. We are not allowed to stain the wallpaper or suspended ceiling. You cannot glue cornices to a suspended ceiling. Let's pick up some glue. Construction stores offer two types of glue from different manufacturers: a) LIQUID NAILS, b) SPECIAL GLUE. The quality of the glue does not depend on the manufacturer. The composition of the glue is the same. To use liquid nails, you must purchase a cartouche gun.
You can choose it from among the inexpensive ones. The main advantages of “Liquid Nails” adhesive: easy to apply, quickly sets, excellent adhesion, installation of the ceiling plinth is quick. The only downside is that the glue is colored (brown or white). This means you need to be extremely careful and careful. Special transparent glue. Even if you accidentally stain the wallpaper with it, it will be almost unnoticeable. It is also convenient for application. But there is a serious drawback - it sets very slowly (when you let go of your hands, the cornice comes unstuck). This problem is almost solved in the following way: apply glue, glue the baseboard and tear it away from the wall a short distance. Wait one or two minutes then glue in place. This way the skirting boards are glued faster. Gluing ceiling plinth to walls with wallpaper and a regular ceiling is exactly the same as gluing ceiling plinth to walls with wallpaper and a suspended ceiling. But in this case, glue to the wall and ceiling at the same time.
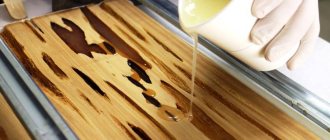
Application of liquid nails
In modern construction, liquid nails are widely used; they can firmly connect two surfaces and withstand loads of up to 80 kg. With them you can glue:
- any brick structure;
- wood, chipboard, fiberboard;
- polystyrene, ceramics;
- glass and metal materials.
You can glue almost anything with them, even materials that are not tightly adjacent to each other. But they will not glue wet wooden objects and an aquarium together. If you need to remove them, it will be easy to do:
- if applied recently, they can be wiped off with a wet sponge or mineral solvent;
- if the adhesive has dried, use a special cleaner to remove it;
- To avoid damaging the surface, use a scraper.
You will be able to appreciate the advantageous properties of liquid nails for repair and construction. Profitable and convenient deliveries in the city of Verkhnyaya Pyshma are provided by the Rainbow Stroy online store. When ordering building materials from us, you will be pleasantly surprised by low prices and fast delivery.
Installation of baguettes
If the ceiling is finished with PVC panels, then plastic skirting boards are installed. Before attaching the plinth, markings are made and a fastening strip (plastic corner) is installed around the perimeter of the room at an angle of 90 degrees.
The fastening strip is installed on self-tapping screws in increments of 30-50 cm
Then the corner elements are trimmed and installed. The ceiling plinth is snapped onto the plank on one side.
Plastic plinth fasteners
Thus, a recess is formed between the baguette and the strip, into which it is convenient to install PVC panels. During their installation, holes are made for wiring. And then the PVC ceiling plinth is fastened on the remaining three sides.
The baguette snaps into place - fastening is complete
More information about installing skirting boards - video: