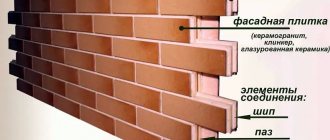
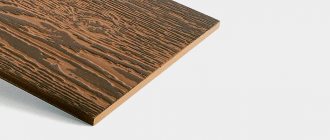
Metal siding is a facing material that is used for arranging ventilated facades. It not only has a decorative function, but also protects the facade, insulation and the entire substructure from negative atmospheric influences - rain, snow, hail, etc.
Many people believe that the sheathing for steel siding can be either metal or wood. This is wrong. Instructions and albums of technical solutions recommend installing siding on a metal frame.
Why should the sheathing for metal siding be metal? This is due to technical and engineering requirements. In addition, it has a number of advantages:
- resistant to rotting;
- has high rigidity and structural strength;
- resistant to constant and sudden temperature changes;
- can ensure a long service life of the entire ventilation façade structure;
- easy and quick to install;
- makes it possible to adjust the guides in length and reach.
In this article we will tell you how to properly make lathing for metal siding with your own hands. But before considering the installation of sheathing for metal siding, it is important to understand the order of the work performed:
- Installation of mounting brackets.
- Installation of thermal insulation material.
- Fastening guide profiles.
- Installation of metal siding.
We will consider only the first three points, which relate directly to the construction of the sheathing.
Types and features of lathing
The sheathing for siding can be wooden or metal. Both can be used on any type of building and for any type of siding. The choice depends on the preferences of the developer and his financial capabilities (metal, as a rule, costs more). On the other hand, if you buy dry planed timber, which also needs to be treated with an antiseptic, the difference in price may be in favor of the galvanized profile.
Wooden sheathing
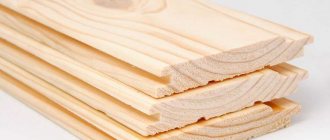
Wooden sheathing for siding is much cheaper than metal structures. Installation work is easier and does not require the use of special fasteners; usually self-tapping screws or dowels are sufficient. In addition, wood is a more affordable material. Construction sites often leave usable waste. However, there are a number of features that should be taken into account when constructing a wooden frame for siding.
For a wooden frame, ordinary wooden beams are used Source ckdd.ru
It is undesirable to use wood with high humidity (30% or more). Otherwise, the wood will begin to dry out under the siding and, if large cross-section bars (70x50 or more) were used, the structure may become deformed. Noticeable deformation of wood in an assembled structure is a rare phenomenon and is only possible if the assembly technology is violated or inappropriate fasteners are used.
Not everyone has a wood moisture meter, so the moisture content of timber often has to be determined based on one’s own experience. But in most cases, for the installation of street structures, it is enough that the material is not freshly sawn. This can be approximately determined by visual inspection. The timber should not be wet to the touch or too heavy.
Blue discoloration on the bars is considered the initial stage of rotting, which is not entirely true. Material with such defects can last as long as regular pine or spruce without blue spots. Putrefactive formations on coniferous trees are brown and reddish in color, but even such blanks can last a long time under certain conditions. However, they should not be used, just like boards with bugs or putrefactive lesions.
Such a picture, if it does not directly indicate poor quality, then at least makes you think about the storage conditions of the wood Source pallazzo.su
It is undesirable to make sheathing from timber in places in contact with the ground or close to it, for example, basement structures. Wood tends to absorb moisture and does not tolerate frequent wet/dry cycles, that is, it quickly deteriorates in such conditions.
Summarizing the above, we can confidently recommend wooden sheathing for any type of structure, except for basement ones. A properly installed structure will last for decades if you pay attention to the choice of material and how to process it properly.
Metal sheathing
Sheathing for metal profile siding involves the use of a galvanized profile. You should not use a profile designed for installing drywall - it is somewhat different from a material that can function for a long time in outdoor conditions. However, it is often used as sheathing for vinyl siding, probably for cost reasons.
The main requirement for a metal frame is the presence of a protective coating. In the vast majority of cases, this is a galvanized coating. The zinc layer, as you might guess, protects against corrosion.
Galvanized metal profile - also used for installing a frame under siding Source mineralnie-vodi.budus.ru
See also: Catalog of companies that specialize in facade materials.
Metal profiles for siding are used for all types of buildings. An exception may be the case of constructing an all-iron structure in regions with a cold climate. The metal has high thermal conductivity, which contributes to its freezing at low temperatures. If a wooden or brick house is sheathed, there will be no negative consequences, which cannot be said about structures made of channel or corner.
The most popular profile for installation has a cross-section of 60x25 mm. The use of material with a large cross-section is not financially feasible, since the profile mentioned above is sufficiently rigid. Samples with a smaller cross-section are less convenient for assembly and cannot ensure the resistance of the structure to external mechanical influences.
The profile length is 3 or 4 meters. Special connectors have been developed for longitudinal fusion.
Method of using connecting elements for metal profiles Source megapolis-sc.ru
The thickness of the metal on the galvanized sheathing for siding is 0.3-0.5 mm. A specialist can distinguish a profile for siding from the same one for drywall without measuring instruments. It is stiffer and somewhat heavier.
Constructions where a frame is simply necessary
There are situations when it is impossible to do without a frame for gypsum boards. These can be curly design details:
- arches and niches,
- built-in wardrobes,
- multi-tiered ceilings,
- bedside tables.
A special section consists of partitions between load-bearing walls, which also cannot do without appropriate foundations. And for not too smooth surfaces, a plasterboard wall frame is often used to hide existing flaws. Thus, the frame profile is used almost everywhere as an additional guarantee of strength and durability. Now let’s move on directly to the practical part of implementing our plan.
Frame profile assembly algorithm
- The first step will be the correct choice of material, both for the frame and for the cladding. So, for example, in the bathroom it is more advisable to use a metal profile (since the humidity there is very high) and a certain type of gypsum plasterboard - moisture resistant. In a living room, to level the walls, you can use standard plasterboard sheets and wooden slats to construct the sheathing. When the materials have been selected and purchased, you can proceed directly to assembling the frame for drywall.
- If you plan to finish both the walls and the ceiling, then work should begin from the ceiling. By the way, check in advance all communications that are carried out under the future structure. It is imperative to leave access to key components so that you don’t have to disassemble half the wall or ceiling if something happens. And the cable length reserve should be at least 10-15 cm, for example, from the mounted ceiling or walls.
- Next, we will mark the surfaces for the profiles. It must be done using a level and plumb line. You can mark with an ordinary stationery marker, but these marks will still be covered later with sheets. It’s worth starting from the lowest angle of the ceiling. If only the walls are sheathed, then markings should begin with the windows.
- Next step: how to attach a metal profile frame for drywall? Much in solving this problem depends on the material from which the sheathed surface is made. So on wooden walls (either made of sandwich or SIP panels) you can fix them with galvanized self-tapping screws of the appropriate length. But on concrete or slabs, in brick walls you will have to drill holes for special construction dowels. So you need to look at the situation and choose the most suitable fastener for the given case.
- It should be remembered that in order to make a frame, the profiles themselves, if necessary, must be cut with metal scissors: this way the galvanization, which prevents the profile from rusting, will be least damaged.
- When installing wall frames, it is advisable to carry out the work in order: first completely cover one wall, and then move on to the other.
- After marking the wall, the marks left by the marker are connected from the floor to the ceiling, and profile guides can be attached according to the resulting lines. Step – 60 centimeters. This is due to the fact that the width of gypsum boards is usually 120 cm, and each sheet when sheathing must be secured at least at three points. One of the profiles must be installed in the corner of the room.
- Rack profiles are inserted into the guides and secured to each other. Do not forget to check the quality of work with a level so that the structure does not become distorted. We finally fix it with self-tapping screws, and the profile frame is almost ready for further work.
By the way, the “checkered” frame is considered the most durable, which also uses crossbars that are secured with the help of special crabs.
As you can see, there are no particular difficulties in the question of how to properly assemble a frame for a gypsum board. You need to strictly follow the recommendations, and everything will definitely work out!
Author of the article
Installation of wooden sheathing under siding
Before starting installation work, you need to calculate the material that will be required to build the frame. The number of slats and its cross-section depend on the following factors:
- Type of siding and direction of panels in the structure;
- The presence of a thermal insulation layer (implies the installation of an additional frame for its installation);
- The distance between the siding and the insulation sheathing (or wall);
- Height of the walls of the building;
- Number of window and door openings;
- The presence of a pediment, its area and shape;
Installation of vertical sheathing beams under siding Source megapolis-sc.ru
Let's consider the simplest situation with wall cladding with vinyl siding. In the vast majority of cases, this type of coating is mounted horizontally. Therefore, the rail to which it will be screwed must be located perpendicular to the siding strips, that is, vertically.
Mounted sheathing for installation of vinyl siding Source centermira.ru
If insulation is not planned, the timber is attached directly to the wall using self-tapping screws, dowels, or galvanized brackets (for very curved walls).
ES bracket for sheathing Source mktools.ru
Installation of internal corner strips
The corners are installed before installing the main panels, immediately after attaching the starting strip. The internal corner profile is attached with the lower edge at the level of the starting strip; the screw density is recommended to be 25-30 cm.
If the starting strip prevents you from positioning the profile in the right place, nail strips should be cut from the corner profile to a length equal to the width of the starting profile plus the temperature gap.
If it is necessary to extend the corner strip, cut off the nail strips from the top by 30 mm and overlap the top one over the bottom one for proper water drainage. The amount of overlap is no more than 25 mm to ensure that the temperature gap is maintained.
You can make a corner connection using a J-bar, which is cheaper than a corner connection. This can be done using one plank, when it fits tightly with its outer edge to a row of panels on one side, and the panels on the second side are installed into it.
The second option is to use two strips on each side of the corner, in which case there is a danger of water entering the gap between the strips, since absolute tightness of the connection cannot be achieved here, in addition, temperature gaps are necessary in any case.
Installation of metal sheathing under siding
The process of constructing a structure from a galvanized profile is not much different from installing wooden sheathing. The main differences lie in the method of fastening and mounting the frame for laying the insulation.
An example of using a metal profile Source pallazzo.su
The direction of the profile relative to the walls also depends on the type of siding and its choice is best left to a specialist. If insulation is not required, the profile is attached directly to the supporting structure. As an example, consider the sequence of assembling the sheathing for vinyl siding with a heat-insulating layer:
- Fasteners for the profile are mounted on the prepared wall. Most often this is a galvanized EC bracket, which is also used for assembling structures for drywall.
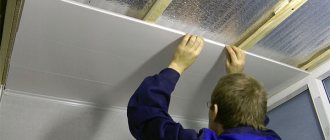
- Thermal insulation material is laid on top of the fasteners. Laying is done in such a way that part of the fasteners is outside the insulation. That is, the brackets actually break through a layer of mineral wool or expanded polystyrene.
The insulation is literally threaded through the bracket Source moypodval.ru
- The waterproofing film is laid in the same way. Fixation is carried out after laying the film using foam dowels (fungi).
- Then a galvanized profile is attached to the protruding brackets (EC bracket), and siding is attached to it.
The distance between the profiles should not exceed 60 cm. The spacing between fasteners on each profile is 40 - 50 cm.
Panel fastening technology
Do-it-yourself installation of metal siding is considered a simple job if all the necessary preparatory processes have been completed.
There is a special guide, following which no mistakes will be made:
Fastening the first panel. It is best to start covering the facade with siding on the side of the house that is least noticeable, so that you can gain experience before working on the front side of the building. The first panel is inserted into the corner profile, as well as into special locks available on the starting strip. We must not forget about the gap. Next, the panel is fixed to the frame, for which special fasteners are used, designed for installing metal siding.
Extension of panels. The installation scheme for metal siding involves fastening the panels overlapping or using an H-profile. In the first case, the locks and frames for fastening on the panels are shortened.
Installation of the remaining panels. The operating technology is no different from installing the first panel and subsequent elements
It is important to install the covering perfectly evenly, therefore, after fixing each part, it is recommended to check the correctness and evenness of the cladding. Excess parts of panels are removed near the openings, so installing siding around windows usually takes a lot of time and requires significant effort.
To level the entire coating, it is advisable to install a finishing profile, which is located at the bottom of the opening. Fastening is carried out with special hooks using a punch.
At the last stages of the work, the installation of slopes and other small but important elements is carried out. A pediment is installed around the entire perimeter. The cornice is installed in such a way that the entire cladding looks complete and beautiful.
Thus, the step-by-step instructions contain all the sequential actions, the execution of which guarantees an ideal result for the cladding of any building. After careful study, it is possible for every person to improve and protect their home from various negative influences.
Lathing for basement siding
If this type of cladding is planned to be used according to its name, that is, for cladding the base or under-pile space, it would be better if the siding sheathing is positioned horizontally. This refers to situations where the distance between the top and bottom of the plinth is within 20-50 cm. In the case of covering large surfaces, such as walls or gables, it is better to use the vertical arrangement of the slats.
For basement siding, it is more preferable to use a metal profile, at least when it comes to the lower part of the structure. However, cases of using wood also occur due to the well-known positive qualities of this material.
The method and procedure for installing siding depend on the presence of insulation Source megapolis-sc.ru
Methods for arranging the structure depend on the specific situation and are determined locally, preferably by a specialist who will be directly involved in the installation.
Choose by price
Until recently, metal sheathing was the most popular. But after the rise in metal prices, she has to look for an alternative. (photo No. 7)
Over the past year, the price of the metal has increased significantly. Accordingly, metal profiles for sheathing have also become more expensive. On average, about 2 times. If in 2022 a high-quality profile 3 m long cost 170 rubles, then in 2022 its price increased to 328 rubles. And this made metal sheathing the most expensive.
Other materials for fastening facades have also become more expensive. Wood has become 2.5 times more expensive, but still remains the cheapest material for cladding. Prices for the plastic system have increased by no more than 40%.
!
If recently plastic sheathing was 15% more expensive than metal sheathing, then in 2022 it has become 30% cheaper.
Lathing for corrugated sheets
In a situation with corrugated sheeting, the choice of material for the sheathing depends more on the purpose of the future structure. For example, if you plan to build a fence, and especially a gate, it is better to pay attention to a square metal pipe. If it is a roof frame, a wooden beam will be more preferable.
The pitch of the sheathing under the corrugated sheet depends on the requirements for the future structure and the thickness of the metal. The standard distance is 20-30 cm (for roofing), while the fastening step on each profile depends on its cross-section and is usually 40-50 cm. A distance of 30-40 cm between each batten will be sufficient even for relatively thin corrugated sheeting ( 0.35 mm).
If the material is used as a covering for walls or arranging a fence, you need to use thicker grades of corrugated sheeting (0.5 mm). The distance between the beam or profile, as well as the step for fastening, in this case will be 50-60 cm.
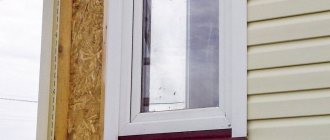
Fourth step: Installation of platbands.
There are three systems for framing openings:
- Window or door flush with the wall.
In this case, you can use a J-bar
It is important to make the connections correctly at the corners
- Install waterproofing.
- Install two vertical J-straps or trim on either side.
- Fix the profile horizontally over the opening with a minimum of 6 cm beyond the frame. from each side.
- Connect the slats using the following method: cut a strip at the bottom of the horizontal profile and bend it down, make a 2cm cut on the side of the vertical slats. and cut at an angle of 45 degrees. top part.
- Fasten the top and side elements.
- Attach the bottom rail in the same way, but make the strip on the vertical elements. You need to make strips so that they cover the sheathing joint, protecting against moisture penetration inside.
- Openings with slopes no more than 20 cm.
Finishing should be done around window trims or platbands.
- Install finishing strips around the entire perimeter.
- Install the top and bottom profiles first, then the side ones.
- Make connections as described above.
- Openings with deep slopes.
They are usually finished with siding. A flexible ebb is installed on the inside.
- Attach inner and outer corner panels around the perimeter.
- Install siding between them.
Fifth step: Attaching the first panel.
The general rule of fixation is that the siding cannot be tightly nailed or pulled; gaps are required for temperature changes in size. It should be fixed in increments of 30-40 cm.
- Insert the first panel into the corner piece and the starter bar lock. There is a 6 mm gap between the panel and the bottom edge of the lock. (When installing in the cold season, leave 9 mm.).
- Attach the siding to the sheathing.
Extension can be done:
- The overlap is 2.5 cm; to do this, shorten the fastening strips and panel locks.
- H-profile - performed in the same way as joining corner strips. Leave a gap of 3 mm to the soffit; in relation to the starting strip, lower the profile by 6 mm. The same gap remains around any structures protruding from the wall.
Sixth step: Installation of siding.
- Install the remaining panels in the same way as the first.
- Check the level every 2-3 rows.
- When installing siding around openings, trim as necessary. At the bottom of the window, fix an additional finishing strip to level the surface of the trim.
- Fasten with “hooks”.
Seventh step: Cladding under the roof.
The finishing strip is attached under the roof structure:
- Measure the distance between the lock of the penultimate panel and the bottom line of the lock of the finishing strip, retreat 2 mm.
- On a separate panel, cut off the top locking module.
- Make hooks on top at a distance of 20 cm from each other. Bend the cuts to the outside.
- Insert the trimmed siding into the penultimate panel and snap the finish locks into place.
Adviсe
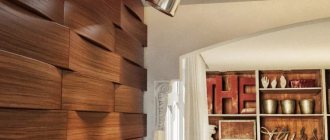
A few words about the color of the J-profile. As a rule, the element is produced in the same color variations as the siding itself, so choosing this element according to shades is usually possible without any problems. But in some cases, when decorating a house, a profile can be used in a different, contrasting color. Despite the fact that designers often use this technique and consider it one of the successful ways to decorate a building, you should still experiment with colors carefully
It is important to remember that such inserts do not always look harmonious
Pink siding trim
Vinyl siding trim
You also need to remember that dark elements will get very hot in the sun, so siding and profiles of such shades should not be used on the sunny side, even in small quantities. Due to exposure to sunlight, they can bend and lose their appearance (we are talking about plastic parts).
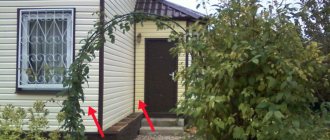
Covering the gable with siding. One of the options
Sometimes profiles on the roof gables may not be installed at all, motivating such a decision by the fact that this allows you to save certain funds, but the decorative elements are still not visible. But still, you should not neglect the use of the J-profile in this place: the fact is that during heavy rain, moisture will penetrate through the remaining cracks between the wall of the house and the siding, as a result, the cladding of the building will not be able to perform a protective function - the wood will still be redundant become moisturized and lose their qualities.