Treatment with paint or varnish
In order for the room to take on a finished look, the wooden lining is painted with varnish or paint.
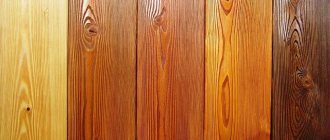
These different bases have different composition and structure of the substance. There are varnishes: Acrylic
Acrylic varnish dries quite quickly. It is easy to apply to the surface. Protects from moisture and dust. Easy to clean.
Polyurethane varnishes
Polyurethane varnish is the most profitable option. There are quite a lot of options to choose from in stores. The color range varies from light to dark tones. When choosing this product, you must purchase a primer in the appropriate color.
Alkyd varnishes
This varnish takes a long time to dry and leaves behind a pungent odor that does not immediately disappear. To speed up the drying process, there is a specially developed product. One of the advantages of this varnish is the creation of a microfilm on the surface of the wood.
Acrylic-polyurethane substances
Made from recycled resin. The composition includes a urethane component, which dries quickly and protects the coating from aggressive environments.
Water based
This varnish is a more environmentally friendly product compared to others. Dries quickly and washes well. Contains water-repellent components. The price of this product is much higher, but the safety of use makes it the most popular in use.
What wooden material to use for interior decoration
There are two options for lining:
- Standard. A distinctive feature of the material is the presence of a groove, which is formed when installing adjacent strips. Such a groove is necessary to hide the place where the elements join. If it is absent, the joint will look like an ordinary gap, which does not look beautiful enough. Standard lining is used for finishing walls indoors, except for lining entrance doors. When assembling all types of material with your own hands, the ridge of one part is inserted into the groove of the adjacent one, which forms a flat, solid surface.
- "Block House" lining. Used for cladding external surfaces. It has improved characteristics achieved by treating wood with special compounds. Visually, this material can be distinguished from standard lining by its shape, which imitates a rounded log or timber.
Wooden lining is classified as:
- Class "A". Such material may have captive knots on the surface, no more than one per linear meter and a half, up to two resin spots on the lath and no more than two small cracks. Quite high quality, such brick lining can be used for covering walls in any room.
- Class "B". For this quality, no more than four knots per one and a half meters of slats, up to two resin pockets and the same number of blind cracks are allowed. This material should not be used in residential areas.
- Class "C". This type of lining is of the lowest quality and is used for cladding sheds, but not for residential premises. In this class you can find quite a lot of defective slats.
Class "Extra". This is a lining without knots or other defects. This is an ideal lining option that is best suited for finishing the walls of residential premises.
When choosing the type of material, the type of wood is also taken into account. Its performance characteristics depend on this indicator.
For example:
- Linden has good healing qualities, which allows it to be used for finishing rooms such as a bathhouse (see Lining for a bathhouse made of linden with an aromatherapy effect) or a sauna.
- Oak is the best option for exterior cladding of a building; it has a wide range of colors: from light yellow to red-brown. However, its main feature is its high strength and dimensional stability.
- Larch has a fairly high resistance to decay and has a very pronounced texture. However, due to the complexity of processing, its cost increases greatly.
- Cedar, which has noble tones, is also not afraid of rotting.
- Merbau is an option with an exotic texture. Advantages of the material:
- moisture resistance;
- temperature fluctuations;
- ultraviolet radiation.
When purchasing lining for interior work, you should take into account that the surfaces are not exposed to the negative effects of precipitation or ultraviolet rays, which allows the use of rocks of lower strength and better appearance.
- Maple has a wide range of colors and a fairly noble texture. It has high strength and can be easily sanded. The material is almost without flaws.
- Ash is used for interior decoration. The small vessels contained on its surface form a unique ornament when cut.
- Walnut is quite hard, but easy to process. The color scheme of the material and structure depend on the region of growth. Does not deform during use.
- Cherry has an easily recognizable noble shade. Its wood darkens over time.
Lining in the attic
Using the attic part of the house as housing is a new concept in construction solutions. It is gaining momentum, because with the cultivation of the attic, the area of the house expands. It will take some effort to turn an uninhabited storage room into a comfortable bedroom. Lining will make their investment minimal. How to cover a room with clapboard?
This process is not difficult. Covering the walls with clapboard is even easier than the ceiling, because the board does not need to be attached in a suspended state.
Tools:
In order to sheathe the walls you will need the same tools as when working with the ceiling. But the frame will take a little more time.
Frame. When installing the sheathing, you need to take into account the characteristics of the room. As well as plans for what it will look like. The fact is that one or another position of the lining creates a different visual effect. A panel mounted horizontally makes the room taller. Vertical installation contributes to the visual expansion of the room
When installing the sheathing, it is important to remember that its location must be perpendicular to the board being installed.
Preparation. The attic is the least warm part of the house. Its thickness usually does not exceed five centimeters of material. As a rule, this is roofing iron, which does not retain heat. To turn the attic into a full-fledged room, it needs to be insulated. There are several types of insulation. Most Popular:
- Glass wool
- Styrofoam
- Mineral wool
Lining stripe. There are several ways to sew the lining to the frame:
- Kleimer.
- Nail in the clapboard outside
- Nail in thorn
- Screw
When choosing from the proposed list, you need to focus on your professional level, as well as the amount of work that you plan to perform. Installing clamps will make the coating more beautiful, but will take more time than nails or screws.
Preparation for sheathing
Initially, you should carefully consider the required amount of material. Wooden eurolining can be cut well with an ordinary hacksaw with small teeth, but the material consumption should be minimal.
The room should be prepared in advance for covering: carry out internal wiring, outline areas for sockets and switches. This calculation needs to be done not only with ease of use.
Also taking into account the dimensions of the mounted panels, so as not to make unnecessary joints and not to use auxiliary strips
You also need to take into account the locations of windows or door openings.
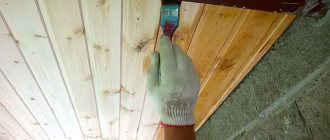
Not only the rooms, but also the lining itself should be prepared for cladding. If it is necessary to cover the walls with clapboard during the cool period of the year, in this case the used material delivered from the shopping center must rest in a warm room for at least 2 days.
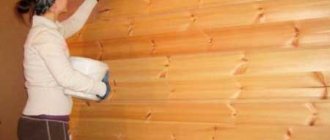
When covering rooms with high dampness with your own hands, all panels without exception must be treated with water-resistant varnish (preferably in 2 coats). It is necessary to dry them completely, then begin installation work.
Between the initial and subsequent coatings, the used material is processed with sandpaper to increase the silkiness of the surface.
Of the required equipment you will need to work with your own hands.
- Saw or jigsaw.
- Build a stapler.
- Hammer.
- Perpendicular.
- Level.
- Column.
Vertical clapboard cladding from the inside of the building
The initial stage is the selection of the lining location method, horizontal or perpendicular. The selection in this case must be productive in terms of the volume of rooms and satisfy the criteria and tastes of the owner.
For a vertical location, the slatted base is located in a horizontal position. In the opposite placement for a horizontal arrangement of the lining.
Frame installation
The main requirement of the frame design is its location in one plane. When laying horizontally, the first rail must be installed exactly in a vertical position, using a level or plumb line. The rail can be fixed using self-tapping screws or simple nails.
Using a plumb line for mounting slats
In the opposite corner, from which it will be necessary to install the rail, we stretch a series of nylon threads to form a common plane. Then, according to these threads, the installation of absolutely all frame components is carried out.
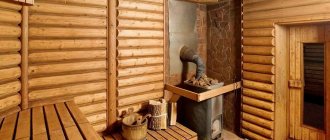
Standard procedure for tiling a bathhouse
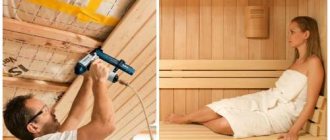
When finishing the interior of a sauna with clapboards, adhere to the following stages of work:
- Installation of a wooden frame on the wall surface and covering it with protective solutions against rotting and fire.
- Wiring distribution using additional protective materials (wire cases).
- Laying insulation made of mineral wool or other non-combustible substances between the sheathing beams.
- Fastening the protective foil material with a mandatory gap between the lining and its surface.
- Installation of lining.
To get a reliable and safe sauna finish, you need to choose the right grade of wood, type of lamellas and not miss such an important point as maintaining the size of the gaps when installing the lining.
The cost of installing the lining
Installing wooden lining is a labor-intensive process, consisting of many operations: preparing the walls, installing the sheathing, attaching the material to the walls and final impregnation.
If you have difficulty installing it yourself, it is recommended to contact a specialist. The approximate cost of one square meter varies from 800 rubles.
The detailed cost of the work looks like this:
- Assembly and preparation of the sheathing costs 180 rubles.
- Wind protection device 150 rubles.
- Coating structural elements with an antiseptic costs 30 rubles.
- Installation 400 rubles.
- Impregnation with varnish or paint 70 rubles.
For a more accurate answer to the question about the cost of work, you should contact representatives of the construction company.
Lining in a bathhouse: how to make...
Let us continue the description of technological processes. The article mentioned above gives an idea of installation methods, but we will still briefly repeat here the basics that you need to know.
Covering bathhouse walls with clapboard
The process itself is not difficult even for beginners, but it is full of nuances.
As already mentioned, you should start covering the walls of the bathhouse with clapboard from the top sub-ceiling strip. For this purpose, the thorn is cut off from it, because it goes with the thorn upward. Fasten the first board through the front side.
However, the upcoming expansion, firstly, and the need for uniform moistening and drying of the reverse side for less warping, secondly, suggest not making the first board close to the ceiling. And so that the gap is not visible, it is covered with a plinth or flashing, preferably with some indentation from the wall.
BUT! Don’t consider this a common practice - the Internet is full of videos whose authors make boards end-to-end. You can do as they do, we proceed from the expansion of the wood, and in linden it is minimal. So it’s better to know the properties of your lining and proceed from them.
The last two or three boards from the floor are usually done like this: it is difficult to insert the last one, so the boards are knocked together into a block in advance and it is this block of 2-3 boards that is inserted into the groove of the last one fixed to the wall. It is fastened from the front side using the same fasteners that were used above - these are either finishing nails, or self-tapping screws, or staples.
Headlining
The direction of laying the boards when covering the ceiling in a bathhouse with clapboard is determined by the direction of the battens of the sheathing and perpendicular to it.
The process itself is no different from wall mounting.
This video not only advertises the best (from the point of view of the author of the video) method of fastening, but also demonstrates the process of covering the ceiling in a bathhouse with clapboard. Listen to the advice of the master, they may be useful in your work.
Treatment with paint or varnish
In order for the room to take on a finished look, the wooden lining is painted with varnish or paint. These different bases have different composition and structure of the substance. There are varnishes:
Acrylic
Acrylic varnish dries quite quickly. It is easy to apply to the surface. Protects from moisture and dust. Easy to clean.
Polyurethane varnishes
Polyurethane varnish is the most profitable option. There are quite a lot of options to choose from in stores. The color range varies from light to dark tones. When choosing this product, you must purchase a primer in the appropriate color.
Alkyd varnishes
This varnish takes a long time to dry and leaves behind a pungent odor that does not immediately disappear. To speed up the drying process, there is a specially developed product. One of the advantages of this varnish is the creation of a microfilm on the surface of the wood.
Acrylic-polyurethane substances
Made from recycled resin. The composition includes a urethane component, which dries quickly and protects the coating from aggressive environments.
Water based
This varnish is a more environmentally friendly product compared to others. Dries quickly and washes well. Contains water-repellent components. The price of this product is much higher, but the safety of use makes it the most popular in use.
Material properties
The lining has a number of positive characteristics:
- high environmental friendliness of the product;
- pleasant appearance;
- resistance to extremes of high and low temperatures;
- increased sound insulation;
- lack of temperature coefficient.
Lining is actively used when covering walls:
- wooden houses, cottages, baths,
- terraces, balconies,
- as decoration for rooms,
- for a bright accent in wooden buildings.
With the right choice of finishing material, the durability of such finishing can reach thirty years.
For craftsmen who have experience in home wall cladding, attaching wide lining is not a difficult task. The cost per square meter of cladding is extremely low, with the exception of special surface decoration.
The lining is monotonous in appearance, but experienced designers are always ready to give it a universal look and find original fastenings for the walls.
Initially, only wooden finishing was used in the construction of houses, but modern trends and craftsmen are coming up with other materials for lining. Today, this type of finishing is widely used in modern construction and renovation.
This material has rightfully gained its popularity due to its cost-effectiveness. Construction markets and stores are overflowing with a wide range of linings for interior decoration.
Application
More and more residents of private houses are choosing the interior of walls made of lining inside the house. This is explained not only by the comfort and magnificent beauty of the interior, which are achieved through the use of wood, but also due to the presence of certain properties that the lining has.
Among them:
- Excellent sound insulation;
- The surface does not require further leveling;
- A wonderful aroma of wood that will appeal to all residents;
- Biological features and high environmental friendliness of the tree;
- Various methods of laying the lining, as well as its different widths and other basic parameters of the panels, allow you to visually change the proportions of the space.
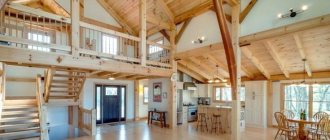
This is what clapboard cladding on the inside of a house looks like
. Let’s say a few words about the space-changing properties of clapboard:
- To begin with, it is worth noting that any decorative lining for interior decoration is made of wooden panels, the width of which is usually 8.8 cm, this in turn is the standard working size. The length of the slats will vary (from 1 to 6 meters), their variation depends on the dimensions of the room and installation methods. Before purchasing sheathing material, it is necessary to make accurate preliminary measurements;
- Another important point is the method of laying the slats on the walls. They can be located vertically or horizontally. The horizontal position expands the space of the room, while the vertical laying increases the height of the room.
Type of lining depending on the type of wood
The lining is made from coniferous and deciduous trees, as well as from exotic species (for example, mahogany). Among the coniferous species, it is worth highlighting spruce, pine, larch and cedar
Spruce is endowed with softness, which is important for making boards with rounded shapes. This material looks great in a modern interior
Pine lining is a budget option that has many important qualities, including high strength. Larch is one of the most expensive coniferous species. Cedar boards have a pleasant natural smell that has a beneficial effect on the body. Among hardwoods, the most popular are oak, alder and linden. Oak wood is a durable and sought-after material. Lining made from this wood is considered a classic option. Alder is suitable for use in damp rooms as it does not absorb moisture. Linden is very resistant to deformation and mechanical damage. Lining from it is relatively inexpensive.
Briefly about varieties
Wooden profiles are divided into 4 grades:
- The highest grade is Extra. This variety is characterized by a high price, but also, of course, appropriate quality. The surface of the top-class board is smooth, there are no flaws, and also there are no knots;
- Class “A” lining allows minor defects, but in terms of price and quality ratio this option is considered optimal;
- The “B” class profile is determined by a much greater presence of knots, and there are also many more flaws on the surface, which are clearly visible on the front side;
- Well, in conclusion, grade “C” panels. Profiles of this class are technical; the presence of a significant number of knots, as well as other obvious defects, make such material unsuitable for cladding interior spaces;
- In addition to grade, wood for panels is classified by species. Covering the premises with panels made of coniferous wood will give the house a healthier atmosphere, and will retain the smell of coniferous forest for a long time.
Covering the bathhouse with clapboard inside and outside
A board is a board. Therefore, you should not assume that it is only suitable for interior decoration, and it is impossible to sheathe the outside of a bathhouse with clapboard. It’s more a question of choosing the right variety and proper processing.
Internal lining of the bathhouse with clapboard
Everything is simple here - on sale you will find many different profiles designed specifically for the interior. They will differ from each other in the following parameters:
- locking connection (with or without a gap for a tenon, offset, without offset);
- front side (presence or absence of chamfers, roundings, reliefs, even threads);
- wrong side (presence or absence of ventilation grooves); more about sauna ventilation here.
Which to choose? From an aesthetic point of view - the one you like best, and from a technical point of view - good grade, so as not to waste time on modifications, suitable wood - well-dried, smooth, and does not change dimensions when moistened. Thickness doesn't matter.
ADVICE! In wet rooms (steam room and washing room), we recommend making the lining from linden, the wood of which does not swell when moistened.
The technology for covering a bathhouse with clapboard is quite simple; it is attached to the sheathing, which is done primarily to create a ventilation gap for future drying. The fastening itself is carried out either directly through the groove or ridge of the plank, or indirectly through a clamp that engages in the groove.
With or without a clamper, you still need to make a choice between the following options:
- finishing nails;
- self-tapping screws;
- long staples.
On our website you will find material devoted entirely to various methods of fastening lining.
ATTENTION! To prevent the wall from crumbling, leave small gaps (1 cm) at the edges, which are covered with plinths or strips.
Cover the outside of the bathhouse with clapboard
Not every lining is suitable for external cladding. This is where the boards should be thicker, and it is desirable that they have a fairly specific profile.
For example, a profile called “American” was created specifically for external cladding. It seems to be designed so that water drains from it without getting into the groove.
As for the types of wood, if you line the outside of the bathhouse with pine clapboard, then in the sun it will definitely “cry” with resin, especially on the sunniest side. Deciduous ones are less resistant (without additional protection) to precipitation and all living creatures (bacteria, fungi, insects and rodents).
IMPORTANT! External cladding should be treated with antiseptics and other types of protective impregnations, regardless of what type of wood they are made of. A good primer and/or impregnation and coating with varnish, glaze or paint significantly increases the “life” of wooden cladding.. This is if we are talking about wood
But profile boards made of PVC - polyvinyl chloride - are also widely represented on the market. In principle, you can line the outside of a bathhouse with clapboard made of this material, but in other articles we have written a lot about the properties of PVC - it does not tolerate heat and cold unless other substances are added to it that make it more stable
This is if we are talking about a tree. But profile boards made of PVC - polyvinyl chloride - are also widely represented on the market. In principle, you can line the outside of a bathhouse with clapboard made of this material, but in other articles we have written a lot about the properties of PVC - it does not tolerate heat and cold unless other substances are added to it that make it more stable.
However, one should not deny that plastic facade lining is a completely acceptable budget option, and when it comes to cheapness, there are always numerous “buts”. Cheapness almost always does not accompany quality.
In general, facade lining is just a facing material; it has little responsibility for loads or heat retention, for example. Its task is not to allow moisture to pass through, not to deteriorate from the sun, in particular from ultraviolet radiation, not to crumble from frost, and to have a durable color.
And here it may well turn out that high-quality plastic lining that meets all the requirements is not a cheap building material at all. So, perhaps, of the budget options, a simple board (even unedged) is the cheapest and will last the longest?
Planken
You can also find planken from wood on the outside - this is a façade plank, lightweight so as not to weigh down the walls. Well, it’s probably worth mentioning siding, which is made from wood fibers and polymers. All this is good, but the choice is up to the owner.
Options for room design using lining
A modern approach to interior design, combined with a new look at the possibilities of cladding, allowed designers to develop many solutions. Today, this material is used for cladding not only walls, but also ceilings, used in residential premises and decorated in different styles. There are design solutions where the coating acts as a floor covering, albeit for a small part of the room.
An effective use case is to lay the slats horizontally. The canvas has an unusual and very elegant appearance, providing an unusual and attractive surface appearance.
At the same time, it is not customary to cover the entire room with clapboard. Only one wall is cut out (very rarely - two adjacent ones, if their total area is small). Most often, only a small section of the plane is sheathed: they create a decorative panel above the head of the bed, create a platform for hanging a TV, separate a section of the ceiling slab for installing a chandelier (or group of lamps).
Many users look at the interiors of different rooms - what the lining looks like in the bedroom, kitchen or living room.
However, it is more correct to take into account the laying technique, type of processing and size of the canvas. This determines the decorative effect and allows you to create sections of walls or ceilings that attract attention and decorate the room, regardless of its purpose.
Living room
The coating goes well with wallpaper. If you make a panel at the bottom of the wall, the room will turn out to be especially cozy and welcoming.
Everyone is already tired of boring, monochromatic living rooms. Let's add some color to the interior using lining and play with contrasts? For example, you can trim the walls with clapboard and paint them in an unusual color (complex dusty shades look most interesting, as in the photo above), and leave the floor or ceiling white. Fresh and unusual. The reverse scheme also works: light wallpaper - snow-white lining.
Kitchen
This material can be used in kitchen decoration: both on the walls and on the apron. Of course, when laying the cladding in the work area, you need to take care of additional processing of the wood. This coating will fit into a modern kitchen design and will withstand country style.
Inside the kitchen, you can cover everything with clapboard or just focus on the dining area. The lining also looks beautiful on a kitchen apron. Do you want problems with cleaning? Treat with an antiseptic and coat with moisture-resistant paint.
In a country-style kitchen, an untouched coating looks harmonious; in other cases, it is better to paint it. For the Scandinavian direction, white, gray and beige colors are suitable, for Provence - delicate pastel colors. For a sustainable look, choose brighter shades such as green or brown.
Hallway and corridor
In panel houses, corridors are often narrow and uncomfortable; Horizontal paneling of short walls will increase the space and make it more pleasant. On long walls, attach the slats vertically or diagonally. The panels look interesting: for example, from the boards you can create the outlines of mountain peaks or a city landscape.
An added bonus in the hallway: you won't need special hardware to hang an extra hook or shelf.
Children's room
The use of environmentally friendly materials is especially important for children, so wooden panels come first. In addition, its variability and ease of processing allows you to create extravagant patterns on the walls and ceiling, which is a plus in the design of a nursery.
Bedroom
The most effective placement of upholstery on a bedroom wall is behind the bed. Accentuate a wall or adjust the geometry of a room with matching stripes.
An interior with a natural tone board in a bedroom with white furniture looks fresh and will remain relevant for many years.
The photo shows a country style bathroom design
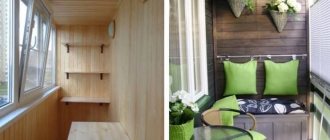
Balcony
Wooden panels are very popular for decorating the walls of balconies. Budget-friendly, stylish, can be varied with paint - these are the factors that determine such a high demand for this material. Also, designers often use lining in the design of balconies and loggias.
Bathroom and toilet
Wood materials have low moisture resistance - that's a fact. But thanks to special impregnations, they can be used for finishing walls in wet rooms, for example, in bathrooms or toilets.
Installing sheathing under panels
Everyone decides for themselves how their profile will be laid, but the choice is not large and includes only three options:
- Horizontal;
- Vertical;
- Diagonally.
But diagonally is not the most common installation method, since sheathing at an angle is very difficult, and also unreasonably expensive. And the only advantage is the original look. Masters use the following rules:
- The attic is sheathed only horizontally;
- Horizontal decoration of the room visually increases the area;
- The vertical one, in turn, visually raises the ceiling.
Having chosen the installation method, prepare the walls; the surface must be flat, which is determined by the plumb line. The surface must be inspected for flaws; if there are cracks and depressions, the surface must be leveled using putty. If your house is made of brick or concrete, then before paneling, sheet insulation is attached to the walls, which, in turn, will serve as a barrier to heat leakage.
The sheathing is installed perpendicular to the selected direction of the lining itself. For example, if you decide to install the panels horizontally, then the sheathing strips should be mounted vertically, and, conversely, when installed vertically, the sheathing is horizontal. The planks for the base are wooden blocks with a cross section of 2-4 cm, pre-treated with an antifungal solution.
It is best to mark the layout of slats installed on the wall with a marker or chalk cord. In the case of a horizontal base, the distance between the bars should be within 40-60 cm. The first and last rows are attached in such a way that it is convenient to attach the lining. Below we take into account the installation of the baseboard.
One of the most important conditions when installing the sheathing is to install it in one plane. For the horizontal installation method, the first frame rail must be attached strictly vertically; for precise installation, we use a plumb line. The block should be secured using nails or stainless steel screws.
Then we move to the corner opposite, where we install the same rail, after which we stretch a certain amount of nylon thread between them in order to create one plane. Then we install the remaining frame elements using this nylon thread. Nails or self-tapping screws are used if the walls of the room are wooden, but in the case of concrete or brick walls, dowels must be used.
Wood panel installation technology
Before installing the lining, the wooden surface must be treated with special protective agents. There are a huge number of them in construction markets. Prices range from high to low thresholds. You also need to make sure that there are no nicks or protruding knots on the front of the board. If they are present, they must be removed with a grinding machine.
After the work has been done, the next step will be installation of the sheathing. A profile is used for this. It comes in wood and metal. It is worth considering that one of the advantages of lining is the alignment of walls. The lining itself is fastened using the tongue and groove type, that is, its tongue snaps into the groove. You can't do it without an assistant.
The next step is to stretch the line from one end of the platform to the other end. The distance between the frame parts should be no less than 50 centimeters. If you want to do less, then keep in mind that it may not be enough to lay the mineral wool seal.
Before installing the lining, it should be dried in the sun or indoors. If you dry it in the open air or where finishing work will take place, it is advisable to leave the material for a longer time. After these recommendations have been completed, proceed to tiling the room.
The lining fabric has a tenon on one side and a groove on the other. During installation, the groove should be located at the bottom to prevent moisture from occurring at the bottom of the structure.
Decorating the inside of a house with wooden lining begins from the ceiling, although assembly from the floor is possible. In this case, the gaps can be hidden under the baseboard. The slats of the structure are attached with nails or with a clamp, which is more aesthetically pleasing and beautiful.
DIRECT UPHOLSTERY OF THE FRAME WITH CLIPPING
Here are several options for attaching the lining to the frame:
Option No. 1 - cut off the head of the nail so as to make it almost invisible at the attachment point, and then drive the nail in from the tongue side at an angle. Then the cladding will be more uniform and attractive.
Option No. 2 is fastening using a special clamp (“clip”). A very convenient way, since you can remove the lining at any time and secure it in another place.
Option No. 3 - when a nail is driven into the inner latch, the outer latch must be short.
Wall upholstery with clapboard. Three types of fasteners
If you want to get a neat and beautiful appearance of the walls, then remember that the lining must completely cover the fasteners.
Preparatory stage
Cladding inside a wooden house is only possible if all external work has already been completed. A wooden house, despite all its obvious advantages, has several disadvantages that should definitely be taken into account before starting finishing work.
Of course, first of all, this is high humidity, which means the appearance of mold and other harmful organisms. Therefore, before you start covering, the walls need to be carefully prepared.
The lining is always installed on dry and perfectly smooth walls, otherwise any defect will spoil the final result of the entire work.
All walls must first be treated with a special agent against fungus and mold. To do this, you can use modern antiseptics, which are sold in any hardware store. All walls need to be treated, even though they are not affected by mold.
If necessary, before installing the lining, you can additionally insulate the walls and take care of additional sound insulation. For example, you can use a material based on mineral wool or use a special vapor barrier film.
Any insulation or special foil must be overlapped directly onto the wall itself. You can strengthen them using a special stapler. The bars will need to be attached on top of this material, and not vice versa.
After the walls are prepared, you can move on to the next stage - making the frame, onto which the lining itself will then be attached.
The frame can be made of metal profiles or wood. If you plan to install the lining vertically, then the frame beams should be attached horizontally and vice versa.
It is recommended to pre-prepare slats that will become the base of the frame. Choose them with a width of no more than thirty millimeters.
The first rail, regardless of how the lining will be attached, must be installed strictly vertically. When securing the rail, for example, with self-tapping screws, be sure to use a plumb line. In order for the entire frame to be made in a single plane, you can use threads that need to be pulled between the slats. By following the threads, you can easily install the remaining elements for the frame.
When carrying out the lathing, remember that the distance between the slats should not be more or less than fifty centimeters. After everything is ready, the sheathing must be treated with a special antiseptic.
So, the preparatory stage is completed. Next, you should begin installing the lining itself.
Mounting options
Next, you need to choose how the lining will be attached. The planks are connected to each other by grooves, but they must also be attached to the sheathing.
You can do this in 2 ways:
- Using a clamper. This is a mounting bracket with 2-3 holes. It is put on the lining and fixed with nails, screws or staples. Installation begins from the center of the wall. Its main advantage is that the kleimer does not damage the lining.
- Using self-tapping screws or nails: the first ones are screwed in at an angle, the second ones are driven in. To avoid rust, it is better to choose galvanized or copper nails. Unfortunately, the metal will begin to rust, and leaks may also appear at the fastening sites.
Claymer for clapboardSource mainavi.ru
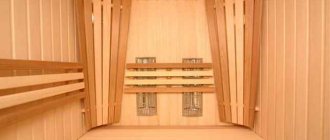
You can easily see how to properly line a bathhouse with clapboard from the inside with your own hands. The lining can be mounted horizontally or vertically. The first method is more suitable for saunas, where the humidity is low, the second - for Russian baths, where there is high humidity.
How to sheathe it yourself?
In order to properly begin attaching natural types of panels, they first need to acclimatize to the room. To do this, the lining is brought inside and left alone for at least two days. You cannot start installation right away, as there is a high probability of warping of the cladding elements. Deformation of the structure will occur if the walls are finished at sub-zero temperatures and high humidity.
Installation of the lining should be done only after the sheathing is fully installed. If the lining is planned to be installed horizontally, the first element must be mounted at the bottom, with the tenon facing up. When the planks are positioned vertically, installation begins from the corner farthest from the entrance to the room.
The first board must be absolutely level. It is correct to take into account both the horizontal and vertical position of the level. Even with a slight deviation of the first panel, subsequent deviations will be quite noticeable. Subsequent lining strips must first be installed in the groove of the previous ones, and then fixed using available means.
Despite the apparent difficulties, it is possible to sheathe walls with clapboard together with insulation and install the frame in a fairly short time. Attaching decorative parts will require special care. Corners and baseboards must be installed with special fasteners or staplers. The wooden lining is additionally impregnated with stain and varnished. Other types of lining do not require additional processing.
The work looks a little different when using aluminum panels. Conventional technology involves installing aluminum profiles from a set of simple modules. Installation is possible using small keys, which are usually used to assemble modern parts of furniture upholstered with plywood.
Despite the elementary nature, the developers strive for maximum variety and original design. The modules can be laid in combination with brickwork. In this case, installation of modules is possible both horizontally and vertically. The cladding is done with loose panels, or they can be nailed in continuous rows. Aluminum panels can be fixed to any height. It is very convenient to sheathe with such a ready-made designer. This technology is accessible even to beginners.
Lining material and its advantages
In this chapter we will look at what material the lining plates are made of.
Plastic
Plastic lining is suitable for covering the ceiling
But it has a huge disadvantage - if you move it carelessly, it can be broken or scratched. The main advantage of plastic over wood is its immunity to moisture.
The panel is also easy to clean without the use of special products. Covering the inside of a private house with wooden clapboard will save time on cleaning the premises.
MDF panel
MDF panels are similar to wood. Lining made of this material copies any surface. Installation will not take much time and effort. Manufacturers offer a large selection of varieties and colors. The material is not moisture resistant and cannot be used in steam rooms or in rooms with a humidity of more than seventy percent. On the website you can see additional information on the material: clapboard finishing inside the house, photos of examples.
Tree
Wooden lining is created from the wood of deciduous and coniferous trees. The following are classified as deciduous.
Linden
It is more common in areas with temperate climates and humidity. The wood of the lining is soft and amenable to processing. Keeps you warm. Has medicinal properties.
Alder
Birch family. Grows in Kazakhstan and Russia. Cladding with this lining will fill the atmosphere of the room with comfort and soft light, with shades of pink.
Oak
Grows from the Far East to the Northern Hemisphere. Over time, the color of the wood darkens, giving the product an antique look. Very strong and durable. Withstands temperature changes and is resistant to moisture.
Coniferous trees include...
Abash
A plant from the Malvaceae family. It has a high threshold of heat resistance and deformation. It has a beautiful chocolate shade.
Aspen
This type of tree is from the Aspen family. It grows in many European countries and on other continents. When heated, it releases special substances that neutralize microorganisms. This type of lining has an average service life.
Cedar
Pine family. Grows on the banks of Crimea. Has a pleasant aroma. Durable. It will give the interior a beautiful and finished look. The price for wood is quite high.
Larch
Family Pine. Wooden panels are not inferior in strength to oak. One of the disadvantages of this type is the accelerated drying of wood. Lining made from such wood will fit perfectly into the interior of the room. Has a beautiful pattern.
Hemlock
Grows in America, directly in Canada. Durable, beautiful. Resistant to external environmental influences.
Kinds
The main types of lining differ in the material from which they are made. Every year new products appear, presented by such materials as:
- Aluminum , it is strictly not recommended for interior decoration due to its lack of resistance to high temperatures and its unpresentable appearance.
- PVC panels will allow you to save on the purchase of material, but will lose in durability.
- MDF is a rather pleasant material that easily fits into any interior. Wiring can be easily hidden under the MDF, and room cleaning work can be done.
Despite innovative technologies in construction, wood is . Various types of wood are used, the most common are linden, cedar, ash, birch, and alder.
The process of finishing a house with clapboard
So, if you decide to cover the interior with clapboard yourself, then you are probably interested in the question of how to cover the inside of a house with clapboard? Of course, we will now describe to you the entire technology of the lining installation process, but if you don’t understand something, then there is a video specifically posted on this page of the site as instructions for use.
Cladding inside the house - vertical installation
First of all, you need to choose how the lining will be located: horizontally or vertically. It all depends on your taste. If a vertical arrangement is chosen, then the slatted frame under the lining is packed horizontally. And accordingly, vice versa, with a horizontal cladding arrangement.
Let's consider the last option in more detail.
To do this, you will have to purchase ready-made slats or make them by sawing boards of the required thickness (25-30 millimeters will be enough). Such material must be dry.
Frame installation
First of all, you will have to align the frame in one plane. Therefore, install the first rail in the corner of the room exactly vertically, use a plumb line for this, secure it with nails to the wall or self-tapping screws. A rail is also installed in the opposite corner. Now stretch four or five strong threads between them, which will define a single plane.
It is along these threads that other frame elements will have to be placed. By the way, the distance between the slats is determined by the range of 50-60 centimeters. And one more tip - be sure to treat the sheathing under the lining with an antiseptic solution.
Cladding the inside of the house with clapboards - sheathing
Installation of lining
The horizontal arrangement of this finish requires one very important point. Each element should be placed with the tongue up and the groove down.
Because there is a possibility of moisture forming on the walls, which, flowing down, will definitely fall into the groove if it is installed incorrectly. The accumulation of moisture is not only a loss of quality of the cladding, but also a high probability of mold formation.
Cladding tenon
Assembling the material starts from the top from the ceiling or from the bottom from the floor, depending on who is used to it. But first you need to bring the lining into the room where it will be installed. The goal is to adapt the material to new conditions. For this purpose, 24 hours will be enough.
The lining is fastened to the frame slats using nails. They must be driven into the back wall of the groove. This is done carefully; you must use a hammer (photo below). If you don't have one, you can make this tool from a larger nail.
It is very important to pay attention to ensure that the back wall of the groove does not crack, this will reduce the strength of the fastening. In addition, there is no need for a tight fit of one cladding element to another. It is optimal if you leave a small gap of one or two millimeters between them
This is in case the humidity inside the room suddenly changes (increases)
It is optimal if you leave a small gap of one or two millimeters between them. This is in case the humidity inside the room suddenly changes (increases).
After the entire operation has been completed, it is necessary to install ceiling and floor skirting boards. If the length of the lining does not completely cover the wall, then it will have to be assembled, adjusted to the size. Today you can find special decorative strips on sale for finishing joints.
We use a doboynik
But now the question arises: is it necessary and how to protect the lining inside the house? This must be done; currently the market offers a fairly wide range of protective compounds, from which it makes no sense to single out just one.
By the way, very often such cladding is simply varnished. But for wet rooms, such as baths and saunas, manufacturers offer special protective compounds that can provide good protection not only from the harmful effects of moisture, but also from elevated temperatures.
Decorating the house with clapboard inside - the final result
General rules for preparing lining before installation
The humidity of the lining during installation should not exceed 14-18%. It must first be kept in the room where the installation will take place. The minimum period is three days, but a week or more is better. During this time, the wood will accept the humidity of the room and will warp less.
Check the geometry of the lining. The groove should be deeper than the tenon, they should fit together without effort. The boards must be level. Anything that doesn't pass the test, put it aside.
The lining must be pre-sanded until smooth. Especially if it has a figured front surface. After installation, you can only sand down minor imperfections. This does not apply to eurolining. It is perfectly processed, often each plank is packaged separately.
Lining on the wall in the room - stylish and modern
Before laying on the walls, the board must be cut into pieces of the required length. Subtract a couple of centimeters from the height of the wall. Leave 1 cm from the end of the board to the ceiling and floor. This gap is subsequently closed with a floor or ceiling plinth. If the floor or ceiling is curved, it is better to cut the ends with the required slope.
How to fasten the lining
After the installation of the frame is completed, they begin to cover it with clapboard. You can attach it in several different ways:
- on nails driven from the tenon side obliquely;
- using a clip, which is installed on the side of the groove and presses its lower part to the base;
- if you use lining with an offset profile (the lower part of the profile under the groove is wider than the top), it is convenient to fasten it with nails from the side of the groove.
With any of these methods, the fastening will be invisible, since it will be covered by the adjacent plank.
What a clamp for covering walls with clapboard looks like is shown in these photos:
It is advisable to cover the joints of the sheathing with the floor, ceiling, door and window openings with some kind of decorative profiles, since these joints do not always look attractive. For example, you can use wooden porticoes, curly baseboards, etc.
Using a block house, imitation timber
Thin and narrow products are attached to clamps. For other types and sizes of such materials, nails and screws are used. If the house is not for permanent residence, it is recommended to resort to classic mechanical fasteners.
For fastening with self-tapping screws, two methods are used: open for thick materials; from the tenon side of medium-thick materials - closed method.
There are four methods for decorating the corners of a block house:
- File the product at an angle of 45 degrees;
- Use a wooden corner when joining two boards;
- Adjust the panel to another one. In this case, the layout is shifted by half the width of the product.
The latter option effectively imitates a wooden frame. However, achieving a figured cutout is not so easy; you will need to skillfully make markings and adjust the panels accordingly.
Creating a frame for clapboard cladding
In accordance with the correct technology for covering walls with clapboards, the first stage of work is the creation of a frame. For it, wooden blocks with a cross section of 15 x 30 or 20 x 40 mm are usually used. If the wall is very flat and smooth, you can get by with flat slats 10–15 mm thick. With such a frame, the useful space of the room will “go away” to a minimum extent. If the wall, on the contrary, is very uneven, with slopes or depressions, thin wooden wedges are used to level the frame, placing them in the right places so that all the posts are placed in the same plane.
Before attaching the frame for wall covering with clapboard, all its elements must be treated with antiseptic impregnation against bugs and mold. If a wooden wall is sheathed, it should also be impregnated with this substance.
In addition, regardless of the material of the wall, you need to pay attention to its lower part - whether it is wet. If there is moisture, it is necessary to cover the bottom of the wall with some kind of waterproof compound - plaster or putty
The backing bars of the frame are placed perpendicular to the location of the lining itself. With vertical cladding, the frame is made horizontally, with horizontal cladding - vertically, with diagonal cladding, the backing bars are laid in the opposite diagonal.
To cover the walls of a house with clapboard, the distance between the frame bars should be 40–50 cm. The ends of the bars are also not laid end-to-end, but with a gap of 2–3 cm. Gaps are left to ensure free circulation of air under the sheathing. In order to achieve an even position of the frame posts vertically and horizontally, use a plumb line and level. The racks are secured to the wall using dowels, screws or bolts, depending on the type of wall. If thin slats are used on a smooth wall, they are attached with glue.
Door or window openings (if they are on the wall) are also lined with backing bars around the perimeter, since the lining adjacent to these openings should rest on frame posts, and not on elements of the door frame or window frame.
The following describes how to properly cover walls with clapboard.
Characteristics of eurolining for walls and its differences
Any wooden lining is made from edged boards, which are obtained after sawing round logs using special equipment. After drying, the board is processed on a milling machine on all four sides to create the required profile and interlocking joints. Finished products are sorted by types and classes, which determine the quality of the resulting products, and then packed into bundles.
Eurolining is manufactured in accordance with the European standard DIN 68126/86. It provides for strict requirements for the geometric shape of the board, the quality of its surface treatment and the moisture content of the source material. Unlike ordinary lining, its European counterpart is distinguished by a wider key joint tenon, which ensures reliable joining of the sheathing elements.
In addition, the panels are equipped with ventilation ducts on the back side that remove excess moisture, preventing the formation of condensation at the joints of the boards with the sheathing elements. This protects the cladding from rotting and the insulation from getting wet. The channels have an additional function: eliminating internal stresses of the material due to changes in humidity and air temperature. In addition, Eurolining has external differences: when installing Europrofile boards, a pattern is formed on the cladding.
Depending on the type of wood and profile, any lining can have a thickness of 12.5-20 mm and a width of 95-135 mm. Classic eurolining has strictly defined characteristics and dimensions:
- board thickness - 12.5 mm;
- total width - 96 mm;
- working width excluding spike - 88 mm;
- board length - from 1.8 to 6 m;
- material humidity - 12±2%;
- number of panels in one package - 10 pcs.
The surface of the eurolining is manufactured according to the “Soft Line” and “Standard” options. The first version of the panel provides for rounded chamfers of the board. The cost of the panels depends on the type and species of their wood and ranges from 100 rubles/m2.
Useful information
Both private houses and apartments, bathhouses, public institutions and utility rooms are often lined with clapboard. You can sheathe the eco-friendly and convenient material not only on the walls, but also on the ceiling. In essence, lining is panels of different lengths and widths, sometimes with grooves and locks (tenons) along the edges for better fastening. It is attached to a special sheathing, and there are several methods of attachment, which we will talk about a little later.
Initially, the finishing of the premises was carried out only with lining made from different types of trees; the price of the material varied depending on the value of the wood. A little later they came up with MDF - the same panels, but made from glued pressed chips. The environmental friendliness remained, but the weight of the material was significantly reduced, and installation became simpler and easier.
What can be trimmed with clapboard?
There is no classic single finishing method. Due to the versatility of wooden boards, they are used both for decorating walls or ceilings, and for decorative purposes.
Ceiling
If the usual painted or suspended ceiling seems boring to you, try panels! Natural red tones will make a lining room more comfortable, dark ones will create an accent and “ground” the ceiling a little, light ones will add air.
This ceiling is used in the living room, kitchen, and hallway. But in the bathroom it is better to abandon this decision - high humidity will significantly reduce the service life of wooden panels.
Lining on the walls
Some people believe that decorating walls with wood is only suitable for private houses and cottages. On the one hand, the closer to nature, the more natural the wooden lining will look. Moreover, natural styles are often used in the design of dachas and country houses - country, chalet, Provence. In them the tree looks harmonious.
On the other hand, no one forbids adding country charm to the apartment. For urban conditions, painted lining is best suited. With its help you will create a unique, cozy interior.
In the photo there is a yellow lining in the bedroom behind the headboard
Window slopes
Plastic slopes reduce the cost of finishing and are not suitable for all interiors, so inside apartments and houses they often resort to finishing windows with lamellas.
The panels are secured in two ways: on the lathing (the same option is used for walls and ceilings), or with polyurethane foam.
Wardrobe made of lining
In apartments, the interior with lining on the walls can most often be seen on the balcony
This same room is a storage room for many people, so it is important to organize storage space here. In order not to ruin the overall appearance, the cabinet is also made of planks
This is a simple, inexpensive and functional solution.
Another place for such a structure is the attic. You don't have to order special furniture for sloping ceilings - create a frame made of wood and use it as a built-in wardrobe.
The photo shows a lining cabinet with louvered doors.
Doors
Does your front door not fit into your interior or is it already outdated? Don’t rush to order a new one: paint it on the outside and cover it with clapboard on the inside. Thanks to the wood, the entrance area will become more comfortable, and by painting it the same color as the walls you can achieve a dissolving effect. Wood also acts as a soundproofing material, so the apartment will be much quieter.
Boards are laid not only horizontally or vertically - there are many ways to lay them out. An original panel on the door can play the role of decor.
As an independent decor
Cladding boards can act not only as a finishing material, but also as a decorative element.
- One way to use it is to create a dramatic accent wall. You can lay out a fancy pattern, paint the panels in bright colors, or do both.
- The second way is to create a panel. Save money on art for your home: make it yourself. All you need to do is think through the layout of the boards and connect them together.
- Method No. 3 - false beams. This decor is used if it is necessary to make the interior more rough and rustic.
In the photo there is lining on an accent wall with a decorative fireplace
Algorithm of actions for securing canvases
Wood paneling can be done on any surface of the room, even on the ceiling. The peculiarities of fastening lie in the choice of the direction of laying the lamellas, since the design of the lathing and the method of fixing the sheets are fundamentally different.
On the wall
Most often, the lining is attached in a vertical direction. This allows you to slightly visually raise the ceiling and create a feeling of space in the room. To correctly install the panels on the wall vertically, you must adhere to the following operating procedure:
- Measuring the perimeter of the room and the height of the ceilings. It is assumed that the amount of material has already been calculated and purchased, so these measurements are needed for installing the sheathing (for what you need lathing for the lining and how to make it, read this material).
- The frequency of arrangement of vertical bars along the surface is calculated. In order for the structure to be strong and the material not to be overused, it is necessary to fasten the bars at a distance of 0.6-0.8 m. The number of linear meters of the frame beam or metal profile is calculated based on the measurements obtained and the number of lines (the first and last planks are attached at a height of approximately 0.1 -0.2 m from the floor and ceiling). All lumber is cut according to calculations.
- Using a building level, a horizontal line is drawn, relative to which marks will be applied for all sheathing lines. It is necessary to take into account the “play” of the floor and ceiling, if there is one, so all the lining must be carefully measured and cut along the line of the floor and ceiling, but attached along the horizon line.
- Using a hammer drill or impact drill, you need to drill holes for the dowels in the block attached to the notches. This is done one by one with each line so as not to confuse them. The hole frequency should be approximately 0.4-0.7 cm depending on the type of wall. The most convenient frequency of fastening is determined by the situation.
- After creating the frame, measurements of the lining panels are made for each subsequent element. If the height of the ceilings, as well as the floor level, are the same, then you can cut the material according to one template.
- The first element is attached with a comb to the corner (read about how to make corners from lining here). The horizontal line is checked with a plumb line on the thread. The longer the thread, the more accurate the result of deviation from the horizon. According to this indicator, the canvas is leveled and fixed.
- All subsequent planks are fastened by placing the ridge of the next element in the grooves of the previous one.
Attention The choice of fastening method does not determine the procedure or principle of laying the canvases. But when choosing self-tapping screws, it is necessary to additionally drill the lining at the point of attachment to the sheathing
This will prevent chips or cracks from appearing in the material.
With horizontal fastening, the essence of the technique is similar. The location of the sheathing bars is different - they must be attached vertically. Installation is performed as follows:
- After selecting a plank of suitable length, it is laid horizontally, pressing it tightly to the floor so that the ridge “looks” upward.
- The beginning of installation is from the corner of the room farthest relative to the entrance.
- The first board must be attached strictly horizontally, so its location is recorded and secured with a building level.
- All subsequent planks are inserted with grooves onto the ridge of the previous ones.
Corners and plinths are installed after the room has been completely covered with clapboard.
another publication here
To the ceiling
Sheathing the ceiling with wooden panels is somewhat more difficult, since it is impossible to get rid of it without help. It is difficult to accurately position the lamellas and securely fix them, taking into account the significant weight of one canvas if its length is more than 5 m. Using a similar scheme, as for walls, the required material and the length of the structural components are calculated. Special finishing nails are used less often; self-tapping screws are used more often, which will ensure more reliable fastening of the cladding.
It is recommended to leave a greater distance between the individual bars than when installing the structure on the walls. When constructing a metal sheathing, the frame will be mounted on special hangers with a guide profile secured.
Important The finishing of the ceiling must be treated responsibly, since the possibility of a massive structure falling due to poor-quality fastening can lead to dire consequences. Therefore, it is better to enlist the help of craftsmen. We offer you to watch a training video on the topic “How to sheathe a wall or ceiling with clapboard without visible fasteners”:
We offer you to watch a training video on the topic “How to sheathe a wall or ceiling with clapboard without visible fasteners”:
Here
Recommendations
Installation of the lining must be carried out in accordance with the rules. At this stage there should be no omissions or defects, otherwise the cladding may turn out to be fragile and will not last long.
Between the planks and the base (wall, facade, ceiling, etc.) there must be a ventilation gap of 1-2 centimeters. It is often overlooked during installation, covering the ventilation space with thermal insulation. For normal ventilation, an empty space must be left between the installed lining and the ventilation layer. If this is not done, the material will begin to get wet, crack, and bend.
If during the work no space was left for ventilation, the casing must be dismantled. If there is insulation, there are 2 ways to create a ventilation gap: you can remove part of the insulation or “build up” the frame, thereby increasing the distance between the base and the sheathing.
During the installation process with your own hands, when aligning the eurolining strips, you must act extremely carefully. In order not to spoil the material when tapping their ends, it is necessary to correctly calculate the impact force. In fact, due to the fear of breaking off the groove, small distortions of the planks are often left during installation. This should not be allowed - the material must be laid perfectly evenly, exactly parallel to the starting plank. Otherwise, the distortion will only increase, causing the entire cladding to be crooked.
If the boards are already installed skewed, you need to find the one that caused the discrepancy. All sheathing installed after it must be removed. Then the uneven plank is leveled and the lining is mounted again.
Wood expands when heated and contracts when cooled. To compensate for the transformation of its dimensions, when laying the sheathing along its contour, a space of several millimeters is maintained. If the installation is carried out without a gap and the boards rest against the walls, the sheathing will be subject to deformation over time. To correct such a mistake, you need to dismantle the baseboards and trim the edges of the strips a little. So, when facing walls, the outer planks should not reach the corners by 5-6 mm. The same thing applies to joints with ceilings and floors.
Often the lining is fixed to the frame using clamps (brackets of a special configuration). Meanwhile, conventional staples can only be used when it is necessary to sheathe interior and dry rooms. For external cladding, as well as for cladding rooms with high humidity, it is better to use nails or self-tapping screws. In such cases, standard staples do not provide a very reliable fastening and the skin becomes deformed as the wood becomes damp, as well as under the influence of sudden temperature fluctuations.
If the cladding of a room with high humidity or a facade is done using not very strong brackets, the fastenings must be strengthened. The easiest option is through fixation using nails or self-tapping screws. It is necessary to take into account that in this situation their caps will be visible on the surface of the skin. If this is unacceptable, then the lining must be removed and laid again using more reliable fasteners.
In accordance with the regulations, eurolining must be covered with protective agents after installation. In fact, this is not always done; as a rule, the material performs its functions without special coating. The result of this is the appearance of fungal growths on the surface. If the tree has not yet deteriorated, it is necessary to apply a protective substance to it as soon as possible. If fungus has already formed, the surface of the boards must be treated with a special anti-fungal agent, and then applied protection. In some cases, before applying protection, the surface is sanded to remove damaged wood.