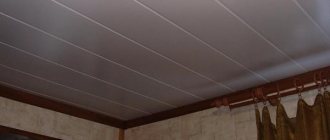
A fireplace box is a structure that partially or completely covers the fireplace chimney pipe. It is needed, first of all, for thermal protection of the walls of the house. The main material of the box is heat-resistant plates (calcium silicate). For structural strength, the box can be reinforced with a metal frame on top of thermal protection boards, and covered on the outside with gypsum fiber sheets. The box can also be made of oven bricks or plasterboard and basalt wool. Although the latter method is rarely used anymore. But the box is not only a fire safety element, but also a decorative one, the design of which determines how the fireplace and the entire room will look.
Often the fireplace box occupies a fairly large area.
It can be made invisible, hidden in the wall, or it can be emphasized with the help of original design and decorations. What types of fireplace boxes are there and what are the possible options for their design and decoration?
Cladding a fireplace from GK panels in 10 steps
Both traditional open fireplaces and more modern closed fireplaces require a suitable surround. It can be made of granite, clinker brick or marble. However, these materials are not the cheapest.
Table of contents
An alternative is to use special drywall, which we will write about in this article.
Selecting the portal shape and design style
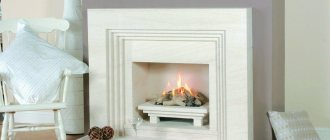
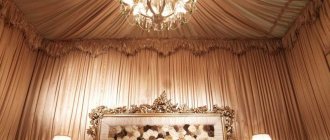
The portal should be designed after the electric fireplace has been purchased. Firstly, this way you can take exact dimensions taking into account ventilation gaps and cord release. Secondly, it will be clear in what style the entire set should be maintained. Today, decorative fireboxes without pronounced design elements are very popular - any portal that is in tune with the interior of the room itself will suit them. But if the electric fireplace has a decor on the visible part that emphasizes its belonging to a specific style, you will have to focus on it.
This electric firebox is already decorated with rich decoration in a classic style
Main portal design options:
- Country - for a small room, a compact structure made of painted or simply varnished light wood is suitable. In spacious rooms, lining with decorative bricks or a plastered surface, partially lined with artificial stone, looks better.
- Victorian - high-quality carved portals made of expensive types of wood, decorated with gilded monograms and moldings. The cladding with slabs imitating polished stone, but always in dark tones, looks great.
- Classic - symmetrical structures with marble finishing or plastered portals with discreet stucco. A distinctive feature is the imitation of columns or at least a hint of them in the form of vertical stripes of framing panels. Such models are made of polyurethane or gypsum.
- Modern styles (urban, hi-tech) usually do not require the creation of a bulky portal, being content with a modest frame of a simple shape made of metal or painted glass. A minimum of decor and compactness are the main rules of these trends.
- Chalet or Romanesque style - despite the significant differences between the two design directions, fireplaces for them are designed approximately the same. Bulky structures faced with stone are welcome here, and the shelf and pedestal decor are made of an array of rich tones.
As for the shape and dimensions, it all depends on the characteristics of the room and the chosen location for the future fireplace. Since this interior detail attracts special attention, it is better to allocate a free wall to the hearth without unnecessary decor. At the same time, the portal must be proportionate - you should not install an overly bulky and lush structure in a cramped room. The standard shape for wall-mounted models is rectangular.
Regardless of the execution, tradition requires the installation of a small pedestal at the base of the fireplace. Its width should be 30 cm larger than the portal, and its height can reach 20 cm. However, here the owners are free in their choice, but without a stone or brick pillow, an imitation of a real hearth will not seem very plausible.
The wide marble-effect pedestal gives the electric fireplace greater significance
Corner models of electric fireplaces always look impressive; moreover, they do not take up much space, so they are worth choosing for small apartments. The design can be either the simplest - repeating a triangle in cross-section - or prismatic. For fireplaces with panoramic semicircular glass, it is also better to make the portal radius: thanks to it, the whole set will look more harmonious.
Wide corner portal does not take up much space
What do you need to know before making your own fireplace mantle?
During operation, the fireplace insert heats up to 400 degrees C. This means that the fireplace can overheat and you can get burned on it. Therefore, its body must be made of fire-resistant materials and protected from overheating. This will allow the thermal energy to be dissipated evenly.
The insert must be installed in such a way that the air supply is not blocked, and holes are also made in the upper part of the portal. In turn, the portal should be supplemented with grilles made of non-combustible materials (brass, steel or aluminum), through which part of the warm air will be discharged into the room. Grilles, however, must be installed both at the top and bottom.
To insulate the back wall of the fireplace (it will not heat up unnecessarily) and the body, inserts are best made from panels or mineral wool. They usually have a thickness of 25-30 mm. Aluminum grates are attached to the portal using a special glue, which reflects heat inside the fireplace body (this increases its efficiency). Self-adhesive aluminum tape is used to join boards and is resistant to high temperatures. You can supplement the fireplace box with the help of silicate-lime, vermiculite and perlite slabs. All these materials are easy to process and can be cut with a hand jigsaw.
Below is an example installation diagram (this may vary depending on the manufacturer's instructions for the fireplace insert). It is clear that the body also serves as a finish, and also protects the firebox itself from overheating.
What is the design
In this situation, we are talking about a structure that consists of a metal firebox and facing material. For comparison, in a classic fireplace, the firebox is made of fireclay bricks. It is able to withstand high temperatures and release the heat received from the fire.
A metal firebox is very beneficial because:
- Manufacturers simulate and optimize it using computers. Its shape is made to minimize heat loss through the chimney .
- The materials used are special alloys, composites and organosilicon .
Using GK panels for lining a fireplace insert
Drywall can be used for lining fireplaces and chimneys, taking into account the following notes and recommendations from manufacturers of chimney and fireplace systems:
- only suitable panels with the required thickness and fire-resistant properties (Nida Ogien type F or Nida Ogien Plus) should be used for the fireplace and chimney casing.
— drywall should not have direct contact with open fire and the walls of the firebox or chimney. It must be insulated on the inside, for example, with mineral wool, covered on one side with a layer of aluminum foil.
- Using commercially available casings, cover the fireplace or chimney with plasterboard so that the temperature of the plasterboard on the interior wall does not exceed 50 degrees C.
- only fire-resistant plasterboard, which does not emit harmful substances when heated strongly, can be used as a box for fireboxes operating on solid fuel.
Specialized panels Nida Ogien type F or Nida Ogien Plus will not only aesthetically cover the firebox, but also provide sound insulation. The desired effect will be achieved when the fireplace works and distributes heat throughout all rooms in the house.
Installation of the firebox, installation of the frame
The fireplace insert is finished with plasterboard directly at the installation site. Therefore, first they install the equipment and only after that they begin to install the frame:
- A porcelain stoneware slab is installed using mastic or special glue. Time is given to harden.
- A firebox is installed on the stove. We should not forget about the technical gap between the wall and the equipment of 100 mm.
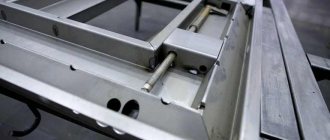
- The dimensions of the future structure are marked on the base and wall, and a frame is assembled from guides and rack profiles. All work is carried out strictly to the level. The frame is fixed to the wall and floor using metal dowels. The profiles are fastened using press washers.
As you can see, assembling the structure for drywall should not cause any difficulties.
When designing a fireplace, it is necessary to take into account that this equipment is flammable and a fireproof fireplace must be used.
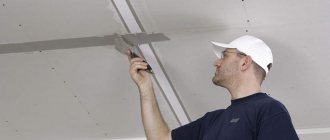
Instructions for making a casing for a fireplace from plasterboard
Below you will find instructions on how to make a portal for the fireplace, which you can see in the photo below.
Remember! After all installation work has been completed, you need to light the fireplace and check the portal for leaks.
Read also: How to make a victory scarf with your own hands.
Mark the location of Nida UD 27 profiles on the ceiling and floor.
Insert Nida CD60 profiles into Nida UD27 profiles. Screw them together using 1mm flat head sheet steel screws - one for each connection.
Attach Nida Og Plus drywall to the metal structure. Use fire safety rules, increase the distance between screws (every 15-17 cm).
Remember! During installation, this is what the camera will look like (see photo below).
Each fireplace manufacturer has its own requirements for installation and installation work, and they are explained in detail in the instructions. There is information about the required distances, expansion joints and types of gratings. If you do not have instructions and recommendations, contact the manufacturer.
For some manufacturers, a poorly made casing can cause malfunctions in the fireplace and the loss of the opportunity to provide free warranty service.
Bevel the cut edge of the drywall at a 45-degree angle, clean off dust and moisten with water (or primer).
Prepare Nida Start putty according to the instructions on the package.
Fill the plasterboard joints with prepared putty.
Remember! You need to press firmly on the gap between the Nida Ogien Plus boards so that the putty is fully absorbed. Use a spatula for this. The putty is taken in small portions and transferred to a flat surface.
Finishing butt seams and outer edges of drywall.
Where there are joints at the panel junction (in the same plane), use non-woven reinforcing tape, mixing it with the first layer of Nida Start plaster. Do the same with the aluminum corners, which are fixed with putty.
Once dry, secure everything to the surface using Nida Finish plaster.
Remember! You need to prepare Nida Finish putty using the instructions for this composition.
Install the necessary ventilation grilles to remove hot air. They must be made of non-flammable materials (brass, steel or aluminum).
After assembling the frame, apply paint of a suitable color to the surface, which will be in harmony with the decor of the room.
You can also assemble the fireplace box on a beam built above the firebox level. The structure in this case is created from Nida UD27 profiles.
In this case, the profiles are sheathed with plasterboard of the Nida Ogien Plus variety, in compliance with the rules and instructions described above.
Also in our online store you can buy cladding, fireboxes, chimneys.
Design
This is the very first stage, during which several important points should be taken into account, especially for functional fireboxes:
- It is necessary to determine the location for the equipment in the room relative to the walls and furniture arrangement. At the same time, do not forget about fire safety: the distance from flammable surfaces to the firebox is at least 700 mm.
- The base for the equipment is recommended to be made of concrete with a height of 300 mm. The perimeter of the foundation should extend beyond the dimensions of the firebox by 250 - 300 mm on each side.
- The recommended gap between the firebox and the plasterboard structure is 50 mm.
- An air vent box should be provided.
- Podium. The design must provide air flow for heating and support the weight of the firebox.
- The thickness of the fireproof wall finishing and a technical gap of 100 mm between it and the firebox.
- To accurately determine the dimensions of the portal, you should take into account the parameters of the facing material: profiles: guide – 27×28 mm and rack – 27×60 mm). For cladding, it is recommended to use fireproof or moisture-resistant plasterboard with a thickness of 12.5 mm.
- The design of the portal and its decoration should fit organically into the interior.
How to make a fireplace box
A fireplace box is not just a decorative component, but also a complete, reliable protection of the structure itself from fire. The fireplace box can be made of any shape and size, and our stove or built-in firebox will be located inside it.
Table of contents
It is important that the materials chosen for assembling the box are non-toxic, safe and, very importantly, fireproof. That is, the materials must be able to withstand heating temperatures well, at least 800 degrees Celsius.
A properly made box will have good thermal insulation characteristics and will be able to protect the firebox from overheating and the house from accidental fire.
Application of plaster
This surface decoration option has a lot of advantages, which include an affordable price and minimal time costs. Despite the visually simple composition of the material, it can be used to achieve an interesting pattern and surface design.
Advantages of this material
One of the most budget-friendly finishing methods. It has an affordable price with high quality coating at the output.
The plaster retains its original appearance for a long time; the surface does not crack or darken over time. Does not require special or complex care.
The material can be used both for decorative units and for devices in which a real flame burns in the hearth, or there is a heating element.
This design method allows you to profitably save not only effort, but also time, thanks to simple application and minimal drying interval.
Depending on the chosen application technique and the color of the plaster, the surface can be made either simply smooth or applied with any pattern - with a sponge, spatula or other tools and devices.
Plaster can be used for both decorative and wood-burning, electrical installations, depending on its fire resistance class and properties. Before using this material, you must read all the requirements and recommendations of the manufacturer (insert leaflet or instructions on the package).
You can learn more about examples of works decorated with this material by looking at the photos in this article.
Advantages and features of box manufacturing
A fireplace box made with your own hands or with the help of a craftsman has the following advantages:
1. Home safety. With the help of such cladding, the house is reliably protected from accidental fire.
2. Fireplace safety. The hearth itself does not overheat and releases the generated thermal energy in a timely manner.
3. Protection from burns. Insulating the firebox helps protect loved ones, children and pets from accidental burns.
4. Stylish and original appearance. Such a box is not only complete protection, but also a stylish and beautiful cladding. With its help, you can give an original appearance to the heating unit and decorate it in a certain style.
Read also: How to make a corner kitchen with your own hands.
5. Increase in thermal power. Thanks to a properly assembled and insulated fireplace box, your fireplace will efficiently and correctly consume and accumulate thermal energy. This will also increase the efficiency of your heating unit.
Before you start designing and assembling a fireplace box, it is important to know what elements such a frame consists of:
1. Ventilation. With their help, air flows are evenly distributed both above and in the lower part of the fireplace box.
2. Corrugation. With the help of this structural element, heated air flows are distributed and thus it is possible to heat not one, but several rooms in the house at once.
3. Isolation. This integral component is necessary to ensure that the fireplace and portal, as well as the house itself, are reliably protected from heat and accidental fire. If the insulation is done correctly and of high quality, the efficiency of the heating unit increases and the efficiency of the heating unit increases.
4. Protective screen. Fireplaces that are installed very close to the walls should have such an integral component. Also, protective screens are simply necessary if the walls, floor and ceiling are not insulated in the room and they are made of flammable materials.
5. Walls. They are the basis of any fireplace box; they, like other elements, serve as protection against overheating and fire. For the construction of such partitions, durable and fire-resistant materials are used, such as plasterboard, gypsum plasterboard, which is based on calcium silicate.
If we talk about the materials from which such boxes for fireplaces are assembled, then we can single out several worthy ones. The first is gypsum board, it is distinguished by its long service life, it also tolerates direct exposure to moisture and does not allow it to pass through. Also, the advantages of this material include a high degree of thermal insulation and strength.
If you want to install the fireplace box yourself, we recommend using the following short guide:
1. The basis of any fireplace box is the frame, which is made of durable, deformation-resistant and fire-resistant materials. Mostly for these purposes, specialists use galvanized sheets. With their help, you can separate certain parts of the fireplace so that they do not intersect with each other and do not overheat.
2. At the second stage of the work on arranging and assembling the fireplace box, it is necessary to carefully and completely seal and seal all seams and joints of such a structure. For these purposes, you can use foil tape.
3. Now you need to create a special protective layer. For these purposes, heat-insulating materials on a fire-resistant basis are used.
4. At the last stage of carrying out assembly work with your own hands, it is important to fasten and securely fix plasterboard in sheets or any other material suitable in terms of its characteristics and features to the surface.
Let's look at these materials in more detail.
GKLO drywall has a high degree of fire resistance, since it contains a material based on a fiberglass layer. As a result of such manipulations, a multilayer material is obtained. Superizol is a solid, reliable material - a highly porous slab on a silica-lime base. Drywall differs in that it produces too much dust during installation. That is, when working with this material you need to use a respirator due to the danger. Superizol will not suffer from such a disadvantage, which is very attractive. Regarding hardness, GKLO drywall will be much more attractive and reliable. Superizol has much weaker strength characteristics. In view of this, you can easily make another practical option for yourself, but after installing the gypsum plasterboard box you will experience difficulties in using it. Decorative finishing will be difficult if gypsum board is used as the material, but if finishing is not planned, then its use is quite appropriate. In terms of its hardness, superisol is slightly inferior to the standard gypsum board gypsum board, which has a good effect on the processing of the material. But it’s bad for subsequent processing of the box if you want, say, to finish it with natural or decorative stone, tiles or other materials.
Assembling a fireplace box
If you are going to assemble such a fireplace box with your own hands and do not have the necessary skills and experience, we recommend that you familiarize yourself in detail with the following tips, recommendations and step-by-step guidance for this process:
1. To assemble such a box, it is important to use only fireproof materials. Specifically speaking, two types of materials are suitable for this. The first is plasterboard marked GOST 6266-97 with a marking that it is fire-resistant. The second material suitable for assembling the box is Superizol, which is produced in Denmark and, like plasterboard, fully complies with all the characteristics and features. Superizol consists of calcium silicate, which is safe, non-toxic and fire-resistant.
2. Superizol is able to withstand heating temperatures from 350 to 850 degrees Celsius, which is a very good indicator. If you use this material to assemble the box, it is recommended to additionally create fireproof protection for the walls in the room in which your hearth will be installed. Superizol is suitable if you are going to use the fireplace almost every day and for at least several hours, as it is resistant to high temperatures and sudden changes.
Read also: How to make a border post with your own hands.
3. To assemble a fireplace box, you need to acquire a tape measure, a building level, metal scissors, an electric drill, a respirator, a spatula, and marking tools.
4. The fireplace box consists of a reliable, durable and deformation-resistant metal base. The best and most suitable for fireplaces and stoves are frames based on aluminum or steel. If another material is used, it is important that it has good strength and is not prone to corrosion.
5. The fasteners with which such a box will be attached to the wall in the room must be made of durable galvanized material. It is important that the wall itself is initially prepared accordingly. It must be fireproof or have the necessary layer of heat-insulating protective materials.
6. The elements of the metal frame are also connected to each other using self-tapping screws. It is strictly not recommended to use welding, as it will not only fail to securely fix it, but will also damage the frame itself and make it less reliable and durable.
7. After assembling the frame and before securing it and fixing it to the wall, it is important to check its evenness and stability. It should be perfectly level, check this using a building level and a plumb line.
8. Now, you need to fix the frame to the wall and, after checking its evenness and stability, prepare the heat-insulating material. Choose the one that suits you best, as mentioned earlier - it could be drywall or Superizol. The material is secured using self-tapping screws, after which the structure is checked for cracks and gaps, which also need to be eliminated using refractory compounds. In order for the box to be durable and not subject to strong heating, it is necessary to insulate it in two layers.
9. At the last stage of the work of assembling the fireplace box with your own hands, it is necessary to perform its decorative lining. For these purposes, fire-resistant materials are also selected and used, such as artificial and natural stone, porcelain stoneware or tiles.
It is important to remember that in order for the surface of the box to be perfectly smooth, even, and ensure good adhesion of the cladding to it, it is necessary to putty the plasterboard or Superizol and only then begin decorating. Portal with different materials. In order to glue stone or tile to a surface, it is important to choose a special heat-resistant adhesive that can withstand high degrees of heat.
A fireplace box is not just a decoration for a fireplace and a place to install a firebox - it is a way to increase the efficiency and efficiency of your heating unit, to distribute heated air through one large or several rooms of the house at once.
Installation of the firebox, installation of the frame
The fireplace insert is finished with plasterboard directly at the installation site. Therefore, first they install the equipment and only after that they begin to install the frame:
- A porcelain stoneware slab is installed using mastic or special glue. Time is given to harden.
- A firebox is installed on the stove. We should not forget about the technical gap between the wall and the equipment of 100 mm.
- The dimensions of the future structure are marked on the base and wall, and a frame is assembled from guides and rack profiles. All work is carried out strictly to the level. The frame is fixed to the wall and floor using metal dowels. The profiles are fastened using press washers.
As you can see, assembling the structure for drywall should not cause any difficulties.
When designing a fireplace, it is necessary to take into account that this equipment is flammable and a fireproof fireplace must be used.
Finishing work: finishing the fireplace and connecting the fire simulator
Having created the surface of the product, we proceed to the final operations. It is important to decide on the composition of the work before it begins, by making a design project or sketch. The decision to decorate a fireplace from plasterboard should be supported by your abilities. If you doubt them, it is better to limit yourself to the type of finishing that you are ready to perform with sufficient quality.
Which is better: heated floors or radiators?
Warm floorBatteries
One of the options for a simplified solution could be the use of ready-made tiles or panels, which can easily be used to decorate the fireplace portal. A simple lime paint or metal finish looks good. The main thing to remember is that the design of fireplaces is endlessly varied!
Next, you should install the electrical wiring through a pre-designed or locally made inlet hole. Install a fire simulator, turn it on, pull up a chair and tell your friends that now you know how to make a fireplace from sheets of plasterboard with your own hands.
Planning stage
It is worth noting that a self-made portal for an electric fireplace is stationary and cannot be adjusted or altered in the future. Therefore, it is very important to make the correct calculations and dimensions so as not to suffer from design flaws later.
Drawing
To avoid design errors, you should create a drawing. Using it you can correctly make markings for the fireplace and assemble the frame of the portal and base.
Final stage
At the final stage, we have to do the most interesting thing, namely finishing the created portal. And we will also do this work with our own hands. But first we need to decide on the material for decorating our makeshift fireplace. To do this you can choose:
- Fake diamond;
- Ceramic tiles;
- Facing brick;
- Wooden panels;
- Mosaic.
Sandstone in finishing
The choice is quite large, especially if our fireplace will not heat anything. But first we must prepare the foundation for future finishing. To do this we need to take putty and serpyanka. First, we fill all the voids on the sheets themselves, where the screws were screwed in, as well as the joints, to obtain a single plane. Then we glue each seam with serpyanka to get a reinforcing layer that prevents the material from coloring. Next we apply a layer of putty again.
Drywall portal
After the portal has dried, we must sand the putty areas with our own hands and prime the surface of the fireplace. Then it needs to be given time to dry again. When all the preparatory work has been completed, we can begin finishing work.
Whatever material we choose, it should be installed carefully. Plasterboard sheets are quite fragile, although they can withstand the load. But when laying tiles, when they need to be pressed tightly against the surface of the portal, careless movements can lead to breakage of the base.
Calculating the socket
The power cord coming from the fireplace can ruin the whole picture. But you still need to install the socket outside the portal in order to have free access to the plug. The distance to it is limited by the length of the cord of the artificial hearth without tension. But the technical side of the issue requires more serious calculations.
The outlet must be able to withstand the current supplied to the fireplace. It is not difficult to determine its amperage: you need to divide the power of the device by the network voltage (220 V) and add 10% reserve. Purely decorative models usually consume no more than 500 W, that is, the maximum current in the outlet will be:
500 ÷ 220 x 1.1 = 2.5 (A) - even old Soviet 6 A equipment can handle this load.
Electric furnaces with a heating function have higher power - about 2–2.5 kW. Using the same formula we get an amperage of 12.5. That is, you need a standard modern 16 A socket, to which you only need to connect the wire from the junction box. Use a copper three-core VVG cable with a cross-section of 2.5 mm2 - it can withstand a current of 19 A and a load of about 4 kW.