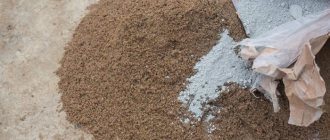
Many types of construction work cannot be done without cement-lime mortar. According to its structure, the material is distinguished by its plasticity and strength. Builders often choose it also due to its excellent adhesion properties. To prepare a high-quality mortar for plaster, it is enough to combine the dry ingredients in certain proportions, which include crushed crushed stone and sand in a ratio of 1:5. You can take less of the last component, it all depends on the desired density of the solution.
After the dry ingredients have set, milk of lime is poured into them. By varying its amount you can achieve the desired thickness. If you want to prepare lime milk yourself, take potassium oxide and dissolve it completely in water so that the result is a liquid of uniform consistency.
Lime: properties and applications
The positive properties of lime are strength and high adhesive ability. One of its main advantages is its rather low cost, which will ultimately affect the overall construction budget.
Lime added to the plaster solution has antiseptic properties, preventing the formation of mold and mildew on the surface of the walls.
The most important property of lime is its plasticity, which binds all the components of the batch into a homogeneous mass. The finest particles of calcium hydroxide are able to hold water on a rough surface, which reduces friction between the components, creating a so-called “lubricant”. Lime is added to the batch instead of synthetic plasticizers.
There are several basic recipes for preparing the mixture. But before using them, you need to figure out how to extinguish lime.
Lime slaking before mixing
To prepare various types of emulsions, slaked (hydrant) lime - calcium hydroxide - is used. First, it should be extinguished with water. To do this, take a container of a suitable size, for example, a barrel or trough. The container must be rust-free metal, wood or plastic.
Slaking lime in metal containers Source orchardo.ru
Considering that the mass after slaking will increase significantly, the container is taken three times larger than the original volume of quicklime. To slak large quantities of lime, a hole is prepared in the ground. Lumps of lime or ground powder are placed in the container and filled with a sufficient amount of water.
Attention ! When combined with water, a chemical reaction immediately begins - the lime begins to boil rapidly, so you need to be careful not to get burned. Safety measures include special protective clothing, rubber or silicone gloves, and safety glasses.
During the hydration process, cold water is used in the following proportions:
- Extinguishing the fluff – 1 liter of water per 1 kg of lime;
- Slaking of the “dough” - 0.5 liters of water per 1 kg of lime.
Vigorous boiling continues for 36-48 hours, the mass is thoroughly mixed several times. Once hydrated, let sit for two weeks before passing through a sieve to remove any lumps. The hydrant mixture is ready for use.
Lime slaking Source infourok.ru
How to apply?
The first stage of applying lime plaster is spraying. Some people skip it, but it’s better not to do this, because the spray allows you to ensure a good connection of the surface with the plaster mixture. It is better to use a solution that resembles jelly in consistency: it should contain a little more water than usual.
Place the mixture on a trowel and begin dripping it onto the surface. Then the material will need to be stretched a little, but you should not make the coating perfectly smooth. Wait a day. After this, you can apply another layer.
You can make the main layer quite thick (about 50 mm). The plaster must be applied with a spatula and stretched using a trowel. The layer must correspond to the level at which the beacons are located. Make movements from top to bottom. Having finished processing one area of the surface, remove excess plaster using the rule.
Then you need to cover it. For this, a more liquid material is used (as for spraying). The thickness of such coating should not exceed 3 mm. After application, you will need to level it and wait two to three hours. Then you should treat the entire surface using a grater with coarse sandpaper. After this, you will need to use fine-grained sandpaper.
See below for more details.
Preparing sand for preparing lime mortar
Several types of sand are used at construction sites:
- River.
- Career.
- Crushed mining waste.
- Quartz sand is used for textured or artistic plaster.
- Barite - for medical institutions and for protecting walls from background radiation.
Sometimes, instead of sand, marble chips are used as filler for decorative surface finishing.
Sand is selected taking into account the fraction and shape of the grains. Coarse grain interspersed with shells is not suitable for forming and leveling walls.
Quarry with a small addition of clay will be an ideal filler for cement-lime plaster. The small cross-section and irregular shape with sharp edges contribute to good adhesion to the surface. A small percentage of clay will prevent the emulsion from settling quickly.
Before mixing, the sand is sifted through a fine sieve with a fine mesh of 3 to 5 mm. This fraction is suitable for starting plaster. For finishing, sift through a sieve with a mesh size of 1-1.5 mm. In the process, pebbles, shells and other foreign inclusions of the large fraction are eliminated. Shell inclusions are suitable for exterior decoration of facades.
River sand, sifted through a sieve Source www.stroyportal.ru
Types of lime mortars
In practice, several mixtures with lime are used:
- Gypsum-lime;
- Lime-clay;
- Cement-lime;
- Terrasite.
The most common cement. With gypsum, the emulsion is used for finishing, when a perfectly flat surface and quick drying are required. And they are used with clay quite rarely - for stoves, fireplaces and mud huts in rural areas. For each recipe, it is necessary to select and prepare all the components.
A type of lime mortar Source talkdevice.ru
Gypsum for mixtures
Lime-gypsum mortar for plastering walls is used only indoors with low humidity.
Advantages of gypsum plaster
This coating is used on ceilings due to its low mass. The walls are covered with a layer of about 5 mm, this allows you to consume significantly less material than when using plaster mortar with cement.
Advantages of coating with this composition:
- Easy vapor conductivity - moisture does not accumulate under the layer of material, good ventilation is ensured.
- After finishing, no varnish, paint or wallpaper is required, as the wall becomes smooth and neat.
- Fire safety - gypsum is not flammable. Therefore there is no risk of fire.
- High plasticity - the mass easily stretches, which is why the wall is covered with a thin layer, reducing material costs and labor costs.
- When heated and wet, no toxic components are released, because the mass consists only of natural ingredients.
Properties of gypsum Source presentacii.ru
Preparation of the solution
Proportion of gypsum mass:
- Dry gypsum powder – 1 part.
- Lime mortar for plaster – 3 parts.
The ingredients are pre-mixed dry in a proportion of 1 part of gypsum to one part of lime. Then both components are mixed to obtain an emulsion.
Preparation of mass from gypsum and lime Source sevparitet.ru
See also: Catalog of construction companies that specialize in finishing and facade materials.
After mixing, the emulsion is transferred to the wall for half an hour. The area is divided into small sections, and the mixture is diluted with water in small portions. If the time is overdue, the batch will have to be thrown away because it will harden and become unusable. On a vertical plane, the mass hardens very quickly, so it must be leveled immediately.
To increase the drying time, drying oil is added to the composition.
Lime-clay coating
For mixing, clay, sand and lime are used. The proportion depends on the fat content of the clay, which has different properties in each area.
Advantages of simple clay coating
Advantages of clay coating:
• Ease of operation.
• Availability of materials.
• Cheap.
• Thermal conductivity.
• Suitable for people suffering from allergies, as it absorbs all odors, leaving the air in the room clean.
Due to the fact that this method is used only at home in the private sector, the preparation and application methods differ.
Preparation of clay-lime mortar
General rules include cleaning the clay from impurities and having sufficient fat content for good plasticity. Before mixing, the clay is poured with water and left for 5 hours to swell. Then add lime paste in a 1:1 ratio and two parts of sand. After thorough stirring, proceed to laying on a vertical plane. Water is periodically added to the mixture to prevent it from drying out.
Example of clay-lime plaster Source myshtukaturka.ru
Component proportions
The standard composition is a proportion of 1 to 4. The first number is lime, the second is sand. In the case of gypsum, the numbers change to 3 to 1, and if you add cement, then the proportions are 2 to 1.
To determine if the mixture is viscous enough, dip a spatula into it. If the liquid mass drains easily from it, it is necessary to add a plasticizer to the composition, because the viscosity is insufficient.
If the spatula has difficulty getting into the mixture, the solution needs to be thinned. Good viscosity is visible in the photo below. You will get excellent adhesion to the wall.
Photo: using a spatula
Video description
Watch the video on how to make clay plaster:
Lime-cement mortar
Lime-cement mortar is considered universal for external and internal work.
Where is lime-cement mortar used?
It is used:
- for finishing the facades of private buildings;
- utility buildings;
- production workshops;
- balconies and loggias;
- residential premises.
Limitations for the use of lime-cement complex:
- In climate zones with high humidity, use on building facades is not recommended.
- In damp basements.
- In wet production workshops.
- For any external and internal work, if the humidity level exceeds 65%.
The material is intended for rough finishing of walls. It is durable and has a fairly long service life.
Proportions and preparation of cement-lime mixture
First, choose a brand of cement. The M400 grade is suitable for processing internal surfaces, and the M500 is suitable for external work. It is better not to take cement that has expired, because the consumption will have to increase, and the quality will be low. For example, brand M500, after a month of storage becomes brand M450, and after six months it loses about a quarter of its astringent and fastening properties.
The proportions of the solution for plastering walls made of cement and sand are shown in the table.
| Cement brand | Cement | Sand | Lime |
| M400 | 1 bucket | 4 buckets | 0.2 buckets |
| M500 | 1 bucket | 5 buckets | 0.2 buckets |
Proportions for lime-cement plaster Source multiurok.ru
Ready-made plaster mixtures
It is easier for beginners to use ready-made plaster mixtures produced by various companies. The finished mixture already contains various additives, so you can’t expect “surprises” from the behavior of the solution when laying it on the wall and hardening the mass. The packaging contains information on how to properly make the batch, the specifics of the composition and its characteristics.
Dry mixtures are prepared according to the instructions that can be found on the packaging. During transportation, partial settling of heavier filler particles in the packaging is possible. Therefore, in order to avoid some deviations in the composition of different batches, it is recommended to dilute the dry mixture entirely (the entire package).
Ready-made formulations have an expiration date. It is better to purchase mixtures that are still far from expiration date. To ensure that the finish on large walls is uniform, it is better to take mixtures for preparing plaster from one batch.
Preparing a solution for plaster is a seemingly simple job. But the quality and properties of the finish depend on how well and correctly the plaster batch is prepared.
Video description
The video will show how to cheaply plaster the walls of a house with lime-cement mortar:
Heavy cement-lime mortar is used for exterior work. It is waterproof and protects the building from low temperatures. For internal ones, light ones with a lot of sand are suitable. It is taken into account that lightweight plasters last less and crumble faster. The frost resistance of such mixtures is lower than that of heavy ones.
Cement-lime mortar for plaster takes a long time to dry, so make a large batch at once. The finished emulsion is left for 15 minutes to “ripen”, mixed again and applied to the walls. If a large volume is prepared, stir the mixture from time to time to maintain homogeneity.
Lime differs in the composition of carbonate impurities. Therefore, before starting the main work on leveling the plane, test batches are made and tested in small areas to determine the optimal proportions of cement mortar for plastering walls.
Test batch for plastering Source yandex.net
Terrasite plaster
Designed for decorative finishing of facades. It has fast setting, so the entire composition is prepared dry and mixed with water in small portions, immediately applied to the facade. After drying, the decorative parts are rubbed down to expose the colored filling.
The complex includes the following components:
- Lime fluff.
- Mica.
- Marble chips.
- Broken ceramics or glass.
- White cement.
- White sand.
- Kohler (pigment).
Application of ready-made terrazite plaster Source stroyfora.ru
Plastering walls
The finished finishing solution is applied to the surface. During hardening, the layer contracts (shrinkage). As a result, cracks appear and the plaster layer lags behind the base. To avoid this situation, metal reinforcing mesh is traditionally used. This technology is proven and reliable. At the same time, it has a number of disadvantages, including the labor intensity and complexity of the production process.
Modern methods include preliminary priming with an adhesive composition to ensure high-quality fixation of the mass on a vertical plane. With this technique, reinforcing mesh is not required. The plaster mixture is applied immediately, preventing the primer from drying out.
Automatic wall plastering Source static.ex-in.online
Video description
Watch in the video how mechanized plastering of walls occurs:
Before throwing the material onto the plane, beacons are placed so that after drying you can see how much shrinkage has occurred. Mixture consumption per 1 square meter with a layer thickness of 5 mm is 5-6 kg. If the thickness is 10 mm, the consumption will accordingly be 10-12 kg per square meter.
Using a spatula or trowel, apply the finished emulsion onto a grater or rule, moving it from the bottom to the top for uniform distribution over the plane.
Apply onto small areas with a spatula or trowel. After spreading over the entire area, the plaster is finally leveled with a trowel. Large volumes of work are divided into separate sections so that the mixture does not fall off and you do not have to do everything again.
The finished plaster lays down beautifully and evenly Source tekato.ru
Drying of the finished layer takes several days, sometimes it takes two weeks for the cement-lime mortar to completely dry and shrink. It is advisable that during this period the air temperature does not exceed 10-20 degrees. At a comfortable temperature, moisture evaporates gradually, which prevents cracking and peeling.
In hot weather, it dries quickly, first microcracks appear, then large ragged cracks. At elevated temperatures, it is advisable to shade the wall or cover it with polyethylene. Needless to say, sub-zero temperatures are unacceptable for the drying process.
After drying, apply a thin finishing layer and dry again. The wall is ready for painting or other decorative finishing.
Wall alignment Source diy.obi.ru
Application instructions
All work is done gradually. You need to create three layers, each of which has its own functional purpose. This is the only way to achieve optimal results.
The technology is as follows:
- Creating the first layer, spraying. Its purpose is to improve the adhesion of the first layer to the wall, as well as to fill all the voids and cracks to avoid the formation of voids. The optimal consistency is creamy, not too thick. The plaster is spread over the entire wall with a trowel. There is no need to level the layer. This process can be mechanized with a special spraying device. The layer thickness is small.
- The second layer is soil. He's the main one. Its thickness is up to 50 mm. The solution is doughy, thicker than for spraying. Application occurs using trowels or trowels. Excess solution will be removed by the rule. They also check the evenness of the surface.
- The final layer is the covering. It eliminates all defects, chips and creates a smoother and more uniform surface. The thickness of the mixture resembles a spray solution. Application occurs on a damp wall, the layer thickness is several millimeters. At the end, you need to treat the layer with a float to remove defects and make the wall smoother.
This was a technical process of applying limestone plaster. If you practice, you can do work inside or outside quickly and efficiently. This mixture has many advantages, including versatility, vapor permeability, plasticity and ease of application. And if everything is done correctly, the finish will last for decades.