When deciding what is best to make the floor in the kitchen on your own, you should initially focus on the microclimate of the room. Thus, the kitchen is characterized by sharp temperature fluctuations, high levels of humidity and the presence of soot and grease. For this reason:
- an ideal floor should be moisture-resistant, washable from dirt and grease stains with conventional detergents, and have a durable, perfectly flat and smooth surface;
- the flooring must withstand increased mechanical loads, not be afraid of scratches and other external damage due to large crowds of people, the movement of large pieces of furniture, falling cutlery or dishes;
- the chosen coating should naturally fit into the existing style of the room; its design can be bright - accent or laconic - background for other interior items.
When selecting this or that material for a kitchen floor, we recommend that you first become familiar with their features and the advisability of using them in a room with difficult operating conditions.
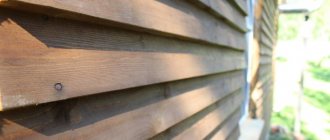
Pros and cons of wood floors
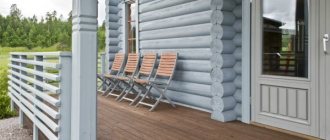
The kitchen floor, made of environmentally friendly material - natural wood, has a luxurious appearance. It can become an ideal addition to any interior, give your home a unique character, and give your household special comfort and warmth.
In addition, wood is a good thermal insulation material, which is why you can walk barefoot on the floor even in the cold season. We also note the ease of operation and everyday care - the paintwork is easily cleaned of dust, dirt and stains, it can always be renewed.
Wooden floors can be laid at any height from the base; if necessary, the coating can be set to any angle of inclination, which creates additional design possibilities.
The disadvantages include:
- wooden floors are susceptible to moisture - with regular contact, the coating turns black and rots;
- sharp temperature fluctuations have an equally detrimental effect on wood - the coating dries out and bursts, microcracks form on it;
- quite high cost - due to the complexity of the process of processing natural material and manufacturing locks and other fastening elements;
- the need to regularly treat wood with paint, stain, varnish and other chemicals that form a protective top layer.
Surface preparation and tile laying
- The space between the beacons is filled with expanded clay, 5–10 cm short of their top. This is done to ensure that the level of the new coating is in the same place as before.
- Next, pour in a liquid solution, preventing the expanded clay from floating up.
- After waiting for the solution to dry completely, make a screed, starting from the window.
- The finished surface hardens for almost a month. At the same time, do not allow the top layer of the screed to dry out, spraying it with water as needed.
The tiles are laid with special glue.
The laying method is similar to laying it on a wooden base:
- The glue is spread in a 3 mm layer with a trowel, leveling with a notched trowel.
- Then they lay the tiles, checking that this operation is performed correctly with a level.
- Excess glue protruding from the seams is immediately removed, preventing it from drying out.
- Plastic crosses are placed between the tiles.
- After the glue has completely dried, a special grout solution is rubbed between the tiles with a rubber spatula.
- When the surface is completely dry, remove traces of the mixture with a damp cloth and install the baseboards.
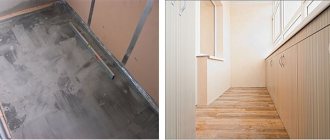
As you can see, you can replace a wooden floor with a tiled floor on your own by choosing the most suitable method from those that we told you about today. We recommend reading the article about waterproofing a wooden floor.
You can replace a wooden floor with a tiled one yourself.
Kitchen floor made from natural cork
No less popular and in demand today is the installation of cork flooring. This is due to the fact that such material has many advantages:
- Good thermal insulation - oak bark flooring consists of air-filled depressions, which makes it “warm” to the touch. This is an excellent choice of material for areas where there is a lot of barefoot walking.
- Health benefits - due to the elasticity of the cork material, the load on the spinal column and leg joints is reduced, and the floor “springs” while walking.
- Sound insulation - thanks to its porous structure, the floor is able to provide high-quality sound insulation in the room.
- Endurance to external influences - the material completely restores its original shape in a short time (when the dent is not very deep, it is not caused by a heavy object).
- Scratch resistance - “clean” cork is not placed on the kitchen floor; it is covered with a laminate or a special varnish. Both options are durable, reliable, and tolerate various types of mechanical damage.
- Aesthetic beauty - thanks to photo printing, the design of the coating can be anything. Most often it is imitated as oak boards, natural parquet or granite.
- Easy maintenance and care - the material can be easily cleaned of dust and dirt with a vacuum cleaner and a damp rag. The varnish coating reliably protects the cork from moisture penetration.
- Easy to install - the floor is “locked”; even a non-professional can install it independently.
- Affordable price - cork is much cheaper in cost than natural wood, but in terms of functional and aesthetic characteristics it is practically not inferior to it.
The main disadvantage of cork flooring is that it cannot withstand heavy weight. When moving large furniture on it, it is better to put soft felt under the legs so as not to “chew” the material.
Wooden board, solid
How often our mothers were upset when they looked at the freshly washed plank floor: the paint didn’t stick and the floorboards were dry and not fashionable. Isn't it fashionable? A modern massive deck board with a finished coating is a luxurious floor, but not a budget one.
This type of floor also doesn’t like it when anything sharp or heavy falls on it: it leaves scratches that cannot always be healed.
Tile floor
How to lay the floors in the kitchen near the stove and sink, since they are exposed to the most intense external influences? An excellent solution is to use tiles that differ from other materials in the following advantages:
- ability to withstand bending - this indicator is determined by international standards. According to regulatory documentation, clay tiles on a kitchen floor cannot have a bending resistance of less than 25,000 Pa;
- wear resistance - the EU standardization system divides tiles into 5 classes, this allows you to select a coating for specific operating conditions. Thus, tiles of the first class are laid exclusively on walls, while tiles of the second class are laid on floors with little mechanical load. It is best to install third or fourth class tiles in the kitchen. The most highly durable fifth class is intended for arranging places with active movement of a large number of people, so it is not practical to spend money on purchasing it for the kitchen;
- resistance to aggressive chemicals - the material is able to withstand the destructive effects of detergents and retain its original appearance for a long time;
- slip resistance - in order for ceramic tiles to ensure safe movement of people around the kitchen, their coefficient of friction must be at least 0.4. The safest flooring material is corundum-coated and has a slip rating of 0.8. But you need to take into account: ribbed, wavy surfaces complicate the cleaning process.
We strongly do not recommend laying glazed tiles on the kitchen floor, as after wet removal they become slippery and can cause falls, bruises, sprains and injuries.
The ideal thickness of such a coating is 10-12 millimeters.
The disadvantages of tiles include their “coldness”; this problem can be solved by installing a heated floor under the ceramic coating.
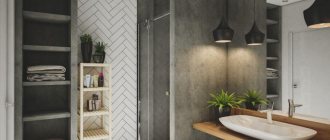
Aesthetic possibilities of floor tiles
Correctly selected, carefully laid tiles on the base of the floor can advantageously emphasize the stylistic features of the room, hide shortcomings, and help bring to life the most daring design ideas.
Let us list some of the nuances of choosing a coating based on decorative characteristics and features of its installation:
- The correct choice of tile size allows you to visually adjust the dimensions of the room. For small-sized kitchens it is better to use small-sized stoves, spacious and tall - large. Complex designs visually reduce usable space, while simple ones increase it. When choosing, it is also important to be guided by the ease of installation - large slabs require less time, and the connections between them are smoother and neater.
- To improve the decorative effect, it is better to use unusually shaped models in the kitchen - polygonal (with the number of edges from 4 or more) or with rounded edges. Ornament also plays an important role.
- If we consider the flooring from a practical point of view, you need to remember that stains and traces of dirt are best distinguished on grainy dark materials and uneven colors. Chips and microcracks are most visible on a plain material, and a beige, light-colored floor requires daily cleaning.
- When you need to make an accent, it is best to choose tiles with a bright, rich pattern. If the flooring is the main background, for example, for a black and white furniture set, then an excellent solution is to make it light gray.
- Plates with a single pattern allow you to create separate functional areas of the kitchen. Solid patterns, on the contrary, combine usable space.
- The appearance of the coating is determined by the color of the grout: a plain color creates the appearance of a single surface, a contrasting one attracts attention. When the grout is slightly darker than the ceramic tiles, the floor looks neater and cleaner from the outside; light-colored compounds produce the opposite impression.
Important! This solution is not recommended for use in small kitchens with low ceilings, as it visually narrows the free space.
A modern design option for kitchen floor coverings is combining the slab with other decorative materials. In this case, the working area is covered with ceramics, the rest of the space is covered with several types of wooden covering or laminate.
What else could a kitchen flooring be like?
In this section we will talk about less common materials and methods. Partly these are new materials, partly they are not very popular due to their high cost or not the most suitable characteristics.
Kitchen flooring made of cork (left) and self-leveling floors (right)
Laminate
Laminate is a popular material for flooring. It perfectly imitates a wooden surface and creates an atmosphere of comfort and tranquility. There are different color solutions - from almost white to almost black. There are even colored options - painted wood. In general, from an aesthetics point of view, everything is good. It also feels good - your feet are comfortable and warm, the laminate floor is easy to clean, it absorbs shocks well, so dropped dishes hit less often.
But from a practicality point of view, installing laminate flooring in the kitchen is not the most brilliant idea. Yes, there are moisture-resistant types. But moisture resistance is about the surface, and the side edges remain the same material - pressed paper. If the puddle on the floor is not removed for a long time (everyone is at work) - several hours - then the moisture-resistant laminate swells, and after drying it remains warped.
Even moisture-resistant laminate swells after prolonged contact with water.
It is also worth noting the high cost of moisture-resistant laminate (33 classes) - from $10 to $40 per square meter. The work is estimated at $3-6 per square, depending on the complexity of the installation scheme and the qualifications of the craftsman. Apparently this is why this type of flooring for kitchens is not very popular.
Read how to lay laminate flooring with your own hands here.
Cork covering
Cork flooring in the kitchen is used even less often than laminate. But it’s not the characteristics of the material that are to blame for this, but its price—it turns out to be an expensive pleasure. The coating itself costs from $15 to $50 per square meter, installation services - from $7 per square meter. This is provided that the base is perfectly smooth and clean.
Cork for the kitchen
Floor cork is available with or without backing. It is better to take it to the kitchen without a backing. The substrate is the same as on the laminate - MDF, but it reacts poorly to water (swells). When using an adhesive plug, it is glued to the floor with special glue and covered with 2-3 layers of varnish, which creates a waterproof film. With this installation, even a flood is not scary.
Cork kitchen flooring looks very stylish, creates a feeling of coziness, and is easy to clean (due to the applied varnish). But if the water remains for a long time, the varnish turns white. You can restore its transparency, but it takes a long time. In general, beautiful, expensive, cozy.
Porcelain tiles
Porcelain stoneware kitchen flooring is durable and beautiful. This material is painted in mass, very dense and hard. So abrasions, even if they form, are not visible. The material has the same advantages and disadvantages as ceramic tiles, only the material itself is more expensive (from $10 per square meter) and the work on laying it is also from $10-12 per square.
Porcelain tiles can be polished or not
Why is it rarely used? Firstly, this is not a cheap pleasure. Secondly, your feet are cold, and heating is ineffective - the slabs are thick and the thermal conductivity is low. And thirdly, it looks beautiful, but on large areas.
Self-leveling floors or liquid linoleum
This technology appeared relatively recently, so not many people know about this possibility. First of all, self-leveling floors are useful when leveling the base. This solution has the property of self-leveling - it is distributed over the surface, and it levels itself, forming a perfectly flat surface. On this base you can put any other floor covering you have chosen for the kitchen, or you can do the finishing using the same technology - use a polymer self-leveling floor or acrylic with the ability to make it with a 3D effect. This technology is also called “liquid linoleum,” although this is far from the same thing.
Polymer and acrylic self-leveling flooring in the kitchen
Polymer self-leveling floor - plain, matte or glossy, with varying degrees of gloss. The surface can be flat and smooth, or it can be rough. Acrylic is a transparent polymer, under which a film with a pattern is placed on a prepared base. This drawing is filled with liquid acrylic, resulting in a three-dimensional image.
It is difficult to say in general about the cost of self-leveling flooring. It all depends on the amount of preparatory work. You remember that first you need to level the base. Moreover, it is advisable to use a leveler, and then the finishing composition of the self-leveling floor so that the deviation is no more than 1 mm per square. Only applying the polymer composition without preparation costs from $5 per square meter. If this is an option with a 3D drawing - from $15. All preparatory work is assessed separately. In general, the idea is not cheap, but the result is excellent both in appearance and in performance.
Vinyl tiles
This material is new. It is called vinyl or PVC tiles, design tiles, or LVT from the English name luxury vinyl tile. To put it simply, this is vinyl linoleum cut into pieces. Geometry can be different - squares, rectangles, complex shapes. It can be laid according to the same patterns as laminate or parquet; you can come up with unique combinations, since there are more colors, as well as geometric shapes.
Assortment in one small store and this is only one type
Vinyl tiles differ from their predecessor - linoleum - in the form of release (cut into pieces) and the method of installation. Some are made from pure vinyl, some with the addition of quartz sand. This material is called quartz-vinyl tiles (sometimes spelled together - quartz-vinyl coating). Quartz vinyl is more dense and wear-resistant. Area of application - areas with high load (commercial premises with high traffic). This material will last a long time at home. If you don’t need such durability (like to change the design often), choose from pure PVC (class 32-42 is suitable for the kitchen).
Laying and types of tiles
In terms of substrate requirements, vinyl tiles have more stringent requirements. It should be smooth and rigid. Suitable for concrete, cement floors, CSP or self-leveling screed, plywood, OSB, chipboard. Such tiles cannot be laid on a soft porous base (old linoleum). Moreover, this base should have a difference of no more than 2 mm per 2 meters of area with two extreme points (the lowest and highest point).
There are several different types of PVC tiles and several different installation methods:
- Tiles that are glued with special glue (it is indicated in the instructions which one is preferable to use).
- Self-adhesive. The back side is coated with adhesive and protected with paper. Before installation, it is removed and pressed to the base. She connects one tile to another end-to-end. the geometry is good, there are no problems on a level surface.
- With adhesive locks. In this case, the tile itself is not glued to the base. The coating turns out to be floating, incoherent and almost monolithic, since the locks are wide - several centimeters, and covered with an adhesive composition.
Adhesive lock on vinyl tiles. This option is preferable as a floor covering for the kitchen. - With mechanical locks. This type of vinyl tile is also not glued to the base; the fragments are connected to each other using the tongue-and-groove principle.
How this material compares favorably with linoleum and laminate is its ease of installation. With any installation method, do-it-yourself installation is no problem, with little time investment. The most important thing is to choose the design you want to create. It is cut with a regular stationery knife. A gap must be left around the perimeter of the room to compensate for thermal expansion (which specific one is indicated on the packaging, since different materials can be used).
Advantages and disadvantages
If we talk about the price, it is comparable to commercial linoleum, but has an even longer service life, is easier to install and clean (even models with relief). It may look very similar to parquet or laminate, or it may look like tiles, porcelain stoneware, marble, etc. Underfoot it feels about like laminate flooring - warm, but not as loud (doesn’t “click” when you walk).
May look like parquet
Another option for “parquet” layout made of vinyl tiles
It looks like ceramic tiles or porcelain tiles
The surface is hard and is not pressed down by heels or furniture (including furniture on wheels). This is all based on reviews from those already using it. From all this we can conclude that this kitchen flooring is an excellent choice and its only drawback is the high price, but it is compensated by its long service life.
Laying laminate flooring on a kitchen floor
Laminate is a floor covering that is highly resistant to moisture. It is most often made from high-strength fiberboard, which swells when exposed to moisture and loses its original characteristics. This can be prevented by a special coating that makes the floor surface waterproof, durable, resistant to external damage and mechanical stress.
Laminate types
Most often, panels of 32 or 33 wear resistance classes are laid on the kitchen floor, the special structure and locking of which ensure practicality and long-term operation during intensive use. Laminate made from natural cork, which has a soft texture and can retain heat in a room, is no less popular.
PVC-based laminate is also in demand because it has high noise absorption, thermal conductivity, and resistance to high humidity. Its waterproof base prevents swelling of the floor covering and its subsequent rotting.
Advantages of materials
Modern coating for the kitchen allows you to give the interior individuality, fill it with comfort and warmth. Each type of flooring material has the following advantages:
- laminate on a plastic base is easy to install - the absence of a chamfer allows it to be mounted on the floor without gaps, which ensures the safety of the structure and outer layer in case of accidental spillage of liquid. The coating is highly wear-resistant, has a wide variety of colors, absorbs noise well and withstands external damage;
- the natural cork coating is completely safe for human health, its surface is treated with a special composition that protects the internal structure from the penetration of moisture and various types of mechanical influences;
- Fiberboard laminate copes well with high humidity, thanks to the presence of special treatment of connecting locks and a protective epoxy layer located at the top and bottom. It is because of practicality, durability and wear resistance that this material is so often chosen for flooring.
Dismantling old surfaces
The renovation begins with the optional switching off of the gas or electric stove in the kitchen and the removal of all household appliances along with the furniture. The room must be ready for the remaining, rather labor-intensive and dusty work.
The first step is to dismantle the old floor tiles, laminate, remove linoleum or perform similar actions with other types of floor coverings. After this, it is worth checking the condition of the floor for fungus, mold and other damage. If such defects are detected, the surface is dismantled to the next layer.
Linoleum
When deciding which floor to make in the kitchen with their own hands, many owners of apartments and country houses choose affordable, easy-to-use linoleum. Modern production technologies, the use of reliable and safe materials today make it possible to obtain a high-quality and durable product, which in its functional and aesthetic indicators is not inferior to alternative coatings.
Linoleum compares favorably with its competitors:
- wear resistance;
- hygiene;
- ease of installation;
- wide choice of colors;
- low cost.
Arranging such a kitchen floor is accessible to everyone. The material is easy to care for and easy to clean from dirt - the synthetic coating is resistant to abrasion and water.
By giving preference to the middle price segment, you don’t have to worry about damage to the surface due to the fall of heavy, sharp objects or exposure to hot grease drops.
In this case, it is better to avoid the accumulation of puddles on the surface; spilled liquid should be wiped dry with a soft cloth to avoid deformation of the material.
The advantages of linoleum include the ability to imitate almost any natural material. This floor can take the form of natural wood, marble, granite, cork, oak parquet or ceramic slab.
Technology selection
To choose the option most suitable for leveling the floor of your kitchen, I advise you to first remove the old covering and inspect the existing base.
If you have an old screed with minor irregularities and defects, I recommend making a partial repair of it, or filling the surface with a layer of polymer-cement self-leveling mixture.
If there is no screed or its significant destruction, it is worth removing the entire layer before the overlap and making a new, reliable and durable screed.
We choose a screed, taking into account existing conditions:
- a dry screed if your apartment is on the ground floor, there is an unheated basement under the kitchen or a room with a high noise level. It should be borne in mind that dry screed will significantly reduce the height of the room.
- A semi-dry screed is an ideal option for leveling the base in a used home. Due to the minimum water content in the solution, moisture from the screed is prevented from getting into the ceiling and lower floors of the building. The finished screed is ready for laying tiles in 3-4 days, for laying laminate and linoleum in 2-3 weeks.
- Wet screed is a cheaper coating option. A simple technology allows you to make it yourself.
Carpet
The soft carpet allows you to comfortably move around the kitchen even barefoot. It is laid all over the floor or combined with other materials, including parquet and tiles.
The advantages of carpet include:
- ease of installation;
- good sound insulation;
- possibility of combination with other materials;
- environmental cleanliness and health safety;
- ease of care;
- affordable price.
However, the coating also has some disadvantages:
- has low moisture resistance;
- accumulates dust, provides a comfortable environment for the proliferation of pathogenic microbes and small insects;
- does not tolerate sudden temperature changes.
The kitchen carpet can be natural or artificial. In the first case, it is made with 100% natural wool or combined with plant fibers: flax, cotton, hemp, etc. The coating is environmentally friendly, but its service life is much shorter than that of synthetic materials.
As for artificial carpet, it is more wear-resistant, practical, and absorbs less unpleasant odors, particles of dust and dirt. It is made from nylon, polypropylene or acrylic fibers, etc.
Nylon flooring looks natural from the outside, it is durable, and pleasant to the touch. The cost is a little more expensive than other synthetic raw materials, but with proper maintenance, such carpet can last more than ten years.
Note that the dirtiness and degree of wear directly depend on the pile - the denser it is, the more strongly the fibers come into contact with each other - which means less debris will get in. Closed-loop carpet has varying pile heights to create a dimensional effect. But due to the different lengths of the pile, such material becomes unusable much faster.
Error three. We violate safety regulations and despise labor protection.
What's the most tedious and uninteresting part about laying tiles? That's right, mixing the glue. As it turned out, this is also a very unsafe activity.
After a couple of days of working with this mortar, we felt something was wrong: my hands turned red and itchy, and a severe runny nose began, my eyes turned red and watery. Attributing my malaise to the spring “flu” season, I stubbornly continued to knead the tile adhesive solution with my hands (!), since, of course, we did not have a special electric mixer, and the home mixer could not cope with such volumes.
A neighbor-doctor who dropped by to visit made the diagnosis a week after the work began. Allergy. It turns out that additives in tile adhesive are extremely harmful to the skin and mucous membranes. Our work impulse was crowned with the joint use of Tavegil, the purchase of a respirator, rubber gloves and a break for a couple of days to restore lost health.
The following labor safety violations relate to working with an angle grinder. And we are not talking about the banal danger of getting hurt. When cutting tiles, you should be very careful, because small particles sooner or later get into your eyes, and breathing tile dust is a dubious pleasure. A respirator is an irreplaceable thing in this case.
Self-leveling kitchen floors
They also have another name - “liquid linoleum”, because at the very beginning the material is a liquid mixture, which is distributed in an even layer over the base of the floor, and hardens over time. The result is a perfectly flat, smooth surface with many advantages:
- Hygiene - grease drops, dirt, moisture and small debris do not accumulate between the joints, because they are absent in a monolithic surface.
- Fire resistance, moisture resistance - unlike flammable laminate, linoleum or parquet, self-leveling flooring is not afraid of open fire flames and water ingress. It doesn't slip like ceramic tiles.
- Resistant to sunlight - does not lose its original color, like laminate or linoleum.
- Environmentally friendly - at high temperatures the material does not release harmful chemical compounds into the environment and is completely safe for human health.
- Long-term service life, ease of self-installation.
- Implementation of the most original design ideas - the ability to combine a large number of colors and shades, obtain three-dimensional floor patterns, etc.
- Unpretentious operation and maintenance - for cleaning you can use a vacuum cleaner and ordinary detergents.
- Resistant to external damage.
The coating also has some disadvantages:
- difficulty in dismantling - the mixture adheres firmly to the concrete base, removing it will not be easy;
- applying the coating will require certain knowledge, skills, and the use of a number of additional tools - a fine-toothed spatula, a needle roller, etc.
Error five. The seams do not forgive negligence.
The joy of the smooth, beautiful floor quickly turned into despondency. We missed a little thing: seams. We left the seams shallow (we thought it was better that way), and we gave them a long time to dry. And when the last tile was laid, it suddenly became clear that the seams needed to be cleaned in order to fill them with high-quality grout. I had to clean the seams with a screwdriver and a hammer; the corner joints were especially difficult. I confess that small chips appeared in several places as a result of my manipulations. The cleaning took almost two days and only then my daughter and I, having thoroughly wet the seams, began to rub them down. No gray grout was found in the store. I had to buy white and add gray universal tinting paste. It was difficult to guess with the shade, now the difference in the color of the seams is a feature of our floor.
Combined floors
The possibility of combining certain types of coatings on a kitchen floor should be determined at the initial stage of repair work, because small differences may arise between materials of different thicknesses that will need to be repaired.
A reasonable choice of kitchen floor covering for a particular functional area will visually improve the interior and bring the most original design fantasies to life.
Combination of laminate with tiles
Definitely, the floor in the kitchen should not be slippery or absorb moisture. Ceramic tiles and laminate combined in a single space combine these necessary qualities. The materials complement each other perfectly, have the same performance qualities and thickness.
For a kitchen space, you need to choose a laminate with the highest degree of moisture resistance and strength. It is better to give preference to a matte finish, because it is difficult to clean a laminated glossy board from dirt and dust. In addition, the laminate with a matte, textured surface has additional protection against slipping.
It is better to lay the material in the eating area - it is pleasant to the soles of the feet, retains heat well, and the insulating layer softens the sounds of steps. But it should not be used near a sink or hob, because laminate is susceptible to grease stains and high humidity.
It is best to equip the work area with tiles, which are highly durable and easy to maintain. Among the wide variety of colors, it is always possible to choose the best option for a specific kitchen style.
Important! It is better to lay embossed or wave-shaped tiles on the floor surface, because slippery glossy ones can lead to injury.
The combination of such materials looks interesting, stylish, the room takes on an elegant, original look.
The combination of tiles and laminate like oak or beech, marble, or natural stone looks unusual. Such a combination brings a touch of nobility to the interior and gives it an “aged” effect.
Linoleum, tiles
A simple, straightforward installation method at an affordable price. The materials are characterized by good heat and sound insulation and resistance to high humidity, softness, ease of maintenance and care.
A wide variety of color tones allows you to combine them harmoniously in various functional areas of the kitchen space. At the same time, linoleum can imitate expensive coatings - for example, oak parquet or natural wood flooring.
The minimum number of joints allows you to keep the kitchen floor perfectly clean. Linoleum is appropriate in the eating area, and wear-resistant, durable tiles are appropriate in the functional area. This combination is a wonderful combination of practicality and comfort.
Porcelain tiles, laminate
Artificial finishing material is similar to ceramic tiles, but has high strength and excellent anti-shock qualities - which is why it is often used for kitchen flooring. Its main advantages include: durability, resistance to aggressive chemicals, drops of fat and water.
On the domestic market, porcelain tiles are available in a wide variety of colors, so choosing the right shade for the laminate will not be difficult. The material in appearance can resemble natural wood, stone, metal, sand and leather.
We recommend placing it in places where moisture accumulates - near the sink or hob. And a laminate that is more comfortable to the touch is suitable for the eating area. Since the thickness of the coatings is almost the same, combining them in a single space will not be difficult.
Laminate, linoleum
Combining two flooring materials is the most popular solution for arranging flooring in the kitchen. After all, they have almost the same cost, service life, heat transfer, hygienic and functional characteristics.
Where you eat, linoleum can be laid in the form of a colorful carpet; it will also be appropriate near a gas or electric stove, because the material is not affected by humidity and is not afraid of sudden temperature changes. Laminate flooring will decorate your relaxation area.
Parquet and tiles
Such materials are not often combined. And in vain, because natural parquet can give the interior a luxurious look and fill the kitchen with special comfort and coziness. Natural material made from valuable types of wood is easy to maintain, easy to care for daily, easy to install, and easy to clean.
However, wooden boards do not withstand mechanical stress, temperature changes and high humidity, so they cannot be cleaned with abrasive detergents. It is perfect for recreational areas - the natural warmth of valuable wood is incomparable to any other coating.
Combining floors in the kitchen is a modern style solution that can truly surprise. It is enough to approach the matter creatively, show all your imagination, even with a limited budget you can decorate the floors in such a way that household members and guests will admire the exclusivity, practicality, and comfort of the interior.
Error four. Where did the fourth package go?
Experience is an expensive thing. In this case, it cost me about one and a half thousand rubles. This is the money that was spent on additional packaging of tiles and bags of glue. If everything is clear with the glue - it replaced the cement screed, leveling the plane of the floor, then with the tiles it was a different story.
We crushed a couple of tiles in the process of fussy moving in the narrow space of the corridor. But another 8 pieces were used “for training”. The fact is that by choosing a diagonal styling pattern, we found ourselves an adventure. Along the edges it was necessary to lay the corners of the tiles, that is, cut them diagonally. Cutting tiles is not that easy. The tile cutter broke our tiles like a child breaking a melted chocolate bar. He stubbornly refused to punch a hole with a diameter of 8 cm in a solid tile for a pipe until he ruined half the package.
DIY floor arrangement
Before laying new material on the floor, all furniture, household appliances, etc. will need to be removed from the room. The worn-out coating must be dismantled. When old plywood or wooden boards are located underneath, their strength should be checked. This base is suitable for linoleum, but not tiles or laminate, which require a perfectly flat cement screed.
Its filling is performed as follows:
- All baseboards are dismantled.
- The old covering is removed - the tile is destroyed mechanically or cut along the contour of the seam with a grinder, the carpet and linoleum are rolled into a roll, after which all nails, staples, etc. are removed. Laminate, parquet is disassembled in parts and carefully folded (if still needed).
- The surface is cleaned of the previous screed, which usually has unevenness, cracks, etc.
After which the base is leveled. This must also be done for linoleum, which, after installation, completely repeats the texture of the surface. To level the floor, a solution is mixed from a dry mixture, which can be purchased at a specialty store. Slats of the same height are installed throughout the entire area. When pouring, they must be completely covered with the solution, after which they can serve as a reinforcing element.
A self-leveling liquid floor is easily applied to the cleaned base, which levels itself and hardens within one week. As a result, a monolithic, perfectly even layer is formed on which any coating can be laid.
Laying linoleum can be done in an alternative way. After waterproofing with rolled materials, a structure made of wooden slats is attached to the base, on which plywood sheets are placed. Bricks or concrete pillars can be used as the base, located at a distance of 15–25 centimeters from each other.
Concrete pillars are aligned using beacons measured using a level. The plywood sheet is then laid perfectly flat. After which the surface can be covered with linoleum, fixing it at the ends with nails with wide heads or staples. Near the walls, the covering is decorated with wooden or plastic skirting boards.
Properly preparing and priming the base
How to make a self-leveling floor yourself? The first step is preparing the base. It does not need to be leveled “flat”, but it must be cleaned of oil and glue stains, debris, and dust. Otherwise, the self-leveling coating will not be able to fully adhere to the base and air bubbles will remain.
Cracks and discontinuities in the old coating must be repaired. This is especially true for wooden floors. If this is not done, then the entire composition will “leak” through the cracks.
It is worth considering that the self-leveling floor has excellent self-leveling properties, but still will not hide significant differences in heights. Therefore, in some cases, screeding will still be required. It is also important to measure the moisture content of the base.
After the base has been cleaned, it needs to be primed, and the primer mixture should be applied especially carefully in the corners of the room. What primer is suitable? Choose a universal film-forming primer or a deep penetration primer if the substrate is moisture-absorbent. You can determine this by pouring a little water on the surface - if the water is quickly absorbed, then a deep penetration primer is better. If in doubt, take the universal one.
In the future, this will avoid any shortcomings. The primer remains to dry for 24 hours - after which you can begin work.
Installation of heated floors
There are 3 floor heating systems:
- water connected to the heating system;
- electrical cable;
- thin-film heated floor with an ultraviolet emitter or heating cable.
Such a variety of systems is due to the need to solve the problem of heating in certain living conditions. We will get to know each of them better.
- Water floor - it is unlikely that it will be possible to connect it to central heating, since doing this in an apartment building is strictly prohibited. But when the apartment is equipped with an individual heating system, or you live in a private house, such warm floors are the ideal solution. The system is installed at the cement screed stage - the base is covered with a layer of foam plastic and reflective thermal insulation. A reinforcing mesh is placed on top, and the pipes are coated with a special mixture. An expansion joint is made around the perimeter of the kitchen, which is necessary to expand the flooring when heated. It allows you to compensate for deformations caused by temperature changes.
- Cable electric flooring is the most universal solution, suitable for any situation. Similarly to the first case, it is mounted in a concrete screed (which will be covered with laminate, carpet, linoleum), or directly on it (if it is planned to lay tiles on top). It is clear that the arrangement of a heating system requires the availability of electricity as such. Such a warm floor consumes a lot of electricity; its consumption can be reduced by modern software devices with a thermostat that control the operation of the system automatically, preventing it from overheating and failure.
- Film flooring - thick material is laid directly on the screed; if necessary, it can also be mounted on a wooden structure. After the old coating is dismantled, a heat-reflecting screen is laid, a heating film and a new cladding are placed on top of it.
As you can see, modern systems allow you to complement each other - where it is not possible to use one of them, there is always a use for the other. In terms of safety, all of them are safe for human health (of course, if the installation was carried out in compliance with all norms and regulations).
Porcelain tiles: durable but cold
What to put on the kitchen floor in an apartment? Some experts recommend paying attention to porcelain stoneware, which is significantly superior to ceramic tiles in its technical parameters. To make this flooring, a mixture of clay, fine quartz sand, metal oxide and mineral pigments are used. All this makes it possible to obtain a surprisingly durable and moisture-resistant surface, which is characterized by increased resistance to aggressive household chemicals, shock and prolonged mechanical stress. Porcelain tiles are one of the most durable and wear-resistant materials. True, so is ceramics, it is quite cool, that is, you will need to install a heated floor in the kitchen. Another significant disadvantage is the rather limited color range of the tiles. Basically, porcelain stoneware is an imitation of granite, marble or quartz.
About screed and insulation
When renovations are in full swing, the question of which coatings to choose is not the most pressing. Now the main thing is screeding and leveling the surface.
Before choosing the material from which the screed will be made, you need to think about what you will lay on top.
If it’s a tile, then it makes no difference what’s underneath and regular cement mortar will do. And if it is a laminate, then it is much better to make a gypsum screed using a plaster mixture. This floor will be much warmer and less moisture permeable.
Also, the thickness of the screed may depend on what type of insulation you choose.
And if you raised the screed high enough, then making wooden flooring is no longer very reasonable if your ceiling height is standard, that is, 2.5 meters. If you “steal” an extra 10 cm, this will significantly affect the visual perception of the room.
And if you are also planning a suspended ceiling, then this will not be good at all. Now let's get closer to the topic and talk about specific coatings.
First, consider the initial data of the kitchen
Look at your kitchen with an open mind: what size is it, whether it is dark or light, think about the chosen interior style. It is worth adding to this list how often you cook, what kind of family you have, whether you have pets, how much time you are willing to spend on cleaning and how often you will do it.
It is clear that if a person lives alone, the only pet he has is a cactus on the window, he runs into the kitchen in the morning to drink coffee, and in the evening to prepare a quick dinner, then the coating may be more demanding to clean. There won't be much to wash or clean. But if you have a large family, there are children, cats and dogs, then in order to save energy, nerves, and time, it is worth choosing a material that will not cause much trouble.
But that's not all: you also need to think about comfort. Is your apartment warm? What floor do you live on or is it a private house? And here we move on to an important point, namely floor insulation.