In offices, you often have to think about how to hide a large amount of cable and ventilation. In addition, it is necessary to level the ceilings, the quality of which leaves much to be desired. All such problems can be solved by installing a suspended ceiling. Armstrong is a system of metal profiles that are connected into square and rectangular shapes, and plates are inserted into these shapes. It includes all the necessary elements, which allows you to speed up installation, ensure high quality work, while maintaining the cleanliness of the room. The installation is carried out according to the standard scheme, you just need to prepare everything you need and determine a sufficient number of components.
What's good and what's bad about Armstrong?
In addition to ease of installation and low cost, the Armstrong ceiling also provides excellent sound and heat insulation. The inter-ceiling space is vast; lamps and communications are conveniently placed in it. Access to them and ceiling repairs are easy and do not require tools.
However, the Armstrong ceiling is not very strong and does not actually protect against leakage from above, and if the slabs are fibrous, then it itself is irrevocably deteriorated by moisture. It is impossible to obtain curved configurations with Armstrong, and the diagonal design of the ceiling negates all its simplicity and cheapness: only a highly paid master will undertake such work, and it will require a lot of time.
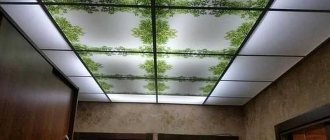
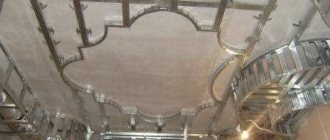
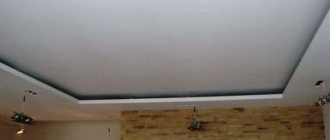
In terms of the height of the room, the Armstrong ceiling “eats off” at least 250 mm, so it can be found extremely rarely in city apartments. Nevertheless, the Armstrong ceiling is used not only in offices and supermarkets, as intended by its creators, but also in restaurants, entertainment centers, etc. But in such cases, Armstrong is no longer an economic, but a design decision (see picture above).
Preparing the base
As with the installation of other types of ceiling structures, before installing the Armstrong ceiling, a number of preparatory measures are carried out. This suspension system makes the condition of the rough foundation completely invisible.
The preparatory stage consists of removing the old finishing material that has become unusable. When paint or whitewash adheres firmly to the surface of the ceiling, it is permissible not to remove it.
If areas of the finish peel off or a layer of plaster falls off, they can damage the installed tiles. For this reason, they must be removed and the cracks filled with putty. Before installing Armstrong ceilings in a room where there is a high probability of leaks, the rough base should be waterproofed.
Since there will be a gap of 20 to 25 centimeters between the ceiling and the surface of the structure being installed, heat and sound insulation materials can be placed in it. Before placing them, first of all, for the fiber boards of the heat insulator, a sheathing is assembled from wooden blocks, positioning it in such a way that it is slightly offset in relation to the suspended frame.
The insulation is laid in place and covered with a vapor-permeable film with a moisture-proofing effect. When polystyrene foam is used as thermal insulation, it is attached directly to the subfloor with glue and dowels with fungi. When installing insulation, it is important to remove the wiring for the lighting device and ventilation ducts.
How does Armstrong work?
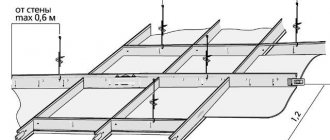
The structure of the Armstrong-type ceiling is clear from the figure. Designations on it:
Armstrong ceiling device
- Ceiling plate.
- Cross profile 600 mm long.
- Bearing profile 3700 mm long.
- Longitudinal profile 1200 mm long.
- Suspension, where 5a is a hook; 5b – rod.
- Perimeter (wall) profile 3000 mm long.
- Mounting unit in the base ceiling.
- Fragment of a ceiling slab.
Explanations for the picture:
The dimensions of the ceiling tiles are 600x600 and 1200x600 mm. The latter are almost completely out of use - the ceiling made from them is not strong enough.
Plates are produced soft, mineral and organic, and hard - metal and glass, mirror and with a pattern. Rigid slabs are heavy, so profiles and hangers for them require special, reinforced ones; respectively expensive. Mineral soft slabs are also almost never used: they contain harmful mineral wool. Organic boards are made from waste paper and are harmless. Soft slabs are easily cut with a mounting knife, hard slabs require special tools for processing; glass - diamond.
Profiles – painted metal or metal-plastic, with holes for hanging. Shelf width – 15 or 24 mm. Wall - L-shaped with a bend or just a corner; others - T-shaped. The profiles are connected along the length using spring locks or bendable tendrils. All profiles can be cut to size on the side opposite the lock.
The suspension consists of a pair of 6 mm metal rods, flat and with a hook, connected by a curved sheet spring with holes - a “butterfly”. By squeezing the butterfly, the rods can be moved, adjusting the height of the suspension, and when released, it fixes them tightly. The upper part of the even rod of the reinforced suspension is profiled for reliable fixation in the fastening unit.
The fastening unit is a regular dowel for a self-tapping screw or a metal collet. The latter is used for reinforced suspension or with a smooth, even rod. Such suspensions are required not only for hard ceilings, but also for places with concentrated loads: lamps, ventilation grilles, etc.
ceiling fastening is completely reversible and dismountable: a straight rod is driven or screwed into the fastening unit without disassembling the suspension, the profile is put on the hook and, squeezing the butterfly, the height is adjusted along the tightly stretched cord. To access the interceiling space, one of the plates is lifted and moved to the side. Close the opening in the reverse order.
About homemade stoves
For some reason, panels made of wood materials (solid wood, laminate, MDF) for Armstrong are not produced, but in vain. This ceiling looks great. Wooden slabs for Armstrong can be cut yourself from boards 600 mm wide or narrower. In the latter case, each square is assembled in a cell on standard tongues, and the excess width is cut off evenly on both sides. If you use the cheapest “tin” for the frame under soft slabs, then each longitudinal plank will need to be supported with an additional suspension in the middle.
Characteristics
The Armstrong range of slabs is large: from economy class products to luxury ones. Naturally, their technical and operational characteristics are different. Here are the standard ones inherent to products in the mid-price segment:
- Armstrong tile size is standard: length - 60 or 120 cm; width - 60 cm thickness - 8-25 mm;
- weight - 2.5-8 kg/m2;
- moisture resistance - 70-100%;
- noise absorption - up to 35 dB;
- flammability class - NG (non-flammable);
- flammability - B0 (non-flammable);
- smoke formation - D0 (does not smoke);
- toxicity - T0 (not toxic at high temperatures);
- light reflection level - up to 85% (mirror surfaces - up to 99%);
- profile type - open and hidden.
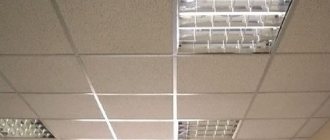
Armstrong ceiling equipment
For Armstrong ceilings, a wide range of 600x600 mm equipment is produced: raster and ceiling lamps, ventilation grilles, internal air conditioning units, etc. Round holes for spotlights in soft slabs are simply cut with a mounting knife; You can also cut shaped holes. For hard slabs, of course, you need a special tool.
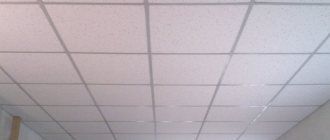
Factory Armstrong plates
Armstrong calculation
The Armstrong ceiling is installed according to the calculation results. The purpose of the calculations is twofold: to fit the ceiling harmoniously into the interior and to determine the consumption of materials for it. Calculating the perimeter is simple: we measure along the walls and round up to a multiple of 3 m. For installation in corners, the wall profile can be cut and bent like any corner.
As for the grating, manufacturers do not recommend cutting the slabs by more than half, i.e. to less than 300 mm - additional cells appear, which requires extra work and materials. However, excessive trimming does not affect the strength of the ceiling, and the materials are cheap, so the slabs are often cut together, gradually reducing their width towards the walls. This gives the ceiling a less austere look.
Example No. 1 : room width - 4.2 m = 7x0.6 m. We cut the slabs closest to the walls into 400 and 200 mm.
General recommendations for placing cut slabs are as follows:
- Along the length of the room, the cut row belongs to the wall farthest from the entrance.
- The width of the scraps is supplemented by a solid size, the result is divided by 2 and a pair of slabs cut to that size are carried to the walls.
Example No. 2: room width – 2.7 m = 4x0.6+0.3 m. We take THREE rows of solid slabs 0.6x3 = 1.8 m along the width. The remainder is 0.6+0.3 = 0.9 m divide by 2. Rows of 45 cm slabs will be adjacent to the long walls. The number of frame cells will not increase.
Material consumption rates for rooms of a standard configuration are as follows:
For square rooms or with an aspect ratio of 3/4:
- Supporting profile 3700 mm – 0.80 m/sq. m of ceiling.
- Longitudinal profile 1200 mm – 1.60 m/sq. m of ceiling.
- Cross profile 600 mm – 0.80 m/sq. m of ceiling.
- Perimeter profile 3000 mm – 0.5 m/sq. m of ceiling.
- Hanging – 0.6 pcs/sq. m of ceiling.
For rooms with an aspect ratio of 2/3 to 1/2, the consumption rates increase slightly:
- Supporting profile 3700 mm – 0.84 m/sq. m of ceiling.
- Longitudinal profile 1200 mm – 1.68 m/sq. m of ceiling.
- Cross profile 600 mm – 0.87 m/sq. m of ceiling.
- Perimeter profile 3000 mm – 0.5 m/sq. m of ceiling.
- Suspension – 0.7 pcs./sq. m of ceiling.
In any case, the obtained values are rounded to the nearest large integer values of standard length profile pieces or suspension. The perimeter is attached to the walls in increments of 0.6 m in the case of soft slabs without additional load or 0.3 m for a hard or loaded ceiling. Spotlights and plastic ventilation grilles are not considered additional load.
The specified standards are valid for premises with an area of 9-10 to 100-120 square meters. m. For other area values or for rooms of complex configuration, the calculation of the Armstrong ceiling is carried out using an online calculator, in a construction CAD system (computer-aided design system) or according to a diagram drawn to scale, see figure in the next section. The main rule is that load-bearing profiles should be positioned parallel to short walls, this strengthens the structure (fewer joints of load-bearing profiles) and saves material.
Suspension units
The rules for installing Armstrong ceilings provide for suspension by supporting profiles in increments of 1.2 m. The suspension units should be no further than 450 mm from the walls. The last condition cannot always be met. In this case, the rows of suspensions along the length of the room are arranged with a shift back and forth so that the suspension nodes are staggered.
Armstrong ceiling design diagram
Concentrated loads are supported by additional hangers located diagonally from the nearest main one. Very heavy inserts (for example, an internal split system unit or a dynamic lighting installation) are supported in the corners and, if possible, placed close to the wall.
Note: the hanger hook will not allow you to place an additional device in the cell, so additional hangers need to be moved slightly to the side.
When marking holes on the ceiling for the mounting units of the suspensions, no special precision is required: a slight tilt of the suspension can be easily compensated by adjusting its height. An example of an Armstrong ceiling design diagram is shown in the figure.
Negative sides
The Armstrong ceiling has disadvantages:
- installation of such a structure reduces the height of the room, so for most apartments this is an unacceptable option;
- when installing mineral fiber tiles, take into account the possibility of flooding of the room by neighbors from above; if there is such a possibility, then it is better to choose metal or plastic panels;
- with frequent changes in temperature and humidity in the room, mineral fiber boards turn yellow and lose color over time;
- Mineral fiber plates are not resistant to mechanical damage and can be easily damaged if used carelessly.
The ease of replacing plates and their low cost eliminate most of the existing shortcomings. You should always have several tiles in stock.
The installation technology of this design is simple. No special tools or skills are required here. After learning how to install an Armstrong ceiling, even 2 beginners can handle the job.
Ceiling frame installation
Installation of Armstrong ceilings begins with the installation of the perimeter. SNiP recommend using a laser or bubble level of at least 1 m in length to mark the height of the perimeter, but in practice the height of the perimeter is often marked off from the opposite: they check the horizontality of the floor (hack workers often do without this, and nothing, they hand over the work), make height marks in the corners and the three of them beat off the outline with a chalked cord. Fast, simple and angry.
Armstrong ceiling assembly diagram (click to enlarge)
Next, the wall profile is cut to size and attached to brick and concrete walls with self-tapping screws and dowels. If the walls are lined with wood, there will be no special weights in the ceiling, and raster lamps should not exceed 1 per 5 square meters. m, then the perimeter can be secured with nails: the main load is carried by the suspensions. It is strongly not recommended to mess around with hangers: use propylene dowels or use metal collets instead of dowels.
After marking and drilling holes in the ceiling, the supporting profiles are cut to size, connected to the floor into strips of the required length and laid in the perimeter. Then they are moved apart along the length, hangers are installed and each supporting bar is aligned according to the sag along a tightly stretched cord.
The next stage is the installation of longitudinal and transverse connections. Basically, two installation schemes are used: parallel and cross, see figure; longitudinal connections are highlighted in green. In terms of material consumption, they are equivalent. The cross pattern is somewhat more labor-intensive, but stronger, so it is used for places where communications will be laid or for additionally insulated ceilings. Of course, before installing the frame, partial profiles are cut to size.
Expert advice
To simplify the process of creating an Armstrong hanging shelf and make a durable, beautiful, reliable structure, you must adhere to the following expert advice:
- Carrying out preliminary calculations will allow you to purchase the required amount of materials;
- take into account the peculiarities of the ceiling in the room; if you come across reinforcement, then the suspensions must be shifted and the number increased;
- depending on the suspensions used, the distance from the ceiling to the suspended structure may be different;
- take some hangers and slabs in reserve, since no one is immune from mistakes and you won’t have to run to the store for the missing element.
Armstrong ceiling assembly
How to assemble an Armstrong ceiling? It’s very simple: the contents of the cells are lifted one by one, tilted, introduced into the inter-ceiling space and neatly placed into the cell. If it's at an angle, you can't press on top to straighten it out! You need to gently push from below in the corners.
First of all, concentrated loads are stacked and communications are connected to them. Then - slabs with pre-installed spotlights; Wires are immediately connected to the lamps.
The assembly is completed by laying the blind slabs. The last slab should lie with its lower surface on the outstretched palms of both hands. We start, level, release; if it stands up askew, push the lower corner with your finger. That's it, Armstrong is ready!
Texture Features
The slabs have the following choice of textures:
- with embossing;
- with perforation;
- general geometric pattern on the entire ceiling;
- additional decorative elements.
The plates come with embossing and perforation.
Perforated modules are well suited for different rooms. They look beautiful and are inexpensive, and this is often important when arranging medical, public and other buildings.
But you can still do it in an apartment!
An Armstrong ceiling can be installed even in a Khrushchev-era building with 2.5 m ceilings, if... you abandon spring-pin suspensions. In this case, the inter-ceiling space can be reduced to 120 or even 80 mm.
How will it hang? The fastening units will be corners made of galvanized or sheet metal with two holes on self-tapping screws, and the hangers will be bundles of 4-6 turns of copper wire 0.6-0.8 mm, elongated in length. The length of such a suspension should be slightly greater than the height of the inter-ceiling space, and the bundles are reached to the standard by twisting the middle of a metal pin threaded into the bundle.
The wire is pre-cut into pieces of the required length, its running end is inserted alternately into the holes of the profile and the fastening unit in an inflection point on them. The ends of the wire are twisted. With some skill, installing such a suspension requires no more time than standard.
Additional recommendations
- Modules need to be installed only at the end of all construction and repair work.
- The temperature in the workroom should be from 15 to 30°C, and the air humidity should not exceed 70%.
- If necessary, the slabs should be painted before laying them in the sheathing.
- It is advisable to use gloves when installing modules. The slabs are very easily soiled and may leave marks on them.
- During installation, the fragility of the slabs must be taken into account.
Following the tips listed above, installing an Armstrong-type ceiling with your own hands will not be difficult, and its undeniable advantages make it a worthy competitor in the list of suspended false ceilings.