In old rooms, finishing ceilings to perfect smoothness is difficult and expensive. Differences between floors and crevices may be too large to be sealed with building mixtures. Such repairs will take a lot of time and effort. The problem will be solved by an Armstrong-type suspended ceiling. This type of finishing has many advantages and few disadvantages. And although the installation of the system seems complicated at first glance, it is actually carried out quite quickly. The main thing is to carefully study the manufacturer’s instructions and advice before starting work.
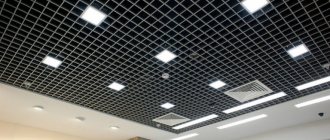
What does the Armstrong ceiling consist of and what does it look like?
This type of finishing appeared a long time ago - the prototype was created back in 1960. It was invented by Thomas Morton Armstrong. Mounted structures of this type are also called modular, cassette or raster.
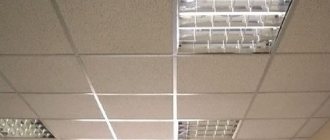
Armstrong is a system of metal slats that form rectangular or square cells into which panels are inserted. The supporting part is attached to the main ceiling, and can be partially visible or completely hidden. In the second case, it seems that the slabs are attached directly to the ceiling. The location of the structure is adjusted by the height of the suspension.
Armstrong ceilings are suspended. The difference is in the method of attaching the frame. In this case, the load-bearing elements are fixed on the base plane, forming a minimum gap. This finishing method is used if the condition of the ceiling is not critical, and there are no communications under it that need to be hidden.
Armstrong ceilings have a simple design and consist of five main elements:
- Hangers - used to attach the frame to the ceiling.
- Guide corners - mounted around the perimeter of the room.
- Transverse and load-bearing profiles form a base in the form of a lattice for mounting panels.
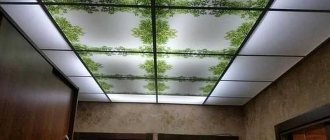
- Panels (cassettes) - inserted into frame cells.
- Lamps and ventilation grilles - have a cell size and are placed in a section between profiles in the same way as panels.
Installation rules
Installation work does not require special skills, since the technology is as simple as possible. The design consists of guide strips mounted around the perimeter of the room and crossbars that are fixed to them with special latches.
Typically, the length of the component elements is 60 cm or 1.2 meters, but if necessary, all parts can be easily cut with ordinary construction metal scissors.
First, guide strips are attached around the perimeter of the room; it is important to set them perfectly level, because otherwise the slabs may not converge with each other or move slightly to the side, and the final structure will not look as impressive as we would like. Advice: before starting installation, it is recommended to draw a straight line for the correct fastening of the guide strips; this will save you from repeatedly redoing the base of the ceiling
Tip: before starting installation, it is recommended to draw a straight line for the correct fastening of the guide strips; this will save you from repeatedly redoing the base of the ceiling.
Now it is important to decide on the location of the lighting fixtures. A clear marking of the wire output will protect against subsequent coincidence of the mounting points of chandeliers or lamps with the guide profiles of the ceiling covering
Advice: it is better to take the wires and cables outside immediately; the exposed ends should be carefully insulated.
If the guide strips on the walls are attached as firmly as possible, for which it is advisable to use dowels, then the hangers for fixing the main profiles will best be held using anchors.
Now you can attach the main T-profiles to the fixed hangers. After attaching all the parts, you need to align them using a laser level. If this is not done, problems may arise with fastening subsequent structural parts.
The next stage is fixing the transverse profile, for which special notches are provided in the main profile. Fastening is carried out by snapping matching parts; additional fastening of the elements is not required. In a similar way, we attach the longitudinal profile to the transverse lines.
The final stage will be the installation of decorative panels. For ease of installation, on the reverse side of each plate there is a designation on which side to insert and in which direction. Grilles and lighting fixtures are installed during the installation of ceiling tiles, for which special holes are cut in the right places for inserting lamps.
Advantages and disadvantages
Armstrong ceilings have many advantages over other types of finishes:
- low cost - from 205 rubles/m2, including frame;
- perfectly flat surface;
- masking imperfections in the base ceiling without expensive and time-consuming repairs;
- the ability to use any number of lamps;
- quick and simple installation, especially if the work is performed by professional craftsmen;
- variability: thanks to suspended structures, surfaces with different geometries are created - inclined, curved, multi-level;
- hiding utility networks, height correction;
- ease of maintenance: if you need to repair communications, you do not have to dismantle the entire finish - just remove a few panels;
- versatility: you can combine structural elements of the system from different manufacturers.
- variety of design: it’s easy to choose an option for any interior style - classic, industrial, modern, minimalism, etc., colors, texture, texture;
- low weight of the structure;
- maintainability: damaged slabs can be easily replaced with new ones, without dismantling the entire coating;
- practicality: systems are installed in buildings with increased requirements for hygiene, sound insulation, fire safety, acoustics;
- savings: thanks to high light reflection and thermal insulation, it allows rational consumption of heat and electricity.
The disadvantages of Armstrong ceilings include:
- reducing the height of the room by 8–10 cm;
- low moisture resistance of most panels;
- some design limitations;
- low strength of the classic ceiling;
- questionable environmental friendliness (formaldehyde may be used in production).
Advantages of Armstrong ceiling panels
If we consider the main advantages of the finishing material, namely Armstrong slabs, we can highlight the following points:
- this building material is ideal for all premises, regardless of size and total area;
- due to the fact that the tiles are light in weight, you can avoid unnecessary load on the base of the structure for installation;
- it is possible to hide all existing defects on the ceiling surface;
- Armstrong ceiling tiles are excellent for those rooms where it is necessary to hide the communication system from prying eyes - electrical wires, ventilation system, hood, cables and much more; in addition, if there is a need to carry out repair work, it will be enough to remove one element without disassembling the whole design;
- if there is damage to one or more elements, there is no need to disassemble the entire ceiling;
- installation does not require special knowledge or construction tools;
- Thanks to the wide product range, it is possible to choose the appropriate option of the required size;
- a wide range of textures and colors allows you to choose finishing materials to suit any design style;
- in the space that is formed between the main surface of the ceiling and the tiles, insulation can be installed if necessary;
- excellent for finishing rooms with high humidity levels;
- Modern products are quite easy to care for; in addition, they do not attract dust;
- All products undergo mandatory certification for compliance with quality standards.
During operation, Armstrong slabs do not fade under the influence of direct sunlight, maintaining their original appearance.
Specifications
When choosing Armstrong ceilings, pay attention to the following indicators:
- Light reflection - in some models of slabs the level reaches 85%, which allows you to save up to 25% of electricity on lighting. Smooth white slabs Plain, Retail Board, Scala Winter reflect light best.
- Sound absorption means the transformation of sound energy into thermal energy (divided into classes A - E). The highest indicator is characterized by low-density OR slabs;
- Thermal conductivity - 0.056 W/m*°C.
- Sound insulation (sound distribution) - reduces sound transmission between adjacent rooms by 43db. Acoustic ceilings are especially effective.
- Moisture resistance - 70-99%. For rooms like the kitchen and bathroom, panels with an indicator of at least 95% are chosen. This ceiling does not deform and remains flat. Duna Supreme, Newtone, Bioguard panels have increased resistance to moisture.
- Fire safety - from KM0 to KM3. Their use depends on the class of the room. Ceramoguard and Newtone products are completely non-flammable and are installed even on escape routes.
- Air permeability - there are two classes of products: A (high) - up to 25x10-3 kg/m² hour Pa and B (low) - more than 25x10-3 kg/m² hour Pa.
Most technical characteristics are indicated in the panel certificates.
"Prima"
This is a more expensive collection. However, outwardly, it does not differ too much from its cheaper counterparts. The main differences between parts in this category are improved performance characteristics. These types of tiles mounted in Armstrong-type ceilings have the following parameters:
- Increased moisture resistance, which makes it possible to install such a coating in rooms with humidity reaching 95%.
- Three possible edge options.
- Improved noise reduction performance.
- Higher strength compared to cheap series.
- Six different exterior options.
- Wider color gamut.
In what rooms is it recommended to install
Armstrong tiled ceiling can be used in almost any building. The scope of their application is determined by the properties of the panel material:
- in swimming pools, hospitals, baths, warehouses, terraces, laundries - moisture resistant;
- in restaurants, clinics, hotels, auditoriums and concert halls - acoustic;
- hygienic - for medical institutions, kindergartens, catering units, etc.
This type of finishing is also found in residential premises - most often in the bathroom, but it is also installed in the kitchen and balcony.
Preparing the base
As with the installation of other types of ceiling structures, before installing the Armstrong ceiling, a number of preparatory measures are carried out. This suspension system makes the condition of the rough foundation completely invisible.
The preparatory stage consists of removing the old finishing material that has become unusable. When paint or whitewash adheres firmly to the surface of the ceiling, it is permissible not to remove it.
If areas of the finish peel off or a layer of plaster falls off, they can damage the installed tiles. For this reason, they must be removed and the cracks filled with putty. Before installing Armstrong ceilings in a room where there is a high probability of leaks, the rough base should be waterproofed.
Types of slabs
Plates for Armstrong suspension systems are made from different materials:
- mineral fiber;
- PVC plastic;
- wood;
- gypsum;
- metal (rack, mesh, Grilyatto, cassette);
- glass, mirrors (design systems).
Mineral panels are made from clay and mineral wool. Additionally, various additives are used - starch, gypsum and others. Another component is latex, it determines the water resistance of the panel. Minslabs can be soft or hard. The second type is more resistant to mechanical stress.
You can choose not only the material of the plates, but also the color, up to black, golden, chrome, etc. The textures are different - matte, glossy, satin, with an embossed surface, reminiscent of decorative plaster, etc. Acoustic models have perforations of different diameters.
Advantages
Among other similar types of ceiling coverings, Armstrong products are distinguished by the following qualities:
- they perfectly absorb sound, thereby increasing the level of sound insulation of the room without the use of additional materials;
- the material from which the covering slabs are made is characterized by increased moisture resistance, which allows the use of such a ceiling in bathrooms, kitchens, open terraces and other places with high humidity;
- special impregnation of the slabs makes the material non-flammable, which prevents the spread of fire in the event of a fire;
- Armstrong slabs meet international safety standards - they are made from natural materials, therefore do not cause allergies and can be used in public places, as a finishing material in kindergartens, schools and medical institutions;
- ease of installation allows you to assemble the ceiling structure with your own hands without putting much effort into it;
- The specific design of the ceiling allows you to hide behind decorative panels communication pipes, cables and other elements that disrupt the harmonious appearance of the room. Along with this, if necessary, hidden structures can be easily accessed without disturbing the integrity of the ceiling;
- The rich color range maximizes the design possibilities of the room.
Dimensions of plates and types of components
For raster ceilings, square and rectangular panels with an aspect ratio of 1 to 2 are produced in several standard sizes:
- 600x600 mm;
- 1200x1200 mm;
- 600x1200 mm.
By agreement with the customer of the Armstrong ceiling, the dimensions of the tiles may differ from the standard ones.
The panels come in different heights - 7, 12, 14, 15 mm. The thermal insulation characteristics depend on this parameter: the greater the thickness, the warmer. The choice is determined by the dimensions of the room: the more spacious it is, the more massive the slabs and the heavier the frame. The systems use rectangular slats (slats) measuring 300x1500 cm, 300x2500 cm.
The slabs are produced with several types of edges, which determine the parameters of the suspension system.
| Edge name | Form | System parameters |
| Board | Rectangular (height 12, 14, 15, 19 mm) | 24 mm |
| Tegular | With step (step height 6.5 mm, total edge height 14, 15, 19 mm) | 24 mm |
| Microlook | With step (step height 8 mm, total edge height 15.18 mm) | 15 mm |
| Microlook BE | With step for design systems (step height 8 mm, total edge height 15.18 mm), with bevel on the edge of the panel | 15 mm |
| Vector | It is installed on the frame from below and hides the load-bearing elements, creating the impression that the panels are attached from the ceiling itself | 24 mm |
The Armstrong ceiling frame consists of several types of suspended aluminum or galvanized steel T-shaped slats:
- universal bearings - main supporting ones (up to 3600 mm);
- transverse - secondary, inserted between universal ones, allowing you to create a cell of the desired size (600 mm, 1200 mm).
The planks are attached to each other using locks or hooks. The connection type can be:
- locking type XL (for transverse elements) - made of high-grade steel and stamped separately using a precision method, it is more durable and economical compared to solid stamping of end elements for overlap joints.
- TL - has a stamped hook for precision and ease of installation when connecting butts.
- TLX is a patented hook-type technology that uses a composite material. Gives a strong and fireproof butt joint.
Slots are provided in the carrier and long slats. Secondary elements of the suspended ceiling are inserted into them. They are compatible with any type of connection. The profile provides a fire compensator for temperature deformations.
To attach the frame to the base ceiling, several types of suspensions are used:
- wire ones are inconvenient, not always reliable, but you can make them yourself;
- straight rigid - made in the form of a corner, which is attached to the base floor;
- adjustable single - consist of a bar and a rod that maintains mobility, which allows you to adjust the height of the system mounting in a limited range;
- double adjustable - resembles a single model, but contains a pair of rods, and allows for even more precise adjustment of the height of the structure.
Another component of the system is wall molding. This is a rail bent at a right angle, installed along the perimeter of the ceiling. The wall corner can be:
- simple shape in the form of the letter G;
- stepped - for slabs with an edge.
If the system uses shaped molding, its step should be the same as the slab edge notch.
Armstrong ceilings require the use of ventilation grilles for effective exhaust and air flow. This type of panels is available in a standard size of 59.5x59.5 cm, which allows them to be used in a system of any configuration. They come in the form of perforated plates or diffuser type.
Armstrong systems come with modular luminaires. The devices are cell-sized panels that use fluorescent elements or LEDs. The latter are beneficial in that they reduce energy consumption by 2-3 times and do not flicker, therefore they protect your eyesight and allow you to better concentrate on work. Spotlights are also used with Armstrong systems.
Types of materials
Mineral fiber is inexpensive, but not the only raw material from which Armstrong ceilings are made; there are different types of slabs:
- Plasterboard. The material is well suited for cladding rooms with normal or low humidity levels. The material is not moisture resistant, so it is not recommended to use it in bathrooms or kitchens.
- Mineral cotton. The advantages of the product are its heat and sound protection properties. Such Armstrong ceiling panels are installed in concert halls, theaters, and other rooms where an acoustic effect is needed.
- Aluminum. Durable and practical slabs, resistant to water and fire. Can be installed in rooms with any level of humidity. The high cost is compensated by a long service life, absence of corrosion and preservation of aesthetic appeal.
- Glass. An original option for interior decoration. Thanks to its strength and resistance to chemical, temperature, and humidity influences, glass can be used anywhere. However, the fragility of the material dictates its field of application. Glass ceilings of the Armstrong type are distinguished into matte, glossy, solid, fragmented, mosaic and others.
- PVC plates. Inexpensive, practical material, suitable for decoration in any premises, including industrial purposes. Plastic is a waterproof, fire-resistant product that tolerates temperature fluctuations well and is not subject to rotting or corrosion. But there is a drawback: when overheated, the plates can melt and release harmful compounds into the air.
- Made from laminated plywood. A very good option for rooms with high humidity. The environmental friendliness of the products is complemented by the light weight of the panels, practicality and average service life. The laminated protective film protects the fragments from dust and damage, while they remain light in weight and easy to install/dismantle.
- Paper. One of the most popular materials for dry rooms where high sound insulation is required. Pressed paper absorbs noise well, does not emit or transmit heat, absorbs excess moisture and releases water vapor if the air in the room is too dry. The budget price tag is an additional plus.
- Wooden. Quite an expensive material with high practical characteristics: thermal insulation, sound insulation. The aesthetic appeal of the slats is also an advantage. In addition, during the production process, the boards are treated with antiseptic and antifungal compounds that increase resistance to moisture, hot air and steam, so wooden squares can be installed in a bathhouse, sauna and other rooms with fluctuations in temperature and humidity.
Weight of the assembled structure per square meter
According to the group of surface density in accordance with GOST R 58324-2018, four types of panels are distinguished (kg per 1 m² of coverage):
- Ultralight - up to 1.5.
- Lungs - 1.5-3.0.
- Average - 3.0-5.0.
- Severe - more than 5.0.
The greatest load is created by slabs of wood and metal, the least by mineral products.
The mass of the entire structure depends on how many elements will be used:
- guides;
- corner profiles;
- suspensions;
- lamps;
- gratings, etc.
On average, the weight of an Armstrong suspended ceiling with components per 1 m² is 2.5-8 kg.
Features of calculation, purchase, installation
Once you have an idea of what an Armstrong ceiling is and what sizes of tiles there are, you can proceed to calculations and installation.
Among the points that will have to be taken into account when purchasing everything necessary for installation, there are important points. These include the quantity:
Slab.
Photo: slabs
Guides.
Photo: guides
Wall edge.
Photo: wall edging
Calculation of the required volume of materials
Now let’s get straight to the main issue – making calculations. The first point that the buyer needs to decide is the size of the tile. For calculations, slab sizes of 60 by 60 cm will be used, since they are most often used.
Photo: square slabs
Only after calculating the required number of slabs will it be possible to proceed to determining the number of guides, the volume of other frame elements, lamps, etc. As an example, we will consider a room 6 by 12 meters.
Photo: Room with Armstrong
Thus, the following is obtained. In order to remove the load from the structure, the volume of load-bearing elements, and before that the slabs, will be calculated on the smaller side of the room. That is, there will be 10 slabs in one row.
6m = 1 row.
0.6 = length of one slab.
6/0.6=10 pcs.
Based on the length of the room, it turns out that there will be 20 such rows.
12m/0.6m = 20 rows.
Let the room require good lighting and this will require the installation of 20 lamps. In accordance with this, the total number of panels (plates) of the standard sample and those modules that are equipped with lamps is calculated.
10pcs* 12 rows = 200 pcs. is the total volume of the slabs.
It turns out that 20 of them are lamps.
The remaining 180 are standard slabs.
By the way, to determine the required number of panels, you can also base your calculations on the perimeter of the room. To do this, divide the area of the entire ceiling by the size of one tile. 12m*6m= 72 sq. meters - ceiling area.
0.6*0.6=0.36 sq. meters - the area of the 1st slab.
72 /0.036 = 200 pcs.
Why is it worth using the first option for calculating the Armstrong ceiling if the size of the tiles is unchanged? Because it is less likely to miss a pair of guides. With some skill, of course, you can use any of the methods.
Now the question is the number of guides. They will be located from one wall to another along the width of the room, which is 6 meters. There will be 19 such guides, according to the number of rows minus one. The reason is that the slabs on the walls rest on the edges. Respectively,
6m*19 rows = 114 meters of supporting profile.
Photo: Guide resting on the edge
After determining the volume of the base frame, which serves as a support for the two sides of each of the slabs, you need to calculate the transverse profile. Each slab should fit square. The situation is similar, you will need 9 units of 12 meters each. That is, 10 rows = 10 transverse profiles and deduction of one piece.
Now the wall edge, or just a corner. Calculating the quantity here is much simpler than for everything else. You only need to determine the perimeter of the room - this value is equal to the total length of the edge. Namely:
12m*6m= 72m – total length of the corner.
The number of dowels for attaching the edging to the wall is a rather vague concept
Here it is extremely important to take into account the load-bearing capacity and condition of the walls. Under normal conditions, it is enough to install 3 dowels on a three-meter corner
Those. 1 unit per 1 m. If unreliable walls are crumbling and the like, then the number of fastening points should be increased.
Photo: Fastening the corner with dowels
The number of suspensions is determined using a certain coefficient, which is 1.2 suspensions. That is, you will need to divide the total area of the room by this indicator.
72m/1.2= 60 hangers
Photo: suspension installation
Again, if there are problems with the load-bearing capacity of the ceiling, then it can be increased depending on the situation. Depending on the number of hangers, you need to purchase the same volume of half rings with dowels that will be mounted in the ceiling.
Any materials should be taken with a reserve of at least 10%. The reasons for the loss of consumables can be either damage during work or the most common defects.
Criterias of choice
When purchasing such a suspended ceiling, take into account the following parameters:
- Thickness of tiles. The most commonly used plates are 12 mm thick. Reducing this indicator reduces the cost, but negatively affects performance. A thin plate will sag under its own weight, therefore ruining the appearance of the ceiling. Products in the mid- and premium price range have a thickness of 15 mm or more.
- Size. Tiles of 60x60 cm are considered standard. At the request of the customer, plates with other dimensions are made.
- Texture. For general purpose rooms, smooth plates or those with random embossing are suitable. When installing them, they do not select a pattern. Depending on the design of the room, matte, glossy, perforated and other modules are chosen.
- Price. Economy class includes cheap, but not always high-quality products from Chinese manufacturers. European brands such as Armstrong, Rockfon produce inexpensive, good quality products, as well as mid-price and premium products.
Cassette surface
Many designers, due to their excellent aesthetic characteristics, give their preference to this type of ceiling tiles. Their top surface is treated with polymer-based varnish or reflective metallic paint. The inner layer consists of a heat-insulating or sound-absorbing layer, while the top layer is made of steel or aluminum.
Their service life is very long, because the outer coating, provided it is intact, reliably protects the metal from corrosion. Such tiles are also very fireproof, since metal is a fire-resistant material.
Preparatory work before DIY installation
Before installing the ceiling, Armstrong prepares the room. To do this, furniture and other items are taken out of it to ensure free movement around the room and access to any part of it. In addition, tools and materials are prepared.
Required Tools
The following tools are prepared to perform the work:
- a hammer drill, it is needed if the walls and ceiling are concrete, in other cases a drill is used;
- bubble level, but laser level provides greater accuracy;
- screwdriver or screwdriver;
- hammer;
- roulette;
- construction pencil;
- pliers or pliers.
To perform the work you need a hammer drill.
In addition, you will need nails, screws, dowels, and connectors.
System elements
The main components of an Armstrong suspended ceiling include the following necessary parts:
- panels;
- profile;
- suspension;
- frame;
- fastening unit;
- fixing the ceiling covering.
Panels
Cassettes of such a product can be either hard (made of metal, glass, various mirror surfaces) or soft (made of organic and mineral material). The first version of the slabs is the heaviest and most massive, so it requires special reinforced guides and frame structures. The second option does not require expensive and large elements. However, it should be noted that soft coverings are made from substances harmful to human health.
Profile
Most often, such parts are made of metal-plastic or painted metal. A special small hole for hanging must be created in the profile. As a rule, the connection of these guides is carried out using spring locks or bendable antennae.
Suspension
This element consists of two small rods, which are connected to each other using a curved leaf spring. One of the parts must be made flat, and the second with a small hook at the end. It is worth noting that the suspension can be easily adjusted using a connecting spring.
Frame
This component of the ceiling is created in such a way that not only the main cassettes of the product, but also various additional elements can be built into it. Wires and other communications items are often hidden in it. Also quite often lamps and fixtures are installed in the frame system.
Mounting unit
It is represented by a regular dowel for a self-tapping screw. It should be noted that for reinforced suspension it is best to use a metal collet. Such mechanisms are necessary not only for the ceiling itself, but also for places with special loads, which include areas with built-in lighting fixtures and ventilation systems.
Attaching the ceiling covering
It is carried out using a small, even rod, which is screwed into the fastening unit using tools. In this case, there is no need to disassemble the suspension of the structure. Also, when attaching the ceiling, it is necessary to put the profile on the hook of the second rod and, holding the leaf spring, adjust the height and position.