According to established tradition, the name of the company that was the first to import products to Russia becomes a household name for all products with similar characteristics. In this article we will talk about Armstrong , which unite many manufacturers from Europe, Asia and America.
Classic Armstrong ceiling with built-in lights
The technical characteristics of the Armstrong ceiling imply the installation of mineral fiber boards (modules) in a suspension system created in the subceiling space from:
- metal profiles;
- wire hangers.
And the founder of this method of decorating ceilings was the company Armstrong , which proposed a technology that subsequently became extremely popular. Following her, other companies from around the world began producing these products.
Today, the Russian building materials market offers many varieties of this type of suspension systems, which for the convenience of consumers are called the same:
- Armstrong ceilings;
- Armstrong type ceiling systems.
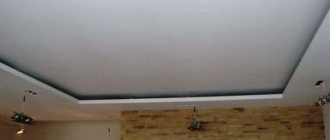
System design
The Armstrong suspended ceiling consists of a system of profiles attached to the sub-ceiling using hangers. These profiles form square or rectangular cells into which lamps and slabs are installed. All this together is the Armstrong ceiling system.
Armstrong ceiling is one of the options
Profiles are load-bearing (guides). They are the ones that are attached to the sub-ceiling through hangers and carry the main load. The total mass of the entire system is small, therefore guides are installed every 120 cm. Suspensions are mounted along the marked lines in increments of 50 cm. They have hooks at the bottom and holes in the guides. The guides are simply hung on hooks. After this, we received parallel guides spaced at 120 cm intervals.
Armstrong ceiling device
Between them with the same step - 120 cm - a transverse profile is installed. As a result, we get a cage of 120 cm * 120 cm. Armstrong suspended ceiling slabs have a size of 60 * 60 cm (to be precise, 598 mm * 598 mm). To install them, frame profiles are also attached to create a cage with the required dimensions. After this, all that remains is to mount the lamps and install them in the slab cells.
Scope of application
The Armstrong ceiling, the technical characteristics of which you already know, can be used in a wide variety of rooms. Economy options are found in offices and shops, schools and hotels. In a word, in those places where the requirements for operational characteristics are minimal.
As for buildings with high humidity, Armstrong is used here with special hygienic qualities.
The special furnishings of hotels and nightclubs require the installation of acoustic panels; custom-made designer structures decorate concert halls and work rooms.
Advantages and disadvantages
Armstrong ceilings were originally developed for use in industrial, office and public spaces. But a number of excellent qualities have led to the fact that they are also used in private houses and apartments. Here is a list of properties of Armstrong type suspended ceilings:
- Low price. This is the cheapest way to install suspended ceilings.
- A large number of options for slabs and profiles. The slabs can be not only matte white. They are metal, painted in different colors with varying degrees of gloss. There are glass, mirror, covered with wood-like film, etc. Moreover, these slabs are easy to make yourself, resulting in a unique design.
- Easy installation. All operations during installation are elementary and require minimal time.
This option is suitable for home - High maintainability. If the slab is damaged, simply remove it and install a new one. Therefore, when purchasing components, take slabs with a reserve.
- The suspended ceiling perfectly hides all communications and allows for excellent ventilation - the slabs very often have perforations. Even if it is monolithic, it simply lies on the frame, there is no tightness and the ventilation of the ceiling space is good.
- The system turns out to be light - the profiles are made of aluminum alloy, the plates are made of pressed waste paper of different thicknesses or a light alloy.
Armstrong ceiling is truly a wonderful product. Apparently that’s why he was so loved by the owners of offices, shopping centers, cinemas, etc. But there are also disadvantages. First, the appearance of such a ceiling is ideal for an office or public space, but not everyone accepts them in private spaces. But this is a matter of taste. The second is a suspended system and “eats up” the ceiling height, which many already have problems with. But if the ceilings are more or less normal, this system can be installed. That's all the disadvantages.
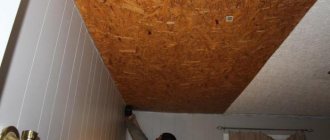
Technology for the production of mineral slabs
Just think how many different components are used in the production of a suspended ceiling. Here you will find perlite with clay, mineral fiber, gypsum, and even starch with latex! Although the main component is one. This is a mineral fiber. It is stone wool processed in a special way.
Due to the fact that the production of mineral slabs has been on stream for a long time, the products are of high quality and meet all standards.
The percentage of a particular material plays an important role in production. For example, if the slab contains a lot of latex, its moisture-resistant properties improve. Therefore, this material can be safely used in a bathroom or swimming pool.
System elements
The Armstrong ceiling system consists of a set of elements that are easily connected to each other. One of its advantages is its modularity, which allows you to get a ceiling of any size and configuration. The only problem is with nonlinear forms - they are not provided and there are no standard solutions. Therefore, this type of suspended ceiling is used only in square and rectangular rooms.
This is a version of the Armstrong ceiling with mixed filling
Profiles
Armstrong dealut ceiling profiles made of light aluminum alloy. There is perforation on the top of the profiles, with which they are attached to the hangers and joined together. The lower part of the profiles - the one that is visible from the room - may have a silver color, but more often it is white. There are also black and gold ones, you can find other colors, but you have to look for them.
Most often the profiles are painted white
Profile lengths 600 mm, 1200 mm, 3600 mm. The supporting profiles must be solid (if necessary, they can be spliced), so we select the length so that the profile is not shorter than the room. It is cut into sections of the required length.
The transverse profiles are partly 120 cm long, partly 60 cm long. You will have to count how many are needed to create a suspension system in your case. It will not be possible to cut them - there are protrusions along the edges, with the help of which they are joined to the load-bearing ones.
Armstrong ceiling installation diagram and its components
Bearing and transverse profiles come in two sizes - for different types of slabs: with a shelf of 15 mm and 24 mm. The “back” is also different - for different thicknesses of slabs (19 mm, 24 mm and 29 mm).
There are also wall profiles. They are made in the form of a corner and are mounted around the perimeter of the room. The outer slabs rest on them. They also come with shelves of different sizes - 19 mm and 24 mm.
Plates
Armstrong suspended ceiling slabs come in two sizes - 120 cm * 60 cm and 60 cm * 60 cm. The second option is more common, perhaps because squares are better perceived than rectangles. They are also available in different thicknesses - from 6 mm to 19 mm. The greater the thickness, the greater the degree of sound insulation such a ceiling has, but this characteristic largely depends on the material from which the slabs are made. And they come in several types:
- Economy class. The cheapest of all, they are highly hygroscopic and do not tolerate high humidity. They absorb moisture directly - in the form of liquid when flooded by neighbors above or from the air. Once saturated with moisture, they become heavy and begin to change shape - to sag, which spoils the appearance. In general, the option is cheap, but performs well in climate-controlled rooms with constant humidity. This group includes Oasis (Oasis) and ,Oasis+, Cortega (Gortega), Tatra (Tatra), Bajkal (Baikal).
Ceiling slabs Armstrong cash register Economy - Prima class. These are more expensive panels, but they have much better characteristics. Firstly, they are more durable and have increased resistance to moisture (85% versus 65% for the Economy class). They are better in terms of sound insulation and appearance. This group includes the collections Adria (Adria), Casa (Casa), Cirrus (Cirrus), Plain (Plain), Duna + (Dune Plus).
Prima class slabs - Moisture resistant. This type of suspended ceiling slabs can be used in damp rooms or at high air humidity. There are two types of Mylar, Newtone Residence.
Moisture-resistant ceiling slabs Armstrong - Acoustic. They have improved sound absorption characteristics. Suitable for installation in sales areas and offices. Available in two types: Neeva (Niiva), Frequence (Friquence).
- Hygienic. These plates are easy to clean and are intended for medical institutions and food industry enterprises. There is only one type - Bioguard.
Acoustic and hygienic - for specific applications - Designer ones. These Armstrong ceiling tiles are significantly different in appearance from all the others. They are used in the design of clubs, restaurants, bars. They have a presentable and sometimes luxurious appearance, but they already cost a lot. There are several modifications: Visual, Cellio, Graphis Linear, Cirrus Image.
Designer ones. These are just the main options.
Above we talked about authentic slabs produced by Armstrong. There are other types and types produced by other campaigns. The name and appearance may differ, but the division into categories is approximately the same.
Some types are made from other materials and in a different style
For example, there are metal plates - white, made of a single sheet and with perforations of different sizes and shapes, some painted in different colors, some made of plastic - translucent and with photo printing. In general, various plates are built into this system.
Types of profiles and slabs
One more point: the Armstrong ceiling slabs have a protrusion at the edges. This projection comes in different widths and depths. The type of profile is selected based on the dimensions of this protrusion. It may be the other way around, but they must fit together.
Suspensions and how they can be replaced
Armstrong ceiling hangers have a hole in the upper part for installing fasteners, and in the lower part there is a hook that holds the profile. The upper part is attached to the ceiling using dowels or other fasteners (depending on the floor materials).
Suspensions are available in various designs
Of all this variety, the most commonly used option is with two studs (in the photo above - the third one from the right and in the photo below). These hangers are inexpensive, quickly assembled, and make it easy to adjust the height of the ceiling when it becomes necessary to place it in one plane.
How to use a suspension when installing an Armstrong ceiling
But these hangers have a minimum height of 25 cm. This is a lot even in some offices, and even more so in houses and apartments. The solution is to shorten the studs (as in the top photo on the right) or use improvised materials. The most suitable are steel pins with a ring at the end and a piece of elastic steel wire. The downside of this mount is that it is difficult to adjust the height of the suspension. You will have to make them exactly the length you need.
How can I replace hangers?
Dowels with hooks at the ends are also suitable. But here, too, you will need additional wire hooks, since too short a distance to the ceiling will not allow you to lay the slabs - you need space for maneuver. The minimum distance between the main and suspended ceiling is 25 mm and this will be very inconvenient. It is advisable to have at least 50 mm. But this is only if lamps or fans are not installed in the ceiling.
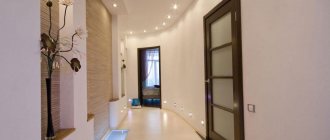
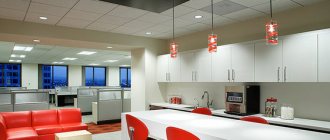
Lighting fixtures and ventilation grilles
Standard lamps and ventilation grilles are well suited for offices, retail spaces, public and medical institutions. They are the same size as the slabs and are simply installed in the chosen location. There are no problems connecting lamps - the large ceiling space allows you to connect wires of the required cross-section without problems. They are placed in metal trays fixed to the ceiling or cable channels.
An example of using lamps and ventilation grilles in an office
In apartments and houses, standard lamps look, at least, strange, and their power is clearly greater than necessary. In this case, recessed spotlights are usually used. It is better to take with LEDs - they hardly heat up and consume little electricity, but they provide enough light.
The use of ventilation grilles in houses and apartments is rather an exceptional case. The system itself is not airtight; many slabs are perforated, which ensures a sufficient degree of ventilation of the ceiling space. If additional holes are still needed, you can either use a standard grille or install a smaller one by cutting a suitable hole in the slab.
Specifications
When choosing Armstrong ceilings, pay attention to the following indicators:
- Light reflection - in some models of slabs the level reaches 85%, which allows you to save up to 25% of electricity on lighting. Smooth white slabs Plain, Retail Board, Scala Winter reflect light best.
- Sound absorption means the transformation of sound energy into thermal energy (divided into classes A - E). The highest indicator is characterized by low-density OR slabs;
- Thermal conductivity - 0.056 W/m*°C.
- Sound insulation (sound distribution) - reduces sound transmission between adjacent rooms by 43db. Acoustic ceilings are especially effective.
- Moisture resistance - 70-99%. For rooms like the kitchen and bathroom, panels with an indicator of at least 95% are chosen. This ceiling does not deform and remains flat. Duna Supreme, Newtone, Bioguard panels have increased resistance to moisture.
- Fire safety - from KM0 to KM3. Their use depends on the class of the room. Ceramoguard and Newtone products are completely non-flammable and are installed even on escape routes.
- Air permeability - there are two classes of products: A (high) - up to 25x10-3 kg/m² hour Pa and B (low) - more than 25x10-3 kg/m² hour Pa.
Most technical characteristics are indicated in the panel certificates.
Ceiling installation Armstrong
Assembling the Armstrong ceiling is simple: you will need a drill, suitable fasteners (dowels or self-tapping screws, depending on the ceiling material), it’s nice to have a laser level, but you can get by with a water and bubble level. To cut profiles, you can use metal scissors, or you can use a grinder with a cutting disk or a hacksaw with a metal blade.
The Armstrong suspended ceiling installation technology looks like this step by step:
- We mark on the walls the level at which the suspended ceiling will be located. It’s easier to do this with a level, more difficult with a bubble level.
- We fasten the wall profile along the intended line. There are profiles with different shelf widths; do not mix them up when installing - the shelf must be the same size as the profiles. Fix to the walls with suitable fasteners every 50 cm.
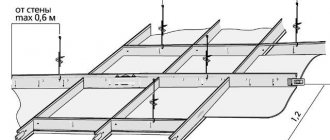
Fastening wall profiles - Having attached the wall profiles, measure the required length of the supporting profile and cut off the required number of pieces. Please note that the dimensions of the room are not always multiples of 60 cm. In most cases, the outer slabs have to be trimmed. There is nothing wrong with this, but you need to correctly develop a plan for placing the slabs on the ceiling - the “undercut” must be dispersed on both sides. But this must be done so that there are no narrow strips along the edges (see the picture).
It’s better to draw a plan, and then start installation - On the ceiling we mark the fastening lines of the guide profiles. They are installed every 120 cm, that is, there will be fewer supporting profiles than cells. We install hangers along these lines every 50 cm.
Installation of hangers - We hang supporting profiles cut into pieces of the required length onto the installed hangers. The profiles have perforations. We insert a hook into one of the holes and press it to hold it tighter. We insert the edges of the supporting profiles into the already installed wall profile.
We hang the supporting profiles and fasten them to the hooks - We take transverse profiles 120 cm long and install them by inserting the protrusions on the edges into the cutouts on the supporting profile. The result will be a grid of rectangular cells 120*60 cm.
- We take short transverse profiles of 60 cm each and insert them so that we get a mesh with a cell of 60*60 cm. The fastening is the same - the protrusion is inserted into the cutout.
Assembling a grid from profiles - We set all the hangers so that the ceiling is in the same plane. A level (laser level) can again help here, but you can get by with an ordinary construction level.
- We insert slabs into the resulting system. We turn them sideways, carefully wind them up, then lower them into place. You need to work with clean hands - the slabs get dirty. If necessary, they are cut with an ordinary stationery knife (place them on a flat, clean surface, apply a ruler along the cutting line or, as a rule, draw them along with a stationery knife, pressing well on it).
Installation of slabs in the Armstrong suspended ceiling system
Here are step-by-step instructions for installing Armstrong. It's really not difficult. You just need to first think through the layout of the slabs and understand for yourself where and at what distance from the walls the load-bearing profiles will pass. Then everything is assembled like a constructor.
Connecting rail 600 mm
The shortest connecting rail has a T-shaped configuration similar to the rest of the frame parts and a painted front part. At the ends there are latched tenons, which are designed for grooves in 1200 mm slats. Accordingly, 600 mm slats are installed perpendicular to 1200 mm.
Suspended frame Albes T24 Economy frame white 0.6 m
Type: profile Length: 600 mm
Suspended profile Albes T24 EURO white 0.6 m
Type: profile Length: 600 mm
Hanging frame Lumsvet T24 white 0.6 m
Type: profile Package: 60 pcs. Length: 600 mm
Essentially, with the help of these parts, all remaining voids in the frame of the Armstrong structure are filled.
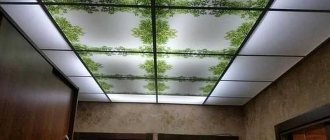
Photos of Armtsrong ceilings in the interior
These are slabs from the designer series
Mirror surfaces on the ceiling in the bathroom
Illuminated milk glass behind the ceiling provides soft diffused light
Even a long corridor looks boring
Large slabs of monolithic polycarbonate with photo printing
Dynamic, light
Diagonal execution is more difficult
Combination of gray metal plates and plain white
Option for a cafe, but the same or similar one will look good in a modern interior
This is already a very complex option - the author's
Aesthetic component of structures
When it comes to choosing a color, white has been and remains the absolute favorite. At the same time, the buyer is not limited in the choice of shades and can opt for patterned as well as colored Armstrong slabs. You've probably seen black ceilings in movie theaters. Most likely, these are also Armstrong slabs.
Perforated structures look very unusual. And the presence of lattice-type cells will allow you to completely hide the suspension system. Such a rich selection of elements will allow you to decorate the ceiling to your liking and even make it multi-level.
Installation diagram
The suspension system is secured with hangers, i.e. suspended from the base, ceiling, building beam, channel, etc. Hence the name of the ceiling - suspended
The system is assembled from T-shaped guides, which are connected to each other using “locking” connections of T-profiles.
More details in the section - Armstrong installation and component consumption