August 15, 2022 Stroyekspert Home page » Foundation » Installation
Drainage of water from the foundation of a house
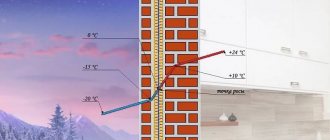
The foundation is the support for the entire structure, so special requirements are placed on its quality and strength. The strength characteristics of the foundation under the house are reduced primarily by the influence of water, this can be groundwater and melt water, as well as seasonal precipitation. Contact with water causes mold and mildew to form on the foundation walls, and the room becomes damp and uncomfortable. All this makes it simply necessary to drain water from the foundation of the house.
Drainage in a summer cottage: the simplest method of installation for specific conditions
Before making a drainage system on a site, it is necessary to select its type based on operational features. It is worth considering the most optimal options for installing water drainage systems, which are popular under certain conditions.
A drainage system is being created from the foundation of the house.
An example of site drainage with a high groundwater level
If groundwater is close to the groundwater level, a deep linear system may be the best option. It will drain moisture from the entire area into a drainage well, ravine or ditch located a level below. It is proposed to use perforated plastic pipes in a geotextile filter as the main elements.
Special pipeline with perforation and geotextile
One of the simplest methods of drainage in a summer cottage with groundwater located near the surface comes down to the following scheme:
- A trench is dug to the distance where the soil freezes. Its slope should be 2 cm per linear meter towards the liquid collection point. A layer of sand is poured for leveling.
- Geotextiles are spread on the prepared bottom so that its edges overlap the walls of the pit by at least 1-2 m. A small layer of gravel is poured on top.
- Next, plastic pipes are laid, after which they are again filled with approximately the same layer of gravel. The ends of the geotextile are rolled up to form a protective barrier. The rest of the trench is filled with soil.
Visual diagram of closed drainage with linear collection
At high groundwater levels, the drainage system takes on a tree-like appearance
Related article:
Installation of open drainage with your own hands on an area with clay soil
For land with clay soil, a system with an open channel arrangement is more suitable. With a closed pipeline system, water will not be able to seep through such soil and go into specialized sedimentation tanks or other suitable places.
Excavation work is underway to construct a drainage system
In places where water accumulates, ditches are dug with a depth of at least 50 cm. Their width should increase as they approach the receiving site. It is necessary to make the widest trench that collects water from the ditches adjacent to it. To facilitate draining and protect the edges from collapse, the side walls are cut at an angle of 30 degrees.
Since the open appearance of the trenches spoils the appearance of the site, it is necessary to decorate them. It not only improves aesthetic properties, but also strengthens the side surfaces of open lines. In this regard, the operation of the system increases significantly.
The process of decorating open channels with stone
Stones of different sizes can be used as material for decorating pits. The largest of them should be placed on the bottom, and the medium and small ones should be placed on top. If you have good financial resources, the surface can be covered with marble chips, which will give the outlet lines a respectable appearance.
If money is tight, then ordinary brushwood can be a good option for decoration. It is necessary to find dry branches of any wood species that grow nearby. They should be tied in bunches and placed on special stands installed at the bottom of the ditch.
Lines in the invisible part of the site can be strengthened with ordinary slate
The thickness of the bundles of brushwood should be no more than 30 cm. It is better to place the branches so that the larger ones lie in the center, and the smaller ones at the edges.
Related article:
Standard design elements
The general principle of creating a drainage system is based on the reception, transportation, treatment of wastewater and its removal from the site or accumulation. A number of elements are used to build the structure. And each link in the chain performs its own function.
Receiver for drains
This refers to any opening that is used to organize the reception and redirection of wastewater in the right direction. Examples: sinks, toilets, drainage hatches, roof funnels, grates, drains.
Such devices are made from durable waterproof materials that are chemically resistant to wastewater - cast iron, ceramics, sheet steel, non-ferrous metals, special plastics.
The main task of such devices is to receive and discharge liquid into the gutters.
All receivers that are used for household needs must be equipped with a flushing system from the water supply - a flush tank or tap
Gutters and sewer pipes
They receive wastewater from receivers. The function of this link is to move the contents to a well or treatment facility.
Pipes and gutters are made from different materials. Asbestos cement is suitable for internal sewerage provided there is no risk of mechanical damage.
Plastic pipes are becoming increasingly popular when arranging drainage systems: they are resistant to temperature changes, easily fit together, and do not oxidize.
Metal and ceramics are also used. The outlet from the washbasin, sink, or bathtub can be made from non-galvanized pipes. The method of laying elements is above ground and underground.
Read about how to choose pipes for arranging external sewerage in this material.
Tank for settling or cleaning
To proceed to the discharge stage, the effluent from the gutters or pipes enters “filters.” Storage containers are made of plastic, concrete or metal.
Plastic drives are easy to install and convenient to use. They are sealed - you don’t have to worry about wastewater getting outside of this tank
If you choose plastic , include in the design the creation of a special pit or metal casing so that the walls of the container do not deform under the pressure of earth masses.
Concrete storage tanks are suitable for arranging a drainage or stormwater system, but they are not as durable as PVC.
Metal tanks must be protected with paints and enamels. Their main disadvantage is their weight, so they require outside help during installation.
Based on their operating principle, drives are divided into:
- drainage wells;
- settling tanks;
- autonomous cleaning systems.
In tanks, the liquid is purified, converted into technical liquid and can be used for watering a personal plot and other household needs.
Discharge of purified water
The choice of the final point of wastewater disposal depends on the quality of the treatment plant. If you equip a station on the site with mechanical and biological treatment of wastewater, the resulting liquid can be discharged onto the terrain. The best solution for autonomous schemes is a three-chamber septic tank.
Schematic representation of a three-chamber septic tank. For improved filtration, brush or mesh filters and lime backfill can be added to such a station.
The first chamber is a settling tank with anaerobic bacteria, where large and heavy fractions settle. A compressor operates in the second container, which activates the vital activity of aerobic microorganisms. In the third compartment, the liquid is finally purified.
There are three options for waste disposal:
- river or soil - effective, but possible environmental pollution;
- infiltrator - in which the waste liquid is further purified by soil and removed with groundwater;
- storage tank - it does not provide for disposal of water.
The general drainage system of a house is divided into internal and external. The first includes communications inside the house: from washbasins, toilets, and bathtubs, liquid moves through pipes to one point. And it is brought out into the external structure up to the well.
Schematic representation of an external sewerage system. The external design may include drainage systems, rainwater tanks, and collector wells
In addition to the household drainage system, it is also necessary to equip a storm drainage system so that atmospheric waters from the roof are discharged to the surface of the earth or to an external network of drains.
Reliable ways to drain water from the foundation of a house
Korovin Sergey Dmitrievich
Master of Architecture, graduated from Samara State University of Architecture and Civil Engineering. 11 years of experience in design and construction.
The foundation is the basis, the support of the building; the life of the house depends on its quality, strength and integrity. The integrity of the foundation is compromised, first of all, under the influence of water that comes into contact with it during rains, runoff of melted snow, rising groundwater levels (or constant presence of groundwater at a high level), etc. As a result, the foundation walls become wet, damp, and overgrown with mold. , and moisture gradually collects around and approaches the upper floors.
All of the above problems demonstrate the importance of timely drainage from the foundation of a building. Moreover, foundation drainage must be carried out during the process of creating a residential structure in order to carefully consider the design of the drainage system, calculate the angle of inclination, select suitable materials for drainage and calculate the depth at which structural elements should be located
Closed drainage
The closed drainage option involves laying pipes underground. This design is applicable to all types of soil and areas; it is the most effective drainage of groundwater from the foundation of a building. Progress:
- A trench is dug at a distance of one and a half meters around the perimeter of the building. Its width is half a meter, the bottom should be located at least 20 cm below the foundation line.
- The slope towards the drainage well should be taken into account. For every meter it is 1 cm.
- The bottom is covered with sand in a layer of 5 cm and compacted.
- A 2 m wide geotextile sheet is laid on it, so that the edges overlap the walls of the ditch. This measure is necessary to prevent siltation of the system; the use of other materials will not provide optimal protection of the structure.
- To form a cushion for the pipes, gravel is poured 5–10 cm thick.
- Next, drains are laid; it is preferable to use ready-made perforated products, they are characterized by high strength, they already have the necessary holes. If there are no special factory pipes, you can use ordinary plastic ones by drilling holes in them on all sides.
- The pipes are first filled with small crushed stone, the next layer consists of a larger one, the total thickness of the cover is about 30–40 cm.
- The resulting “pie” is covered with the remains of geotextile, and 5 cm of sand is poured on top of it. Next, the entire structure is covered with earth.
In places of bending, it is necessary to provide for the installation of inspection (inspection) wells. Thus, excess moisture flows through the pipes into the drainage basin underground, which prevents freezing and eliminates the influence of groundwater located close to the surface.
Stages of arranging a drainage system
After the most suitable scheme is selected, calculations are made of the diameter of the pipes and the optimal slope for each section of the chain. Next, the entire system is assembled according to plan.
Stage #1 - calculation of pipe diameter
To determine the diameters of the pipes, it is necessary to calculate the flow of wastewater that will pass through this network.
First, we find out what the norm of water consumption per day is. It differs and depends on where you live. In a small city, an adult uses approximately 200 liters, and in a metropolis - about 700 liters.
Table of standard water consumption for various devices and recommended pipe diameter. To correctly calculate consumption, you need to use GOSTs and SNiPs
The diameter of the pipes is also selected for a specific receiver. If this is a toilet, this means a large amount of waste, so you need a pipe with a diameter of at least 85 mm. Pipes with a diameter of 32 mm are usually connected to washbasins, washing machines, and dishwashers.
Stage #2 - determining the slope for laying
Wastewater flows by gravity, so a slope is required. With its help, the flow moves at the required speed. The end point is the lower part of the drainage basin.
The maximum permissible slope for horizontal pipelines is 15 cm per laid meter of pipe. But it is absolutely impossible to make such a slope along the entire length.
The degree of slope of the sewer pipeline depends on the diameter of the pipes, the material from which they are made, and the degree of filling
If the terrain is favorable, the slope is natural and close to the slope of the earth's surface. If there are watersheds in the network, there is a transfer of wastewater from bottom to top, or the total depth is greater than permissible, a pumping device is needed.
Stage #3 - installation of the pipeline
A pipe of the required diameter is connected to each receiver. It is permissible to lay pipes externally; it is less labor-intensive, but not ergonomic. More often, communications are sewn into walls, for which ditches are made in the surfaces.
Pipes are connected to each other using special couplings, rubber rings, soldering, gluing
According to the specifications, shut-off valves must be installed into each outlet. Threads are cut in metal pipes, and a coupling is installed in plastic pipes.
All branches are connected in a closed circuit. Here it is necessary to ensure the impossibility of redirecting fluid flows.
Schematic diagram of the arrangement of the internal water supply and sewerage system. This internal wiring shows a pair - a water supply system (a) and a drainage system (b)
After laying the internal sewerage system, an external one is created: trenches and a pit are dug for cleaning. Next, the walls of the trenches are strengthened and, if necessary, insulated with textiles or a clay or concrete casing. After which pipes are placed in them.
Now you need to connect external ones to the external taps. Each joint must be sealed and tested for strength.
At the last stage, a treatment facility is installed and drains are connected to it, serving as receivers for drainage from the roof, drainage installations, and internal sewerage pipes. It is recommended to equip special hatches at the docking points to allow for prompt repair of breakdowns.
The need to install drainage for a pile foundation
Drainage as part of a pile structure performs the function of draining excess water that forms on the site due to the peculiarities of climatic conditions. Rain and melt water passes through the soil layers and stagnates under the foundation.
During the construction of a building, the natural process of water movement in the ground is disrupted, since the pile structure becomes a kind of dam on the path of groundwater.
As a result of this violation of the hydrological regime, the groundwater level rises, which leads to subsidence of the foundation and a decrease in soil density. The exception is sandy and crushed stone soil types, which easily allow water to pass through, preventing its accumulation in the soil layers.
The drainage structure protects the foundation from the negative effects of moisture, prolonging its service life many times over.
The composition of the soil on which the structure is supposed to be built plays an important role. Clay soil retains moisture well, which cannot pass further, and therefore the soil liquefies, which leads to noticeable shrinkage of the house and destruction of the building material.
During precipitation, there is increased moisture in the clay soil and subsequent destruction of the pile foundation. If the building is located on a slope, precipitation will always flow down the slope towards the house, deteriorating the quality of the foundation.
When constructing a drainage structure, the depth and chemical composition of groundwater, which intensively destroys the pile foundation, is taken into account. The content of aggressive chemicals in the composition accelerates the destruction of the foundation.
For such conditions, it is necessary to install a high-quality drainage system.
Draining a flooded basement of a building
Sometimes a situation arises that the owner of a house becomes convinced of the need for deep drainage after the fact, having seen in the spring that the basement of his house is flooded. In this case, in addition to installing external deep drainage, waterproofing the basement walls and making a high-quality blind area, it is necessary to drain the basement of the building.
installing a pump in a pit to drain the basement from penetrating water
Dehumidification is performed in the following way:
- First you need to pump out all the water from the room. If it is not possible to quickly set up a pit, some kind of container will do, in which you can install a pump and collect the accumulated water there, it all depends on the amount of water and the specifics of each specific case.
- After removing the water from the basement, it is necessary to provide sufficient ventilation to dry the walls; at this point, it is necessary to empty the room of all things stored there.
- To remove groundwater, a pit measuring 0.5x0.5x0.5 m or more is dug at the lowest point of the basement. Its walls and floor are concreted and waterproofed. A linear drainage system is installed along the perimeter of the walls, draining into a dug pit. To avoid accidents, it is necessary to fence the constructed structure. Another, more economical solution to the problem could be to install a container with a volume of 50 liters or more in the dug pit; this will avoid waterproofing the walls.
- A drainage or fecal pump is lowered inside and with its help the accumulated water is removed from the basement through a hose. The choice of one type of pump or another depends on the degree of contamination of the water; if there is debris, silt or fibrous inclusions in the water, it is more advisable to use a fecal pump. Currently, there is a wide selection of pumps that allow you to pump out water in both forced and automatic modes.
When it is necessary to cover a large area with a drainage system or strictly limit the groundwater level, then another advanced drainage installation method can be used: a geocomposite drainage system.
How to drain groundwater and wastewater from the foundation – Piles Mania
The foundation is the basis, the support of the building; the life of the house depends on its quality, strength and integrity.
The integrity of the foundation is disrupted, first of all, under the influence of water coming into contact with it during rains, runoff of melted snow, rising groundwater levels (or constant presence of groundwater at a high level), etc.
As a result, the foundation walls become wet, damp, overgrown with mold, and moisture gradually collects around and creeps up to the upper floors.
All of the above problems demonstrate the importance of timely drainage from the foundation of a building. Moreover, foundation drainage must be carried out during the process of creating a residential structure in order to carefully consider the design of the drainage system, calculate the angle of inclination, select suitable materials for drainage and calculate the depth at which structural elements should be located
Moreover, foundation drainage must be carried out during the process of creating a residential structure in order to carefully consider the design of the drainage system, calculate the angle of inclination, select suitable materials for drainage and calculate the depth at which the structural elements should be located.
How to drain water from the foundation
Drainage of water from the foundation of a house
The foundation is the support for the entire structure, so special requirements are placed on its quality and strength.
The strength characteristics of the foundation under the house are reduced primarily by the influence of water, this can be groundwater and melt water, as well as seasonal precipitation.
You can protect the foundation of your house from precipitation and groundwater in various ways:
- Installation of a blind area around the perimeter of the house.
- Creation of a storm drainage system in combination with a drainage system.
- Drainage system.
How to drain water from the foundation of a house
The influence of moisture entering the soil in the form of precipitation, melt and groundwater negatively affects the strength of the foundation.
Overmoistening of the soil contributes to flooding of basements, dampness in the building, and the appearance of mold and mildew on the walls.
And seasonal freezing and thawing of the soil leads to the formation of ice on the foundation walls and base, resulting in the destruction of particularly important structures.
Well-designed foundation protection can prevent damage caused by high humidity. Experts note that, along with waterproofing, the most effective is the direct drainage of accumulated water from the house. It can be organized in several ways, depending on the source of moisture.
Drainage of melt and storm water from the foundation of the house
Problems associated with the seasonal formation of surface water can only be eliminated with an integrated approach that involves the use of:
- roof drainage system;
- blind areas;
- drainage systems.
The installation of a roof drain is necessary to collect water that forms when snow melts or appears during rain. Flows, thanks to a system of pipes located on the facade or inside the house, are redirected to storm drains located under the outlets of drainage risers.
Subsequent water drainage is provided through an open or closed drainage system.
Open surface drainage is a shallow ditch with a slight internal slope, opened along the perimeter of the outer side of the blind area. A sand and gravel cushion is added and compacted to the bottom of the trench, after which drainage trays are installed on it, covered with gratings.
The greatest effectiveness of using such a storm drain is achieved in areas with uneven terrain, the natural slope of which helps to remove accumulated water from the foundation and base of the house. The disadvantage of surface drainage is that it often gets clogged, leading to constant cleaning of the trays.
Plot
Damage caused by melt water and heavy precipitation can be prevented by installing surface drainage.
This system serves to collect and drain excess precipitation, which often floods the adjacent area, and with it fruit trees (and other plantings), foundations and basements. The article will focus on the surface drainage system. Content:
Advantages of surface drainage
The installation of the system does not require serious financial investments due to the reduction of excavation work. As a result, the likelihood of a violation of the structural strength of the soil, that is, subsidence, is reduced.
- Due to the organization of external drainage of a linear type, the coverage of the territory for the catchment area has been significantly expanded, while the length of the sewerage main is reduced.
- The system can be installed without disturbing the entire integrity of the existing road surface. Here the insertion is carried out according to the width of the gutters.
- The system is suitable for installation on rocky or unstable soils. And also in those places where it is not possible to carry out deep work (architectural monuments, underground communications).
Types of drainage systems
Drainage drains are part of storm sewers that are used in the improvement of both public and private areas. There are 2 types of systems: linear and point.
- The linear system consists of gutters, a sand trap, and sometimes a rainwater inlet. This design copes well with its task over large areas. When organizing it, earthworks are kept to a minimum. Its installation is necessary in areas with clay soil, or whose slope is more than 3º.
- The point system consists of locally located storm water inlets connected underground by pipelines. The system is optimal for collecting water coming from roof gutters. Its installation is also advisable in areas with modest areas or when there are any restrictions on the arrangement of linear drainage.
Each system is efficient, but combining them is the best option when organizing drainage.
Drainage device for drainage
To organize linear or point drainage, various elements and devices are used, where each component serves its purpose. Their proper combination leads to effective work.
Gutters
Drainage trays are an integral part of the linear system; they serve to collect precipitation and melt water. After which, excess moisture is directed into the sewer or, at least, taken away from the site. Channels are made of concrete, polymer concrete and plastic.
- Plastic products are lightweight and easy to install. Plugs, adapters, fasteners and other elements were developed specifically for this purpose to facilitate the process of assembling and installing the system. Despite the high technical characteristics (strength and frost resistance) of the material used, they are limited by load - up to 25 tons. Such gutters are installed in suburban areas, pedestrian areas, bicycle paths, where high mechanical stress is not expected.
- Concrete trays are undoubtedly strong, durable and affordable. They are able to withstand very heavy loads. Their installation is advisable in places where vehicles pass, for example, on access roads or near garages. Steel or cast iron grates are installed on top. A reliable fastening system does not allow changing the position during operation.
- Polymer concrete channels combine the best properties of plastic and concrete. With a low weight, the products take a significant load and are distinguished by higher physical and technical properties. Accordingly, they also have a decent price. Thanks to the smooth surface of the gutters, sand, sparse leaves, branches and other street debris pass through without difficulty. Proper installation and periodic cleaning guarantee long-term drainage service.
Sand receivers
- This element of the system is responsible for filtering water from sand, soil and other suspended particles. The sand trap is equipped with a basket in which foreign debris is collected. Equipment installed in close proximity to the sewer drain will provide the most efficient operation.
- Sand traps, like trays, must match the type of load. Since this element is in conjunction with other components of the drainage system, it must be made of the same material as the rest of the chain links.
- Its upper part has the same shape as the gutters. It is also closed with a drainage grid, so the sand receptacle is invisible from the outside. Its location level (below the soil freezing depth) can be reduced by installing these elements on top of each other.
- The design of the sand trap provides for the presence of side outlets for connection to underground storm sewer pipes. Outlet taps of standard diameters are located significantly above the bottom, so small particles settle there and remain there.
- The sand receiver can also be made of concrete, polymer concrete and synthetic polymers. The package includes steel, cast iron and plastic gratings. Its selection is made depending on the expected volume of water discharged and the load level in the area of its installation.
Storm water inlets
- Melt and rainwater collected by drainpipes from the roof of the building ends up on the blind area. In these areas, storm water inlets are installed, which are square-shaped containers. Their installation is also advisable in places where it is not possible to install linear surface drainage.
- Since storm water inlets perform the function of a sand trap, they are complemented by a garbage container, which is regularly cleaned, and a siphon, which protects against odorous substances coming from the sewer. They are also equipped with nozzles for connecting to underground drainage pipes.
- Most often they are made from cast iron or durable plastic. The upper part has a grille that absorbs loads, prevents the entry of large debris and performs a decorative function. The grate can be plastic, steel or cast iron.
How to drain groundwater from the foundation of a private house with your own hands?
The foundation of any house, and especially a private one, is subject to the negative influence of ground water. They contain components that can destroy the concrete base. Even if the house is carefully waterproofed and equipped with supports, this does not guarantee protection from the influence of groundwater and further destruction. Only foundation drainage can provide such protection and ensure drainage.
Drainage installation around the foundation of the house
The main stages of creating a closed drainage with your own hands:
- Digging a trench half a meter wide and half to one and a half meters deep. You should dig with an inclination towards the ditch into which the water will drain.
- Filling the trench bottom with sand and further compacting it, taking into account the angle of inclination of the bottom.
- Laying drainage pipes on the sand (if there are no special perforated ones, you can make them yourself: by drilling holes in ordinary plumbing pipes in a 180-degree sector).
- Sprinkling the pipes first with large and then small crushed stone and compacting a layer of earth on top of the crushed stone.
- An inspection well must be installed in the bend of the drainage system, to which pipes with holes for drainage are attached. The pipes must lead to the very boundaries of the site.
Now we need to organize water drainage outside private property:
- we dig a trench again;
- we make a slope and cover it with sand;
- we install pipes without holes (here there is no need to collect water from the lawn);
- we fill up the pipes and put the soil and turf in place.
Thus, foundation drainage is an operation, before which it is not recommended to engage in the actual construction of the house. Drainage provides protection around the foundation, removal of excess moisture from it and, therefore, long-term operation of the building.
Useful tips for arrangement
If there is a need to turn the pipe 90 degrees, it is better to organize two 45-degree bends. This will reduce the sharpness of the turn and create minimal resistance in the network.
If a turn of 90 degrees or more is achieved, a manhole is installed at the junction. It smoothes the turning angle and prevents clogging
It is impossible to organize drainage from the roof to the blind area. This will lead to waterlogging of the soil around the building and loss of its bearing capacity.
The surface water drainage system and foundation drainage should not be combined. Their joint work is dangerous due to rainwater entering the drainage and flooding the foundation.
Don't forget to add taps to the system that will prevent flow redirection in emergency situations or during repairs.
Construction of ponds, sewage pits or ditches
Owners of country houses are often interested in how to dry a plot of water with their own hands without drainage. This is also possible, but it is best to use such methods in the country, and not in a country house. This is digging ditches, sewage pits or decorative ponds. They can become not only a means of draining water, but also an element of landscape design. The choice of method depends on the characteristics of the site and the reason for the accumulation of moisture.
Wells
The easiest way is to dig holes in the lowest flooded areas. They should be cone-shaped, tapering downwards. The diameter at the surface is 2 m, the depth is at least 80-100 cm. Such pits can be decorated by turning them into decorative ponds. To avoid shedding and silting, their bottom is covered with gravel.
Ditches
Ditches are more difficult to dig, but such a system will drain excess water more efficiently. They are organized around the perimeter of the site. To prevent the walls from crumbling, they are reinforced with boards or concrete slabs. You can put a metal box on the bottom.
Drainage ditch beautifully designed to look like an artificial streamSource kndlandscaping.com
A variant of this drainage method is the installation of decorative streams. This is appropriate if the site is located on a slope. The bottom of the artificial stream is laid out with pebbles, pebbles or geotextiles. It is recommended to arrange streams under trees, as in a sunny place the water will bloom.
What types of gutters are there?
The path adjacent to the house must have a slope of at least 2° from the wall of the building. In fact, thanks to this slope, water should not accumulate on the surface of the blind area.
But, if you do not install a drainage system, then all the water flowing from the path will seep under the ground and penetrate into the foundation, basement or basement.
The drain must ensure that water is drained away from the building. You can use the following as a drain:
Finished gutters
Typically, such structures are used when laying tiles (paving, clinker, ceramic) or for soft blind areas (crushed stone, gravel). These products are individual elements of short length, which are made in the shape of a semicircular recess. They are laid out along or across the blind area.
If the gutters lead directly to a centralized sewer system or a special drainage tank, then it is desirable that they be of a closed type, that is, a grate should be installed on top. This will prevent leaves, debris and dirt from getting into the drain, eliminating the need for regular cleaning.
Metal gutters are durable, fireproof, resistant to temperature changes, and inexpensive. But their disadvantage is their heavy weight and possible manifestations of corrosion. Also, during heavy rain, a drum effect occurs - drops of water noisily hit a metal surface.
Concrete gutters are resistant to corrosion, temperature changes, and rotting. The material is strong and durable. Although it is heavy in weight, this is a plus, because such a gutter will not budge, even in heavy rain. Minus – high price;
Creating recesses for drainage
When pouring concrete, you can immediately leave a small depression along the edges of the blind area to drain water. Or you can use a hammer drill to knock out a groove in already hardened concrete and place a drain structure there. The advantage of this method: low cost.
However, it doesn't always look beautiful. Even sometimes, just by appearance, it becomes clear that the drainage system was not initially thought out and the owner does not have the funds to create a normal drainage system.
If there is a limitation on funds, then a sewer or asbestos pipe (Ø 25 cm) can be used as a groove for draining water. It is divided in half or mounted entirely (if one end of it is connected directly to the drainpipe coming from the roof).
Types of drainage, their features and purpose
There are 2 types of drainage around a low-rise building: surface and underground; let’s look at both types:
Surface
Surface drainage and point storm drains around the house are built to collect excess moisture that falls in the form of precipitation. According to the layout of drainage pipes (drains), this type of system is divided into ring, layer, and wall.
For each specific case, a separate project is created, which takes into account the landscape, soil type, location of buildings on the site (existing or future), type of foundation of permanent buildings, level of soil freezing and many other points.
Type 1. Wall
The drainage around the winding is of the linear variety. Be built simultaneously with the foundation. Construction of the system after completion of construction is possible, but it is much more difficult and expensive.
Necessary for removing moisture from the external surfaces of the foundation. It consists of trenches encircling the foundation along the perimeter at the maximum permissible distance, in which drains are laid. The depth of the trench is 0.3-0.5 m below the foundation level.
The trenches have a slope, usually 1 cm -2 cm per 1 m, so that water flows under the influence of gravity to one lower point.
At the lowest point, the drains are connected to the inspection well. An outlet pipe is also connected to it.
How to choose a slope for a drainage system?
When choosing a slope for a drainage system, you need to operate with the following criteria:
- The angle of the roof.
- Roofing surface area.
Slope for drainage system
Moreover, the larger both parameters are, the better. After all, the steeper the angle of the slope, the less likely it is to collect water that has stagnated in the depressions and is populated by colonies of harmful microorganisms. That is why flat roofs, as well as slopes with an inclination angle of less than 10 degrees, are completely unsuitable for the role of an accumulating plane. And also, the higher the slope, the less chance of collecting dirty water: after all, it simply will not have time to become polluted, moving at high speed from the roof to the storage facility.
Well, everything is clear with the area of the roofing surface - the larger it is, the higher it is for rain. It’s not for nothing that meteorologists calculate the intensity of rainfall in millimeters of precipitation falling per square meter of surface. That is, we can quite rightly assume that the larger the surface, the greater the volume of water will be “collected” from such a “field”.
In addition, you need to pay special attention to the roofing material. After all, the ecological purity of the collected water depends on its characteristics.
How to make drainage around the house with your own hands?
Step-by-step instructions for installing a closed drainage system:
Determine the location of the closed drainage system, which can be implemented in two options:
- pass only near the foundation, i.e. around the house (wall drainage), preventing water from penetrating directly into the house.
- be located throughout the site, thus protecting the basement of the cottage, as well as plantings and other outbuildings.
Closed drainage device (solid, wall).
The drainage diagram around the house is shown in the photo
Mark the location of drainage ditches on the site. Typically, devices such as a laser rangefinder and a level are used for this. But, you can make it simpler, trace where the water grooves remain after the rain - that’s where drainage trenches should be laid.
Dig trenches. When digging, be sure to observe the height difference. After all, water should flow to the drainage well, and not accumulate in pipes.
Digging a trench for drainage of a country house site.
Advice. To check the “operability” of the trench, it is better to wait for heavy rain and see if there are any places of significant accumulation of water.
Lay a layer of geotextile. Its role in drainage is to filter water from impurities that could clog the drainage pipe perforations.
Laying geotextiles at the bottom of the trench for drainage.
Advice. If you have clay soil, geofabric is a must; if you have crushed stone or sand, then it is not necessary.
You can use any geotexyl, the main thing is that it allows and filters water well. It is better not to use dense needle-punched geotextiles, because... it does not pass water well.
Fill the bottom (bottom) of the trench with gravel.
Laying perforated pipe.
Lay a perforated pipe - the basis of the drainage system. Pipes can be ceramic or plastic. But any type of pipe must have perforation to receive water (perforation can be done independently, using a drill). The pipes are connected to each other using a cross or tee.
Advice. The pipe perforation should be smaller than the size of the smallest gravel particle.
Lead the ends of the pipe into inspection wells. Such wells are installed at all turns so that the system can be maintained. For example, clean a pipe with water pressure or evaluate changes in water level.
Advice. Collecting pipes over a large area of the site must converge into a main pipe (with a diameter of more than 100 mm), which will carry the collected water to the drainage well.
Lead the ends of the pipe into the drainage well. This is the last component of a closed drainage system.
Exiting pipes into inspection wells.
According to their functional purpose, drainage wells are divided into two types:
- accumulating. This well has a sealed bottom. Water is accumulated in it and then used for irrigation;
- absorbing. A well without a bottom, the water in it gradually disappears into the soil.
- Fill the geofabric with crushed stone without reaching the top ground level of 200mm.
- Fill the drainage pipes with crushed stone to a height of 300mm.
- Wrap the pipes with geotextile overlapping and secure the joints with rope.
- Fill in sand, soil and/or lay turf.
Absorption well and drainage pipe wrapping with geotextile.
Advice. A surface drainage system (storm drainage system) can be installed on top of a closed system and also drained into a drainage well.
The finished drainage system is shown in cross-section in the photo.
Sectional diagram of the drainage system.
Conclusion
Which of the listed types of drainage is right for you can only be determined by knowing the characteristics of the site. In general, you should choose the drainage around the house whose cost of installation and operation is the lowest, and of course, which you can do yourself. At the same time, it must perform the role of drainage efficiently and reliably. After all, according to experts, proper drainage around the house will extend its service life by more than 50 years.
Summarizing
The practice of users of our portal suggests that a way out of any situation, even the most hopeless one, can be found. If you lack experience or self-confidence, you can always seek advice from experienced FORUMHOUSE members, who will always tell you what and how to do correctly during construction. And even without a large budget, with the right approach you can make a reliable and inexpensive storm sewer and site drainage system with your own hands.
A thread on FORUMHOUSE explains how to drain and drain a wetland. We also advise you to study the topic, which gives advice on choosing geotextiles for the drainage system.
Useful articles about the features of the drainage system of the foundation and site, the choice and independent installation of a drainage well, and what to do if the basement floods.
The videos contain the nuances of site drainage and tips on choosing drainage pipes.
Deep drainage system
If the groundwater level on the site is high, and the house has a basement or underground garage, then you will have to install a deep drainage system.
Signs that it is necessary include:
— High humidity in the basement; — Flooding of the basement; — Quick filling of the septic tank (cesspool).
It is advisable to equip an underground drainage system for the foundation during the construction of a house. This will be much cheaper than removing moisture from a finished foundation built without taking into account the real groundwater level.
Water is discharged directly into a storm or mixed sewer system (by gravity - if the slope of the site is not < 5 mm per linear meter of pipe length) or is first redirected to storm water inlets or to a collector well, from where it is pumped out by a pump.
The slope can be either natural or artificial - for example, through the use of special concrete pipe-channels with an internal slope or multi-level stepped gutters.
Water collected by surface drainage can also be drained into the collector, and from there it will flow into a municipal storm drain or be absorbed into the soil (through a drainage field - a layer of crushed stone).
Arrangement of a simple drainage system
Drainage trench around the house (ring drainage)
The simplest way to drain water and neutralize the effects of ground moisture on the ground floor and foundation is to install a fairly wide drainage gutter around the perimeter of the building at a distance of one and a half to two meters from it. Its depth should be below the level of the foundation; its bottom is given a slope and filled with cement mortar.
A drainage ditch effectively removes moisture from the foundation of the house, but water from downspouts should not flow into it.
Closed wall drainage
The purpose of this soil drainage system is to remove groundwater, rainwater, or meltwater from the foundation and prevent groundwater from rising during snow melt or heavy rainfall. It is a closed loop of perforated (perforated) pipes or gutters with the convex side up, laid at a depth of one to one and a half meters.
Unlike ring drainage, wall drainage pipes are laid above the level of the foundation base. The trench is paved with broken bricks or large crushed stone of several fractions; the drains are also covered with crushed stone and, together with it, wrapped in a filter material - for example, geotextiles or fiberglass. The filter prevents the drain holes from becoming clogged with silt, and the top of the trench is covered with gratings and covered with soil.
“Rotary wells” are installed at the corners of the building - they set the direction of the discharged water. The wells are made of PVC, their diameter is less than half a meter, and their height is from one to three meters.
The ditch with pipes should slope down the slope (and away from the building) and discharge water flows below the level of the basement floor. Such a drainage trench pulls towards itself, absorbs and removes moisture from approximately an area at a distance of 15-25 meters around itself.
Where should the water be drained?
If the building is on a slope, as a rule, the drainage trench goes around it like a horseshoe from the side of the hill and has an exit on the opposite side. If there is such a possibility, water can be drained into a small “technical” reservoir, from where it will be used for household needs - watering the garden, construction and repairs, etc.
In other cases, water is either immediately discharged into a public or individual sewer system, or enters a storage collector well, where it is absorbed into the soil and transported by gravity or pump to the site.
The installation of simple drainage trenches is not difficult, but the arrangement of a full-fledged soil drainage system, connecting both the drying of the site itself and the drainage of water from the house located on it, requires special calculations and professional installation. It is better to entrust it to professionals, since losses from malfunctions, repairs and alterations will be greater than the cost of specialist services.
Surface drainage
This water drainage system is designed to drain storm and melt water from the site (overflow) and is called surface drainage.
It’s easy to protect yourself from melt and storm water:
- It is necessary to dig ditches half a meter deep along the perimeter of the site with walls sloping at an angle - they will discharge water into a common drainage ditch behind the lowest point of the site. Their bottom is covered with crushed stone, broken bricks, straw, poles, and the top is covered with earth;
- A more rational and reliable way to prevent your site from turning into a swamp and the foundation from “floating” is to install a more serious surface drainage system, which involves laying plastic channels or rectangular polymer concrete gutters around the perimeter (linear drainage). Plastic ducts are inexpensive and come in several varieties, but they all resemble halves of a pipe cut lengthwise. They allow you to quickly install a branch over large areas using special fasteners and adapters. The channels are covered from above with protective grilles;
- Polymer concrete gutters are more expensive, but the quality of this material is much higher than that of plastic. They are just as light, but more durable, abrasion resistant and waterproof;
- Storm water inlets. These adapter tanks are used to collect rain and melt water from the roof of a building (with a vertical drain) or are installed at the “point of intersection of slopes”, collecting water flowing from the entire site (with a side drain). To protect against debris and leaves, cast iron, steel or plastic grilles are mounted above them.
When installing surface drainage for an area, you must remember that it cannot be connected to the drainage of the foundation, otherwise storm water flows may flow under the base of the house and undermine it.