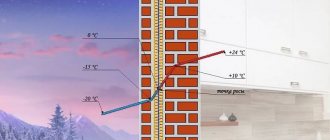
Finishing not only gives the house a finished look, but also protects the structure from adverse external influences. The quality of the result depends on the correct choice of materials, compliance with technological requirements and the sequence of work stages.
Exterior finishing work consists of several stages. This is the selection of suitable materials, calculation of their quantity, preparation of the base and application of a decorative coating.
The first stage of finishing a house or cottage is the choice of materials; let’s look at the most popular ones. For cladding the walls of stone buildings built using traditional technologies, facade paints, decorative plasters, ceramic and stone tiles are used. Plastering walls followed by painting is considered one of the most inexpensive types of cladding. Modern facade paints are designed for long-term use. They do not fade under the sun's rays and resist moisture and temperature changes well. However, the paint will have to be refinished after a few years.
Decorative facade plasters contain mineral or polymer granules. This type of finishing has an aesthetic appearance and is resistant to both natural influences and mechanical damage. To work with decorative plasters, you need to find experienced craftsmen who have experience working with these materials. Otherwise, it may lie unevenly, with unsightly spots that will spoil the appearance of the facade.
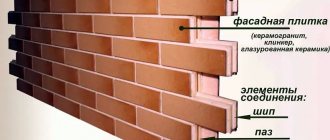
For private houses and cottages, ceramic or stone tiles are most often used at the stage of finishing the basement and porch elements, that is, those parts of the house that are most susceptible to contamination and mechanical damage. Clinker and porcelain stoneware, as well as natural stone, are best suited for these purposes.
Calculate the amount of necessary materials according to the construction plans of the house. It is better to entrust this work to specialists who will do the work. Indeed, in the calculations it is necessary to take into account not only finishing, but also additional materials.
Principles of interior decoration in a country house
After the rough finishing has been completed, that is, preparing all surfaces for final design, the stages of finishing interior work begin during the construction of a private house. If you start doing it before finishing it - that is, puttying, laying tiles, etc. already after finishing work, dust, all liquid mixtures and other construction waste settle on decorative, often quite fragile and easily contaminated surfaces, scratch them and irreparably damage them. This applies to both walls and floors and ceilings. Subsequently, you will not have to resort to any additional expenses to eliminate the consequences of the destruction of materials.
This can be derived as the first rule:
- Never begin finishing work before completing the entire complex of “wet” and “dirty” work.
To select a contractor who is ready to provide professional assistance in preparing documents on a land plot and a house construction project, we recommend using the company search in the Building Companion catalog. In the contractor’s profile, you can view reviews, portfolios, and request an estimate of the cost of the work. Get advice from specialists on preparation for construction »
It is equally important to follow the following rules:
- Try to always purchase any finishing material from the same batch - be it tiles, wood, clinker, or any other. Even building materials purchased in the same store, from the same series and of the same color, according to documents, from different batches may differ in slight changes in tone and pigmentation (especially when it comes to natural materials). Sometimes this can only be noticeable after, for example, you put up wallpaper and see them side by side and in the same lighting.
- Strictly follow the entire sequence of work.
- Always buy finishing materials with a small margin. If they turn out to be unnecessary, you can always save them or simply throw them away.
Advice from professionals
To obtain high-quality preparation of walls for wallpapering or painting, professionals recommend adhering to good construction practices, which involve the use of plasters, primers and putties for the work that are appropriate for the wall materials and operating conditions. It is also necessary to maintain the time intervals necessary for complete drying of the layers of applied compositions. For a customer who does not have the professional knowledge of a finisher, the following rule will help to evaluate the quality of the wall preparation: “The prepared wall surface should be similar in evenness and smoothness to the surface of the refrigerator.”
Stages of interior finishing
The sequence of internal work during the construction of a private house is no less important than its quality. If we summarize this entire complex of work as much as possible, we can present it in the following form:
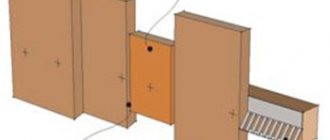
- Closing the circuit. This is where, as a rule, interior work begins. Closing the circuit means installing all doors and windows in accordance with the design documentation. If you neglect these rules according to the principle “the more difficult it is, the later,” you risk subsequently damaging the wallpaper and other finishing materials when installing doors and windows, as well as getting them very dirty. If you plan to install expensive, luxuriously designed doors or window frames, you can buy temporary doors and windows of the same size during construction. You can buy them at the nearest construction market for a couple of thousand, but you can save much more this way.
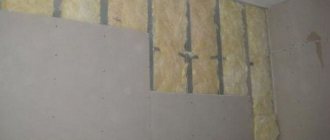
- Installation of electrical wiring. This is done, as a rule, with the help of construction drilling rigs, which drill into walls and partitions to carry wires, install socket boxes, etc. Some drilling technologies (so-called dry drilling) allow you to do without excess moisture and dirt, but this is still one of the most “dirty” types of work, the implementation of which, after finishing, is guaranteed to ruin any finishing material within the radius of the work. As a rule, installation is carried out in three steps. First, the installation of electrical wiring is carried out, then a set of works on “coronation” is carried out, that is, drilling with bits of appropriate sizes, and then sockets are installed, antennas are installed, etc.
- Plastering works. They are carried out on all walls and partitions - using cement-sand plaster or gypsum. Gypsum plaster is more expensive, and it only works at temperatures up to +5 degrees. If you do not plan to move in in the coming year, or do not plan to heat the apartment in the winter (for example, you are going to leave for the whole winter), we recommend using cement-sand plaster.
- Carrying out heating systems. We recommend doing this after plastering work, as this will allow you to hang all the radiators at an even distance from the wall, at a strictly measured distance from each other, and will save you from the tedious need to lay plaster behind an already hanging radiator.
- Performing finishing leveling screed. Its goal is to make the surface of the floor and walls perfectly smooth, to smooth out all the imperfections, sagging and roughness that appeared or were not corrected during the rough work. Only after this can the walls be considered ready for painting, wallpapering or decorative plates, as well as other finishing activities.
- Floor finishing. This is one of the few stages that allows for some variability: you can start laying the floor both before the walls and after. We recommend installing doors after installing the floor covering.
- Wallpapering, installing decorative boards, finishing plaster, etc.
Most of the mistakes in working on the interior are associated with the incorrect sequence of interior decoration of a private house, so it is very important to adhere to this particular scheme.
How to get rid of serious defects
By “serious defects” we usually understand extensive cracks and out-of-flatness of walls from 20 mm. They are removed with plaster. Plaster mortars are cement-based and gypsum-based. The first ones are durable and moisture resistant. They are used in rooms with high humidity - bathrooms, living rooms, and kitchens. It should be taken into account that the period for complete hardening of the cement plaster mortar is 28 days. Attempts to speed up the process by increasing the temperature in the plastered room lead to the formation of cracks, which forces the cracked plaster to be removed and plastering to be repeated. Gypsum mortars are not as moisture resistant as cement mortars. They dry out within 5 – 7 days. When applying a thick layer of plaster - 50 - 70 mm, do this in two to three approaches, allowing each layer to dry. If, due to the specifics of the room, there is no alternative to the use of cement plaster, it is advisable to apply it at the beginning of the renovation, so that there is time for drying.
Extensive cracks are covered with plastic, and for cement mortars, with a metal mesh made of stainless wire. This strengthens the plaster layer and prevents the appearance of new cracks after the repair is completed.
Common mistakes
Any internal work during the construction of a private house is unique, as are the errors during its implementation. However, it is possible to identify several typical errors that occur among private homeowners with enviable regularity. These mistakes are especially common when the interior decoration of a private house is done with your own hands, and without the proper experience and skills.
- Incorrect formation of the doorway. This also includes incorrect selection of the door itself to the size of the opening. It is important to remember that the opening must be at least 10 cm wider than the door you plan to purchase if it has thresholds, and 5 cm if there are no thresholds.
- Installation of doors until all finishing work is completed. This can result in both damage to the doors themselves and contamination or damage to finishing materials.
- Incorrect threshold installation line when laying flooring. When installing a door, the threshold can be installed either in front or behind the door leaf, but not at the same level.
- Poor quality insertion of fittings. This can damage the door leaf, which will lead to its complete replacement or major cosmetic work. To insert fittings, you need to use a specialized tool, or better yet, entrust this to professionals.
- Lack of special fasteners and non-use of a laser level when installing the door frame in the opening.
- The trim of the casing does not match the design of the door. This error is mostly external in nature and does not affect the functionality of the doors, but it is very important to take it into account when choosing a platband.
- Purchase of finishing materials from different batches. If it happens that you did exactly this, you can do the following. Paste them in different rooms, or at least on different walls, where the lighting will be different - this will not allow a random guest to immediately see the differences.
- Buying wallpaper that is too dark. This mistake is very often due to the characteristics of the retail outlet - in the salons where wallpaper is sold, as a rule, it is very light, in contrast to the rooms where they will actually have to hang. To prevent this, just ask for a sample of wallpaper at your home to look at it in a future setting. If this is not possible, just buy wallpaper 1-2 shades lighter than you would like to see in the room.
- Improper storage of wallpaper. At first glance, this seems obvious, but nevertheless, many people place rolls vertically rather than horizontally. This leads to the fabric becoming wrinkled and wrinkles appearing that are almost impossible to remove.
- The adhesive for the base is incorrectly selected. For vinyl wallpaper based on non-woven fabric, you should always select non-woven adhesive. If you choose the wrong adhesive, you will probably have to struggle with the wallpaper peeling off for a very long time - not only during construction or renovation, but also subsequently.
- Incorrectly mixed glue. If you first add water (especially hot water) and only then add glue, the adhesive mass will form in lumps and it will be impossible to work with it. First, you need to pour cold water into a bucket or other container, turn on a drill with a mixing attachment or a mixer at low speed. When a funnel forms in the water, you can start pouring glue into it - only then will you get a uniform mass.
- Poor preparation of walls before applying finishing coating. These can be pits, protrusions, bubbles, chips. You can check this using a spotlight, which should be brought to the wall and illuminated from below - this way you will see all the irregularities. You can remove protrusions and tubercles using a grater with sandpaper; recesses and pits can be removed using putty.
- Didn't vacuum the walls before gluing the wallpaper. If there are usually no problems with the floor, then in the vast majority of cases they forget to vacuum the walls. Dust and grains of sand inevitably appear on them when applying putty and other work. Subsequently, this makes it difficult to glue the wallpaper evenly.
- Dirty hands when wallpapering. This is the easiest way to stain them forever, or doom yourself to further cleaning with chemicals. Always wash your hands thoroughly before working with wallpaper, and do not forget to dry them with a towel.
How to remove old coating
If an apartment that has already been in use is being renovated, work on the walls begins with the removal of old coatings. Using a spatula and sandpaper, remove old wallpaper and paintwork. This process is labor-intensive and, when removing paint with sandpaper, dusty. You will need a respirator and safety glasses. Attempts to speed up and mechanize the operation using grinders, as practice has shown, do not lead to success. The working parts of grinding machines - a belt or a disk - tear out fragments from the surface of the wall, increasing the volume of putty.
Content:
- Decorating houses with Velox
- Interior decoration of a wooden house
- Brick houses for rough finishing
- Rough repairs of panel houses
- How to finish houses from blocks
- Bottom line. TOP houses with hassle-free rough finishing
One of the houses built by Dom Veloxa LLC in the city. Pinery
Engineering systems of cottages
Engineering systems of any building mean technical solutions that ensure comfortable living for all inhabitants of the cottage. As a rule, the cost of engineering systems in construction can reach up to 50% of the entire project budget. The engineering heat supply system includes heating devices and a boiler. Water supply and sewerage include the intake and drainage of water, the branching of water pipes around the house for household and other needs.
The power consumption system of cottages, in addition to reliability, must have good power, sufficient to consume modern equipment, but not exceed the connection rules established in the contract. When drawing up a contract, it is necessary to take into account the amount of consumption of all proposed devices powered by electricity when turned on at the same time, with the addition of a reserve.