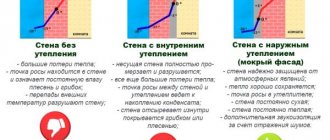
Insulating a home is the primary task of a homeowner who wants to use their home as efficiently as possible. Insulating both a wooden and a stone house from the outside will allow the developer to significantly reduce heating costs, save usable space inside the house and protect the house from the negative effects of atmospheric phenomena and precipitation.
One of the most popular and in demand methods of thermal insulation of housing is the technology of insulating the facade with mineral wool under plaster. You can familiarize yourself with the features, rules, tools and stages of installing mineral wool under plaster below.
Why she?
Stone wool for facade insulation (another name for mineral wool) is a non-flammable insulation material. For example, according to the manufacturer Rokwool, their mineral wool slabs can withstand temperatures of 1500 degrees WITHOUT FIREING or MELTING!
Alas, cheaper foam plastic cannot boast of this. There is a second important nuance. Vapor permeability. Mineral wool allows steam to pass through better, which means that in a sense it can be called a breathable insulation. Of course, insulation with mineral wool will cost more. You can see more about the properties of this material in the video on the topic: how to insulate the facade of a house with mineral wool.
Mineral wool for plaster is produced by different companies:
- Knauf,
- TechnoNIKOL,
- Rockwool,
- Izovat,
- URSA,
- Paroc.
To insulate the facility, the customer provided TechnoNikol mineral wool for façade insulation.
According to the manufacturer Rokwool, their mineral wool boards can withstand temperatures of 1500 degrees.
What is this process
Cotton wool for insulation is used when finishing the façade parts of a house to increase thermal protection, comfort, and maintain a stable indoor microclimate. When performing work, experts recommend following the sequence of the process to create a single multilayer structure.
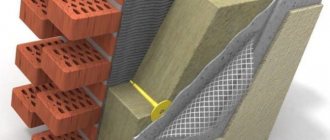
Standard technology includes the application of 3 main layers:
- heat insulating;
- reinforcing;
- decorative (finishing).
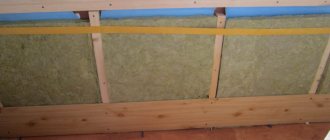
Mineral wool insulation for finishing wall panels outside the house is made in the form of slabs with dimensions of 0.6x1.2 or 0.5x1 m. The thickness of the mineral wool reaches 50-150 mm. Facade finishing will increase the fireproof characteristics of the building and improve the level of sound insulation in the premises.
When performing external insulation of a building before applying decorative plaster, it will increase the aesthetics of the house. The strength of mineral wool differs depending on the brand of building material and is (0.08-06 kg/sq. m). Manufacturers offer materials with different densities (35-100 kg/cubic m) for various types of buildings and climatic conditions of the region.
Good foundation - good design
The next important step when insulating with mineral wool is preparing the wall. Considering that we are working at a new facility and the walls are quite smooth, no special preparation is required. But still, most of the objects are houses with old walls. Run your hand along the wall; if anything falls off, you need to prime it. In some, especially “difficult” cases, it is necessary to plaster the walls to level them, but this happens rarely or plaster is only partially needed. Use a facade primer, for example Ceresit CT 17.
How to choose for your home?
It was noted above that stone wool differs in the following characteristics:
- shape (plates or rolls);
- size (slabs are usually made in sizes of 0.5 by 1 meter, or 0.6 by 1.2 m);
- thickness (from 5 to 15 cm);
- rigidity (depends on the thickness of the threads).
Rigidity is worth mentioning separately. The following types of wool can be found on the market:
- 15 microns are the thinnest threads that give the material softness and lightness. This wool can be used to insulate ventilated facades.
- 30 microns – threads of medium thickness. Cotton wool is considered universal; it is used in a wide variety of designs.
- Over 30 microns - thick threads forming hard cotton wool. It is most often used in industry.
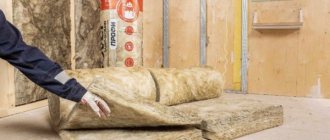
What material to choose for thermal insulation of your own home? First of all, you should focus on cotton wool in slabs, since rolls can slide under their own weight, and working with them is much more difficult.
For reliable thermal protection, 10-centimeter slabs of soft or medium hardness are sufficient.
The question often arises: what density of stone wool should be used when insulating a facade? In this case, it should be understood that the density of wool is not a determining factor for choice . According to their physical and mechanical characteristics, slabs of different densities may be suitable. When choosing a material, it is enough to study the manufacturer’s recommendations.
If in doubt, you should consult with professionals.
Preparing the stove
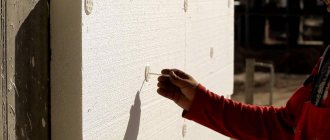
The technology of façade insulation with mineral wool involves the use of a special adhesive solution. For example, you can use a mixture of Ceresit CT 180. How exactly to apply the glue can be seen in the photo below.
Note. If you apply the adhesive composition in exactly the same volume, you will end up with a large overspend. This was a special case for one slab; this photo shows only the principle: the amount of glue should be reduced by 1.5–2 times. As a base, using a spatula, apply a thin layer of adhesive to the entire inner surface of the slab. And after that, make large spot applications of the mixture. After this, you can attach the slab. The slabs at this site are quite heavy, so it’s difficult to install them alone; it’s easier with two people.
In places where the slab borders a window, the edge of the window opening must not coincide with the joint of the slabs. Otherwise, cracks will appear in the finished structure. The slab should “flow around” the window. For some areas you need to cut out “interesting” designs.
After the first row of slabs is installed, it's time to think about how to install the next one.
What tools will you need?
To carry out installation work you will need:
- guide profile elements;
- construction level;
- adhesive composition;
- mineralized wool;
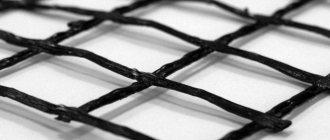
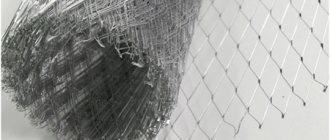
- mesh for reinforcement;
- spatulas, plaster composition for the facade;
- dowels
Fastening with dowels
If for polystyrene foam someone considers fastening with dowels-umbrellas only as reinsurance, then for mineral wool this cannot be said for sure. Its weight is at least twice that of foam, which means additional fixation is simply necessary. However, please note that these elements do not need to be attached immediately, but at least a day (24 hours!) after gluing. When insulating the facade of a house, carefully follow the instructions for the building materials. Dowels can be attached at least 24 hours after the board has been set on the adhesive. How many dowels are needed? For polystyrene foam, 4–5 is considered acceptable, for mineral wool, 8 and above. How to fasten with dowels? First you need to drill a hole for the anchor. It should be 15–20 mm deeper than the dowel itself. After this, the fastening element itself is inserted and hammered or screwed. Where should I place each dowel? Usually, the center of the slab is also attached to the “bandaging” areas. That is, in the place where the vertical seam abuts the top plate, a hole is drilled. If we are insulating the facade with mineral wool under the plaster, it’s time to move on to the plaster itself. And for this you need a reinforcing mesh.
Plastering
If, after the glue has dried, with the reinforcing mesh fixed, large irregularities are visible, then rough plastering needs to be done. It will completely hide imperfections and make the surface smooth.
In cases where there are small differences, decorative plaster is applied immediately. In this case, you need to adhere to the principle of finishing. The method of application will depend on the selected texture.
If the composition did not have a coloring component, then after drying you need to apply 2-3 layers of paint. Here you need to be careful when choosing paint; it must be combined with the composition of the plaster.
Strengthening the structure
The first stage of reinforcement is patches. These are elements that hold the structure in particularly vulnerable places. Namely: corners of window openings, corners of a building, doorways. In such places, an adhesive solution is applied to the slabs, over an area slightly larger than the mesh itself. At least 200 by 300 mm. After this, the mesh itself is embedded in the glue. Let's make a reservation here right away. You can’t do the opposite: fix the mesh and throw glue on top. The mesh should be embedded in the glue. The mesh is placed on the adhesive solution and embedded in it. Now that the weakest structural elements have been strengthened, we move on to installing the main mesh. Its installation is similar to the installation of “patches”, but only in larger sizes. Apply a layer of glue and, using a spatula at least 35 cm long, level it over the surface of the facade. After this, we gradually recess the mesh into it and close it so that it is not visible. Below is a video showing how to work correctly with a spatula at this stage of insulating a facade with mineral wool and the technology for applying glue.
Insulating the facade with foam plastic
It is polymeric materials that have become insulation materials with the longest periods of successful operation in difficult climatic conditions. Research and special testing were carried out, which confirmed excellent results: the foam does not lose its original technical characteristics even under conditions simulating 80 cycles of temperature changes.
What are the unique performance characteristics of foam? After all, almost all builders know: foam type insulation cannot boast of serious resistance to external influences. They do not tolerate the influence of ultraviolet rays well, they can dry out quite quickly, lose their original structure and even completely collapse. But the façade of the building is directly exposed to ultraviolet rays.
Insulation of facades with foam plastic
It turns out that the main secret to the effectiveness and practicality of polystyrene foam as insulation is its combination with a layer of plaster. The material must be plastered in full accordance with technological principles. Then it will acquire excellent performance characteristics.
- A layer of plaster will protect the foam from the negative effects of moisture. The insulation itself takes a long time to dry, and when left in a humid environment for a long time, it becomes too fragile, completely losing its performance properties. Plaster completely eliminates this negative factor, turning polystyrene foam into durable insulation that is resistant to atmospheric influences.
- Polystyrene foam is a rather fragile material. A layer of plaster prevents the formation of dents, scratches, cracks and other damage to the insulating layer. Together with plaster, the foam is already quite reliably protected from mechanical influences.
- When plastering polystyrene foam, the fire safety level of the facility increases. The foam insulation catches fire on its own, and the plaster prevents the spread of fire. However, builders note that the professionalism of the plasterer will matter here: the layer must be even, continuous, and of sufficient thickness.
- Exposure to sunlight is detrimental to polystyrene foam, since ultraviolet radiation destroys it and makes it brittle. But the foam + plaster option completely solves this problem.
It is obvious that when plastering an insulating foam layer, builders are primarily guided not by aesthetic, but by practical goals. The combination of polystyrene foam with plaster significantly improves the performance properties of the latter.
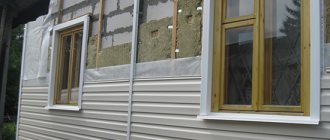
Insulation of walls with foam plastic from the outside
Plastered foam
Excellently plastered polystyrene foam façade
Prices for foam plastic
Styrofoam
Primer
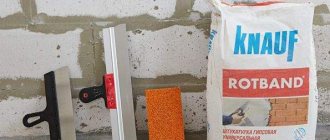
To apply a high-quality finish to mineral wool under plaster, you also need a primer. Choose a good primer mixture, for example, the Ceresit CT 17 already mentioned above. If you apply the primer carefully and slowly, you will not have to apply it in two layers.
Now all that remains is to apply the finishing layer, which will give the building a finished look. Someone seeks to insulate a house with mineral wool under the siding; this topic is discussed in another article. In our example, the final finish will be peach-colored “Bark Beetle” Ceresit CT 175.
For the sake of fairness, it is worth saying that mineral wool is also used for facade glazing of large buildings. But insulating a house with mineral wool with your own hands is also not a rare case. We examined the basic, general principles of the technology of facade insulation with mineral wool. We have identified 3 important stages:
- how to insulate a facade with mineral wool - how to fix the slab to the surface;
- How to apply a layer of glue to the slab;
- And first we highlighted the advantages of insulation with this material.
Finally, you can look at a gallery of 28 photographs, which shows all the stages of insulating facades with mineral wool using technology:
Preparing the walls
The first step is to do a little cleaning of the surface. This is done in order to improve the adhesion of the glue and remove dust and dirt as much as possible. Otherwise, the mineral wool, like a sponge, will absorb everything that remains under the insulation layer.
The façade preparation process is as follows:
- We dryly clean with a brush with stiff bristles all remnants of masonry mortar, efflorescence and traces of paint;
- Using a roller we apply a deep penetration primer to the façade walls. There is no need to save money; the better the surface is saturated, the easier it will be to glue the slabs.
Priming is performed twice, and you should try to apply the second layer in the direction perpendicular to the first treatment. It is better to work in the absence of wind and sun; it is believed that in such conditions the primer dries more slowly, penetrates well into the wall material and does not collect dust.
Safety precautions
The algorithm for insulating building walls with mineral wool requires strict adherence to safety standards. Although the material is classified as environmentally friendly, working with it is potentially hazardous to health. The problem lies in the high volatility of the smallest fragments of insulation. If they settle in human lungs, this can become a starting point for the development of serious diseases.
For this reason, it is strongly recommended not to neglect the use of a protective respirator, gloves and goggles to protect the respiratory system, exposed skin and mucous membranes from contact with material fibers.
When the work is completed, you need to do a thorough cleaning - thoroughly rinse the tools that were used during installation, and also clean the surrounding area with a professional vacuum cleaner, or, at worst, a broom soaked in water.
Positive and negative sides of mineral wool
Advantages:
- The material has a high level of fire resistance .
- Good resistance to irritants of chemical and biological origin.
- Mineral wool is free from such a disadvantage as deformation.
- The material is not capable of accumulating liquid. It has low hygroscopicity.
- Vapor permeability indicators are at a high level.
- This insulation has high sound insulation .
- This material is safe for human health.
- Easy to install . Even a builder who does not have much experience can cope with the work of insulating walls with mineral wool.
- Long service life - about seventy years.
Negative sides:
- Glass wool fibers are very brittle and if their structure is disrupted, small fragments can painfully injure a person.
- In some cases, mineral wool contains formaldehyde resin . If it is exposed to high temperature for a long period of time, it will oxidize to phenol (which is poison).
- Thermal insulation made using mineral wool is easily blown out . Therefore, the structure must be carefully covered with decorative finishing material.
The above disadvantages are not characteristic of stone and basalt wool.
Suitable place to work
When insulating the façade of a building with mineral wool, it is convenient to use special scaffolding. In addition, this design is an additional element of safety for people who carry out repair work. It is better to assemble scaffolding without haste, carefully checking the stability of each structural element. The supports must stand firmly on the ground; you can use thick pads. Don't forget to install barriers along the edges of forests.
Types of mineral wool
Mineral wool is a material, which in turn is divided into several types, differing from each other in properties and characteristics.
Glass wool
This insulation consists of compressed slabs consisting of fibers up to 15 microns thick and up to 5 cm long . Made from melted glass, limestone, dolomite, borax and soda. The result is an elastic and durable material.
NOTE!
Working with glass wool requires extreme caution , since fragile glass threads can dig into the skin, get into the eyes or respiratory tract. Therefore, when using such insulation, you should wear a special suit, gloves, goggles and a respirator.
Glass wool is highly hygroscopic and has the lowest density compared to other types of mineral wool . This material is practically not used for insulating residential buildings. It is often used for thermal insulation of technical rooms and pipelines.
Characteristics of glass wool:
- thermal conductivity coefficient – from 0.03 to 0.052 W/(m K);
- operating temperature range – from -60 to + 450°C;
- vapor permeability – from 0 to 0.6 mg/mh*Pa.
Glass wool
Slag wool
Slag wool is made from blast furnace slag, which is a waste product from metallurgy . The material is based on fibers 4-12 microns thick and 16 mm long. Slag dust and small balls can also be added to the composition.
This type of insulation is most often used for thermal insulation of non-residential premises and temporary buildings . The high hygroscopicity of the material makes it unsuitable for insulating building facades.
Characteristics of slag:
- thermal conductivity coefficient – from 0.46 to 0.48 W/(m K);
- operating temperature range – from -50 to +250°C;
- sorption humidification in 24 hours – up to 1.9%
Slag
Basalt (stone) wool
It is produced by melting volcanic rocks (mainly basalt, but also diabase and porphyrite), followed by processing in a centrifuge, where the plastic mass is converted into thin fibers under the influence of a powerful air flow.
Next, binders and a water repellent are added to them, which gives the material moisture-repellent properties. After this, the basalt fibers are pressed and heat-treated, resulting in high-quality insulation.
IMPORTANT!
This type of mineral wool slabs is the best option for thermal insulation of the facade. Stone wool is not afraid of moisture, has low thermal conductivity, good vapor permeability (due to its cellular structure) and practically does not absorb moisture.
Characteristics of stone wool using Rockwool as an example:
- thermal conductivity coefficient - from 0.032 to 0.048 W/(m K);
- average vapor permeability - 0.3 mg/(mg/mh*Pa);
- maximum heating temperature – up to 1000°C.