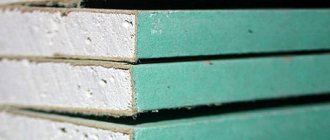
Which profile is better
Before you make a frame for drywall, you need to determine what to choose - wooden beams or metal parts. Both materials have their advantages and disadvantages.
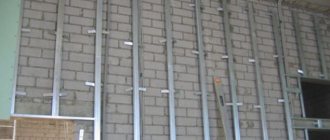
In modern construction, it is best to make a frame for plasterboard on the wall from a galvanized profile, since it is more reliable and durable. When working, less waste is produced, which means a person saves significantly on the purchase of materials.
The advantages of a metal structure are:
- It is not susceptible to moisture and does not deform.
- The frame will serve for a long time.
- The elements have a smooth surface, making the design ideal.
- There are a large number of types of fastenings.
- The design is strong and reliable.
Metal profiles have virtually no disadvantages. The only thing that can harm such a structure is corrosion. But if all operating conditions are met and the microclimate in the room is correctly created, then this problem will not arise at all.
The wooden beams for the frame have an internal cross-section measuring 40x70; for horizontal elements, the cross-section should be 30x50.
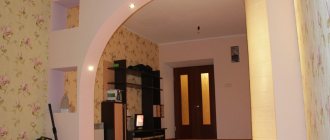
Frame ready for covering Source dingonn.ru
Most often, coniferous trees are used to make this material. They are pre-treated with a special substance.
The advantages of this material include:
- low cost;
- environmental friendliness.
But such materials have a number of disadvantages:
- the bars do not always have a perfectly flat surface;
- under conditions of high humidity, wood swells and deforms;
- the design lasts a maximum of 15 years, since the material is susceptible to fungi, rot and damage by insects;
- Before making the frame, the wood needs to be treated with a special substance, which will result in additional budget expenses.
Modern builders prefer to work with metal products. The design is reliable and strong.
A set of profiles that will be needed to make the frame Source plaportal.com
Frame options
Plasterboard lathing can be made from the following materials:
- from wooden blocks;
- from metal profile.
To make the right choice, you should take into account the characteristics of the material for the frame.
Coniferous wood blocks are used to create the frame. Wood is sensitive to high humidity and temperature changes. In damp rooms it is affected by mold. If there is a sudden change in temperature, it may become deformed. But the material for a wooden frame is cheaper. The bars also provide more reliable fastening of the self-tapping screws, since the latter are held in the wood with each turn.
Metal profiles are more expensive, but they are more reliable and durable. They are not so detrimentally affected by environmental influences. Also, such a frame takes up less space. The metal does not require additional processing and adjustment, therefore, assembly will take less time.
In general, everyone decides for themselves which material to choose. Wood is suitable for warm and dry rooms. Metal is a more versatile material.
Frame materials
For a person who is faced with the installation of sheathing for drywall for the first time, it is difficult to determine what is needed for the job and in what quantities to purchase materials. This is actually a simple task, since it is best to buy all the parts made of metal:
- Guides . They are designated by a combination of the letters UD or PN. They are installed as the basis for the entire frame.
- Rack-mounted . They are marked with the abbreviation CW or PS. They serve as racks that are installed perpendicular to the floor covering and connected to the guides. Sheets of plasterboard are attached to the frame, hiding all the imperfections of the walls.
- Ceiling . They are signed as CD or PP. Defects on the ceiling are hidden in the same way as on the walls.
There are also profiles for the frame of corners and arches, which are used strictly for their intended purpose.
To secure the profile mesh to the surface, you will need to use special fasteners:
- If it is necessary to extend the profile, you will need to use a connector. To strengthen the place where metal profiles intersect, so-called “crabs” are used. For ceiling frames you will need to use a two-level “crab”.
Installation of hangers Source saucyintruder.org
- To keep the structure securely on the surface, straight and anchor hangers are used. These elements perfectly level the surface.
- All frame elements are attached to the surfaces with dowels.
- The metal parts are connected to each other with self-tapping screws. The frame is sheathed with plasterboard, also fixing it with self-tapping screws.
Materials, tools
You will need:
- metal profiles PN and PNP – guides for walls and ceilings;
- PS profile – rack-mount;
- PP profile – ceiling;
- EC brackets – direct hangers for fastening rack profiles;
- ceiling anchors;
- simple connectors for lengthening the metal profile and cross-shaped ones - “crabs”;
- dowel-nails with a diameter of 6 mm;
- self-tapping screws "bugs".
Tools:
- metal scissors;
- screwdriver;
- long level;
- perforator;
- pencil;
- a hacksaw for wood, a hammer - when installing wooden sheathing.
USEFUL INFORMATION: How to make a plasterboard wall with your own hands
Types of structures
You can build any structure from plasterboard sheets if you know how to make the base. The most common types:
- Walls and ceilings . The design evens out all the unevenness formed during the construction process.
- Partitions in the room . They make door and window openings, as well as additional decorative elements.
- Boxes , thanks to which you can hide communications carried out in the room.
- Niches, shelves, cabinets and decorative fireplaces.
Niches and shelves in the design solution Source mr-build.ru
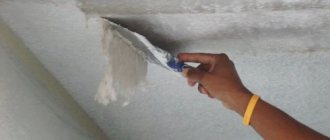
How to assemble a ceiling frame
If you need to hide unevenness in a room, all manipulations begin from the ceiling. Since there are no rooms where the corners are even, it is very difficult to level the ceiling when starting repairs from the walls. If you first level the ceiling, then when working on the walls, all the resulting gaps will be closed.
The work is carried out in several stages:
- marking;
- installation;
- connection of profiles.
How the marking is done
Markings must be done at the initial stage of work on the frame made from a profile for plasterboard. At what distance from the ceiling surface the new surface will be depends on how much the owner wants to lower the ceiling. Marks are placed with a construction marker. Draw lines by controlling the ruler and level. It indicates where the guide profiles need to be attached.
A grid is drawn on the ceiling. The sides of the cells should be equal to 60 cm. This will be the plan for the ceiling frame.
Important ! Before constructing a frame for plasterboard from a metal profile, you must first install all the electrical wiring, leaving at least 10 centimeters of spare cable. This will make it easy to connect all nodes. Install sockets, switches and lamps according to plan.
Profile mesh for ceiling cladding with communications Source kitchenremont.ru
See also: Companies specializing in finishing materials, ventilation and air conditioning.
Marks on the walls are drawn after determining the distance between the frame and the main wall. The resulting space should be equal to the dimensions of the profile and communications that will be hidden behind the casing. After these manipulations, a line is drawn on the ceiling, serving as a guide for installing the racks.
Important ! The closer the structure is to the wall, the more free space will remain in the room.
A plumb line is lowered from the top guide, perpendicular to the floor, to determine the boundary of the structure on the floor surface. Marks are drawn on the walls, opposite which the racks will be installed. The distance between them is made no less than 60 centimeters. The places where hangers will need to be installed are also noted. Marks are drawn every 80 centimeters.
Features of assembling false walls and partitions
False walls are a vertical analogue of a suspended ceiling, the base for which is an existing wall. The assembly technology here is similar to the ceiling one, but the mesh does not need to be assembled. Firstly, the height of the ceilings rarely exceeds 2500 mm (the length of the plasterboard), and if it does, it is not by much. Secondly, a sheet standing vertically will not tend to sag. Here, rather, it is necessary to strengthen its resistance to “pushing”.
This can be achieved by installing rack profiles vertically every 40 cm. There will be no savings on metal profiles, but “crabs” will no longer be needed, which will significantly speed up the process. If you need to join the sheet, you can install and “hang” jumpers at the joints.
The frame of a partition made from a plasterboard profile can also be a grid of vertical posts and horizontal lintels. Such a device is justified when their height significantly exceeds the length of the drywall sheet. In most cases, it is more convenient to use more frequent installation of rack profiles - every 40 cm. Jumpers then become necessary only at the joints of the gypsum boards.
For ease of laying communications, partition racks are often equipped with special holes.
Suspensions are not used in partitions - after all, there is no support for them. Therefore, such parameters of the metal profile as wall thickness and dimensions are of decisive importance here. Also, in order to increase the rigidity of the structure, more durable sheet materials are used than for the ceiling. Including thick gypsum board (12.5 mm), GVL (gypsum fiber sheet), SML (glass-magnesium sheet).
If you have figured out the usual lathing on the wall, then assembling a frame for a plasterboard partition will not be difficult.
Video description
How to make an interior partition from a metal profile with an arch can be seen in the video
How to install a ceiling frame
Before you start connecting all the frame elements, you need to take into account that all sheets of sheathing material must be joined on the rack. The process itself is carried out as follows:
- The guide profile is fixed according to the established markings.
- On each side of the square of the ceiling frame mesh, straight hangers are installed exactly in the middle, securing them with dowels. They will capture the main elements.
- Ceiling elements are inserted into the guides and secured with self-tapping screws.
- Measure out 60 centimeters of the profile, cut it off and attach it with screws across the main profiles. At their intersections, “crabs” are used.
- The frame for the ceiling is leveled and fixed with hangers. The antennae are bent and secured with self-tapping screws.
Calculations and wall mounting
Having acquired all the necessary materials for the work, we begin installing the sheathing on the wall. First, the base of the selected surface to which the entire structure will be joined is marked.
Installation diagram
Next, an indentation of approximately 65 mm or more is made from the wall, it all depends on the unevenness of its surface. Then a straight line is drawn on the ceiling (this mark serves as a guide for the profile). After all the work done, we place these markings on the floor. This procedure is carried out using a laser level. Thanks to this mark, you can easily navigate the installation with the lower profile guides.
At this phase of the work, it is necessary to carry out the calculations correctly, as they will affect the result and the evenness of the wall. The marks, both upper and lower, must be strictly perpendicular.
Drywall frame for wall
Defects on the walls are hidden in a similar way, but in this case there are some difficulties that should be taken into account:
- Communications are laid along the wall. A line is drawn on the surface of the ceiling where the guide profile will need to be installed. To draw a similar mark on the floor surface, they resort to a plumb line.
Sheathing for plasterboard covering, hiding communications Source voicednepropetrovsk.ru
- Horizontal elements are inserted into the guide every 60 centimeters. The sheet of drywall will be mounted on three posts at once, standing perpendicular to the floor, with one of them located exactly in the middle of the sheet, while the others serve as support for the joints.
- Having drawn all the marks, you can assemble and install the frame. The racks are inserted into the guides and fixed in a stationary position with self-tapping screws.
- Horizontal cross members are installed as for the ceiling mesh frame. Fastening is done using self-tapping screws. Suspensions are used to level the surface of the frame. The intersections of the profiles are connected by “crabs”.
On a note ! It is very difficult for a beginner to place horizontal posts exactly, so professionals recommend using a guide before making a frame from a plasterboard profile for walls and securely fixing it. Three or four threads stretched between the outermost standing profiles are suitable for this.
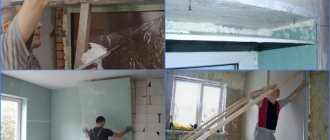
Option 2 – wooden frame
Fastening drywall to the wall on a wooden frame is a method that is most often used in country and country houses. It is inexpensive, but due to the nature of the wood, problems can arise, because when temperatures change, the racks can become deformed, and the structure itself does not tolerate dampness well. But for dry rooms this option can be considered, although if you can afford a metal frame, then choose it.
Wooden frames are most often used in wooden buildings
Since many types of work are the same in both cases, there is no point in describing them twice. In particular, we will not dwell on the marking process, but will deal with those aspects that differ.
Required materials and tools
Due to the fact that different materials are used, the list of everything needed is different. Let's consider what materials are needed.
| Material | Required characteristics |
| Wood block | This will be our main material, so we need to choose high-quality products. The width should not be less than 50 mm, otherwise it will be inconvenient to attach the drywall. It is also important to use smooth elements with low humidity; if the material is not completely dry, it may become deformed already in the frame, which is extremely undesirable |
| Metal corners | There are many sizes and configurations on sale, so choosing the right option is not difficult. I most often use the 30x30 option, it is inexpensive and has good strength indicators, ensuring frame rigidity |
| Self-tapping screws or nails | I recommend using self-tapping screws, they are much more reliable. As for the size, the length should not be less than 30 mm; hardware with a large pitch of 3.5 mm in diameter is used. Wood screws are sold in all building materials stores, so finding them will not be difficult. |
| Straight hangers | If you have smooth walls, then the block can be attached directly to them, if necessary, placing chips or blocks in certain places. But if the unevenness is significant, then it is better to fasten the block in the same way as a metal profile - on hangers, this is both reliable and fast |
Here's everything you need to build a frame from a wooden block
The tools you need are the same as in the case above, with the only difference being that the wood is cut using a hacksaw or a power tool; it all depends on what is at hand.
A hacksaw will help you quickly and efficiently cut a block of wood.
Preparation stage
The most important thing here is to calculate the volume of necessary materials and purchase them in advance; the process is simple, but it requires care and consideration of all the nuances:
- First of all, you need to draw a rough sketch of the sheathing, this will allow you to calculate the number of bars in linear meters . You can also roughly calculate how many corners you will need to build the structure. As for fasteners, about a dozen self-tapping screws are required per square meter, based on this, make calculations;
A variant of the simplest frame, note that the door opening is reinforced with double bars
- After making payments, you can purchase everything you need. I advise you to pay special attention to the quality of the block; it should be dry and even; pine products are most often used; they are reasonably priced and have good performance characteristics;
- As for preparing the room, everything is simple: nothing should interfere with your work, all necessary materials must be arranged so that they are at hand, there must be an outlet within reach.
Installation of the structure
The frame for plasterboard for the wall is made according to the following algorithm:
The workflow is simple once you understand it
- We examined the markings in detail in the chapter above, so there is no point in dwelling on them; here I will only note that you must take into account the thickness of the block when calculating the indentation from the wall surface;
- Then you need to take measurements and cut the block into pieces of the required size. Everything is simple here, using a hacksaw is so easy that even if you have never cut wood, you will learn how to do it in a couple of minutes. When marking, draw lines on the block around the perimeter so that the ends of the elements are even;
- Regarding fastening the frame around the perimeter, the following can be noted: if you have concrete walls, then you need to drill holes in the bars according to the diameter of the dowel and select fasteners of such a length that they extend into the wall at least 40 mm. If the bases are wooden, then the screws are selected according to the same principle. In cases where the block is fixed close to the wall, it can be fixed to any surface convenient for you, which is very convenient;
You can fix the top not to the ceiling, but to the wall, this simplifies the work
- After securing the structure around the perimeter, you can begin installing the vertical posts. They are cut to the required dimensions and fixed between the guide bars, the spacing of the vertical elements is 60 or 120 cm, it all depends on the design features and the ease of implementation of one or another option. Before fastening, always check the position of the frame using a level;
Vertical posts must be located at a strictly defined distance
- As for the transverse elements, it is easiest and most reliable to attach them using corners. The working process is quite simple: first, pieces of the required size are cut, and then they are fixed at the distance you choose (usually it is 40-60 cm). It is important to achieve structural rigidity, so decide on the spot how best to arrange the reinforcing elements;
- If you use hangers as fastening elements, then you don’t have to make crossbars; the structure will still be rigid and reliable. Therefore, decide in advance which option will be more successful in your case. As I noted above, gimbals are much more convenient on uneven surfaces.
If the block is attached to hangers, then you don’t need to install jumpers
Do not forget to strengthen window and door openings; for reliability, you can place a double beam there or strengthen individual areas with additional lintels.
Video description
The video shows all the stages of making a partition in a room.
The partition is made in a different way. To do this, two frames are erected, where the guides are installed independently of each other. The vertical elements will be inserted in such a way that they alternate in a checkerboard pattern at a standard distance. The stand is attached to only one sheet. This method will help remove the acoustics that form between the internal surfaces of the partition. The thickness of this structure increases by 10 centimeters.
Mineral wool is used as sound insulation Source zonaremonta-ufa.ru
How to build a frame in the corner of a room
Installing drywall on a wall with a frame is not difficult and anyone can handle it. But it also has difficult moments, such as setting the corner of the room. They come in two types: external and internal. Work on each is carried out differently.
How to build a drywall frame for an internal corner
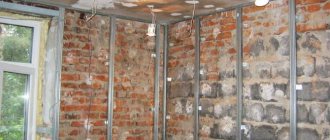
If the installation of the frame for drywall on one wall has already been completed, you need to proceed to the next one. This is where the difficulty in work arises. Since it is not possible to install the end stand on the wall, you will have to use the already installed PS profile as a base.
The racks are fastened using self-tapping screws that are nine and a half centimeters long. The stand needs to be secured every thirty centimeters. The racks are connected as follows:
- the stand serving as the base is attached to the adjacent side;
- the outermost profile, which serves as the beginning for the construction of the adjacent wall, is attached to the base with the front side.
How to make a frame for an external corner
Constructing an external corner is much easier, since in this case it is enough to place racks on each side of the corner and attach them to the wall and supporting profiles.
For the corner of the frame, you will need to install two posts, attaching one of them with the front side to the side of the other Source www.remontnik.ru
Option 1 – metal profile frame
I’ll say right away that I try to use this particular option, since I consider it optimal from the point of view of reliability and ease of implementation. If everything is done correctly, you will get a very strong and durable structure that is lightweight, withstands adverse influences well and can be used in premises for any purpose.
Necessary materials
A frame for plasterboard made of metal profiles is constructed from a certain set of elements; they are standard and are sold in all hardware stores, which is a definite plus. As for the main structural elements, we need the following.
| Material | Recommendations for selection |
| CD profile (main) | It is made of galvanized steel, the thickness of which must be at least 0.55 mm, otherwise the strength of the structure will suffer. The profile size is 60x27 mm, the standard length is 3 meters - this is quite enough to erect a frame for walls. As for the cost, it starts from 100 rubles per piece, but, as experience shows, the price of good quality options is 140-160 rubles |
| Profile UD (guide) | The manufacturing material is the same, but the size is different, it is 27x28 mm. The elements are used to create a frame around the perimeter of the wall, this simplifies leveling and significantly increases the reliability of the structure. The requirements for the products are the same as in the option above; as for the cost, good profiles can be found at a price of about 100 rubles per piece |
| Straight profile suspension | It is used to align the load-bearing elements perfectly evenly and give rigidity to the structure, because if the profile is fixed only at the top and bottom, it will sag in the middle. Suspensions have a standard length of 300 mm and must be made of galvanized steel with a thickness of at least 0.6 mm. The price per piece starts from 5 rubles, the highest quality products made from 0.9 mm sheet cost about 8 rubles |
| Single-level “crab” connector | If you need to strengthen the frame with jumpers, then it is best to use a special single-level connector to attach the stiffeners. It allows you to quickly and reliably fix structural elements and give rigidity to the connection, excellent for strengthening openings. The cost of one piece is about 15 rubles |
Here are all the necessary design elements
But it is impossible to build a frame without fasteners, so we will also need a certain set of hardware products.
| Name | Recommendations for selection |
| Quick installation dowel | Used for attaching wall profiles and hangers to walls made of concrete, brick and other solid materials. The most commonly used size is 6x40, but longer options can be used, it all depends on the strength of the bases. The price of one piece is about 4-5 rubles depending on the type and manufacturer |
| Self-tapping screw with large pitch | Necessary in cases where it is necessary to secure the supporting structure on wooden bases. For work, options with a length of 30 mm or more are used, it all depends on the strength of the wood. The cost varies depending on the packaging, for example, the popular version with a length of 41 mm costs approximately 100 rubles for 200 pieces |
| Self-tapping screw with fine pitch | It is used for attaching drywall to the frame, that is, it will not be needed when constructing the structure, but in order not to go to the store five times, purchase it immediately. The 3.5 by 25 mm option is used, with its help you can quickly and efficiently fix the material on the profile |
| Self-tapping screws "bugs" | With their help, the profile is fastened together, and the hangers are also fixed. The size of the fastener is small - the length ranges from 9.5 to 14 mm, it is better to take options without a drill, they hold better in the profile and are easier to screw in. The cost of packaging 1000 pieces is approximately 350-400 rubles |
It is impossible to carry out work without fasteners
Sometimes additional elements may be needed, it all depends on the specifics of the room. I would like to note this type of product as acoustic tape, it can be laid between the profile and the wall, this will dampen vibrations and sound vibrations propagating through concrete . The use of tape allows you to improve the sound insulation of the room, which is important in apartment buildings.
The tape is laid under the profile and under the hangers
Work tool
Even before starting work, you need to assemble a certain set of devices with which the frame will be installed:
- A hammer drill is needed to drill holes for dowels; they will have to work a lot, so it’s better to have a couple of spare drills of the required diameter and length on hand, just in case. Sometimes you can hit the fittings or the drill simply fails due to wear, and if you don’t have spare equipment, the work will stop;
It is unlikely that you will be able to make holes in concrete without a hammer drill.
It is not necessary to buy a hammer drill; you can borrow it from friends or rent it for a couple of days, so you can save significant money.
- I will not be mistaken if I say that you will have to do most of the work using a screwdriver. When constructing a structure, you have to tighten a huge number of screws; you will work 10 times longer with a screwdriver, and you will get very tired. I advise you to buy a screwdriver, it can be used anywhere and will come in handy more than once during repairs and other work;
For work, do not forget to purchase several PH2 nozzles, this is exactly the slot in all fasteners used
- The profile is cut using the most ordinary metal scissors; there is no need to work with a grinder, it is inconvenient and impractical. Good scissors cut metal like paper, there are no sparks coming from them, and there will be no noise that annoys the neighbors either. When choosing, you should be guided by considerations of convenience; if the instrument fits in your hand, then take it;
I work with this type of scissors - they are simple and convenient
- As for the measuring tool, we need a whole set: a plumb line for drawing clear verticals, a level for marking and controlling the plane of our frame, a tape measure for taking measurements and a pencil for marking. If you have a laser level or can borrow one, great, with its help the marking process will be much faster and easier, but you can get by with a plumb line.
Without a measuring tool it is impossible to make an even frame
Calculation and preparatory work
Now let’s figure out how to organize the initial stage of the process, first of all we need to calculate the amount of material, for this the following work is carried out:
- To begin with, I advise you to make a simple sketch, on which you need to indicate the length and height of the wall, and then mark the position of the drywall sheets, their width is 120 cm, height up to 3 meters, it is better if there is a solid element from top to bottom. Having laid out the sheets, you can quickly calculate the material for the frame, so do not skip this step;
On the drawing, be sure to take into account windows and doors, if any.
- Next, you can make a sketch of the frame, everything is simple: the racks are located in increments of 60 cm, the transverse jumpers can be made at the same distance. A distance of 50-60 cm must be maintained between the hangers, and crabs are placed on all cross-shaped joints. In the figure below, all elements are marked in different colors to make them easier to count, this is very convenient;
When the structure is visible visually, the calculation is much easier
- As for the fasteners, the dowels are spaced every 40 cm, there are 20-25 bugs per square meter and about 10 ordinary self-tapping screws with fine pitch. Here it is important to calculate the approximate volume; anyway, it is impossible to calculate with precision down to the piece.
As part of the preparation, you should also clear the room of all unnecessary things, or at least provide unobstructed access to the walls on which the structure will be built. Make sure you have electricity; if there is none in the room, install an extension cord.
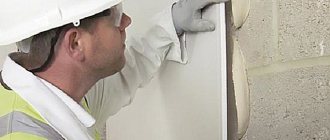
Surface marking
It is no secret that the walls in apartments are not ideally flat, so before starting installation we need to make markings, here everything should be done very carefully and carefully, if you make a mistake, the wall will turn out skewed. The work instructions look like this:
- First, you need to draw vertical lines along two side surfaces to which the frame will adjoin. You can do this with a level, but working with a plumb line is much easier and more accurate. You just need to place it at the required point on the ceiling, and it will project a point on the floor, no knowledge or skills are needed here, just mark the places;
You can simply press the plumb line against the wall and draw a line
- If you decide to work with a level, then set it vertically and mark the surface. Here it is important to monitor the position of the air bubble; even its slight displacement will lead to a vertical skew;
You can only work with the level
- To connect the verticals to each other, the easiest way is to stretch the cord from wall to wall and mark the surface of the floor and ceiling along it . You can attach the cord directly to the wall under the ceiling and above the floor, and its position can be adjusted using a self-tapping screw, unscrewing or screwing it into the surface to the desired level. Although, as for me, it’s easier to call two assistants so that they hold the cord, and you draw a line - quickly and accurately;
If there are no assistants, the cords are set as shown in the photo
- After marking, check the lines again with a level, you can drop a plumb line in the middle - keep the cord on the line on the ceiling, and the tip of the weight should point to the line on the floor. If everything matches, then the marking is correct.
The plumb line always shows the vertical, so it is the easiest way to check the markings
Installation of wall profile
When we have lines along the perimeter of the future structure, it will not be difficult to carry out this stage with our own hands:
- First of all, you need to take the profiles and try it on at its location. Most often, elements need to be cut, so it is better to do this in advance. To do this, measurements are taken using a tape measure, then the size is transferred to the profile and cutting is done, first two sides are cut, then the base is bent and the final cutting is made along the line;
Cutting the profile in advance will allow you not to be distracted when installing it
- Next, you need to lay the profile along the line and mark the drilling points for the dowel holes. Please note that if there are no holes at the edges of the profile piece, then they need to be drilled at a distance of 500 mm from the end. After marking, you can start drilling holes, the work is noisy and dusty, it is important to constantly monitor that the hammer drill is perpendicular to the surface;
To avoid constantly checking the depth, set it using a stop or wrap electrical tape around the drill
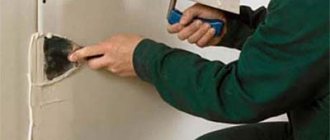
- If you use acoustic tape, then before installing the profile it must be glued to its base. The work is simple, since the tape is self-adhesive, and the main thing is to place it evenly and press it tightly to the element;
The tape is very easy to apply
- The profile is placed against the wall, the alignment of the holes is checked, and if everything is fine, then the element can be attached . To do this, first insert the dowel all the way, and then hammer the screw into it. There is no need to tighten anything, this fastener is called a dowel-nail for a reason, it is designed specifically for such installation so that the process is quick and simple;
Just drive the screws in with a hammer, and if you need to remove them, they are unscrewed with a screwdriver
- In the corners of the structure, insert the profile into each other for reliability; this will give the frame additional rigidity and stability. The work is carried out along the entire perimeter, you should have a complete frame in the places where the structure was built.
This is how the profile connects at the corners
Installation of the main profile
Now we have come to the final stage of the process, after which the walls will be faced with plasterboard over a metal frame. We’ll figure out how to create a strong and level foundation:
- To begin with, you should mark the future racks; for this you can use a standard level, or you can simply take a plumb line, press it in the right place and draw a line along the cord. The presence of such landmarks will significantly simplify the work process and allow you to control the position of each element;
It’s easy to mark verticals using a plumb line
- Then you need to attach drywall hangers to the walls along the vertical lines. They are located perpendicular to the lines exactly in their middle in increments of 50-60 cm and are secured with the same dowel nails. The work is simple, but it will take some time, because a lot of holes need to be made;
The hangers can be fixed immediately; you can bend them later
- Next, we need to measure the length of the vertical elements and cut the profile to the dimensions we require. To ensure that the structure does not bend and is easy to assemble, the length of the stand should be 5 mm less than the distance from the floor to the ceiling. Cutting is carried out in the same way as in the case described above: first the sides are cut, then the profile is bent and the product is cut to the end along the bend line;
This is how you cut the profile quickly and easily, bend it - and nothing interferes with the cutting
- The main profile is inserted into the guide frame and positioned along the line we need, its position is checked with a level. After this, the parts are simply screwed together with self-tapping screws, and the first stage of work is completed.
For such connections, you can use a cutter, which is the name of a special tool that cuts two profiles and bends the metal from the inside, creating a reliable connection.
The cutter allows you to fasten the profile without screws
- In order for the profile to remain rigid and stand level along its entire length, it must be additionally fixed using hangers; they are bent on both sides, after which the position of the stand must be set using a level. After this, the frame is fixed with self-tapping screws, which are screwed through the holes in the hangers. To prevent the ends of the hangers from getting in the way, after finishing the work you simply bend them to the sides;
The suspension allows you to mount the profile in the desired position
- If you decide to strengthen the surface with jumpers, then the connection is made using crabs; they are placed on the inside of the profile, after which their protrusions are bent and self-tapping screws are screwed through the holes, everything is quick and reliable. To make it clearer, the photo below shows how the crab is positioned from the inside of the frame;
Crabs allow you to connect jumpers quickly and securely
- If you need additional heat and sound insulation, you can put mineral wool in the frame; the easiest way is to use rolled material, which is cut into the required pieces and simply pushed into the spaces between the posts.
Additional insulation will not be superfluous in panel buildings
After this, gypsum board walls can be covered with a metal frame; the process is simple, and I have already described it in my other reviews.
Construction of a semicircular frame
Semicircular plasterboard structures are used for the following design solutions:
- creating an arch;
- establishing rounded corners of the room;
- construction of multi-level ceilings;
- creating armholes and wall edges.
To build such frames, you can buy ready-made elements. But it will be cheaper and more practical to create them yourself. If you buy a ready-made structure, you will need to look for elements of the required length and then fold them into the required circular shape.
In order to make a semicircular frame yourself, you need to cut several wedges in the profile along the edges. This will allow you to bend it into the desired shape. Further work is no different from the above processes.
Video description
How to make a frame for an arch can be seen in the video.
In places where it is planned to build a niche or shelf, the horizontal profiles must be further strengthened, since they will be subject to load.
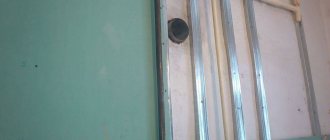
To make a box that hides the sewer risers, you will need to use a guide profile. It will serve as fastening of the structure to the foundations. To construct the main frame, ordinary profiles will be sufficient. A hatch is left in the area of the unit that needs to be serviced. It will provide easy access to communications.
Important ! When making boxes whose purpose is to hide communications, it is necessary to make doors. This will provide easy access to the nodes in case of emergency. The walls of the box should not touch the communication elements, so the box is made with a small margin, creating a gap.
A blind box can be made if:
- There are no tees and there is no need to clean it.
- The riser is made of plastic, the pipes are fixed with clamps, which prevent subsidence.
- The risers are made of materials that do not require repair or replacement.
Open access should be:
- Up to risers made from pipes whose service life is limited. When a leak occurs, it is necessary to promptly replace certain areas.
Communications can easily be hidden in a plasterboard box Source yavvannoy.ru
- Pipes through which cold water flows should not be closed, since the lack of ventilation provokes the formation of condensation on their surface.
Briefly about the main thing
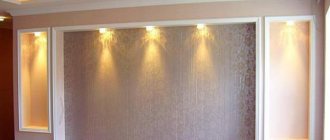
If you use a profile frame for drywall, the structure will be reliable and will last for many years. The cladding will perfectly hide all defects on the walls and allow you to arrange the interior to your liking. You can add shelves, niches, make partitions in rooms and build arches.
But in the process of work, one should not forget that the cladding takes away a small area from the room. This is especially important for those rooms that are already small in size.
Despite the fact that wooden frames do not harm the environment, they are used less frequently in the construction of frames due to the fact that the material does not have a long service life. They are used only in rooms with low air humidity, where the elements will not become covered with fungus and rot.
Ratings 0
The advantage of plasterboard walls and ceilings
All plasterboard structures have the following features:
- Surface evenness. The wall or ceiling receives a perfectly flat surface. This makes it easy to apply putty and decorative plaster. Cover the surface with finishing materials: wallpaper, tiles, paint.
- Soundproofing and insulating materials are installed under the gypsum board. This keeps the room quiet and warm.
- GKL structures hide electrical wiring and other cables. It is also possible to hide ugly pipes.
- Creation of illuminated niches and soaring ceilings.
- Creation of shaped elements and their installation on walls.
- Lifetime. A properly made design has a long life of 20 years.
Based on these features, drywall is used in damp rooms, near hot walls, and on fireplaces.