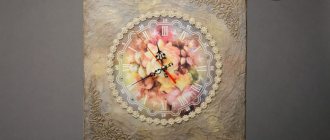
Fluid Art is pouring acrylic paint, a technique that is in vogue among artists, professionals and amateurs. With paint mixed to a thin consistency and poured onto the canvas, gravity does all the work as you tilt the canvas in different directions to create a one-of-a-kind design. Sometimes the artwork looks like marble and sometimes it looks like geodes. No two paintings are the same. There are countless ways to pour paint, and in this article we'll show you three basic methods to help you get started. These paintings are so fun to create and the results are so magical, you will be in awe!
Fluid Art paintings
To create incredibly beautiful paintings using the Fluid Art technique, you will need the following creative materials: film, acrylic pouring medium, acrylic paints, plastic cups, wooden popsicle sticks, water, silicone oil, stretched canvas, buttons, rubber gloves, palette knife.
Step 1: Cover your workspace with film
Pouring paint is a very messy activity, so be sure to line your workspace with a protective film. If you're working on the floor, keep your work area away from curious pets who might step on paint drips.
Step 2: Mix the paint
To mix the paint so that it flows easily onto the canvas, you will need to add a pouring medium and some water. Art stores sell products specifically labeled as pouring media, but they tend to be very expensive. We recommend a product called Floetrol, which you can find at any hardware store. It's used as a paint additive to prevent brush marks when painting houses, but it works wonders as a potting medium for little money.
The required proportions of paint, potting medium and water are approximately one part paint, one part potting medium and half water. However, these are just estimates because different paints have different viscosities, even within the same brand. Start by adding some pouring medium to a plastic cup. Then add an equal amount of acrylic paint. It's hard to tell how much paint you're adding since it will sink into the pouring medium, so we recommend using a scale to determine the amount.
Mix the two parts using a popsicle stick. Gradually add water and stir until the paint has the consistency of a thin milkshake. One way to test the paint is to see if it flows smoothly from the end of the popsicle stick into the cup of remaining paint without forming a mound. Repeat the same for all your colors and include some white and black paint. They create contrast that sets off other colors.
Step 3: Add some silicone oil
Silicone oil helps create small amoeba-like shapes in the patterns. They are correctly called "cells." You can use a basic silicone oil that you can find at a hardware store. Add three drops to each cup of paint and mix well.
Step 4: Prepare the Canvas
Turn the stretched canvas over to the back side and insert buttons into each corner. You may need to tap gently with a mallet or mallet to secure the buttons. The buttons lift the canvas to allow paint to drip onto the film, preventing the canvas from sticking.
Apply some white paint mixture to the canvas to prime it. This first coat of paint acts as a lubricant, helping the paint spread even more easily. Now comes the fun part: pouring the paint.
Fake poured acrylic
There are more and more homeowners interested in restoring bathtub enamel every year. Following the growing demand, manufacturers of self-leveling acrylic are expanding production and improving a series of acrylic enamels for plumbing equipment. But a variety of types of “entrepreneurs” strive to make money from this paintwork.
First type : small companies intending to occupy a niche in the local market. Before reaching consumers with the liquid acrylic of their production, they buy the products of large companies in bulk, bottle them in their own containers and sell them under their brand.
Having won over buyers to the “new product” after several months of sales, such companies begin to bottle not other people’s products, but their own. Without sufficient funds and equipment, these companies develop acrylic technologies with “optimal characteristics”, using raw materials from dubious suppliers.
Second type : similar enterprises also purchase large quantities of liquid acrylic with hardener from well-known manufacturers, but only in original containers with a label.
Next, each container is opened, a portion of the product is poured out and the solvent is added. Diluted acrylic is taken to the market and sold under the guise of the original product.
If liquid acrylic is diluted with a solvent, its performance characteristics will sharply decrease. This coating does not adhere well to the bathtub; it is too liquid and brittle. After a short period of time, the painted bathtub turns yellow and the enamel peels off. Please note that liquid acrylic cannot be diluted with anything other than the included hardener.
This counterfeit can be easily recognized by the incorrect color of the label and the low-quality plastic from which its container is made. Similar “products” regularly appear in various regions of Russia
Third type : a small enterprise purchases several containers of liquid acrylic from well-known brands and tries to copy them. Having developed a very approximate formula and technological process, this company purchases the cheapest possible raw materials. The production of products with bright labels and names begins.
The manufacturer does not make any attempts to popularize a specific product brand, because The product is of low quality and soon there will be no buyers for it. However, the company often changes the shape of the containers and the name of the product, thereby restarting its sales again and again. Such liquid acrylic cannot be called high-quality, only cheap.
Expert in the field of arrangement of sewerage systems and water supply systems
Its largest domestic manufacturers have been working on improving the formula and the technological process for producing liquid acrylic for over five to eight years each. Only their products can last as long as possible, are odorless and resistant to yellowing. Therefore, it is necessary to choose enamels from large enterprises for bath repairs.
“Stakril” , “Ekovanna” and “Plastol” most often appear . To interfere with imitators, manufacturers of these brands periodically change the color design and shape of cans with liquid acrylic and a hardener.
You can find out the actual type of the brand you are interested in by visiting the manufacturer’s website and studying the product description page.
A label without distortions or swelling, markings on the lid, a high-quality PVC container with a rich color - this is an original product. The seal on the lid is intact, which means acrylic was not cast from this bucket
However, the goods are distributed differently in different regions - some batches are sold out for months. Within the factory warranty period and subject to proper storage procedures, packaged liquid acrylic is completely suitable for use.
Let's assume that you are offered a brand product, say, "Plastol" - the expiration date is fine, but the bucket is designed in an outdated design of the manufacturer. The seller explains: the batch of acrylic arrived before the design of the cans was changed, but otherwise the product is original.
Inspect the bucket of acrylic and the bottle of hardener:
- Marking on the lid. Plastol prints the batch number on the lids of the cans using laser lithography. Manufacturers of “Ekovanna” and “Stakril” mark the lids with adhesive labels with the batch number printed on them. There should be no other labels on the lids.
- Cover color . Be sure to make sure that the color of the caps on the jar and bottle matches the image of the product on the manufacturer’s website.
- Brand logo. Labels on the sides of cans and bottles must contain the actual manufacturer's logo;
- The correctness of the sticker. Labels on the sides of acrylic cans and on solvent bottles are applied by the original manufacturer using in-line machine adhesive. Distortions and crumpled areas mean that the label was affixed by hand and is a fake;
- Integrity of the filling. The plastic fuse on the caps of the bottle with hardener and the jar of liquid acrylic must be intact (not broken).
The caps of bottles containing liquid hardener are usually signed with a marker when releasing a batch - this is normal. There is not enough space on the bottle cap to fully print or place a label.
Additional information about the types of self-leveling acrylic, as well as tips for choosing restoration enamel, are given in the articles:
- How to choose enamel for bath restoration: a comparative review of popular products
- Self-leveling acrylic for bathtubs: seven popular compositions for restoration + what to look for when purchasing
Direct Fill Method
Step 1: Pour in paint
With the direct pour method, you simply pour paint from cups directly onto the canvas. In this example we are pouring paint in stripes of alternating colors.
Step 2: Add Contrast
For some dramatic contrast, pour a few thin strands of black paint onto the canvas.
Step 3: Tilt the Canvas
Tilt the canvas in different directions to distribute the paint throughout the canvas. Continue tilting the canvas up and down, back and forth to move the paint until you are happy with the design.
Step 4: Clean up the edges
Use a palette knife to scrape off excess paint from the bottom edges of the canvas. You can also use a knife to fill in any areas around the edges that didn't receive any paint.
Let the canvas dry for 24-48 hours.
Quilling. Master Class
Bizarrely shaped patterns, carved leaves and flowers are quilling. Working with this technique is exciting, but requires perseverance.
All quilling materials can be purchased at a craft store
You will need:
- thin strips of paper;
- tools for working with paper: needles, scissors, sticks; glue;
- canvas.
The drawing for the painting can be printed on a printer
Strips of paper are folded into various shapes: curls, spirals and glued to the base, making up a composition.
Any composition using the quilling technique consists of individual figures
An example of creating a butterfly using the paper rolling technique
A similar picture is suitable for decorating a children's room.
This original painting will decorate any room in your home
See also: Preparing New Year's decor
Dirty pouring method
Step 1: Pour layers of paint into the cup
With the dirty pour technique, you first take a new cup and pour layers of color into the cup rather than onto the canvas. When adding layers of paint to a cup, hold the cup at an angle and pour the paint onto the side of the cup rather than straight down. This way the layers of paint remain distinct.
Step 2: Pour out the contents of the cup
Pour layers of paint from the cup onto the canvas in any pattern you desire. You can pour it all into the middle at once or scatter it across the canvas.
Step 3: Tilt the Canvas
Tilt the canvas, moving it in all directions to distribute the layers of paint until the canvas is completely covered and you are happy with the design.
Clean the edges with a palette knife and let the canvas dry for 24-48 hours.
Questions and answers
I want a colored bath. Will it be possible to make a bright shade?
The toner should not exceed 3% of the total volume of liquid acrylic (counted together with the solvent if there are two components). How saturated the color will be depends on the specific pigment. It is impossible to increase the volume of the color, as this will violate the properties of the composition.
How to spot fake acrylic?
Popular brands are sometimes actually counterfeited or diluted with solvents to increase sales volume. On originals, information is always printed on the covers or lasered. The information on the hardeners is written in marker. Fakes are supplied with stickers. The seals on the jars must be undamaged. Also, before purchasing, you should study the logos of popular brands and compare the quality of printing, the colors of the label and bottle elements, and the outlines on the packaging.
As can be seen from what has been described, restoring a bathtub with acrylic is not as difficult a procedure as it might seem at first glance. It’s quite comfortable to do all the manipulations yourself if you have the necessary equipment or you can rent it from friends. The work takes a moderate amount of time, but if done carefully, it will please the owner for many years to come.
Inverted Cup Method
Step 1: Pour layers into cup
As with the messy pour method, pour layers of different colors of paint into the cup.
Step 2: Place the canvas on the cup
Turn the canvas upside down and place it on the cup. The front of the canvas should be facing down towards the paint.
Step 3: Turn the cup and canvas over
While holding the cup steady on the canvas, flip them over at the same time so that the cup is now upside down on the canvas. Then lift the cup to release the layers of paint.
Step 4: Tilt the Canvas
As with other methods, tilt the canvas in different directions to create your pattern.
Clean the edges with a palette knife and let the canvas dry for 24-48 hours.
Here are two different examples of paintings using the inverted cup method.
Black color
It seems that black and white photographs, monochrome abstractions, and decorative graphics convey a gloomy mood. However, it is not. In the interior, they can become a win-win solution, filling the emptiness of sterile white walls or diluting colorful patterns with their severity. Black color is universal, luxurious in any form.
Photos can be mounted on wooden shelves
See also: Buy a key holder or make it yourself?
Bonus Technique: Dive
Step 1: Press the canvas onto the paint drops
You will undoubtedly have a lot of extra paint accumulating on the protective film as you tilt the canvases, paint dripping. Don't waste this paint. Use it to create even more paintings. Simply turn the canvas upside down and press it against the drops of paint. Make sure you press on all sides so that every part of the canvas is in contact with the paint.
Raise the canvas and your work of art is ready. Tilt the canvas in different directions if you wish. Clean the edges and let it dry for 24-48 hours.
Pouring acrylic paint is so fun and easy. She will make an “artist” out of any person. We hope you have enough wall space!
Do-it-yourself bathtub restoration
Restoring the enamel coating of a bathtub bowl yourself will save you an average of 1,200-1,700 rubles (that’s what craftsmen charge). However, you need to evaluate your skills before starting work: a minimum of experience in assembling plumbing fixtures and performing painting work is essential.
The process of preparing the bath and casting a new coating requires care, otherwise long-term quality cannot be achieved.
Materials and tools used
So, you have purchased a sufficient amount of liquid acrylic and hardener. Please note: you need enough acrylic enamel to finish your bathroom. Soviet-made models have a length of 1400-1700 mm, European products are made with a maximum length of 1800 mm.
All required tools and protective equipment must be prepared before starting work on the “fill bath”. Carefully evaluate your readiness for work. At the stripping stage, it is still permissible to stop work, but after mixing the acrylic with the hardener, you cannot stop
Manufacturers indicate on containers with liquid acrylic the length of the bath for which the calibrated volume of material is calculated. Measure the length of the bowl along its center, from the edge of one side to the edge of the other. If your object of work is longer than the size indicated on the jar of acrylic, you need to buy more material. It is important.
For enameling using the “fill bath” technology, the following tools and materials are needed:
- Device for mixing . When manually mixing acrylic with hardener and color, you will need a wooden or plastic spatula - blade width 40-60 mm, handle length 500-600 mm. Mixing with a drill and mixer should not be done, only by hand.
- Sandpaper – 5 pcs. (230*280 mm). You need sandpaper grade P60 (according to ISO-6344) or 25-H (according to GOST 3647-80) on a fabric basis, waterproof.
- Solvent No. 646 or 647 . It will be required to degrease the surface of the bathtub bowl after sanding and washing it.
- Spatula – width 100 mm. A metal spatula will do, but only a new one, without dirt or rusty streaks.
- Adhesive tape - adhesive tape, 50 mm wide. You will need two types of tape - masking tape (on paper) and fastening tape (on film).
- Wallpaper knife. Necessary for cutting tape and trimming dried acrylic streaks from the bathroom drain hole before reinstalling the drain and overflow.
- Screwdrivers - straight and Phillips to remove the drain-overflow siphon. A gas wrench may also be required;
- Stool . It is much more convenient to mix acrylic with a hardener and put the prepared enamel into a container for application if you place a bucket of liquid acrylic on a stool.
In principle, to prepare the walls and bottom of the bathtub for casting with acrylic, manual processing with sandpaper is sufficient. But only if it has not been painted with anything before, i.e. Factory enamel on the surface. Otherwise, you will need to clean it with a drill or grinder.
To remove secondary enamel, the drill requires a Velcro attachment and sanding wheels of grade P40 (or 40-H); for an angle grinder, grinding wheels of the same brand are needed.
Required protective equipment:
- Work clothes – trousers, long sleeve shirt or jacket. Drops of acrylic on the skin are not dangerous, but once they dry, they are quite difficult to remove.
- Headdress – at least a headscarf. Hair should not get on the enamel coating during the casting process.
- The respirator is at least a petal. Cleaning the bathtub will cause a strong release of dust; you should not breathe such air.
- Disposable latex gloves . Hands must be protected from contact with liquid acrylic.
You will need newspaper sheets or PVC film to cover and hang the surfaces around the restored plumbing fixtures. We remind you: drops of cured acrylic spilled during the restoration process are very difficult to remove.
Preparing the bathroom
Collect and remove items usually found in this room: toothbrushes, towels, laundry basket, other cosmetic and hygiene items. The shower curtain should be removed, and if possible, the curtain bar should also be removed.
Ideally, the bathtub should only be surrounded by walls before starting work. First, enameling requires space for the worker. Secondly, nothing should fall into a bathtub with an uncured full acrylic coating.
If the sink cabinet and washing machine are located close to the side of the plumbing, they need to be moved or, if it is impossible, removed completely. A 100 mm gap between the bathtub wall and any nearby object is sufficient.
To prevent dust particles of old enamel from passing into neighboring rooms, the ventilation hole in the bathroom is covered with PVC film. It will not be possible to open it until the end of the restoration work.
If there is a non-removable geyser in the bathroom, as well as other objects and appliances that can be damaged due to excess dust, it is necessary to cover them with sheets of newspaper or plastic film secured with tape.
Cleaning the bowl of a restored bathtub
The inner surface of the bowl must be thoroughly sanded by hand, with a drill with a special attachment, or with a grinder equipped with a grinding disc.
For manual sanding, use a special sandpaper attachment or wrap it around a short piece of wood of a suitable width.
Sanding a bathtub that has previously been cleaned of household contaminants is an important step. Acrylic coating will not adhere to smooth surfaces. However, you cannot scratch the walls and bottom too much. The layer of cast enamel must be uniform
The entire enameled surface of the bathtub should be cleaned, paying special attention to the bottom, the areas where the bottom meets the walls and their bends. When cleaning, perform circular and horizontal movements, alternating them. Finally, you need to walk over all surfaces in a circular motion.
Purpose of cleaning: to remove rust and form a shallow (no more than 0.5 mm) relief on its inner surface. Such irregularities will ensure reliable fastening of liquid acrylic and will not cause its overuse.
If you previously tried to restore the bathtub by painting, you will need to completely remove this layer of enamel. We remind you that you should not try to completely remove the factory enamel from the bathtub - there is no need for this.
Cleaning is considered complete if the entire internal surface (including the sides) has become slightly rough, without chips or protruding edges of the factory enamel coating.
Washing and drying plumbing fixtures
After cleaning with hand-held electrical appliances, the air in the room will be very dusty. To remove dust, run hot tap water over the bathtub and the tiled wall around it. The hotter the water, the more steam it produces, the better.
In principle, you can use baking soda for this purpose. But it is better and more correct to degrease the bathtub with a solvent, and use soda to wash the bathtub bowl
Remove dust particles as thoroughly as possible from the tiles on the walls around the bowl, from the shower curtain rail, from the surfaces of the sink, from the washing machine, from the faucet and other objects. It is strictly forbidden to leave dust - the slightest draft and it will fly up, depositing on the freshly applied acrylic coating.
Completely clean the surface of any dust particles that have accumulated after cleaning. Rinse the bathtub with water from a hose, use liquid detergents without abrasive particles. Please note: the cleaner the bowl, the more firmly the acrylic enamel will stick to it.
Once you have finished rinsing, completely close the water taps on the mixer. Remove the shower hose (there will be a gasket there, don’t lose it), put it in another room.
Not a single drop of water should end up in the bath. If the faucet is leaking, wrap it with plastic film or, as a last resort, turn off the water supply using shut-off valves on the water pipes.
Over the years of use, the drain and overflow can become tightly stuck to the drain holes; it will need to be trimmed and knocked out. But proceed carefully, otherwise the cast iron bathtub will be seriously damaged
Remove the drain-overflow, acting carefully - after painting it must be put back. Under the drain hole you need to install a suitable container with a volume of at least half a liter, into which excess liquid acrylic will be drained during the process of pouring the enamel composition.
Turn up the hole in the sewer pipe elbow where the drain pipe from the drain-overflow was previously inserted. Otherwise, water may leak when draining through the kitchen sink.
Wipe the bowl, tiled walls, above the bathtub and adjacent surfaces dry. After washing, there will be drops of water on them. Use a lint-free cotton cloth and, if possible, a hair dryer.
Dry especially carefully the areas adjacent to the sides of the bathtub, drops of water always remain there. If the cracks in these areas are difficult to dry, use a hair dryer designed for drying hair.
Laying flooring and degreasing the bathtub
The process of applying acrylic coating is accompanied by smudges from the sides. You will need to lay newspapers and polymer film on the floor - lay it overlapping, overlapping the edges. It is very difficult to remove acrylic drops from the floor, so try to reliably block their access to the floor covering.
The slightest moisture on the bathtub will prevent the acrylic mixture from forming a durable coating. It is especially difficult to remove wet streaks from the side around the perimeter of the junction with the wall - you need a hairdryer, at least a household one
The walls adjacent to the sides should also be covered with paper and tape, first placing masking tape along each side. If the wide side has a sliding screen, it is necessary to dismantle it entirely. If the screen is tiled, cover it with newspapers (film).
If there are deep chips on the enamel of plumbing fixtures, they must be thoroughly puttied. Use quick-drying auto putty - auto enamel stores sell it. To work with putty, use the manufacturer's instructions indicated on the packaging.
The last stage of preparation for enameling is degreasing the surfaces. Wet a lint-free rag with solvent and wipe down the entire bathtub as thoroughly as possible. All that remains is to collect dust particles and lint remaining after wiping and degreasing.
With an open, dry, clean hand, walk along the sides and sides of the bathtub, discarding debris to the bottom. Then use your hand to push debris from the bottom into the drain hole.
Preparing liquid acrylic for application
Before mixing acrylic enamel, containers with components should be kept warm for a day at room temperature. The best operating temperature is 24-26°C.
If at the time of acrylic casting the room is cooler (less than 20°C), it is necessary to heat the mixture by placing it in a basin with warm water. Liquid acrylic should not be heated to a temperature exceeding 26°C.
After opening the can, the liquid acrylic needs to be stirred, only then pour in the hardener. The enamel ready for casting will have a creamy consistency.
Open the bucket of acrylic, the bottle of hardener (using latex gloves!), and pour the hardener into the jar of acrylic. Next, mix with a wooden (plastic) spatula, following the manufacturer's instructions. Please note that they give different times for the mixing process.
For example, “Plastol Premium” must be stirred for 12 minutes, then allowed to settle for 3 minutes and smoothly stirred again for 3 minutes. And “Stakryl” after ten minutes of stirring and three minutes of settling can be poured onto the walls of the bath.
To tint acrylic enamel, after mixing the composition for three minutes, pour drops of color into it without stopping mixing. But no more than 5 drops - the acrylic mass will thicken and it will be impossible to work with it. Saturated color for decorative protective enamel is impossible, only light shades.
When stirring, perform circular movements, periodically changing their direction. While mixing, run a spatula along the sides and bottom of the bucket, removing unreacted acrylic and combining it with the hardener.
Take your time, move the spatula smoothly - air bubbles are unacceptable. You cannot use a mixer on a drill, because... the mixture will include a lot of air.
Check the time required for mixing strictly by the clock dial or smartphone screen. The minutes indicated by the manufacturer for the process of preparing the mixture must be strictly observed.
Casting acrylic enamel into a bathtub
The bucket of liquid acrylic is too large to pour the enamel directly from. You need to prepare a small plastic container, for example the same hardener bottle. Cut it in half and wipe dry with a rag.
The capacity of the container from which the acrylic mixture will be poured should be no more than a liter. Larger vessels are more difficult to work with due to size and weight
After 40-60 minutes from the moment mixing is completed, the acrylic mixture will begin to harden and will become impossible to work with. Don't waste your time. Place the jar of acrylic in the bathtub, next to the prepared container for casting. Fill the latter with acrylic mass and begin application.
Stand firmly next to the bathtub so that you can reach any edge of it without changing the position of your legs. Do not place your feet directly at the edge of the side - acrylic will get on them.
The first stage - sides
Start pouring liquid acrylic from the far left edge of the bathtub bowl, gradually moving your hand to the right. The sides should be filled with so much enamel that it completely covers the surfaces and re-filling is not required. Add acrylic to the container as it becomes empty.
When spilling liquid acrylic over the sides, you need to rock the container left and right along the length of the side. Don't worry that the mixture won't reach the bottom - it will flow right there
Be careful - if you pour too much acrylic, it will flow from the sides onto the floor and there may not be enough enamel for the entire bath. If there are empty areas on the sides, apply the composition to a spatula and use it to cover the unfilled areas.
Second stage - walls
They need to be coated with the compound in two passes. Make the first pass from the edge of the back of the bathtub bowl (the area where the wall becomes completely vertical) in the direction from left to right. Don’t skimp on the enamel composition; the excess will flow to the bottom, but it still needs to be painted.
Do not scrape the remaining mixture out of the container. It is enough to place an inverted jar on the bottom of the bathtub so that the moving remnants of acrylic enamel flow out on their own
The first pass along the walls will cover them almost halfway. Be careful - drops from the filling container should not fall on surfaces already coated with the composition. Otherwise, drips will be visible.
Spill especially a lot of acrylic on the back of the bathtub, it is less vertical and the composition will drain slowly. Remove the bucket of acrylic from the container being treated.
Make the second pass in the same direction as the first. Only pour the enamel from the level to which the acrylic composition was drained during the previous pass. Then the liquid acrylic will cover the walls completely, over the entire height.
The composition that has flowed to the bottom will try to flow into the drain hole - do not allow this, use a spatula to move it to the center of the bottom of the bath. Drain the remaining acrylic mass directly from the jar onto the bottom of the bathtub bowl, then remove the empty container to the side and away so as not to interfere.
No need to scrape out the bucket from under the liquid acrylic to collect all the composition and transfer it to the bath! In these places there is a lot of material that is not mixed with the hardener, and when placing it in the bathtub bowl, streaks and yellowed areas are inevitable.
The third stage - sealing bald spots
If you find areas on the walls that are not completely sealed with the compound, do not worry, this is normal. Use a spatula to scrape up a small amount of material from the bottom, then spill it onto the uncovered areas. The acrylic poured into them should be enough to flow to the bottom level.
To ensure that the acrylic material completely covers the side walls, use a spatula. It is necessary to collect enamel on it from the places of greatest accumulation and transfer it to empty areas
Inspect the walls, look for errors - somewhere you touched the applied coating, or a drip formed due to a lack of liquid material. Using a spatula, coat the defective areas with acrylic in a volume that allows it to flow to the bottom. Then all errors will be leveled out.
The fourth stage - covering the bottom with acrylic
There is enough liquid material here - it has dripped from the walls and is poured from the jar. Using a spatula, level the acrylic coating along the bottom, making sure the layer is uniform by eye. Proceed carefully, not catching the sectors of the transition of the bottom to the walls. Now excess enamel may flow down the drain, do not prevent this.
Gravity will force the liquid acrylic to flow to the bottom, but the layer itself will be uneven. Using light movements of the spatula, you need to visually level the enamel coating
To fully level the enamel layer, run the edge of the spatula along the surface of the bottom - draw a lattice with it. Then leave the bath alone for 15 minutes and the acrylic coating will level off by itself.
All that remains is to use a spatula to collect drops of acrylic hanging from the lower edge of the side. Move the spatula carefully, without catching the main plane of the bathtub side. Wait 10-15 minutes - drops may form again.
How to dry a free-flowing bathtub
The acrylic coating hardens gradually, more and more every hour. While meticulously examining the results of enamel pouring, workers sometimes notice small defects and try to erase them with acrylic from neighboring areas. You can't do that!
That's it, the enamel has already hardened enough and any touch to it will only make it worse. Wait for preliminary drying (polymerization), then use the factory repair kit.
Spills of acrylic mixture dripping from the side of the bathtub onto the laid floor should be removed. Otherwise, the enamel may leak through the newspaper sheets and seriously stain the floor covering. And it's very difficult to clean it off the floor.
After 48 hours from the moment the acrylic composition is applied to the surface of the sanitary container, its preliminary polymerization will occur.
Until this time, no one - neither you yourself, nor other household members, nor pets - should enter the bathroom. Otherwise, every speck of dust, every hair brought in by the air flow through the open door will stick and spoil the appearance of the freshly painted bowl.
To avoid spreading pollutants through the air, do not touch newspapers with acrylic stains placed on the floor. It is safer to remove them later, after waiting for 48 hours of polymerization.
It's time to install the harness
The new enamel layer is completely dry, there is no need to wait any longer. Install the drain-overflow trim, having first removed the accumulator for the flowing acrylic and cut off the dry streaks with a wallpaper knife. Before assembly, check the suitability of the gaskets on the harness - if they have lost their flexibility, lubricate them with sealant before work.
Having installed the drain and overflow, twist the drain pipe to its previous position - the inlet hole is turned “to the bathtub” horizontally. Connect the harness to it, remove the protective film from the mixer and turn on the water - you need to make sure that the drain does not leak. That's all, the bathtub is repaired and ready for use.
In order for your plumbing fixtures to remain attractive longer, you need to follow basic rules for caring for the coating and choose the right cleaning product for the bathtub.
It should be noted that bowls with cracks cannot be restored. Therefore, you will have to select a new bathtub and install it.
Russian artists who painted in gouache
Boris Mikhailovich Kustodiev (1878 - 1927)
The work of Boris Kustodiev is distinguished by his love for the portrait genre - paintings in which the surrounding landscape or interior reveals the character of the hero. His paintings are bright and cheerful. For everyday scenes of a decorative and entertaining nature.
1 / 8
The works of this artist radiate health, joy and love of life, regardless of the period in which they were painted. Among the famous paintings painted: “Portrait of Fyodor Chaliapin”, “Maslenitsa”, “Fair”
Kazimir Severinovich Malevich (1879 - 1935)
1 / 6
Russian avant-garde artist, art theorist, founder of Suprematism. Malevich challenged academic art, experimented in his paintings, combining incompatible things. Malevich's work was constantly changing and developing; he tried all the directions and styles that arose at the turn of the 19th and 20th centuries. Among the famous paintings: “Bather”, “Self-Portrait”, “Head of a Peasant”.
Sudeikin Sergey Yurievich (1882 - 1946)
1 / 5
Russian painter who classified himself as symbolic painting. His paintings are permeated with theatricality, farce, which echoes tragedy. Sergei Sudeikin depicted his characters in sharp poses, using bright colors. Among the famous paintings: “Venetian Dolls”, “Lovers by Moonlight”.
Vsevolod Andreevich Filippov (1893 –1976)
1 / 8
The main themes of the artist Vsevolod Filippov are Russian nature, Russian architecture, and the history of Rus'. His paintings were first presented at a personal exhibition in 1955. The world recognized Vsevolod Andreevich as a subtle landscape painter and master with a unique style. Famous paintings: “Sunset”, “Streams Run”, “Moscow Courtyards”, etc.
Valentin Aleksandrovich Serov (1965-1911)
1 / 7
Valentin Serov’s paintings are characterized by a light, “sunny” intonation. The artist tried to convey in painting everything that pleases the human eye. The portraits painted by Serov are distinguished by their amazing similarity, while at the same time very accurately emphasizing the character traits of the hero. His later works demonstrate the artist's versatility, as he is not limited by the stereotypes of any school. Famous paintings: “The Model”, “In Winter”, “The Rape of Europa”.
Artwork made from stretched threads
DIY painting ideas can be completely unexpected. Like, for example, the way to depict animals or plants using colored threads stretched over carnations.
You will need a tinted base, preferably made of thick plywood or chipboard. A template made of cardboard or thick paper should be glued onto it with a few drops of glue. These could be drawings of beautiful leaves, flowers, animal figures or abstraction.
Small nails are hammered along the contour of the template, a little not completely, so that threads can be easily caught on them. By removing the template, you can get a contour image from stretched, intertwined threads.
Origin of the term
The term gouache (from the French gouache, from the Italian guazzo “water paint, splash”) came from France, where it appeared in the 18th century, although the technique of gouache painting in European countries was known back in the Middle Ages. Gouache was originally a type of watercolor. To give a dense texture, white was added to water paints.
1 / 4
In the Middle Ages, glue was introduced into water-based pigments. Over time, artists learned experimentally that chalk powder and zinc white make the paint opaque and increase its density.
History of paint creation
Book miniatures in the Middle Ages were made using a combination of gouache and watercolor. The Renaissance is known for the use of gouache for various preparatory work, sketching, and making miniature portraits.
1 / 5
Gouache painting flourished in the Russian Empire in the 19th and early 20th centuries. It was during this period that painters from the World of Art organization used paint for decorations, posters, massive easel works, etc.
1 / 5
Gouache is made from pigments to which white and glue are added. White gives it a matte and velvety appearance, but when it dries, the color of the pigment becomes duller.
Basic auxiliary materials
In order to make a handmade decorative painting, you need to prepare a frame, stretcher and material, paints, glue with which the image will be created.
There are many ways to create an artistic and unusual work from simple objects. Several proven creative techniques are offered, but the world of human imagination may turn out to be much wider than these examples.