An ordinary person who occasionally renovates his home encounters many difficulties when decorating rooms. Working with large sheets of wallpaper of varying quality causes particular difficulties.
We bring to your attention information about photo wallpaper: how to glue it to the wall with quickly accessible tools. Based on it, you will be able to create a unique interior that will reliably serve for many years.
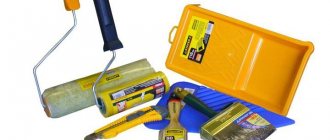
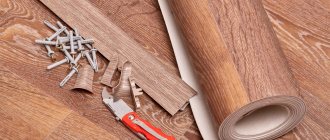
Required Tools
- Wallpaper and glue.
- Wallpaper or stationery knife. They trim the protruding parts of the canvases and their ends.
- Painting tools. Large brushes, which are convenient for applying glue to the underside of canvases, or rollers. A small brush is suitable for coating joints.
- Measuring tools. They will help you maintain the correct proportions, check the accuracy of horizontal and vertical lines, and prevent the canvas from falling to one side.
- A block or flat board. They measure the boundaries of parts of the overall exhibition.
- Pencil, pen, marker.
- Clean, dry rags.
- For working at height, a chair or ladder.
What tools and glue will be needed for the job?
The choice of adhesive depends on the type of coating base.
If you are faced with the question of how to glue paper photo wallpaper, then any universal wallpaper glue will do. For non-woven fabrics you will need a special composition. Dilute the glue according to the instructions on the package. Please note that the composition will dissolve faster in warm water and will be more homogeneous than in cold water. Even if the instructions say that the adhesive solution will be ready in five minutes, still wait at least half an hour. This simple trick will help you achieve the best quality gluing.
Tools for work
In addition to glue, you will need the following tools:
- building level;
- roulette;
- sharp scissors and a construction knife;
- pencil;
- glue tray;
- wide and narrow brushes;
- rubber roller;
- soft, preferably cotton rags (old T-shirts work great);
- damp cloth or sponge.
How to choose adhesive for photo wallpaper
- An adhesive composition with the appropriate marking is used.
- Canvases with patterns adhere well to brand compositions Contact Vinyl, Quelyd, Methylane, Pufas.
- For photo wallpapers with thin canvases, a thick adhesive mixture is selected, which will prevent it from slipping after finishing work.
- Thin paper photo wallpapers can be glued with any type of wallpaper glue; it is applied to the canvas, which is immediately glued to the wall until it gets wet.
- The color of the glue should not appear on the surface of the material as spots or stripes. A completely transparent glue is best.
- Moisture-resistant compounds will prevent the development of mold under and on the canvases.
- The composition should not have a strong toxic odor.
- The faster the glue hardens, the higher its quality.
- Domestic glue can also be of high quality, but the price will be several times lower than its foreign counterparts.
- When purchasing, you need to check the packaging for tightness and dryness.
Often a certain amount of glue is added to photo wallpapers, but due to the fact that it is necessary to coat the back of the canvas and the wall, it is not enough to cover the intended area. You will need to buy more glue.
Types of photo wallpaper
Among the huge assortment in the hardware store, there are sure to be photo wallpapers that are ideal for a specific interior. To make the right choice, you need to consider all types of wallpaper. They are divided into groups according to the base material and texture, style direction, and the presence of decorative effects.
By material
Several decades ago, photo wallpapers were produced only on paper. Today, new materials have appeared that do not have the disadvantages of paper and have the necessary qualities for easy and even pasting, maintaining a fresh look for many years.
Vinyl based
The opaque, dense and soft vinyl base consists of two layers: paper and PVC. This material is not afraid of moisture and exposure to high temperatures; such wallpaper can be washed and brushed using various detergents, and any embossing can be applied to it. Vinyl does not rot, does not release toxic substances into the air, and mold and mildew do not form on it.
The material stretches slightly, which makes it easier to paste in uneven corners and on areas of walls with complex terrain; embossing hides surface defects and makes joints invisible. The disadvantage of this material can be considered its airtightness. The high price is compensated by the durability and high quality of the coating.
For pasting, a special composition is used, which is applied to the wall, according to the instructions included on the package.
Self-adhesive sheets are also sold
Paper based
Traditionally, wallpaper was made from paper. This environmentally friendly and cheap material is still used today. Walls covered with paper sheets breathe, glue is inexpensive.
The disadvantages of such a base are related to the properties of the paper:
- instability to abrasion and various mechanical influences;
- low strength, short service life;
- susceptibility to deformation and soaking from moisture, the formation of mold and mildew;
- fading from ultraviolet radiation;
- highlighting flaws and irregularities in the wall.
This wallpaper is recommended to be placed in rooms without high humidity, for example, in living rooms and bedrooms.
You can glue the paper with any wallpaper glue, and you can make it moisture resistant using lamination.
Manufacturers offer two-layer laminated waterproof wallpaper and UV protection compounds that protect paints from fading
Non-woven base
A lightweight base of thin combined fibers and cellulose forms a non-woven fabric that does not stretch when wet and does not shrink when dry, which ensures easy gluing. This material can be washed and used to decorate walls in bathrooms and kitchens. But it should be taken into account that non-woven fabric is subject to abrasion and other mechanical stress.
Photo wallpapers are glued with a special glue, which is applied only to the surface of the walls. Non-woven fabric does not form air bubbles and hides unevenness; the strips fit perfectly together.
Non-woven fabric is also used to make the basis for heavy frescoes with pronounced relief.
Non-woven wallpaper is breathable and safe for human health; it is used to decorate bedrooms, children's rooms and living rooms
Textile
The rich history of fabric wallpaper goes back several centuries; it is a premium material. The bottom layer of paper or non-woven fabric serves as a strong base for the decorative top layer of natural fabric with a picture. Silk, linen, velor, and cotton are used to make wallpaper.
The glue for such wallpaper is applied to the back side of the canvas and left for the required time, and the wall is first leveled and thoroughly primed. Paintings are produced with a self-adhesive coating covered with a backing.
Textile wallpaper does not lose its color when exposed to sunlight
By invoice
The manufacturing technology of vinyl canvas allows you to create various textures on the surface that are visible under certain lighting and imitate the texture of natural materials: canvas, strokes of oil paint, sand, plaster, and their combinations. The texture is made by embossing vinyl or non-woven fabric, the paper has a glossy or matte smooth surface, and the fabric has its own unique texture.
Canvas
Imitating the interweaving of canvas threads gives the feeling that there is a real painting on the wall. This texture can be glossy or matte; it does not have a deep relief, therefore it is not able to mask defects in the surface of the base.
It is recommended to level the walls before pasting them under canvas and wipe them with a damp cloth after finishing.
Painting
Strokes of free-form oil paint imitate a painting created with a brush or palette knife. They often print paintings by famous artists. The depth of this texture reaches 3 mm, which allows you to hide small protrusions and recesses on the walls. This texture promotes the accumulation of dust, so photo wallpapers should be washed regularly or vacuumed with a soft brush.
Painting canvases are heavier than other types; the walls must be primed before pasting for better adhesion.
Sand texture
Fine or coarse sand - you can choose the size and degree of dullness of the coating. This original texture diffuses light, does not create glare, looks calm and harmonious in any interior and is suitable for all style trends.
The disadvantage of sand is that the surface quickly becomes dusty; to solve this problem, wet cleaning of photo wallpapers is necessary
Plaster
The ideal authenticity of the texture of a plastered wall and an artistic fresco is achieved by combining smooth areas with relief ones that follow the contours of the depicted objects. This technique is used when finishing with Venetian plaster. This effect emphasizes the volume of the painting and gives the surface a vintage feel and a touch of antiquity.
The surface of such wallpaper has good breathability
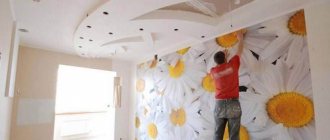
3D wallpaper
An innovation that has become available to customers quite recently is photo wallpaper with three-dimensional 3D images. The stunning effect of expanding the space of a room, the most beautiful photographs of animals and plants taken with macro photography, space objects, underwater, natural and city landscapes - a complete transformation and unique design of the room. Such paintings look especially realistic with well-thought-out lighting and the arrangement of the landscape from floor to ceiling.
Three-dimensional images visually enlarge the space, so they are an excellent solution for small spaces
Preparing the walls
- Removing old decoration from the walls, otherwise in the future it is likely to fall off along with the new painting.
- Remove old paint only when it peels off or falls off. A layer of acrylic-based primer is applied to the firmly held paint.
- If the walls are too bright in color, the paint may bleed through the wallpaper, so the surface is treated with white dye for painting.
- All irregularities are removed (especially important before gluing thin paper wallpaper).
- Under thick vinyl or non-woven photo wallpaper, only large flaws are smoothed out. Check the evenness of the walls using a building level or plumb line.
- After leveling with plaster, the wall is rubbed down with finishing putty, and when it dries, the surface is sanded with fine sandpaper, wiped off dust and covered with acrylic primer.
- Areas near window openings are treated with an antiseptic.
Features of care
If everything is done correctly, then the Mona Lisa will delight us with its mysterious and always lively look for many years to come.
Behind the vinyl
What you will need:
- soft sponge;
- soap-based detergent (no chlorine!);
- a bucket of warm water, a cloth or napkin.
- The wallpaper should be vacuumed or cleaned with a soft bristle brush.
It is necessary to ensure that no streaks remain on the panel during dry cleaning. - If there are no streaks and the paint has not peeled off, you can carefully wipe the wallpaper in places where it is dirty. Moisture is immediately removed with a napkin.
For paper
It is not advisable to wash paper photo wallpapers at all!
Only dry cleaning to remove dust is necessary . To further protect the paper panel from contamination, you can cover the pattern with wallpaper varnish.
High-quality photo wallpapers pasted according to the recipe will surprise both the master masters and their guests and relatives. They will definitely become a source of real pride in front of all their friends with the long-awaited result of the renovation, which was done with their own golden hands.
Finally, the Mona Lisa is on the wall of the living room in our modest two-room apartment! How great it is that high art is now available to everyone. And it is so close, so tangible! Photo wallpapers transform any interior. And most importantly, there are no limits to imagination.
Selection of pattern and its dimensions
- Ideally, a canvas whose area coincides with the area of the wall.
- If the wall is wider than the total area of the photo wallpaper, then the canvases are placed in the center with the same distance from the corners.
- The canvas, which is larger than the size of the wall, is trimmed in inconspicuous places or from the side that least spoils the overall composition.
- It is better to first lay out fragments of photo wallpaper, consisting of 8-12 parts, on the floor to get an idea of the final result.
- Markings are made on the wall. The lines beyond which the first row of elements should not protrude are measured with a plumb line. The next row is glued along a straight line, adjusted to the reference first one.
With custom-sized photo wallpapers, no adjustment is necessary.
Features of choosing a pattern on photo wallpaper
You can purchase beautiful and high-quality photo wallpapers, posters, and modular paintings at a discount in our online store.
Of course, the choice of designs on this type of wallpaper is simply amazing. And therefore, when choosing this finishing material, some difficulties arise. In this regard, first you should decide which color in the picture should be the main one. As a rule, it should be harmoniously combined with other colors prevailing in the room. After this, you can proceed to choosing the subject of the picture. For the bedroom, it is best to choose something soothing. For a living room or children's room, you can choose brighter and cheerful designs, but it is worth considering that it is better to avoid aggressive colors. For a small room, it is better to choose photo wallpaper where cool colors predominate, thereby visually expanding it. And for a more spacious room, you can choose both cold and warm color shades.
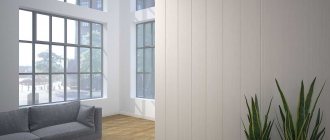
Seamless photo wallpaper
To obtain a solid image without joints, large photo wallpapers up to 3 m wide and up to 50 m long are used. They are glued horizontally to the entire surface of the wall at once. The base is usually non-woven or paper, and the top layer is a single woven material or its individual fibers.
- The walls must be cleaned of old finishing material, plastered and puttied.
- The glue is diluted, the finished composition is applied to a section of the wall, and the canvas is applied to it.
- The strips are fixed at the top and bottom with slats, and their surface is leveled with a rubber spatula or roller.
- Using a knife or scissors, cut out window and door openings, holes for switches, and sockets.
- Excess sheets are cut off, and after a day the fixing slats are removed.
It’s easier to hang up large-sized photo wallpapers with two people. One will gradually unwind the roll and hold it at an angle, and the second will coat and glue it.
To make them look perfectly even on the wall, they can be secured with a construction stapler and trimmed around the edges with plinths.
Features of gluing seamless photo wallpaper
To install seamless photo wallpaper, it is recommended to use QUELYD Murale adhesive for all types of wallpaper. The surface of the wall must be soaked with a thick layer of glue; it is important to coat the edges well.
Before gluing, the material is rolled completely into a roll and placed in the place where gluing will begin, then you need to unfold it 1-1.5 m. You need to press the canvas to the wall so that 2-6 cm remains at the ceiling and floor to avoid difficulties with trimming residues. After this, they are smoothed with a plastic spatula. If glue gets on the surface, it must be removed as soon as possible with a damp cloth. During the pasting process, it is necessary to create conditions of constant temperature and absence of drafts for 1-2 days until the photo wallpaper dries.
You can do the gluing of seamless photo wallpaper yourself, but it is still recommended to trust the work to experienced and qualified specialists. To do this, you can leave a request on our website or call us.
Gluing technology
The method of wallpapering may differ from its base.
The glued canvases dry from a day to three days, during which there should be no drafts in the room, windows cannot be opened, and the heating cannot be turned on.
High air humidity increases the risk of bubbles. If they do appear, you must immediately pierce them with a needle and inject glue inside with a regular medical syringe, and smooth the surface. Excess product that comes out through the puncture is removed with a clean rag.
Non-woven base
- The prepared surface is marked.
- Fragments with parts of the image are laid out in the required order.
- Glue is applied to a section of the wall under one sheet of paper; there is no need to apply the wallpaper itself.
- The dry sheet is glued to the wall and leveled. Similarly, according to the markings with the accompanying alignment of the pattern, the remaining fragments are glued.
- The joints are trimmed, the edges are glued and rolled with a roller.
Paper based
- The wall is leveled and primed, markings are applied, paper photo wallpapers are laid out on the floor, and white edges are cut off (if any).
- In a clean plastic bucket, mix dry glue with water in the required proportions. The first canvas is laid face down, the reverse side is coated with glue, and a layer of the mixture is also applied to the wall.
- Before the canvas gets wet, it is quickly glued to the wall from top to bottom.
- The material is carefully leveled and other fragments are glued. Residues of glue that have appeared at the joints are removed with a dry cloth. If necessary, the joints are cut.
Vinyl photo wallpaper
- The base is prepared and primed twice.
- Vinyl photo wallpaper is coated with glue from the inside out, folded in half and soaked in the glue for the number of minutes specified in the glue instructions. In parallel to this, the wall is coated within one canvas.
- The sheet is pasted onto the marked area and smoothed out.
- Other fragments of the picture are glued in the same way.
- Holes for sockets/switches are cut and seams are rolled.
How to glue photo wallpaper on a wall
In the process itself, it is important not just to paste the wallpaper, but also to keep the picture intact. Remove joints and prevent bubbles from appearing. The gluing technology is simple - you need to dilute the solution in the correct proportion and glue the surface to the wall in parts.
Necessary materials
Before starting work, you need to prepare tools and materials:
- Wallpaper with a pattern. Before purchasing, you need to decide in advance on the size and choose the right type.
- Glue. The seller will help in this matter, who will suggest a model suitable for a certain type of canvas.
- Knife. Using a knife, you can get rid of bulges and smooth out the edges.
- Brushes. It is recommended to choose large ones because they speed up the process.
- Roulette or ruler. It will help to maintain the level and sideways movement of the pattern.
- Roller. Rubber is perfect. With its help, you can iron the wallpaper so that it does not lag behind the surface.
- An ordinary pencil for notes and a rag.
Pasting photo wallpapers from 4, 8, 12 parts
Photo wallpapers, consisting of several fragments, are glued from the center of the image or from its edge. The canvases are first laid out on the floor and the wall is marked. If white stripes are visible on the edges of the fragments, they are carefully trimmed with a knife. The principle of gluing wallpaper consisting of 4, 8 or 12 parts is different.
- A vertical line is drawn along the plumb line along which the edge of the canvas will go.
For an image consisting of 4 fragments, it is better to mark the beginning in the center of the wall, and for photo wallpaper of eight or 12 elements - from the edge.
- One separate fragment is taken, its dimensions are measured, the wall is drawn according to it, so that when gluing each element of the drawing falls into place. The proportionality of the angles, the accuracy of the markings are checked, the location of window, door openings, and technical openings is taken into account.
- The wallpaper is stacked face down so that what is glued first is on top. Glue is applied to it, the sheet is pressed against the wall, and leveled. If there is a margin on the sides of the canvas, then the gluing is done with an overlap. The joints are coated and a rubber roller is rolled on top.
- When gluing the following strips, you need to combine the pattern well to form a complete picture.
Modern photo wallpaper: beauty and practicality in the interior
Unfortunately, paper photographic canvases are not suitable for decorating every interior - high humidity, temperature changes, mechanical damage and dirt can destroy the paper in record time. Therefore, for the decoration of rooms such as kitchens, hallways, bathrooms and children's rooms, more wear-resistant and durable materials are used: fabric, vinyl and non-woven fabric.
Main characteristics of modern photo wallpapers:
- Fabric washable
A practical and durable solution for premises with a high degree of traffic and aggressive living conditions. Fabric treated with special protective agents, and even the printed design, which is applied to the base with a special printer, are not afraid of dirt, grease, or water.
Fabric photo wallpaper in the interior
- Seamless fabric
Perfect for decorating large rooms. Their main difference from ordinary photo wallpapers is that they are not glued, but stretched and tucked into a baguette, which eliminates the need to level the walls. The main advantages of all types of fabric photo wallpapers are the resistance of the colors to fading in the sun and the ability to wash them if they get dirty.
Seamless photo wallpaper on a fabric basis
- Non-woven
They are printed on a textured non-woven base and produced in standard image sizes. They are produced serially or to order with a solid or fragmented image, which must be taken into account when choosing a design solution.
Photo wallpaper: base - non-woven fabric
- Vinyl
They are produced on a textured PVC base with solid and fragmented standard images or to order.
Recent Entries
Soldering or crimping electrical wires Why is there humidity in the apartment and what to do Chopped at home: technical features and advantages
PVC photo wallpaper
In addition to photo wallpapers with fabric, vinyl and non-woven bases, there are laminated and varnished canvases on sale. The front surface of the former is covered with a glossy or matte film to protect against wear, and the latter is covered with varnish or special paint with protection against fading.
Self-adhesive photo wallpaper
Two craftsmen usually work on attaching the self-adhesive: one gradually peels off the backing, the second glues the strips to the wall, leveling them with a rubber spatula.
The backing is first removed by 50 mm, the sheet is glued with the upper part according to the markings applied to the wall. The adhesive strips should not be allowed to stick together one on the other, since they cannot be separated.
The sheet is applied to the wall in the right place, after which it is no longer possible to correct its position. The work is carried out quickly, since without a backing the sticky layer dries almost immediately. The surface of the sheets is smoothed with a wallpaper spatula to avoid bubbles.
Preparatory work: marking
Now you will need to measure the length and width of each individual fragment, and make markings on the wall using a pencil, ruler and level. Thus, you must mark all the places where you will need to glue the elements of the finishing material. The most important thing at this stage is to place the upper left or right corner with millimeter accuracy, as is more convenient for you. For this you can use a ruler, a plumb line, and a level. As a result, you should get an angle equal to 90⁰. And from it it will be possible to draw straight lines on the sides.
You can purchase beautiful and high-quality photo wallpapers, posters, and modular paintings at a discount in our online store.
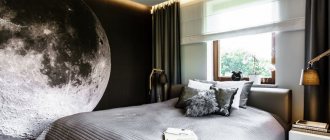
Ceiling sticker
The ceiling surface must be prepared, uneven surfaces removed, and plastered. Ceiling photo wallpapers are usually produced in the form of squares rather than stripes; gluing in a checkerboard pattern is more suitable for them.
- The sheets are laid out on the floor. To avoid confusion, they will be numbered.
- The white edges on the canvases are trimmed with a knife.
- Markings are made on the ceiling for each square of wallpaper.
- The ceiling is smeared with glue and the fragments are pressed against it one by one.
How to dilute the mixture correctly
Having decided which glue to glue the photo wallpaper on, it is important not only to mix it so that there are no lumps in the finished liquid, but also to strictly adhere to the recommendations specified by the manufacturer. Experts advise careful consideration when using a quick-setting composition; they are diluted in small quantities so that there is enough time to completely smooth out one of the elements before the solution hardens in the container.
Detailed instructions involve preparing a clean plastic bucket, into which water at room temperature is poured, after which the adhesive base is poured into the vessel, thoroughly mixing the contents. The solution is considered suitable for application to a plane when the master mixes it until it is homogeneous, without any lumps.
Door pasting
- The door is degreased, cleaned, handles and other protruding elements are removed from it.
- Self-adhesive wallpaper is more suitable for doors, but other photo wallpapers are also suitable.
- A sheet is cut from the wallpaper strips to the size of the door, taking into account the bend.
- If the stripes are narrow, several of them may be needed, then the door is first marked, and only then the gluing is done.
- Self-adhesives begin to stick from top to bottom.
- When attaching ordinary sheets, glue is applied to the door leaf, the sheet is pressed against it and carefully leveled.
- Excess pieces are removed with a stationery knife.
- After the glue has dried, the fittings are attached to the door, and then the door itself can be attached to the hinges.
Pasting and caring for photo canvas
If all the preparatory work has been successfully completed, you can begin gluing the wallpaper. The first thing you need to do is prepare glue.
Preparing glue for photo wallpaper
This must be done in strict accordance with the manufacturer's instructions and in an amount sufficient to paste a piece of wallpaper, which you can finish in one go.
Applying glue to the canvas
The thicker the wallpaper, the thicker the layer of glue should be applied to it before gluing. It is also worth taking care of the control lines - these are the same lines of joints of individual fragments of the image that you marked earlier using a pencil, tape measure, plumb line and ruler. They must be covered with a strip of glue 10-15 cm wide immediately before applying the composition to the canvas.
Pasting of photo wallpapers is carried out according to the following algorithm:
- The white fields that contain the image fragments are carefully cut off with a knife. Otherwise, you will have to adjust the joints blindly.
- The wallpaper is folded into a fan of 8-10 sheets and face down. At the top there should be a fragment that you will glue first and so on.
- Using a roller or brush, glue is applied to the canvas. Particular attention is paid to the edges.
- There is no need to wait until the glue on the photo wallpaper sets - you need to start gluing immediately after application. It is carried out exactly according to the markings.
- Gluing begins from the top of the fragment, and the canvas must be gradually, carefully and thoroughly smoothed from the center to the edges.
Smoothing photo wallpaper during the gluing process - Excess glue is blotted with a sponge or removed with a rag.
- The next fragment is included in the work and so on until the bitter end.
Roller for rolling wallpaper joints
When gluing photo wallpaper and while the glue is drying, a stable temperature and humidity regime must be maintained in the room.
After gluing photo wallpapers, they must be thoroughly wiped with a dry, clean cloth or sponge to remove any remaining glue and dust. To further protect the canvas from wear and tear, it can be varnished, but this can only be done if the front side of the canvas allows it.
If you did everything correctly, from choosing wallpaper to gluing it, you are simply bound to like the result. Well, then all that remains is to enjoy the view of the updated interior of your apartment.
What wallpaper according to characteristics
Installing photo wallpapers begins with their selection. Divided according to various indicators:
- material used in manufacturing;
- texture;
- how many layers;
- subject;
- visual part.
In addition to the main characteristic, self-adhesive and standard wallpapers are distinguished. For the first type, glue is not needed, since it is already applied to the surface.
Material
The following types are distinguished:
- Paper. They are inferior in quality to other types due to their low moisture resistance. They fade quickly and are difficult to glue.
- Non-woven. Considered the best in most respects. Easy to apply thanks to the non-woven backing. They tolerate washing with warm water, but there is a risk of mechanical abrasion.
- Textile. Tapestries are used as the basis. Some of the most expensive on the market. Made from linen, cotton and silk. Can be glued using simple glue.
- Vinyl. They are made of plastic, which is why they are quite dense and highly durable. For maximum impregnation, you need to fold the area in 3 layers and let the glue dry for 5-10 minutes.
Texture
The image on the wallpaper directly depends on the texture of the material. Thanks to the manufacturing method, they do not lose their properties after wet cleaning. The following relief designs are distinguished:
Plastering. Externally they resemble plaster. They are made on a vinyl or non-woven base. With a highly pronounced relief, it can push the imperfections of the walls into the background. They look like frescoes or oil paintings.
Sandy. Using this textured look will make the wall look like a sand painting. They have a matte surface and are able to mask the roughness of the wall. To avoid the accumulation of dirt, you need to do wet cleaning once a week.
Canvas. Looks like a real painting
The surface is never smooth, as it cannot hide all imperfections, so before pasting you should pay attention to the unevenness of the wall.
Painting. Up to 3 millimeters deep
The base is vinyl. Creates the effect of wall painting.
What are photo wallpapers and how to hang them
At its core, photo wallpaper is a huge photo, printed on separate sheets, which, to be “assembled,” must be glued to the wall, like a puzzle. The specifics of gluing such a set differ from conventional wallpaper in a number of specific requirements:
- Almost always, thin paper is used in photo wallpaper, which is why all surface imperfections appear clearly on the outside;
- Each fragment of the image needs to be joined as accurately as possible with the edges of neighboring sheets; it depends on how developed your eye and joining skills are, whether you can glue the whole picture without losing proportions, tilts or the appearance of a grid of light joints;
- It is very difficult to peel off, correct the position and re-glue individual fragments on the wall due to the fact that photo wallpaper paper very quickly absorbs the glue and loses its strength.
In addition, there are so-called designer photo wallpapers. Most often, the image on such wallpaper is made to order, printed on special equipment, which allows you to reduce the number of fragments and adjust the overall size of the picture strictly to the size of your wall on which the masterpiece will be glued. They cost an order of magnitude more than conventional materials, and are easier to glue.
Useful tips
How to properly glue photo wallpaper? If the photo wallpaper is already smeared with glue, then under no circumstances should it be folded in half. Because of this, they are sure to leave a permanent mark on them. It is also impossible to keep them smeared for a long time; it is better to apply glue to each strip separately only after gluing the previous one. If you followed our recommendations, then the work done should show a positive result.
There are also self-adhesive photo wallpapers. At first glance, of course, the process of gluing them is much simpler and faster. You just need to peel off the protective tape and apply the material to the desired location. But in reality, everything is not so simple, and those who have already dealt with self-adhesive understand this.
Self-adhesive photo wallpaper cannot be adjusted to its level if it has already been glued to the wall even slightly. With regular photo wallpaper you still have some time to do this. Also, when gluing self-adhesive wallpaper, it becomes impossible to remove trapped air from under it. The resulting bubbles will remain there forever. Therefore, without having certain skills in working with self-adhesive, you can only waste money and at the same time ruin the appearance of the room.
Working with non-woven base
Let's figure out how to glue non-woven photo wallpaper, since this coating option is the most practical and convenient for gluing it yourself.
In this case, there is no need to lubricate the blades with glue, so the speed of work increases.
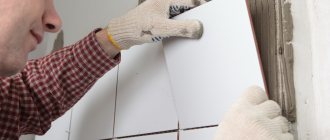
Place the items on the floor. Using a wide brush, generously coat an area of the wall slightly larger than the area of the piece. Press the dry canvas against the wall, leveling it along the pre-marked right angle. Using a rubber roller, stretch from top to bottom, and then fan-shaped from the middle to the edges. After the roller, the element is glued, gently blot the edges with a clean rag, pressing them against the wall
Do not rub so as not to spoil the drawing. Non-woven fabric is quite plastic, so if necessary, you can pull the fabric if any unevenness or wrinkles suddenly appear on the surface. Glue the next sector in the same way, paying special attention to the joints. The edges should not overlap one another, but there cannot be gaps between them. Remove excess glue as you go.
At the end, all joints are rolled with a roller. When finished, avoid sudden changes in humidity and temperature to prevent the segments from peeling off.