Nowadays, not only ultra-modern designs are in trend, but also old or artificially aged furniture. Sometimes in some interiors objects that have scratches, peeling paint, faded color, or frayed edges .
Moreover, the sets or cabinets themselves may be completely new - they are simply made in this particular style. And a special technology helps to make them so – patination. What is patina on furniture? We'll figure it out by reading this material.
What is patina on furniture
You can create amazing beauty with your own hands
Popularity of aged furniture
Whatever one may say, everything new is well forgotten old. From time to time, things that look similar to those once used by our great-grandmothers come back into fashion. Moreover, despite the apparent antiquity, they look very stylish and organic. This also applies to furniture, and not just clothes or souvenirs, equipment or a number of other items. Moreover, it is not necessary to use exactly old things - in some cases they can be completely new, just artificially aged.
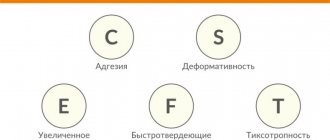
Patina and its types
Stain is often used to restore furniture
The effect of artificial aging can be achieved using a number of simple techniques. For this purpose, various chemicals, as well as mechanical or thermal methods can be used. Artificial aging is a technology of antique imitation . Moreover, it is possible to decorate not only furniture in this way, but also doors or windows, etc. Nowadays, aged furniture is considered quite prestigious and beautiful, it seems very reliable and often, contrary to the opinion that a person simply does not have the money to buy a new one, can be considered luxury item.
Classic white kitchen with gilding
Table. Methods for aging furniture.
| Methodology | Description |
| Chemical | This is the best way to age wooden furniture. Moreover, this is the easiest option that can be implemented at home. As a rule, it is simply enough to treat the furniture with some kind of chemical (for example, ammonia, if we are talking about hardwood) and that’s it. With coniferous facades you will have to tinker a little. However, the chemical method in any case involves the use of various chemical compounds, including paint. This technique also includes the so-called patination. |
| Mechanical | This option is suitable if you want to realize the effect that insects create during their life. That is, furniture treated in this way will appear to be eaten away by them. To do this, you will need to use an awl and nails, and use them to make small paths or depressions. The main thing is not to forget to clean the damaged surface from the resulting debris and cover it with a protective agent. |
| Thermal | This option is also quite simple and consists in burning out a number of elements using the same soldering iron or special devices. Its natural pattern will appear on the tree. It is enough to remove the accumulated carbon deposits with a brush and cover the surface with stain, and the furniture will turn into a real rarity. |
An impressive duet of craquelure and patina
Dear "Mr. Chest of Drawers"
On a note! The easiest way to artificially age objects made of wood is when it comes to doing it yourself.
Classic aging with acrylic paints
What is patina?
What is patination and what does the word “patina” mean? Previously, patina was the name given to an oxide film that forms on metal products and has a certain color. So, she tints copper with a malachite or bluish tint. Brass and bronze also boast the ability to develop a patina. More often, only antiquarians and collectors knew this word; it was rarely used in ordinary speech.
Patinated furniture in the interior
Patina is a little bit of a fairy tale in the house...
On a note! Interestingly, the presence of patina was not considered some kind of defect or something bad. On the contrary, its appearance is a sign of the quality of the product, which could last for many years and not collapse.
Aged items go very well with deliberately raw walls
Over time, the concept of “patina” has become more extensive - this is the name given to any plaque that appears during the aging process of a wooden or metal product. At the moment, the effect of artificial aging is also called patina, and the process of giving furniture an antique look is called patination.
Today patina is the effect of artificial aging
So we can distinguish three types of patina:
- natural or natural , which appears on its own after some time on metal products. The reason is the contact of the object with air, only the oxidation process occurs;
- artificial , which is also formed due to an oxidation reaction, but appears due to the effect of special substances on objects;
- decorative , which allows you to very quickly age an object and give it a special charm. It is this option that will be discussed in this material.
Metal old objects are a frequent design nuance in styles with patina
Country charm
Metal paints with patina effect
- home
- Articles
- Cold galvanizing
Metal paints with patina effect
– these are special means for patination (artificial aging) of metal. In the natural environment, all metals except gold and platinum become coated with an oxide film over time due to interaction with moisture and air. This effect is most noticeable on products made of copper and bronze, which become covered with a greenish coating. Such a film can preserve the metal or, conversely, destroy it.
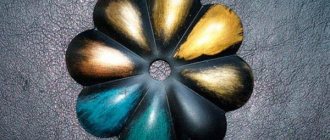
The fashion for vintage items has caused a rush of demand for artificial patination technologies. This process allows you to simulate oxide deposits on the surface, while maintaining all the properties of the metal. Together with zinc primers, patina enamels create an additional protective barrier against corrosion. Prevents oxidative processes on metal. And they create a patina effect - an imitation of aging of the entire product or its elements. You can choose a color for a specific type of metal (copper, silver, gold) or use shades of graphite, lapis lazuli and emerald green.
Ways to create a patina on metal
To patina metals, powder dyes, oxidizers, oil-based products, bluing (blackening) and paints with a patina effect are used.
- Powder patina.
Before the advent of this product, silver paint with coloring pigments was used. However, before applying a powder patina, the metal must first be primed and painted. The procedure is simple and does not require special skills. But in this case, the patina is only the final outer layer. - Acidic compounds.
For patination of metal, various mixtures with acids and oxidizing agents are produced. Essentially, they trigger the process of natural oxidation of the metal. This technology is acceptable for small interior products that are not affected by moisture. Oxidizing agents should not be used for external structures. - Oil and wax products.
Oil-based patina is a paste-like product that is applied to various surfaces. It can be bitumen or oil art paint. Its properties are similar to wax patina. The thick, non-flowing composition is suitable for vertical surfaces, but it dries very slowly. - Blueing.
This is a separate technology for blackening metal, mainly steel and cast iron. Burnishing can be done in different ways: alkaline, acid, thermal. The alkaline method is often used for iron. In thermal heating, steel is heated in the open air until it darkens. Other metals are rubbed with oil and heated to form a film. - Paints with patina effect.
These are ready-made decorative compositions that create an imitation of natural patina on the surface. Using ready-made paints is convenient and cost-effective. They can be applied at home. To protect against corrosion, it is recommended to use enamels together with zinc-rich primers.
Where are patina effect paints used?
- Manufacturing of forged and antique designer products.
- Decorative design of interior and exterior items.
- Restoration of antiques and museum relics.
- Painting of garden furniture, gazebos, canopies, stairs.
Heat-resistant modifications of enamels with a patina effect are also produced. This expands the scope of their application and allows the processing of products heated to high temperatures or in contact with fire. These compounds can be used to paint barbecues, stoves and fireplace grates, as well as to weld and cut painted metal structures.
The nuances of artificial patination
Before patination of metal, you need to carefully select the method and composition. If you make the wrong choice, the effect may be far from expected. It is better to apply the product to a small area or to the same metal to evaluate the result. If you lack the skills, it is most convenient to use paints with a patina effect - for example, Zinkor-Top Patina. This is decorative enamel, completely ready for use. Thanks to the variety of colors, it is easy to match it to a specific metal. After drying, the color fades a little.
It is also necessary to maintain a balance so that patination does not deteriorate the appearance of the product. This will also affect its artistic value, which is important for collectible or rare pieces. When processing wrought-iron stairs and railings, it is better to apply paint only to shaped details: curls, flowers, vines. This gives them a more naturally aged appearance. It is also important to follow the principle of contrast: dark metal is covered with a lighter patina, and light metal is covered with a dark patina or blackening (blueing).
Brief application instructions
Regardless of the chosen composition, the metal surface must be cleaned of old coatings, loose rust and dirt, then dust-free and degreased. If these are ready-made paints with a patina effect, then they can be immediately applied to the prepared surface. When using forged furniture or steel structures outdoors, it is better to pre-treat them with zinc-filled compounds. Such primers will create a protective anti-corrosion layer and an even coating for painting.
The use of paints and varnishes with acids and bluing technology require special care! Personal protective equipment must be used. Ready-made enamels with a patina effect are easier to apply. It is enough to protect your face and hands from paint and ensure good ventilation when working indoors. Do not paint near a fire source or at extremely low temperatures.
Do you need advice and help in choosing the right composition?
Call us at: +7, 8 (800) 555-34-18
You can leave a request in writing by e-mail:
[email protected]
We work for
Call right now, we guarantee the quality of our products and affordable prices!
To the list of articlesNext >
Patination
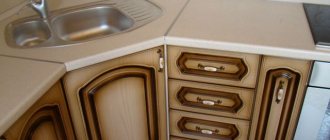
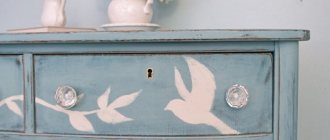
Nowadays, patination is actively used in the production and restoration of furniture, and both natural wood and the more common MDF panels can be aged. Furniture with a patina can look very rich without actually being expensive. Looking at such interior items, many people think that they see in front of them an ancient set that served some noble family for many years. But in fact, these cabinets were made at the factory just yesterday.
Furniture with patina can look very rich
On a note! It is easy to distinguish artificially aged furniture from furniture that has aged on its own. Just look at the inside of the headset. For artificially aged items, patination is performed only on the outside.
Creamy caramel color scheme with bright splashes
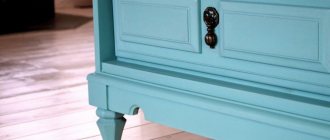
The option with patinated furniture is suitable for those who really love antiquity, but cannot afford to spend fabulous money on good and high-quality antique furniture. Most often, the patina option is used to decorate rooms in the Provence style.
The mirror takes center stage here, but check out the stunning triple table
By the way, some owners of new furniture can age the interior items themselves by patination themselves at home. This technology is not complicated, but it is labor-intensive, but if you want, you can do everything yourself.
Scandinavian style patina
Patination technology involves applying acrylic or other paint to the furniture façade and then grouting it. After that, it is enough to coat the furniture with a special composition (varnish) so that it acquires a matte shine and remains protected from external influences.
Looking at this authentic bureau, it is unclear whether it has aged naturally or artificially
On a note! The patination technique is often used to decorate chests of drawers, armrests of upholstered furniture, cabinet doors, kitchen units, and stools. In short, everything where there are wooden elements.
Boudoir bathroom in a country house
General recommendations are as follows:
Before use, the container with patina must be thoroughly mixed.
Add 1 to 5, or 1 to 10 acetone or isopropyl alcohol to it. It is advisable to use a mixture of alcohol and acetone in a ratio of 1 to 1. (The higher the alcohol content, the easier the patina will be removed; accordingly, the more acetone, the more adhesion the patina will have)
The patina must be stirred as often as possible, since the metal fractions very quickly settle to the bottom.
Therefore, it is not advisable to pour a large amount of patina into the spray gun tank.
Spray guns can be used as spray guns with a nozzle from 0.8 to 1.2, or regular ones, with a maximum nozzle of 1.5. The pressure of the spray gun is 3 or 4 atmospheres.
You can erase gold patina or silver patina after 5-10 minutes.
When erasing patina, it is recommended to constantly blow the product with a blow gun to prevent it from rubbing in.
Consumption of gold patina (silver patina) depends on the desired effect, and usually ranges from 10 to 40 g/kW m
The patinated surface should be “fixed” with a clear varnish. As a rule, non-yellowing acrylic varnish is used for these purposes.
Types of patina
An artificially created patina appears many times faster than a natural one. This is all explained by the rapid occurrence of chemical reactions that result from the action of certain chemicals on the surface of an object. In this way, you can imitate various shades - from golden to black, and sometimes you even manage to create a unique unnatural color combination.
Patination of furniture
Now there are 4 main types of patina. Let's take a closer look at them.
Table. Types of patina.
| View | Description |
| Liquid | This patina can be achieved using a special varnish called “patina”. It gives the product a yellowish tint. As a rule, it is used by artists who want to give their canvas a little aged look. When working with wood, this varnish is used at the completion stage. |
| Thick | The compositions that are used in this case have the consistency of a paste, usually two-component. Often sold as a set with a finishing patina and base. You can achieve the effects of gilding, rust, etc. A very common look. |
| Water based | This is something akin to paint, which is applied in various ways to the surface of the product. Suitable for many materials, including wood and metal, also used for aging ceramics. The work must be completed before the patina dries. As a rule, only 4 color options are produced - black, white, rust and green. |
| Faceted varnish | When dried, this substance can crack beautifully, creating a craquelure effect. The more layers of varnish applied to a product, the more cracks will form on it. The color range of the varnish is very rich. |
Artificially aged furniture in Provence style
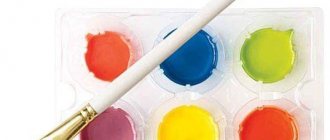
What is needed for patination?
Having mastered the patination technique, you can, within a few hours, beautifully and harmoniously age furniture. Moreover, it will look really advantageous if the interior style suits it. Usually paints are used at home, but you will also need brushes, primer, varnish, sandpaper or a special sponge for sanding. As a rule, everything you need can be bought in office departments and partly in hardware stores.
Bed for a titled person
It is best to take two types of paints, for the bottom layer and for the top. The bottom layer can be anything, but the top layer is better made to look like metal (ideal options are gold or bronze).
Advice! Before starting to patina furniture, it is recommended to practice on some unnecessary piece of furniture. Even though the technology is simple, you still need to have some skills to make sure everything works out as it should. For example, you can try to patent a wooden box or an ordinary board.
First, it’s better to practice on some unnecessary objects
It is important to understand that you should not apply too much paint, otherwise you can ruin the texture of the wood and it will simply appear dirty. The coloring composition should be applied to flat surfaces that do not have any special protrusions. Also, you should not apply it where there is constant contact with surfaces (for example, on furniture handles) - the paint will not stick anyway.
DIY wooden chest
In our new article, we look at the best options for making chests with your own hands. Ideas, step-by-step instructions and tips can all be found in this article!
How to quickly make a patina on furniture: step-by-step instructions
Finishing furniture elements with light surfaces with gold leaf will be a worthy decoration, but the main thing is not to overdo it in the amount of gold decor.
Gold leaf goes well with the dark surface of furniture, for example, when it acts as noble abrasions.
The following step-by-step instructions with photographs will tell you how to make a patina on furniture quickly and easily:
- On the face-covered surface of the ends of the stool, as described above, apply a gold leaf with lining paper, previously cut into small longitudinal pieces.
- After waiting for the glued gold leaf to dry completely (the drying time is recommended by the glue manufacturer), walk over the surface with medium or fine-grained sandpaper.
- Rub the surface across the grain or in a circular motion until you achieve the desired abraded effect.
- The end parts are subject to abrasion when using the stool, so be sure to cover them with a protective layer of gold leaf varnish.
How does patination occur?
Let's see how to patent an ordinary furniture box with your own hands, creating a scuffed effect on it.
Step 1. First of all, the box needs to be sanded using sandpaper. This procedure will get rid of unevenness and roughness. After the box has been sanded, dust should be wiped off with a cloth.
First, the box is sanded with sandpaper.
Step 2. Next, the places that should ultimately appear shabby should be treated with regular candle wax. These can be the sides of the box, as well as some places on its flat surface. The pre-treated surface can also be coated with wood primer. If primer is used, it should be applied in a thin layer.
The necessary areas are treated with candle wax
Step 3. Then the box needs to be coated with paint of the main color. In this case, white acrylic paint is used. It must be applied carefully with a brush to the entire surface of the box. This paint dries quickly, and you must wait for it to dry before carrying out further work.
Application of white acrylic paint
Step 4. Next, the box needs to be sanded again. The procedure will allow you to get rid of some of the paint, so you need to sand the surface in those places where the paint needs to be removed. It can be easily removed in areas that have been waxed. You need to work along the grain of the wood.
Re-sanding
Only those areas where paint needs to be removed are sanded.
Important! There is no need to use paper that is too rough. Otherwise, there is a risk of damaging the surface of the box.
Step 5. Next, the furniture needs to be given a dirty effect. It is created in the area of the corners of the drawer. And for this purpose a composition will be used, which is called patina. In this case, it is better to take a water-based one. A small amount should be applied to a palette or any plastic surface that you don’t mind getting dirty.
A small amount of patina is taken
Step 6. The best way to apply the patina is with a piece of sponge. It is necessary to lightly moisten the sponge with the patination compound and apply this composition to the surface of the furniture with gentle, gentle movements.
The sponge is moistened with a patination compound
Patina is carefully applied
Step 7. Next, after all the compounds have dried, you need to coat the surface of the box with varnish, preferably not glossy, but matte. The work is completed. All that remains is to dry the surface of the box, screw the fittings to it and you can use it.
Applying varnish
This is what the finished aged box will look like
By the way, patina can be applied in two layers. Then the colors will be more saturated. But you shouldn’t be overzealous, otherwise the furniture will look unnatural.
Video - Patination of furniture facade
Antique chest of drawers
An antique chest of drawers like this will refresh the room and bring into it a slight reminder of what once was. It’s not difficult to make it from a piece of furniture you’ve just purchased in a store or a really old one, adding antique handles, a little imagination and creativity. And after that, no one will distinguish this “antiquity” from the real inheritance of your great-grandmother.
You don't have to be a master to do this type of patination. The technology is very simple. Read the job description and you will understand everything.
Prepare everything you need to age your chest of drawers
- Wooden chest of drawers,
- dye,
- stain,
- paraffin candle,
- matte acrylic varnish,
- brushes,
- emery cloth,
- old rags.
Step-by-step instruction
- Remove handles from dresser doors and drawers.
- Sand the outer wooden surfaces with emery cloth and remove any remaining varnish.
- Remove dust from the dresser.
- Cover the surfaces to be decorated with a protective agent (primer). Leave for 8-10 hours to dry.
- Use a paraffin candle to rub the most protruding areas of the chest of drawers.
- Using rough strokes, apply a thick layer of acrylic paint in the color you want to the chest of drawers. To paint the front of the drawers, remove them. Leave the product for 12-24 hours to allow the paint to dry completely.
- Using the sandpaper, rub the paint very lightly in the areas where the paraffin was applied. After some areas have been erased, go over the surface with a dry cloth.
- After removing the excess paint, remove dust and dirt from the surface of the dresser.
- Cover the product with a thin layer of matte acrylic varnish. Leave to dry for 4-6 hours.