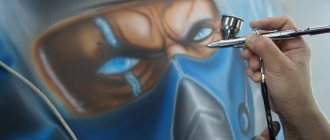
Hello, dear readers! Are you tired of monochromatic manicure? Do you want your nails to look like a work of art? An innovative device - an airbrush - will help you with this.
From this article you will learn what this device is, how to use an airbrush for nails, and what various decorative options you can create with it. We will also focus on materials for airbrushing and look step by step at creating one of the design options.
Advantages of airbrushing
The art of airbrushing is more than a century old, but it began to be used for applying designs to the surface of nails relatively recently. This technique is becoming increasingly popular because it has a number of undoubted advantages:
- Airbrush gives the artist more freedom in creativity - it can be used to create three-dimensional images, which is impossible with conventional painting.
- It significantly speeds up the drawing process.
- Paints dry quickly, so even painting complex images will not take much time.
- It is inexpensive - the necessary paints are cheaper than most analogues, and the necessary equipment, if used correctly, will last a long time and will pay for itself many times over.
- With the help of an airbrush, it is much easier for beginners to create many of the most popular designs, for example, French, gradient, ombre, openwork patterns.
Let's sum it up
Working with the artistic design of a car is quite difficult; there are many specific aspects. Airbrushing done professionally gives wonderful results. But to achieve such an effect you will have to work hard. If you do not have an artistic sense and taste, this does not mean that you cannot make beautiful airbrush elements for cars. It is enough to learn how to do it correctly and without any errors in the technical sense.
Proper preparation for this action is important. If you have a bad tool and a low-quality compressor, it will be very difficult to get good results. It is also impossible to create a high-quality design on the car body if you use cheap and unsuitable paints for this process. Watch the video, try to do everything yourself, and also get trained by an experienced master. This will help you understand how interesting this area is for you.
People always strive to make the surrounding space beautiful and individual, so they paint facades and fences with drawings, and paint decorative items in unusual colors. To paint small areas, you can take a paint can or brush, but painting large surfaces with such methods will take too long. When decorating facades or fences, it is convenient to paint with an airbrush, which allows you to quickly create real masterpieces on the walls.
What is an airbrush for nails
This is a tool with which paint is applied to the nail surface without contact - it is sprayed under compressed air pressure.
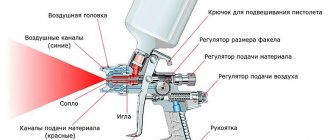
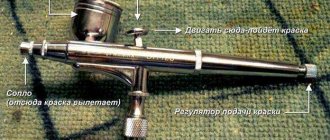
The airbrush (more precisely, the airbrush kit) consists of three main modules:
- The airbrush itself is a tool that is a cross between a pistol and a fountain pen. A compact paint tank is attached to it on top or on the side.
- A compressor unit that supplies compressed air (the tool can be sold without a compressor, in which case the latter will have to be purchased separately);
- Hose for connecting the compressor to the sprayer.
The nail airbrush is sold unassembled, but it is not difficult to assemble, and instructions are included with each one. The assembly procedure is simple: you just need to connect the spray gun to the compressor using a hose and replace the paint tank (if it is detached).
There are two main types of airbrushes: simple or single action and the most “advanced” and more often used - double action.
Single action
In such an airbrush, the “trigger” only turns on the paint supply, but does not affect the air pressure. It is adjusted elsewhere, usually with a screw. If you use this type of sprayer, then when replacing paint you need to completely unscrew and then tighten the screw again.
With proper adjustment, it is not difficult to achieve the optimal dye to air ratio. As a result, immediately after applying the design, the coating becomes dry. This airbrush is ideal in cases where the design is drawn using stencils or a smooth transition of colors (gradient) is made.
Double action
In airbrushes of this type, working with the trigger (lever) is a little more difficult - it has two functions.
First, you pull the trigger and air begins to flow into the nozzle. In the second movement, you do not press, but pull the trigger back, as a result, paint begins to flow into the sprayer. The further you pull the lever, the larger quantities it flows. In order to change the paint, you need to pull the trigger all the way and the unnecessary residue will pour out.
Such airbrushes are used more often and not only in beauty salons. True, without sufficient experience, working with them is not so easy. But the result will certainly be worth the time spent on training and training. Once you get the hang of it, you will get clear images with precise rendering of all the details.
Typically, the device comes with cleaning brushes and pipettes. More expensive kits add solvents and device care products.
The price range for airbrushes is very wide. So, there are devices whose cost starts from 600 rubles. (they come without a compressor), and there are those that cost about $500. Inexpensive tools nowadays are often ordered from Aliexpress (they are ideal for beginner craftswomen), while professional ones are usually purchased for beauty salons.
Washes, special effects, decals and other modeling tricks
You can show additional volume with the help of correct toning of the model, i.e. emphasizing the relief and texture of the surface by darkening the recesses and highlighting the upper parts with highlights. Removers are thinly diluted paints with a reduced pigment content that flow into recesses and cracks. When the wash dries, remove the excess with a cotton pad. It is important to pay attention to the chemical composition of the remover, which may contain solvents and affect the acrylic painted surface layer.
The “dry brush” method is where a light pigment or slow-drying paint is rubbed into the base coat in the lightest areas. The brush should have a minimum coloring effect, so it should be wiped dry initially.
Decals are a technique for applying decals, most often used to transfer symbols or attributes of various branches of the military in modeling. The decal may appear whitened due to the fact that residual air bubbles accumulate between the decal and the model. Most often this occurs when the model is coated with matte varnish. Therefore, there is a reason to coat the areas reserved for decals separately with a glossy varnish. General leveling can be done by painting the surface with a final layer of matte varnish.
Suitable paints
In order to use a spray gun, you need to purchase special paints.
Regular varnish (even diluted) is not suitable for working with an airbrush. You should also not use acrylic masses that are stored in tubes.
The device only works with water-based compositions. They already contain acrylic, diluted to the required consistency. Airbrush paints look something like cream. They should not be too thick, or, conversely, too liquid.
To work with an airbrush, two types of paints are used:
Water based
They have a high water content, and acrylic is added to them as a pigment.
They are usually matte, less often - mother-of-pearl or metallic. Easily dissolves in water. Have two advantages:
- spray well;
- They do not dry immediately, so they can be easily wiped off from the skin around the nail.
These paints are good for beginners. The result with them is worse than with acrylic analogues, so professional craftsmen rarely use them.
Acrylic based
They also contain water, but the concentration of acrylic dyes in them is much higher. They do not dissolve in water (and are not washed off after drying), so the color scheme of the design is always brighter and more saturated than when using water-based paints.
Acrylic-based paints are sold for every taste and color: powdery, nude, shiny, matte, translucent, fluorescent, chameleon, neon, metallic, pearlescent, etc.
The many benefits of acrylic paints can only be fully exploited if you are skilled enough to prevent the mixture from hardening in the spray gun.
The disadvantage is that they are not so easy to remove from the skin on your fingers or clothing.
Tip: There is no need to mix water-based and acrylic paints - they have a heterogeneous composition, different densities and therefore usually do not combine with each other.
How to choose
To choose the right airbrush, consider the following parameters:
- An airbrush powered by a compressor requires an external power source. Equipment powered by cylinders can be equipped with units for regulating pressure and air supply.
- The air hose must be rubber, plastic braided, and of sufficient length.
- Chinese airbrushes are often equipped with a pressure reducer. This will limit the maximum pressure on the device and ensure dynamic air flow.
- Quality of seals. We choose plastic seals for working with acrylic paints (Japanese production).
When choosing a model, the following are taken into account:
- presence of a handle;
- size, weight of the device;
- container volume for dyes (at least 2 pieces from 2 ml);
- number of nozzles;
- the presence of a Teflon seal for the needle;
- number of regulators.
Iwata
Japanese Iwata airbrushes are made of stainless carbon steel, chrome-plated brass, resistant to corrosion, with a Teflon seal. Manual assembly, varieties, and checking the sprayer settings allow you to use the tool to create precise drawings in a wide variety of areas: body art, body airbrushing, textile painting, porcelain painting.
Fengda
Fengda airbrushes (manufactured in China) are chosen by experts in their field, and they are also preferred by those who have only recently begun to master the art of airbrushing. The devices are characterized by ease of use in service stations for body repairs, when painting facades, large areas, and minimal adjustment function.
The model range includes all design types. Not recommended for creating small drawings. The needle seal needs frequent repairs.
Jonnesway
The Jonnesway airbrush (Taiwan) is made of chrome-plated steel; the needles are made of titanium. The company has its own steel foundries and specializes in the production of repair kits and keys for cars of almost all models. The production of airbrushes is a related industry, so the choice of Jonnesway models that are in high demand is limited.
The advantages of Sata professional airbrush models include spray accuracy, material quality, and minimal weight.
Airbrush materials
In addition to the airbrush itself, you will need (or may need) the following materials and tools for work:
- airbrush paints;
- pipette for collecting dye;
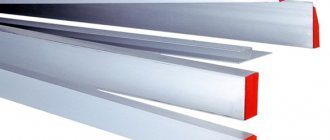
- stencils;
- stickers;
- rhinestones;
- tweezers;
- buff;
- acid-free primer;
- sticky layer remover;
- top;
- device cleaner;
- tips for training.
Additional recommendations
Knowing the basics of how the product works, the artist will be able to decorate any surface, and following step-by-step instructions on how to use an airbrush will make the work easier:
- Before purchasing, you need to determine which airbrush is best to choose according to the previously discussed criteria;
- When working, keep the device strictly perpendicular. This will ensure even paint spraying;
- The intensity of the color, the thickness of the paint and the result depend on the distance to the surface. It is permissible to change the distance, but only gradually;
- During the spraying process, smudges may appear. They are removed with sandpaper, after which modifications are made;
- To make the process more comfortable, it is recommended to prepare several jars at once. This will save time on changing the palette.
The intensity of the color, the thickness of the paint and the result depend on the distance to the surface.
Regular training and gaining experience are the main conditions for successful work. Drawing with an airbrush is quite difficult, but knowing the main rules and principles, the artist will be able to create amazing three-dimensional images.
Working with an airbrush
It should be noted right away that the art of airbrushing in general (and on nails in particular) cannot be mastered in a week or two. You can paint portraits with an airbrush, but people who have achieved such perfection in this technique have needed years of constant practice. You cannot create masterpieces without learning how to paint: first you need to master the technique of applying paint.
How to work correctly
In order to reach a professional level in airbrushing, you first need to work out the technique of producing an air-droplet mixture of the required concentration using a trigger.
It is necessary to ensure that the mixture always dries almost immediately after application. Achieving such a result is not so easy - you will have to practice a lot.
So, let's get acquainted with the basic rules and techniques:
- While working, hold the airbrush in a way that is comfortable for you. It is only important to maintain an inclination of approximately 45 degrees. The accuracy of the image on the nail plate depends on this.
- When working, the wrist should remain motionless. Spraying is carried out with brush movements - up and down. As a result, the coating will be more uniform.
- First press the trigger (lever) to introduce air, and then smoothly move it back so that paint begins to flow into the system. Once the mixture begins to spray, gently press the lever forward and the spraying will stop. Repeat the entire cycle several times until you feel that you can control the process with the trigger.
- To ensure that the paint and air are mixing correctly, first apply a sample to absorbent paper.
- The less you press the trigger of the device, the less intense the color.
- Move the tool smoothly - this way you will evenly spray the pigment over the nail.
- Always watch your hand and don't stop it. Otherwise, an unattractive stain will appear on the nail plate.
- If you want to get thinner lines, then keep the airbrush at a close distance from the nail; if you want to make more transparent and blurry outlines, then move it further away.
- Only slow down the spray gun if you want to achieve a more intense color.
Important! Do not forget to rinse the airbrush by passing the cleaner through it before filling the tank with paint.
How to clean
The sprayer will last a long time if you properly care for it.
Do not forget that it must be cleaned after each use. This is done using an alcohol solution or a special product:
- Use a paper towel to remove any remaining ink from the tank.
- Pour alcohol or a special cleaner into the hole.
- Turn on the airbrush and force the liquid through the needle.
Now you can refill the paint and get to work. The same is done when changing colors!
How to use
Setting up the device, preparing and selecting a surface are necessary steps to mastering the airbrush. 3-5 hours are enough to learn how to use the tool correctly. Preparation includes:
- Connecting the air supply hose to the compressor.
- Installing a paint tank.
- Blow out the nozzle with a stream of air.
When changing colors, you should always flush the nozzle with solvent to avoid uneven color in the design. It is best to practice on a sheet of cardboard or use a stencil for work.
Why does it spit paint?
Setting up an airbrush requires care and caution when fixing the nozzle. The kit includes a key for installing a threaded nozzle. The cone-shaped nozzle is installed by pressing the cap.
If the threaded nozzle with nozzle is installed offset, a distortion occurs in the air supply system. The pressure decreases, the device may not produce a uniform stream, but spit paint. Among the possible reasons for the supply disruption are:
- clogged nozzle;
- There are dense pieces in the dye, uneven consistency;
- lack, excess pressure;
- insufficient fixation of the needle, worn seal;
- incorrect consistency of dye.
The smaller the nozzle, the less thick the chosen paint should be. The thicker the dye is chosen, the more pressure the compressor must supply.
Settings
A properly configured tool will turn the painting or painting procedure into a pleasant hobby. Before starting work, the following settings are required:
- A stable supply of compressed air at the selected pressure is checked.
- Place a container with paint of the consistency that is suitable for the selected nozzle.
- Adjustment is made by moving the needle.
- If the airbrush does not produce a jet when you press the trigger, you should loosen the needle lock.
- If spraying starts at the slightest touch of the handle, move the needle forward using the adjusting screw.
How to paint
You can master the airbrush at a semi-professional level after several hours of training. How to use an airbrush for a beginner:
- You should not spray the composition on one point for more than a second: the paint may flow.
- After installing the dye tank, you should check the quality of the jet on the rough material (a piece of cardboard).
- Do not bring the nozzle close to the work surface. The minimum distance is 2 mm.
- The farther you hold the nozzle from the working surface, the wider the drawing point will be, and its contours will be blurred.
- To accurately draw an element, it is recommended to take the smallest diameter of the nozzle and hold the airbrush at the minimum allowable distance.
- The angle of inclination of the jet to the working surface should be as close as possible to 90°.
An airbrush is used for drawing, monochromatic painting, and can be used to create optical illusions on a completely flat surface. This is a convenient tool for repairing paintwork and creating airbrushing when decorating a body.
Anyone can learn this art, but you will have to work hard and make some efforts. A novice artist can easily ruin a car's body by using the wrong paints or the wrong application method. You can approach the car directly only after practicing certain skills in the training areas. This can be a simple sheet of metal, pre-painted metallic. But even before practice, it is important to take into account some theoretical aspects of this difficult art.
Expert advice
- If during spraying you do not see a stream of paint coming out of the airbrush nozzle, then everything is in order - the proportions of paint and air are correct! And if a stream is visible, the mixture is too wet.
- It is best to start by practicing on tips, a white sheet of paper - gradually working out the application technique, only then move directly to nail design.
- When painting, try to use the lightest colors first. This way you can add the next darker color faster with less cleaner.
- Before use, paint bottles must be shaken to avoid sediment. This especially applies to compositions such as “metallic”, “gold”, “silver”, etc.
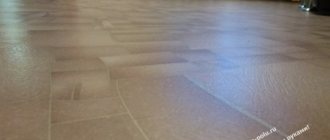
If one color smoothly transitions into another and there is no visible border between them (that is, you already have a gradient!),
then it’s time for you to move on to the next, more complex stage - creating drawings using overlays and stencils.
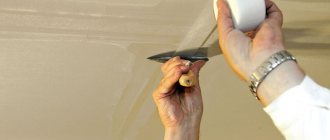
Preparing the model for painting
As with any work with plastic or metal, the surface must first be prepared before painting:
- matting - the formation of adhesion due to the application of fine sanding abrasives with a grain value of 1500 or 2000;
- degreasing - before applying the design, it is necessary to degrease the surface using a universal anti-silicone cleaner and a special degreasing cloth, because touching the surface with your hands or other ways of getting fat on it is possible;
- priming - applied after the surface acquires an even matte shade without unevenness, possibly even in several layers.
Airbrush with stencil step by step
To create a beautiful design on the nail plate, you need to follow the standard procedure: remove the previous coating, file your nails, and then apply polish (you can use regular polish, but professionals advise using gel polish).
For example, let’s look step by step at how to make a simple design with an airbrush using a stencil:
- After standard hygiene procedures on the nails, we apply a base of gel polish in two layers. If it is well pigmented, then one layer is enough.
- After drying, cover the nail with a glossy topcoat, dry it again and polish it with a buff or a soft file.
- Pour 2-3 drops of the desired coloring pigment into the airbrush tank and close it tightly.
- Choose the stencil you like and apply it to the nail plate. It is more convenient to do this with tweezers. There are a variety of stencils and you can use them even on one nail many times - it all depends on the design you come up with.
- First, we point the airbrush at a piece of paper or a glove. This is necessary to control the mixture. (To avoid making a blot, such checks must be done periodically until the entire manicure is completed.)
- After this, spray the paint over the nail plate with smooth movements, creating a light air gradient.
- After a few seconds, carefully remove the stencil with tweezers. If the stencil is applied more than once during the process (and this most often happens), do not forget to dry the nail with air before each fixation.
- Apply the top coat, dry it in a UV lamp and remove the sticky layer of the topcoat.
- After a manicure, do not forget to moisturize your skin with a special cream.
Ready!
Anyone can make this design at home. You just need to practice a little. For clarity, I suggest you watch a video in which an experienced nail artist shows how to do airbrushing using stencils:
Criterias of choice
The choice of tool depends on what types of airbrushing will be performed. Typically, inexpensive airbrushes with a thin nozzle and needle are used. Even beginners can work with such a device. But those who want to engage in airbrushing at a professional level should consider the following points when choosing:
- Volume of the dye tank. It is best if it is from 2 ml;
- Sealing the needle and nozzle - drawing will be more comfortable if the seals are made of Teflon;
- The nozzle diameter in high-quality airbrushes should be at least 2 mm;
- The device should be easy to replace the main components such as the reservoir, trigger and nozzle;
- Protection of seals from the effects of used reagents;
- Possibility of adjusting pressure and paint supply.
Purchasing a tool taking into account all the criteria will allow you to perform high-quality and beautiful painting of any surface.
Design options
Using an airbrush, you can create a unique nail design that will fit into any look. The following options are considered the most popular:
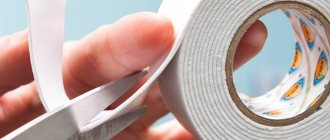
French manicure or Baby Boomer
- done using sticky strips and (or) a gradient, best done on medium or long nails.
Ombre
- looks ideal on short nails, goes well with rhinestones, bouillons and other decorative elements.
Lunar with gradient
- suitable for any length, creates a feminine look, combined with glitter and sequins.
With stencil
- the easiest to implement, saves time, creates a neat and attractive design.
Small thematic images
- usually painted on one or two nails, the drawing technique is simple, suitable for any holiday or celebration.
Geometry plus gradient
— suitable for any nail length, creating clear lines and shapes.
Any, even the simplest nail design can be made unique by creating additional details using acrylic powder, rubbing, beads, broths, etc. Don’t be afraid to experiment!
What to remember
Let's summarize:
- Airbrushing is a relatively new and very popular trend in nail design. It helps to create a perfect and original nail design in a short period of time.
- There are two types of airbrushes - single and double action. The first is ideal for beginners, the second is intended for more experienced craftswomen.
- The technique of applying a picture using an airbrush is quite complex and to achieve perfection in it, you need a lot of practice. Don't try to create a complex design with drawings right away - start with the very basics. First, master the basic technique and learn how to work with stencils.
- In order for the airbrush to last a long time, you need to choose high-quality paints and do not forget to clean the tool in a timely manner.
Did you enjoy working with the airbrush? How long did you have to train to learn how to use it? Share your experience with us in the comments!
Feed Types
Depending on the location of the paint container, the device has:
- siphon feed;
- hybrid;
- gravitational.
With the gravity feed type, the tank is installed at the bottom of the device. Under the influence of air movement through a working airbrush, a pressure difference is created in the body and the installed tank, which lifts the paint.
With a siphon installation, the paint container is located at the top of the device. The working medium enters the housing under the influence of gravity, and after mixing with air, a uniform stream emerges from the nozzle.
When using a siphon feed, it is better for novice craftsmen to use an air bulb instead of a compressor: this will allow them to master the control principle in a short time.
Artists who prefer to create paintings over a large area in the art style choose siphon structures. Body airbrush masters prefer gravity feed of paint to a nozzle with a diameter of no more than 0.2 mm.
You can paint with an airbrush with a hybrid feed using dyes of maximum density. The difference in methods is based on the use of excess (extra) pressure. With this design, the paint tank can be installed vertically (on top or bottom of the device), at an angle or horizontally.