Sooner or later everything falls into disrepair. This applies not only to things, but also to plumbing equipment. The bathtub, which just recently shone with whiteness, after some time will inevitably turn yellow, lose its gloss and become covered with a network of cracks.
Agree, a complete replacement of plumbing fixtures is a costly and troublesome undertaking. If the integrity of the bowl is preserved, you can extend its service life by repainting the surface of the bathtub. This service can be ordered from a specialized company or you can do the work yourself. The main thing is to choose a high-quality composition.
Before choosing enamel for bathtub restoration, you need to find out more information about the products available in plumbing stores. We have described in detail the pros and cons, as well as the specifics of applying different compositions.
To make it easier for you to make a choice, we suggest that you familiarize yourself with a review of popular enamels that have received a lot of positive feedback from consumers. Among them are products of domestic and foreign companies.
Description
The putty bath, with a length of 355 mm, is suitable for the use of spatulas up to 350 mm long. Thanks to its large volume (2 liters), there is no need to bend over to the main container with the applied material every time you need to put another portion of the mixture on the spatula when puttingtying walls, ceilings, as well as when installing plaster beacons. As a result, energy and time are saved and productivity increases. Despite its volume, the bath lies comfortably in the hand, which allows you to work with it for a long time without overworking your hands. Our putty baths are made entirely of AISI430 stainless steel and are guaranteed not to leave rust marks on your snow-white plaster.
Material: stainless steel
Dimensions : 355x100x68 mm
Contents: 1 piece.
Results
Based on the materials presented above for the restoration of equipment, everyone will independently decide which paint is best to paint the plumbing in their case. If your plumbing product has become unusable only because the enamel on the inner surface has peeled off, it is worth determining what you can use to paint the bathtub. Restoration will cost much less than purchasing a new plumbing fixture. After all, then you will have the need to dismantle the old equipment and carry out a complete renovation of the bathroom, and this is a very serious expense item.
Based on their material capabilities and preferences, any person who wants to update their plumbing will easily determine what is best to paint the bathtub with. If you want the coating of the product to last for a long time, then two-component bathroom paint is suitable for you, because its durability exceeds many similar paints and varnishes. If you are more interested in the question: is it possible to paint a bathroom without special equipment and in a short time, purchase aerosol enamel; it does not need to be diluted with a hardener or solvent, moreover, it dries quickly and is easy to apply.
In any case, before throwing away your old plumbing fixtures, think carefully about whether they can be restored. This procedure will not take you much time and effort, and most importantly, it will not ruin you financially.
Buy profitably
You can save on your purchase if:
Pay for the products by credit card directly on our website (in this case, the goods are cheaper than payment upon receipt).
By purchasing a set of two or more tools that can fit in one package (you save on shipping and get an additional discount). For residents of Belarus, you can buy any of our products in installments of up to 6 months (installment cards are valid). Considering all of the above, you save your precious time on searching and delivering a highly targeted tool. After all, time is not money - time is our life!
You can significantly speed up the repair or construction process:
Using our tools and performing finishing work yourself, you will complete the work not only efficiently, but also faster than craftsmen working manually. And at the same time you will save obscene amounts of money!
What would you choose for the same money, Porsche Cayenne or Nissan Almera?
This is a perfect comparison between our hopper buckets and buckets from other manufacturers. Proven in a crash test (see video below).
Our hopper buckets are professional tools made from durable and modern materials that do not corrode.
We do not skimp on quality, and do not put limited resources into our products, and that is why we compare our hopper buckets with the Porsche brand. They are very comfortable, durable, reliable and multifunctional. With proper use and timely maintenance, they will serve you trouble-free for many years.
At the same time, the prices for our hoppers practically do not differ from narrowly targeted and lower-quality analogues. Now knowing all this, what will you choose?
Tools
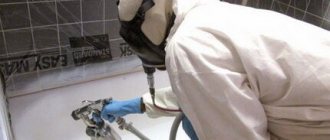
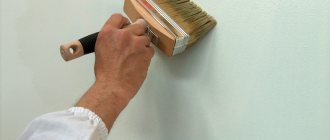
All necessary work will require a minimum number of tools. Before the work process, you need to protect your skin. Enamel is toxic, you need to wear a respirator and gloves, an apron will also come in handy, enamel can cause dermatitis.
- Of the necessary tools, a brush up to seventy millimeters is a must.
- It should be natural; buy 2 brushes if one of them is not in very good condition.
- You will need a Durex wheel for grinding and a grinding attachment.
- A special knife will come in handy to remove excess particles from the brush.
Additional materials can be acetone.
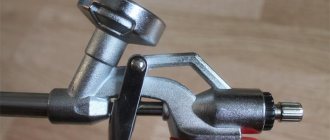
Compressor selection
Choosing a compressor for a hopper bucket.
You can skip this short introduction, but for a better understanding of the principle of choosing a compressor, we recommend reading it.
The fast and high-quality operation of a hopper bucket is influenced by many factors, but the key ones are three: the technical capabilities and quality of the hopper itself, the correct choice of compressor and the correct method of connecting to it, based on the task at hand.
Before you start choosing a compressor, it’s worth remembering the old joke: “... we’ll do the job quickly, efficiently, not expensively - remove one extra word!”
We often observe when people using a 50-liter compressor with low productivity, and also having it connected incorrectly, complain that the hopper bucket works slowly and that labor productivity does not increase. But we, as a manufacturer, declare that using our hopper the work will go much faster, while we assure that our hopper can work with a 24-liter compressor and 206 l/min at the inlet. How so? Below we will tell you how to choose the right compressor based on your tasks and will start with the option of using a low-power compressor.
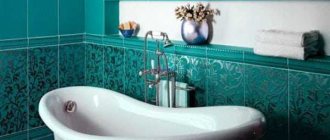
Restoring a bathtub
It is quite possible to restore an old bathtub at home. For example, they replace the bathtub cover, install a liner, or use enamel filling.
Use epoxy enamel or acrylic. Whether the bathtub is painted with simple ordinary enamel, this cannot be done, because such paints are not resistant to temperature changes.
An acrylic bathtub liner will allow you to restore your bathtub. But it should be borne in mind that it will seem to decrease. The thickness of such a liner is quite small; if you want to maintain the volume of the bathtub, then the best option would be to use enameling.
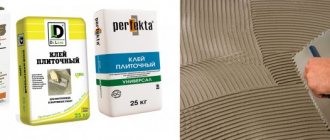
Do-it-yourself decorative plaster from ordinary putty
Do-it-yourself decorative plaster from ordinary gypsum putty is a great way to make the interior original and memorable. Why plaster? The answer is simple: it is convenient to work with, the composition is inexpensive, and the result is wonderful. The process of applying decorative plaster allows you to play with patterns and textures, thereby making the interior more attractive. Shall we begin?
Preparatory stage
First of all, it is necessary to prepare the surface to be decorated. If there was paint or wallpaper on the wall, you need to completely get rid of it. The bare wall is cleaned of dust, dirt and mold, and then carefully inspected for chips, cracks or dents. If there are any, it is necessary to fill them with regular plaster and level them. After this, the surface of the wall is checked using the rule: it must be perfectly flat, otherwise the putty will not lie correctly.
Once the leveling layer has dried, you can apply the primer. The best soils for concrete walls are mineral-based or containing acrylic copolymers. For wood, alkyd compounds are better suited, and for metal, a primer with zinc additives to protect against rust. This stage should not be neglected, since the soil provides excellent adhesion between the wall and the plaster layer.
The preparation stage also includes preparing the solution. Usually, mixing rules for plaster are written on the back of the package; the ideal proportion is 8-9 kg of putty for every square meter of wall. The solution should resemble sour cream or paste in consistency; to check the decorative plaster, you can take a piece of drywall, apply the composition to it and see if it spreads or clumps.
Base layer and texture
The process of applying a base layer of putty has an obvious advantage: you don’t have to try to spread the composition as evenly as possible, since there will be two more layers on top. This will allow you to practice before you start working with the pattern and decorative texture. The ideal thickness of the plaster layer should be approximately 2 mm.
To create a decorative texture you will need one or more tools:
The easiest way to create an interesting coating on putty is to use a regular soft roller. The surface in this case will resemble velor.
It is no less easy to decorate a wall using special decorative stencils, which are pressed into a layer of putty by rolling. But this method of application has a serious drawback: in order for the design to remain clear and beautiful, the stencil must be constantly washed to remove putty.
Examples of stencils in the photo:
If you can’t buy a ready-made stencil, you can make it yourself. To do this, the roller is covered with porous foam rubber or wrapped with a simple clothesline. A good option is a vegetable net or a folded plastic bag.
There are several more ways to beautifully cover a wall with decorative plaster, made with your own hands from ordinary putty, using a spatula or trowel, but they require some skill.
Venetian plaster
This stunningly beautiful coating allows you to imitate the surface of stones of different types. Venetian plaster is prepared from slaked lime, dyes and sand from natural stones. To use such a mixture, it is important that the surface is perfectly smooth, otherwise the desired effect will not be achieved.
Finishing with decorative plaster involves applying several layers, the first must be continuous, the rest are formed using a flexible spatula. Each layer is thoroughly dried and rubbed. Upon completion of the work, the surface is covered with acrylic varnish. Result in the photo:
Using a trowel, spatula or trowel
A beautiful textured pattern, reminiscent of scales, is obtained by making vertical strokes on the plaster using a spatula.
If you take not an ordinary spatula, but one with teeth, you can draw stripes, circles or waves.
The trowel will help to imitate decorative raindrops; to do this, you need to press the tool to the surface and immediately peel it off. You can get a texture reminiscent of the surface of a stone by running it from top to bottom with a trowel, one side of which is raised.
Coloring
Before painting, you need to leave the room for a day to dry. After this, the wall is well cleaned with ordinary fine sandpaper.
The decor looks impressive using two different shades of paint. The essence of the work is as follows: using a roller with a long pile, the wall is painted in a dark color; a tool with a short pile is intended for a light shade. Dark paint gets into all the cracks and recesses, while light paint remains on the surface. This results in a rather interesting decorative pattern.
Types of compositions for cold enameling
To renew bathtubs, you need a high-quality coating that is highly resistant to temperature changes, water and chemical cleaning agents. The most commonly used paints are epoxy paint and liquid acrylic.
Latex or acrylic enamel
This two-component material should be mixed well immediately before use. Experts include the following advantages of liquid acrylic:
- strong adhesion to the surface to be coated;
- high abrasion resistance;
- easy care;
- low thermal conductivity, allowing you to retain heat for a long period.
Glossy paint maintains its shine for a long time. The bathtub is safe to use because it becomes non-slip.
The product is applied by pouring onto the sides of the bath, from where it flows down, forming a new layer. This requires a large amount of material and financial costs. The coating has several other disadvantages:
- toxicity;
- Strong smell;
- uneven distribution over the surface.
Cleaning products must not contain alkalis or acids. To improve adhesion, the base of the bathtub is primed. Poor preparation will lead to rapid peeling of the enamel.
Two-component epoxy enamel
This suspension contains epoxy resin, fillers, and pigments. The product is two-component; before work, a hardener is added and the composition is thoroughly mixed. Apply with a brush to avoid drips. It is difficult to scratch the surface. The following advantages are highlighted:
- good adhesion (adhesion) to metals;
- high wear resistance;
- the ability to care with abrasive agents;
- insensitivity to acids and alkalis.
The hardened layer is homogeneous, smooth, and glossy. The material has a low price. Disadvantages include rapid loss of whiteness, toxicity, and unpleasant odor. To avoid the appearance of drips, the consistency of the solution must not be disturbed.
Epoxy enamel Tikkurila Temacoat RM40.
Aerosol products
Various formulations are available in aerosol form, ready for use; you just need to shake the can. The advantages of use include:
- easy application;
- uniform distribution of paint;
- the ability to imitate different textures using additives.
It takes less than a day to paint, cure and achieve a shiny finish. The disadvantages of aerosols include the insignificant thickness of the applied layer, which is quickly erased, and the liquid consistency of the composition due to the large proportion of solvent.
The inner surface of the bath must be carefully prepared. This method is short-lived. The updated version will last 10-12 months, then chips and yellowish stains will begin to appear.
Protective covering
Applying colorless transparent varnish is an important step necessary to strengthen the decorative coating and give it durability. You can apply a layer of varnish only after thoroughly drying the wall; this will take a day. There should be no drafts in the room.
For living rooms, it is better to choose water-based acrylic varnish, since it does not smell and does not emit toxic substances. On textured surfaces, a glossy, varnish or pearlescent finishing layer looks good. Do-it-yourself decorative plaster using ordinary putty is a great way to make the interior unique and original. The main thing is good imagination and taking into account all technological nuances.
Source