The dimensions of a modern bathroom do not always allow the room to be fully equipped with the necessary set of furniture, so designers use various architectural solutions to make maximum use of the free space. One of the most spectacular elements of the interior is considered to be a shallow niche in the bathroom, which is an unusual structure for storing cosmetics. It will also help hide utility lines and create a relaxed romantic atmosphere.
Pros and cons of a niche
A recess in the wall is an architectural technique that has been known since antiquity and has successfully survived to this day. In modern living spaces, niches are not always used skillfully, but in the bathroom such an element is often a necessity, and not a tribute to fashion. Its use has the following advantages:
- The ability to keep all the necessary items at hand. A well-equipped niche in terms of capacity can replace a small pencil case or shelving. Unlike pieces of furniture, it does not have sharp corners, which are difficult to avoid in tight spaces.
Everything is at hand Source ytimg.com
- A way to organize space. Convenient built-in shelves in the bathroom, which are part of the box design, will successfully disguise the pipe layout.
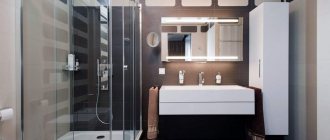
- Stylish design element. Even if a non-standard place for the niche is chosen (for example, above the toilet), it will still properly perform a decorative role.
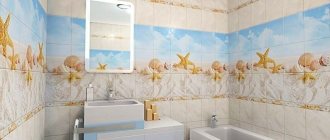
Stylish color scheme Source easydrain.com
The idea has several disadvantages:
- You must have certain skills to calculate and build a niche in the bathroom; how to decorate it beautifully is a separate task that requires choosing a shape, color and materials.
Using shallow openings Source hzcdn.com
- Limited opportunities. In an open, essentially decorative design, it is inconvenient to store many items (for example, towels).
- Difficult dismantling. If you get tired of a niche, unlike a regular shelf, you can’t get rid of it so easily. Most likely, a complete renovation will be required with the replacement of wall decoration.
Imitation wood finish Source geometrium.com
Some more cool ideas
An interesting solution for a small bathroom is a roll-out storage system. It is hidden from view, does not take up much space and helps keep personal hygiene items in perfect order.
18. Roll-out storage system
It is convenient to store towels and toilet paper near the toilet. For example, use the space above it for this.
19. Storage above the toilet
It’s easy to turn an ordinary door into an original storage system. All you have to do is attach several rods to it and hang towels on them.
20. Door as a storage system
And, of course, don’t forget about little helpers – multi-story organizers for soap and shampoo bottles.
21. Organizer for personal care items
We suspect that the favorite option will be “on the side of the bath,” but maybe someone has other options and life hacks for storing open gels, shampoos and other constantly needed jars?
Vote and share your options in the comments!
Kristina Shvetsova
In a pre-thought-out bathroom design, it is unlikely that storage will be planned on the sides)) I try to make special shelves if the space of the room allows.
- Like | 31
- Save
Natalie Velikorodnaya
- Like | 22
- Save
Kristina Shvetsova
I agree, splashes may get on the shelves, this is not critical for shampoos, and the towel may become a little damp on one side, this will bother some people, but not others, although it is not necessary to put them there. But on such shelves there is a lot of space for bottles and decorative items; for many this is not important, but some people like to soak in the bath and look at candles, for example)))
- Like | 3
- Save
0672954597
I store it on regular shelves, but I’m considering setting up special shelves. It seems to me that such shelves will give the bathroom a certain mood, create comfort and individuality. Such shelves will give you the opportunity to express and realize your fantasies.
- Likes: 1
- Save
NATALIA ANDREYCHUK
I try to predict such places at the stage of planning decisions, preferably hidden, invisible to the eye upon entering a given room. Because often in this area there is a large number of bottles, bottles, washcloths, and if there are children, then also toys. Therefore, I think, if the layout allows, it is better to hide this place. More
- Like | 21
- Save
Anna Demidova's studio / modern interiors
Contact the designer, he will come up with an idea =)
- Like | 5
- Save
Elena Sokolova
- Like | 3
- Save
Katerina Cherkasova
Corner cabinet with mirror door. And under it there is a corner metal shelf for what does not fit in the closet and what is used most often.
- Like | 2
- Save
Ekaterina Solovyova
- Like | 22
- Save
Ekaterina Solovyova
- Like | 14
- Save
Yulia Teplyuk
We have a plastic basket with dispensers of the same shape and 2 similar shades. Shampoo, baby shampoo, shampoo for the nanny of the youngest child (who lives with us) and a hair mask. There is a separate basket for a glass with toothbrushes, toothpastes and other small items. All this stuff is on the shelf opposite the bathroom, the splashes do not reach the opposite wall. We have shelves of 2 heights, on the top there is a small mirror on a leg, on the bottom (10 cm from the floor) there are baskets. Liquid soap on the washbasin sink. Cosmetics in the refrigerator on the door or in the dressing room. We have classic minimalism, I don’t like junk.
- Like | 4
- Save
Where to place and how to use
The location of a niche in the wall in the bathroom can be of two types: horizontal or vertical. The choice of shape depends on the characteristics of the room, as well as on what design problem needs to be solved.
For example, a horizontal niche can be placed on a narrow wall; this will help expand it visually. On the other hand, there will be little space in such an opening, so a vertical design with several shelves may be preferable. For a long wall, various layout ideas are also possible.
Diversified niches Source mayabaklan.com
For such an architectural detail, choose any suitable place; in standard bathrooms it is often the wall above the bathtub or washbasin. A niche above the toilet is often installed in a combined bathroom; This area most often turns out to be unoccupied and is suitable for storing household chemicals. A niche above a bathtub or sink is used to solve the following tasks (which can be combined):
- As a convenient storage place. If size allows, shelves are built in, so things are always at hand.
Niche in the shower stall Source hzcdn.com
- As a way to expand space. If you attach a mirror to the back surface of the niche located opposite the door, the bathroom and the structure itself will visually appear larger.
- As an effective decorative detail. To design shelves in the bathroom, various finishing materials are used, lighting is provided, and mirrors are installed.
Decorative opening on a narrow wall Source laparet.ru
See also: Catalog of companies that specialize in interior redevelopment
Sometimes in apartments of the old housing stock (and some new ones) architectural recesses in the wall are provided for by the layout. If the opening is large, it is convenient to place large items in it: place a washing machine, and hang a boiler or heated towel rail above it, secure a cabinet or shelves.
Practical wide opening Source design-homes.ru
When the size of the niche allows, you can install a shower stall in it. There are also many difficulties in this arrangement, since the shower stall is not mounted close to the wall. If you want to purchase an exclusive model with transparent back walls, you will need to tile the walls, which means reducing the usable area.
Built-in shelves in a plasterboard partition Source castella.com.au
If the dimensions of the niche do not match the dimensions of the shower cabins (which are mostly standardized), you can only find a suitable option from manufacturers of premium equipment, which does not always fit into the budget. The solution may be to install a shower door. In this case, a niche in the bathroom with tiles as finishing will be used rationally, regardless of its dimensions.
Decoration of the shower area Source samstroy.com
Materials for creating shelves in the bathroom from plasterboard
The main materials when making bathroom shelves with your own hands are plasterboard and metal profiles. The frame of the structure is created from galvanized profiles. It is based on UW or UD guides in the form of original rails made of thick sheets of metal. Elements can have a width of 50, 75 and 100 mm, and a depth of 40 mm. The basis for plasterboard boards are load-bearing CD profiles, which are mounted on guide elements.
To make shelves you need plasterboard sheets and a metal profile
When creating curved structures, arched profiles in the form of slats with reinforced perforation are used. Such elements can bend in any direction due to the presence of a large number of holes and cuts in their structure.
The frame made from profiles is covered with plasterboard. It is represented by sheet construction and finishing material, which consists of a core protected on both sides by a cardboard layer. Cardboard gives the product the necessary rigidity and helps reduce gypsum stress during installation work and during operation. It also protects the inner layer from abrasion.
There are several types of drywall, each used for a specific task. To create shelves, moisture-resistant plasterboard is used in the bathroom under tiles marked GKVL, where the symbol “B” indicates the moisture-repellent properties of the product. Such sheets have a green or bluish tint. Drywall contains special modifying components that reduce its absorption of moisture and prevent the appearance of fungus and mold on its surface.
Drywall has a number of distinctive advantages, which makes it in demand when organizing the interior space of premises. The material is environmentally friendly, resistant to temperature changes, good noise insulation properties, and durable. Drywall is flexible to work with. The material cannot be deformed without appropriate effort. From it you can create elements of various configurations.
Important! Drywall is a fragile material, so you should work with it carefully and slowly.
For the bathroom it is necessary to use moisture-resistant plasterboard, which has a greenish tint
How to create a niche
If you are lucky and there is already a niche in the wall above the bathtub as part of the planning solution, all that remains is to finish it. It is possible that a recess is formed after combining a bathtub and a toilet; in this case, the work also involves finishing the surfaces.
Narrow niches for decoration, wide niches for storage Source pinimg.com
Sometimes a small useful niche can be made if one of the enclosing structures is a brick partition. In this case, it is enough to remove several bricks and line the resulting recess with a suitable material. A neat niche-shelf for storing household chemicals can be organized when arranging a screen under the bathtub, near the wall.
Plasterboard wall near the bathtub Source hzcdn.com
Preparing to install the box
Before starting the construction of the structure, preliminary work should be carried out.
Before starting work on the manufacture of the box, you should make sure that the pipes and other elements are reliable by checking all communications for leaks and hidden defects
If a new pipeline is being laid, it is advisable to provide a minimum number of connections.
Then choose a box design that would be best suited for the bathroom, take all the necessary measurements, and then make a sketch of the structure. In this case, it is necessary to provide access to devices and instruments (filters, valves).
Before starting the manufacture of the box, it is important to carefully measure the distance, and then make a calculation, finding out the required number of profiles, PVC panels and other materials
According to the drawn diagram, you should calculate the required amount of building materials, providing a small reserve.
It is also important to stock up on all the necessary equipment in advance, as well as purchase panels, guides and other necessary structural elements. They need to be carefully inspected in order to identify chips, defects and damage in time.
How to design an opening
The design of a bathroom with a niche in the wall depends on the preferences of the owners and is made from materials suitable for wet rooms. Openings with shelves are usually used to place personal hygiene products and household chemicals, and the following techniques are used for decoration:
- Place decorative items: vases, trinkets, shells.
Glass shelves - practical and beautiful Source remontbp.com
- A large but shallow opening can be turned into a display case for a collection of souvenirs.
- The illuminated niche looks especially impressive. Use LED strip, original-shaped lamps or built-in spotlights. Candles will make the atmosphere romantic.
With LED backlight Source dizainiya.ru
Blinds
If the pipes that you want to hide from prying eyes are located in a niche or wall opening, then the best option is to install blinds or roller shutters. This method does not interfere with the accessibility of communications and at the same time makes them invisible. Regular ready-made blinds with a manual control mechanism will do. There are special types of sanitary blinds.
The main thing is to choose the appropriate width, and you can fix the box to the ceiling or wall. It is also important that the base for the roller blinds is perfectly flat, without distortions and waves on the ceiling and wall, otherwise the curtain will not be able to rise and fall freely.
This is a modern, practical and cost-effective way to camouflage pipes. Suitable for interiors designed in high-tech, minimalism, loft, etc. styles.
Subtle points
In order for the niche to turn out beautiful and pleasing to the eye, the following conditions must be met:
- The niche looks especially impressive if not a box is built, but the entire wall is sewn up. By installing a false wall made of plasterboard, you inevitably reduce the size of the room. In a small bathroom you will have to abandon this technique.
In a modern style Source design-homes.ru
- The construction of a metal frame requires taking into account the size and thickness of the tiles. If the design is complex, combining all the planes is difficult even for a specialist, so the result largely depends on the skill of the installer.
- The horizontal surface of the niche is laid with a slight slope to avoid stagnation of water.
False wall of complex design Source diegobianki.com
- For a niche to look truly stylish, it is necessary that its size matches the size of the tile (it is a multiple of it and fits into the layout). A tile cut to fit the opening spoils the whole impression.
- A niche located in a wet area requires careful maintenance. It must be washed and dried after each water procedure. Leaving moisture leads to the formation of fungus, which is especially noticeable if the grout on the tile is ordinary, and also light-colored.
In a classic interior Source hzcdn.com
Maximum functionality
In a small room, not a single centimeter of space should be lost. Everything should be used to the maximum. This also applies to the place at the sink, where you can place all kinds of shelves, organizers for storing small items, and use the space under the sink.
13. Storage by the sink
14. Open cabinet under the sink
15. Creative design of the area at the sink
16. Rational storage
17. Laconic bathroom organizer
Briefly about the main thing
A niche in the bathroom wall is an original design element. It solves several problems: it organizes and decorates the space, and also masks utility lines. Sometimes it is part of the architectural plan, in other cases it is arranged on its own, inside a partition or inside a false wall, which is erected from plasterboard.
Depending on the size and design, the opening is left unchanged, shelves are built into it, a washing machine or shower is installed. The walls are tiled, and mirrors, lamps, candles and vases are used for decoration.
Ratings 0
Frame installation instructions
Regardless of what type of coating the box design provides, first of all you should install a metal frame. To do this, it is important to adhere to the following regulations. Work should begin with the walls adjacent to the corner.
First of all, you need to make markings on vertical and horizontal surfaces.
The first stage of creating a pipe box is the installation of vertical guides, which are mounted on both sides of the corner or from communications
After this, you should install guides (ud profile), which determine the dimensions of the box. To attach them to the surface, you can use European screws (dowels) by drilling holes in the appropriate places with a drill. For walls lined with tiles, flea screws (length 2.5 mm, diameter 3.5 mm) are well suited, which can be screwed into the joints between the tiles.
If the pipes run horizontally, it is enough to lay out the guides parallel to the floor and secure them. After this, you should form the outer corner by twisting the corner post from two ud profiles. Their shelves need to be directed at right angles in different directions, and then connected with small screws.
The vertical structure should be fixed to the floor and ceiling using horizontal elements that are fixed to horizontal surfaces
The supporting profile cd is cut with a knife into pieces whose dimensions correspond to the width and length of the box. The first corner rib is fixed on the vertical surface, which determines the rigidity. The resulting sections of the profile are inserted with one end into the installed guide, and the other into the stiffener, so that the parts of the corner are connected to the profile.
At a certain distance, which can vary from 30 to 70 cm, jumpers should be added - they give the system strength and reliability, and are also used for hanging panels.
The finished frame of the pipe box combines vertical guides and horizontal jumpers, giving rigidity to the structure. It is also important to provide space for a door or hatch
Having completed the work on one side, a second corner profile is attached to the other wall in the same way, after which the work on creating the frame of the box is considered complete.
Installation of an invisible hatch
To provide access to pipes with a plasterboard structure, you can use a ready-made plastic door or make a disguised opening panel consisting of an aluminum frame, a door, a magnetic lock, and a structure of hinges and components.
An inconspicuous door (invisible hatch) installed in the wall will allow you to easily check water readings, turn off the valve, and also assess the condition of the pipes
In order to open the invisibility hatch, just press on its middle, after which the magnetic lock snaps off, releasing the door from the frame. The following article will introduce you to the details of the design of various plumbing hatches, which we recommend reading.
The hatch is installed as follows:
- At the preliminary stage, you should decide on the location of the door. Usually it is located in the center of the box or partition, which makes it possible to better maintain the symmetry of the pattern when tiling.
- When installing the frame, it is important to leave a niche (on two or four sides), the size of which corresponds to the parameters of the hatch. After its construction, the frame is attached to the profiles using long self-tapping screws (special holes are provided for them). According to the instructions included with the kit, the door and other hatch parts are attached to the frame.
- Next, the frame is covered with plasterboard sheets, which are overlapped onto the hatch frame (it should also be attached to the covering with self-tapping screws).
- Upon completion of the work stage, the drywall and door are covered with a layer of primer. After drying, the hatch and box are covered with tiles (one color or with a pattern). All seams between the tiles are covered with sealant, after which the structure is left alone for two days for final drying.
The final stage is cutting the hatch, which is done using a sharp utility knife pointed at an angle of 45 degrees.