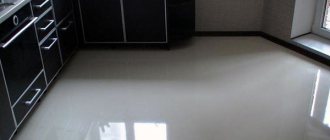
The main advantage of self-leveling floors is a perfectly flat surface after pouring. Self-leveling floors are used to prepare the base for finishing coatings or as a base material. The main reasons for the need to pour a second layer are gross violations of the recommended technology or a complete lack of construction experience among the performers. In order to make a decision about pouring the second layer, you need to know the features of bulk materials and how to use them.
Is it possible to pour a self-leveling floor in two layers?
Self-leveling floor - impeccable work
When is it necessary to pour a floor in two layers?
First of all, installing a poured floor involves creating a flat surface over the entire area of the working base. Therefore, the first layer was called “leveler”, which smoothes out the bumps and fills the cracks. Its thickness can vary from 10 mm to 30 cm depending on the condition of the base, the slope of the room and other factors. As a rule, the rough layer involves the use of a cheaper compound, since the mixture consumption is quite high. It is worth considering that a perfectly smooth coating will be achieved with a sufficient amount of mixture, which should fill the surface completely, taking into account its differences.
The need for a second layer arises when creating a smooth decorative surface. This layer is quite thin - up to 25 mm, since the mixtures used are much higher in cost than base solutions. The finishing compound is poured only when the first layer of self-leveling floor is completely dry.
Sometimes a second layer of self-leveling mixture is used to eliminate defects in the first coating. Considering the high cost of materials for this technology, it is worth understanding whether pouring a second layer of self-leveling floors will be economically feasible in this situation or whether it is better to prefer a conventional cement screed.
Reasons why you should not fill the screed in parts
- poorly leveled building foundation;
- the floor may not rise to the required level. By pouring the material in parts, the surface may turn out to be lumpy and not level;
- Screed in parts will not create a slope angle if necessary;
- cracks may appear on the surface after drying;
- the floor will not be perfectly flat;
- minor defects and irregularities may remain on the surface;
- The solution can be applied in parts, only room by room. If one room is flooded in stages, once a day, the effect will be the opposite.
How to make a second layer of self-leveling floor?
If you doubt whether it is possible to fill the self-leveling floor with a second layer in a particular situation, it is better to turn to professionals. After receiving advice about the mistakes made and with a positive response from the specialist, you should begin preparing the surfaces.
Repair work on installing the second layer can begin no earlier than a couple of weeks after applying the first layer.
Such a long period is explained by the completion of chemical reactions between the components of the poured mixture, and gases will no longer be released into the air. By ignoring this, you may end up with swelling of the subsequent layer, and the self-leveling floor will have to be re-done. In addition, you should not experiment with the smallest layer thickness and go beyond the limits specified on the packaging by the manufacturer. To complete the cycle of chemical reactions, the poured mixture must retain moisture throughout the day. If the layer thickness is too small, the coating will dry quickly without gaining the necessary strength.
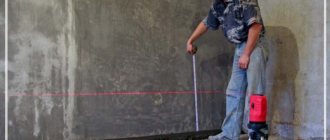
To begin with, you should remove all kinds of debris and dust from the surface and seal the cracks with putty. If there are tubercles, remove them with a punch so as not to increase the thickness of the future layer. To prevent differences in height, you can use a laser or bubble level. The latter option is faster and simpler; the entire check will take a few minutes.
Next, you should prepare the necessary tools and equipment: containers for mixing the mixture, a drill with a mixing attachment, a needle roller. It is also important to calculate the dry construction mixture and do it with a reserve. You will not know the exact amount of materials required for a given area, since unforeseen circumstances may arise during the process of pouring the mixture. But if there is not enough material, subsequent filling will spoil the quality of the coating and create many difficulties.
The next stage is primer. The solution must be applied carefully, without skipping, and, if necessary, in several layers. This procedure will increase the adhesion of the base and subsequent coating, and will also significantly reduce material consumption. Place damper tape along the walls and prepare the composition according to the instructions on the package. After stirring the mixture, let it sit for 5-10 minutes, and then repeat the procedure.
Is it possible to completely fill a self-leveling floor in one go? Repairers do not recommend doing this, because during the application process the mixture must be leveled with a squeegee and a needle roller, preventing unevenness and the appearance of bubbles. It is important to remember that each compound has its own “lifetime” after mixing with water. Therefore, breaks in work are undesirable until the surface is completely filled with the solution.
Tools
To create a self-leveling floor, the following tools are required:
- Containers for stirring mixtures and water.
- Construction mixer, electric drill with attachment.
- Putty knife.
- Raklya.
Roller, paint shoes
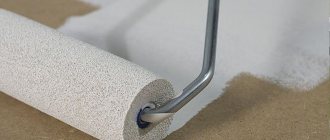
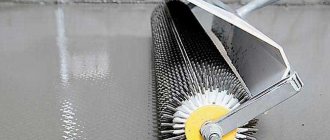
- Use a needle roller to remove air from the solution.
- Special shoes with spikes for walking on mortar.
- Typically, building level.
- Electronic humidity meter.
- Primer roller.
After preparing the tools, materials, and base for work, the pouring of the self-leveling floor begins.
Why choose self-leveling flooring as a base layer?
Regardless of what type of floor finishing is planned, the base layer must be perfectly smooth. This is exactly the result that innovative self-leveling floor technology promises. Despite some nuances in installation, it has a number of advantages:
- durable - allows you to withstand heavy loads;
- universal – makes even surfaces of any complexity: wooden, concrete, tiled floors;
- easy to install - every home repairman or builder can master the rules for pouring self-leveling mixture;
- high speed of bonding - you can move on the surface after a day;
- thin layer - even when applying a layer of 0.5 mm, high strength characteristics are maintained.
Pouring self-leveling mixture. Encyclopedia about construction and floor repair
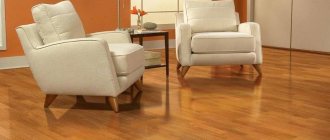
When moving across the floor in an old apartment, every creak reminds you of a thought that regularly comes to mind - about repairing the floor, because it is impossible to constantly experience discomfort looking at the old parquet floor and listening to these unpleasant sounds. But now every step you take, including those related to repairs, should be carefully thought through. In some places you can simplify something or, on the contrary, remove all the old finishing and make a major overhaul of the entire floor. But in the latter case, the classic picture immediately appears in the imagination - a lot of garbage, a lot of fuss, and the result in fact in some cases can be the same as if the old finish remains in place. A reasonable question arises: is it possible to lay laminate flooring on parquet? It turns out that in this case you can really get away with little damage by simply placing a new coating on top of the old one.
Which self-leveling floor to choose for further finishing?
If you are thinking about creating a flat and smooth surface without a single flaw, then self-leveling flooring is an excellent solution in this situation.
It can be used as a base for tiles, linoleum and laminate.
Depending on the specific case, there are two main groups:
1. Self-leveling – designed for the finishing layer, consisting of epoxy resin and polyurethane (sometimes methyl methacrylate). Typically this coating is used as a stand-alone finish, but over time it may lose its original color and shine. In this case, the base becomes an excellent option for finishing under tiles. However, before installing it, it is worth removing all defective areas and increasing surface adhesion.
The thickness of such self-leveling floor covering usually does not exceed 20 mm.
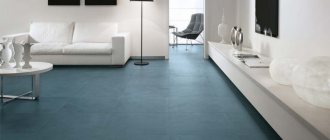
2. Self-leveling - this composition is suitable for creating a flat surface up to 22 mm under linoleum and laminate. Among the components of the mixture are cement and plasticizers, as well as a number of fillers. This compound has become a worthy alternative to conventional cement screed. To prevent adhesion to the wall and ceiling, polyethylene film and damper tape are used.
Let's find out the composition
Any mixture, even if the final self-leveling floor is poured, includes the following main components:
- Binders. This can be cement, gypsum, or a combination of them, which are supplemented with polymer components.
- Supplements They impart qualities to the solution such as excellent spreadability, better ductility, and increased adhesion to the previous layer or overlap.
- Fillers. This includes lime chips and sand with the appropriate fraction.
Its use will depend on the content of the mixture itself - for the finishing layer or as a surface leveler from existing unevenness. If desired, mixtures with dyes are selected, which is especially typical for the finished version of the floor.
Each mixture will have a purpose: for the kitchen, bathroom, garage and other objects.
Gypsum mixtures are suitable for dry rooms, but for wet rooms it is better to take cement-based compositions. Their qualities will differ markedly, and the drying time will also vary.
Warm floors require an elastic solution to work. The mixture must change (shrink and expand) under the influence of constant temperatures. When deadlines are running out and you want to do everything as quickly as possible, it is best to arrange a quick-hardening universal self-leveling floor.
A universal self-leveling floor can be used to install not only the second layer – the finishing layer, but also the main layer – the subfloor. Everything will depend on the preferences of the customer or the independent contractor.
Why do defects appear and how to eliminate them?
Without experience in performing work of this type, unexpected defects may sometimes arise on the new surface.
Most often this is due to errors in the procedure, including:
- Insufficient water in the mixture. As a result, the strength of the composition is less, and the horizontality of the coating is disrupted. In the first case, the defect is insignificant if further laying of decorative tiles is planned. Is it possible and necessary to pour the self-leveling floor in two layers in this case? Yes, if the surface is not even and smooth enough.
- Large amount of liquid. In such a situation, the binding components do not absorb or consume all the moisture, resulting in delamination of the surface, which means dismantling the floor, plus re-filling it.
- Poor or no priming. May result in an uneven surface. This defect can be eliminated by sanding, putty or re-application of the composition.
- Slow composition distribution. As a rule, this problem occurs among beginners. The result is an uneven coating, since to create a smooth surface you need to constantly level the composition in all directions.
- Wet base. If a cement screed was used as a working surface, it is important to wait until it dries completely. Before this process is completed, water vapor and carbon dioxide are released from the base. A self-leveling floor poured in a hurry will have bumps and air “pockets”, which will require complete removal of the coating.
- Drafts and temperature changes. If the rate of hardening is different over the entire surface, then zones with dips or bumps may appear. If the defect size is critical, the floor will need to be refilled.
The method for eliminating errors depends on three factors: the causes, the area affected and the specifics of the defective self-leveling floors. If the defect occupies a small area, then repairing it is not difficult or financially expensive. In the case of large areas, dismantling the floor and re-filling the mixture is required.
Is it possible to lay the screed in parts?
I'm doing some renovations for myself. The room is 20 sq. m. a floating screed is planned: 2 cm of mineral wool, plus 6 cm of sand concrete on top. All for the sake of soundproofing. Having assessed the upcoming volume of work, I was horrified: about 40 bags of sand concrete, or almost 2 tons! And I have to mix all this and put it on the floor! Tools include shovels, 2 drills with whisks, and construction buckets. I can still afford to buy an inexpensive mixer (for 2-3 thousand). I definitely can’t do it in one day. In this regard, the question is: is it possible to do the screed in parts? A week probably won't be enough for me. How will this affect the quality of the floating floor?
AlexBrbrbr, can be done in parts. This is probably the rare case when you actually need a mesh that will connect different parts
AlexBrbrbr wrote: Probably, even a week won’t be enough for me.
How to properly lay a vapor barrier on the ceiling?- Is it possible to glue wallpaper on whitewashed walls?
- Imitation of a brick wall made of gypsum plaster
Come on. Pour 10 bags each onto a level place, and, pouring water from a watering can, gradually mix with a shovel. This will be better than using a mixer a little at a time.
Gray, oh, how joyful this is! For some reason, many instructions say that you must lay the entire screed in one day. Allegedly, only then will the plate be united.
You can pour it out, but there will already be a reinforcing mesh on the floor that will interfere with mixing. And rolls of waterproofing rolled out on mineral wool can be damaged with a shovel.
Gray wrote: pour it onto a level place, and, pouring water from a watering can, gradually mix with a shovel
you are inattentive - the screed is on cotton wool. I need a 90 liter basin and a professional mixer for rent in Petrovich. fill it in a day.
40 bags of 50 kg in 10 hours is necessary for good health. And you also need to level it.
AlexBrbrbr wrote: a floating screed is planned: 2 cm of mineral wool, plus 6 cm of sand concrete on top.
who gave the recipe for this pie? what kind of cotton wool? There is no good cotton wool for floors, they only sell unusable rubbish. Therefore, it is better to make grades PPS-25 or PPS-35 on foam plastic. The sound insulation will be sufficient, but if you want more, the floor will not help - the sound still travels through the walls and is very good. The screed can be made 4 cm. Have I made the work much easier? Parts of 20 sq.m. - nonsense. It can be done slowly in a day without any parts.
Construction and finishing. Facades. USHP. Design. Technical supervision. Development of GOST, SP, technical documentation.
AlexBrbrbr wrote: And rolls of waterproofing rolled out on mineral wool can be damaged with a shovel.
Yes Yes. I still need to buy something... a membrane, impregnation, primer. why not? Polystyrene foam and a screed on top, that’s all... no waterproofing and no problems with water from the screed killing the mineral wool. At the same time, there are much fewer problems. Read the forum - it’s been explained and chewed on a thousand times. No time? I have something to paint too.. so good luck
Construction and finishing. Facades. USHP. Design. Technical supervision. Development of GOST, SP, technical documentation.
AlexBrbrbr wrote: plus 6 cm of sand concrete on top. All for the sake of soundproofing. Having assessed the upcoming volume of work, I was horrified: about 40 bags of sand concrete, or almost 2 tons!
Hire a helper in some market. In my room of 19 sq.m. one worker and an assistant were pouring a sand concrete screed about 50 mm thick. We got it done in a day. The worker was wayward, poorly managed, but not mentally retarded. But the assistant was shocking with his stupidity. As it turned out later, this worker somewhere in the market hired him as an assistant for a while.
Your profile says “Moscow”. There are a lot of migrant workers and diggers, draggers, mixers, loaders, cleaners, and sweepers who just came to Moscow to earn money. Sometimes they stand under construction stores with cardboard boxes. Today I saw such a digger with a cardboard “We dig trenches and other works” near Leroy. Or you can try to negotiate with local janitors about auxiliary work. Hire some seemingly sane Ravshan, set his solution to stir, and you’ll fill and level the screed yourself, and you’ll get it done in a day. Or get a friend/relative/spouse/fiancée to help. One is on the mixer, the other is dragging, pouring, leveling.
How to properly polish a surface?
Using a grinder allows you to get a high-quality even and smooth coating in a short time.
Preliminary grinding of the base layer of the self-leveling floor is carried out 3-5 days after its application. The final stage is carried out only when the coating has finally become hard. If the working base is sufficiently worn, then using a grinder you can remove the top damaged layer and sand it, preventing loss of coating strength. Therefore, such a tool is indispensable both during preparatory work on pouring a floor device, and for the entire cycle of this technology.
If we talk about large working areas, then in this case an electric trowel is used. Its movement is carried out sequentially in both perpendicular directions. As a rule, such a tool should be used until the base layer has completely hardened, since the rotating blades can tear out pieces of material and damage the coating. The trowel is not suitable for poured mixtures that contain polymers.
Is it possible to apply another layer of self-leveling floor to the self-leveling floor? Considering the information above, the answer to this question will be yes. However, remember that the cost of mixtures to create an even base is quite high. Therefore, in critical situations, it is better to dismantle the old coating and fill it with a new, thinner layer of mortar.
Instructions for creating a screed
- first you need to find the highest point on the floor and push off from it;
- if the floor is very crooked, you can make beacons. To do this, at the highest point of the floor you need to make a hole using a hammer drill and screw a self-tapping screw into it;
- now you should take the opposite side of the floor covering and make a second beacon;
- between two beacons you need to stretch a fishing line or nylon thread. Thus, 10-15 beacons can be made over the entire surface of the floor, along which it is easier to make a screed;
- Now you need to leave a mark on the wall, usually at a distance of 1.5-2 cm from the floor, and use a laser to transfer the mark to other walls. The floor should be leveled according to these marks;
- After this, you need to dilute the solution and fill the entire floor surface. If the room is large, it should be filled piece by piece, but evenly;
- After the work has been done, the floor should be left to dry;
- After 15-20 hours, use hard sandpaper to walk over the entire surface for perfect leveling and leave the floor to dry for another 7 days.
Important! If the screed is made at 1-2 centimeters, then 3 days will be enough for the floor to dry.
Now you know how to make a rough screed and why you shouldn’t apply it in parts.
Conditions for using the technology
A self-leveling floor is a quick way to create a perfectly flat surface. The composition sets very quickly, after which you can begin construction or finishing work. Self-leveling material is poured for the following purposes:
- organizing a screed to level the concrete in preparation for the finishing coating. The idea of pouring a thin layer from 2 to 30 mm is a way to eliminate unevenness of the old surface;
- performing a screed when laying waterproofing from roll, film materials on oiled concrete or wood. The layer should be 30-60 mm;
- performing thermal insulation before insulation. Monolithic self-leveling floors rise 30-60 mm above the main surface;
- laying water or electric heated floors. Self-leveling material hides communications. The fill should not be more than 30 mm.
Types of mixtures
Various polymer compositions are used to finish the floor. They are made on the basis of epoxy resins, polyurethane or methyl methacrylate.
The first option can be used at temperatures from 15 to 20 °C and a slight draft that provides ventilation.
The polyurethane floor is poured at a temperature not lower than 15 °C, and they try to exclude any air movement.
The third type requires strict adherence to all the rules of technology. It is allowed to carry out work starting from 8 °C.
The composition may contain coloring substances that give the surface the selected shade. Other methods of decoration are also used:
- sticker of two and three-dimensional images;
- mosaic and fantasy patterns;
- unique drawings made with paints;
- compositions from small objects.
Preparation of the solution
There are several rules, the observance of which will protect you from mistakes and hassle with alterations.
- For mixing, use clean tools and clean running water.
- The water should be warm, within +20C. Hot water speeds up the setting of the solution.
- Manufacturers indicate the proportions of the mixture and water for mixing the solution on the packaging. Observe them strictly! Excess water will lead to stratification of the mixture, slow drying and loss of strength of the floor; too little will lead to poor fluidity of the solution.
- When mixing, pour water into the container, and then pour the mixture into it, stirring constantly, but not vice versa!
- You need to stir the solution for about 5 minutes using a mixer or drill with an attachment. Then it is advised to leave the mixture for a few minutes, and then stir for another 2-3 minutes.
- Sometimes manufacturers indicate the amount of liquid needed for a certain amount of mixture, ranging up to a liter. How to be in this case? Experiment. To begin with, you can use the average. If you have doubts about the resulting consistency, do a test: cut a 5-liter bottle into a ring, place it on glass or tile, pour the solution over the top and put it away. If the mixture, spreading, covers an area three times the diameter of the ring, the consistency is considered good.
- Never add water to a hardening solution! You cannot mix the solution “for future use”; a portion is made for one pour.