The popularity of self-leveling coatings is due to a number of advantages: lack of joints, wear resistance, environmental friendliness, ease of installation and resistance to chemical influences. The only negative factor is the fairly high cost. Therefore, it is imperative to take into account the self-leveling floor consumption per 1 sq. m.
To replace the coating, you should evaluate the degree of financial costs for:
- Consumption per sq. m. composition;
- Payment for specialist services;
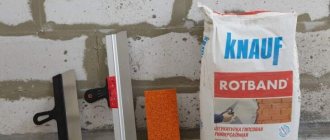
- Expenses for related materials (primer, putty, varnish).
And only after all the necessary calculations have been made, you will be able to make the right decision: to make a poured coating or not.
Self-leveling floor thickness
H3 is the thickness of the solution written on the packaging;
H is the permissible layer thickness.
Calculations per 1 m2
Determining the horizon with a laser level
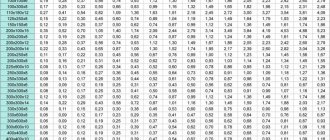
It is simply necessary to calculate the self-leveling floor per 1 m2 if you do not want to overspend materials. Approximately 1 sq. m of coating required 1 liter of solution without any impurities. Moreover, its thickness will be only 1 mm.
Depending on the manufacturer and the density of the material, this value may fluctuate in one direction or another. For example, the consumption of 1 square meter of epoxy mixture will be 1.5 kg, and for polyurethane mixture - 1.4 kg. To accurately find out the mixture consumption per 1 m2 of self-leveling floor, you should use the following formula: S×H×P=G where:
- S is the total surface area;
- H is the minimum layer thickness;
- P is the density of the solution;
- G – consumption per square meter of material.
A self-leveling self-leveling floor is calculated using the same expression.
How many bags of mixture are needed?
To calculate the number of bags of self-leveling floor, we will use a clear example. It is necessary to fill a floor with an area of 30 square meters. m, while the thickness of the epoxy mortar will be 2 cm. As you remember, the consumption for this type of mixture is 1.5 kg per sq.m. Then it turns out:
- 1.5×20 = 30 (kg) - per 1 sq. m;
- 30×30 = 900 (kg) - total weight of the mixture;
- A 25 kg self-leveling floor will require 36 bags of epoxy material. As you understand, for this 900: 25 = 36 (bags).
Features of self-leveling floor
The floor finishing material has an excellent property that makes working with it much easier. It easily self-distributes over the surface and hardens quickly. And in the process, a perfectly flat and smooth plane is formed.
The coating consists of two parts. The first layer contains polymer elements and is often called rough. The final layer is called mineral. Its structure is made of cement with special modifiers. Additional components are mineral fillers.
Polymer mixtures for applying a rough self-leveling layer are:
- Polyurethane. The coating is elastic and copes well with normal and even shock loads. Excellent for unheated rooms.
- Methyl methacrylate. The surface is resistant to mechanical loads, but requires strict compliance with all conditions of the installation technology. Due to the pungent odor, it can only be used in rooms with good ventilation.
- Epoxy-urethane. The coating is not afraid of any chemicals and is resistant to friction. The elastic surface is well suited for garages.
Epoxy floor Source archidea.com.ua
- Epoxy. After hardening, the floors can easily withstand impacts, withstand heavy weight, and are not afraid of temperature fluctuations. In addition, the surface is easy to clean. Excellent for residential premises.
Thanks to their excellent characteristics, self-leveling floors have become in demand and are used in most public buildings. The halls of train stations and airports, the lobbies of institutions are a small part of the places where such coating is used. The material has gained no less popularity in private buildings.
Damper tape
The screed expands and contracts under the influence of temperature changes.
As it expands, it pushes against the walls, which can lead to its destruction or damage to the walls.
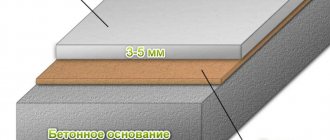
To prevent this from happening, when pouring a self-leveling floor with a thickness of more than 5 mm, use a damper tape, which absorbs all expansions of the self-leveling floor, thereby protecting building structures.
Therefore, if the thickness of the self-leveling floor is more than 5 mm, after treating the base with a primer, stick a damper tape around the perimeter of the room, at the bottom of the wall.
In the future, when the screed expands, the damper tape will take on the entire load.
The next step is to prepare the filling solution.
Reducing mixture costs
The consumption of self-leveling floor per square meter is directly dependent on the thickness of the layer. And this is directly related to the condition of the surface. It is necessary to examine it for porosity, as well as the number of irregularities. And if there are a lot of defects, then it is better to make an additional cement screed. Minor surface imperfections are removed manually in preparation for applying the self-leveling mixture.
Surface preparation Source monolitvtomske.ru
See also: Catalog of companies that specialize in paints and varnishes and related work
Elimination of irregularities
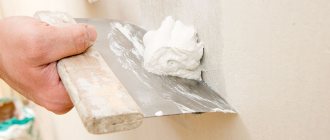
Floors must be thoroughly swept and vacuumed. This way even the smallest cracks and small bumps become noticeable. The first ones need to be covered with putty. But first they need to be processed. A crack no more than 2 mm wide is simply expanded. That is, all problematic concrete around the edges is removed. And for a wider and longer gap in the floor, additional perpendicular cuts are made with a grinder.
Large tubercles on the surface are removed using a perforator. After this, all small irregularities are smoothed out with a grinding wheel. And if during the preparation process the old coating peels off in some areas, then you still cannot do without a preliminary cement screed. After treating the surface, it must be thoroughly vacuumed again.
Surface priming
In order not to waste an unreasonably large amount of materials when the self-leveling floor is distributed, the consumption of the mixture must be reduced. In addition to bringing the surface to a general level, it is necessary to deal with the porosity of the old coating. And the easiest way to reduce absorbency is by priming.
Surface priming Source prorab.help
This operation is mandatory and not only neutralizes all pores on the surface, but also prepares the latter for adhesion to the self-leveling mixture. But before priming, it is necessary to check the compositions of the primer and self-leveling floor. They must completely match each other. Otherwise, rejection is possible. This can happen if an acrylic primer is used for the epoxy leveler.
What affects consumption?
There are several factors that influence the expected mixture consumption. The composition, which is prepared in the factory, of course, has its original shelf life.
This is the first. The second point is that it’s very disappointing when the solution is diluted, the floor is poured, and you realize that the materials have already run out, you need to go to the store for the mixture. That is, it is easier to calculate the number of bags of the mixture in advance.
How is the mixture consumption determined? This is the total area of the room and the quality of the rough base, which is prepared in advance.
That is, if the rough base has complaints, it is uneven, more filling will definitely be needed.
But if, for example, the functions of a leveling material are performed by a cement or polyurethane screed, then the leveler is removed from the list of materials. And this is also an economic effect.
The purpose of pouring the composition also matters. To form a subfloor and then organize the finishing coating, the amount of material will be different than for pouring, for example, a 3D floor. Both dry and diluted mixtures will be required in different quantities.
Calculation of consumption of self-leveling mixture
The prepared solution for self-leveling floor cannot wait long for its fate, since it contains a quickly setting hardener. Therefore, it is necessary to work with it very quickly. But this is easy to do, because the mixture itself spreads well over the surface and you just need to help it with this.
And the main problem for beginners is preparing the right amount. Since the floor leveler is not cheap, out of a desire not to spend extra money, everyone tries to prepare the material back to back. But if there is a shortage of it, the solidity of the coating will be impaired. After all, by covering the gaps a second time, even the most experienced master will no longer be able to bring the two mixtures to the same level. And their junction will inevitably be noticeable.
Therefore, all experts recommend not going to extremes of saving and buying materials with a reserve. It’s another matter to keep the overspend to a minimum. And to do this, they make accurate measurements of the area and calculate the required number of bags for purchase.
Laser marking Source otlichnyjremont.ru
On the importance of accuracy in calculations
Self-leveling floor consumption must be calculated as accurately as possible. After all, the repair process involves obtaining an even coating, which is easier to achieve if you fill the entire area in one go. A break in pouring to buy a new bag of mixture can lead to drying out of part of the floor covering, this will affect the quality and will result in the formation of seams between the areas of pouring the solution.
And the seamless nature of the self-leveling floor is considered one of its advantages, and has many positive aspects for further use. Accordingly, it is not recommended to allow their appearance.
If you buy too many packages of dry mixture, then after that you will need to put it somewhere. Having to find a suitable location for proper storage can be a hassle, and finding buyers for leftover material isn't always a pleasant experience.
If you plan to carry out similar work in other rooms, then you can quickly find a place to use the excess, but in the end, you will still need to calculate the self-leveling floor consumption per 1 square meter. m. until the renovation is completely completed.
Self-leveling floor consumption must be calculated as accurately as possible.
Video description
In the video, the master will tell you how to properly prepare a room for a self-leveling floor, how much mortar is needed per square meter and how to calculate the required number of bags of self-leveling mixture:
And at the end, some tips from professionals on how to prepare the mortar:
- The mixture must be kneaded in such quantity that it can be distributed within 20 minutes.
- If you dilute the dry composition with much more water than indicated on the packaging, this will naturally lead to a reduction in material consumption. But the quality of the coating will be seriously affected.
- All work is carried out at a room temperature not lower than +10 degrees Celsius.
- Mixing the solution is carried out in two stages, with a break between them of 5 minutes. Let the mixture settle.
Mixing the solution Source remstd.ru
Difficulties when pouring the floor
Even if you acted strictly according to the instructions and prepared the bulk material strictly following the instructions on the packaging, you are still not immune from some difficulties.
For example:
- If you planned a layer of 3 mm, but the prepared mixture does not spread well , resulting in an uneven layer thicker than necessary, then there is no need to add water so that the mixture becomes thinner and can be well distributed over the surface. Just use special tools: a needle roller, a squeegee . With their help, you can easily roll the mixture over the surface to achieve the desired result.
- If you do not follow the proportions specified by the manufacturer, the surface may become lumpy and many bubbles may appear, which will not decorate your floor and will interfere with the installation of the final coating.
- Please note that some diluted mixtures thicken very quickly . Therefore, dilute the amount of mixture that you can quickly level. It is best for two or three people to fill the floor at once. While one is busy stirring the mixture, others are leveling the floor.
- Some users note that such surfaces do not retain heat, but this is easy to fix if you use a backing.
However, do not be afraid of difficulties. Even a non-professional can do this work. And the high cost of self-leveling flooring is compensated by its durability and long service life.
We calculate the cost of building a house from aerated concrete with our specialists: the price of materials and labor. You can find out the rules for choosing soft decorative panels for interior wall decoration here.
The topic of technology, main stages and average prices for parquet sanding work is discussed in our article.
Briefly about the main thing
To accurately calculate the consumption of the mixture for self-leveling floors, it is necessary to take proper measurements in the room. In this case, slopes and surface differences up to one millimeter are taken into account. Data from the manufacturer, which is indicated on the packaging, is also used.
When making calculations, do not forget that the thicknesses of the rough and finishing layers differ. And the size of the distributed layers is influenced by both the quality of the surface and the prepared solution. As well as strict compliance with all conditions of installation technology.
Ratings 0
General requirements, recommendations.
- The brand strength of the base is not less than M200.
- Base moisture content is not more than 4 wt.%;
- The air-to-base temperature is at least 3°C above the dew point.
- Air temperature, base, from +5°C to +25°C.
- Material temperature from +15°C to +25°C.
- Relative air humidity - no more than 80%.
- Drying each layer at a temperature from +15 to +25°C for 18-24 hours, but not more than 48 hours. at a lower temperature, the drying time increases by 1.5-2 times.
- The curing time of concrete after laying before applying impregnation is at least 28 days.
- Elakor-ED is applied with rollers (brushes) and spatulas (metal and rubber).
- Close the container with the material tightly.
Types of self-leveling floors
The main components that are necessarily present in the mixture are cement or gypsum. In this regard, they can be divided into groups:
- cement-containing;
- gypsum-containing or anhydrite.
Cement based levelers
Compositions based on cement are more versatile. They can be used in any room. They have a number of undeniable advantages:
- minimal shrinkage;
- high adhesion;
- versatility when choosing a base;
- high strength and the ability to be used as a screed;
- resistance to cracking.
Movement on such a self-leveling floor is possible within a few hours.
There are also some disadvantages:
- final strength comes in about three weeks;
- the consumption is quite large, the thickness of any layer is at least 5 mm.
Anhydride mixtures
Compositions based on gypsum are undemanding in terms of the evenness of the base. Their advantages include:
- minimal shrinkage;
- speed of drying;
- thermal conductivity, because of this property, anhydrite self-leveling mixtures are ideal for installing a “warm floor” system;
- possibility of applying screed up to 10 cm high;
- high strength.
A significant disadvantage of self-leveling floors of this type is that they can only be used in dry rooms. This condition is caused by the fact that gypsum perfectly absorbs moisture and because of this it swells and deforms. Therefore, it is better not to use such floors in the kitchen and bathroom.