It has long been known that a balcony is an important part of any apartment. It’s not for nothing that every owner strives to ennoble it. As a rule, finishing of a balcony is carried out at the final stage of its renovation.
There are many building materials that give the balcony room an attractive look. Unfortunately, many of them are afraid of high and low temperatures, absorb moisture, and wear out quickly. Tiles have great advantages.
Let's take a closer look at all the issues related to the use of tiles for the balcony.
Step-by-step installation instructions
And now we have smoothly approached the instructions for performing the work.
As you know, with preliminary preparation the work is done better. That is why, first of all, we will look at the tools and materials that will be needed when performing the work. First, let’s look at the tools:
- First of all, the construction level.
- Of course, a tile cutter, or a grinder.
- Rubber hammer.
- Roulette.
- Set of spatulas, regular and notched.
- Container for solution.
- Also, you will additionally need a pencil or marker, a sponge and a rag.
Also, depending on the choice of method for leveling the floor on a loggia or balcony, you will need an additional set of tools. We will look in more detail about the methods of leveling, filling the floor on the balcony, etc. below.
Preparatory stage
First of all, as with other facing work, the old coating is dismantled. Because without eliminating it, you will increase the load, and possibly exceed it, which can subsequently lead to the destruction of the balcony.
Permissible surface loads:
- For Soviet-built balconies 200 kilograms per meter,
- For new houses up to 400 kilograms.
If there are unevennesses, you may need to screed the floor on the balcony, which is carried out using one of several technologies:
- "Wet." It is carried out using a special solution consisting of concrete and sand. A layer of waterproofing and thermal insulation is pre-laid.
- The next option is a warm screed on the balcony. It is carried out in approximately the same way as the first one, but heating elements are also provided. In other words, the name of such a system is “Warm Floor”.
- And the last option for leveling the floor is to lay joists. The technology of such leveling involves laying waterproofing, on which logs are subsequently placed. Next, the space between them is filled with insulation. After that, moisture-resistant plywood, as well as gypsum fiber sheets, are provided.
Read more about each of the alignment methods in separate materials:
Laying tiles
After deciding how to level the floor on a balcony with your own hands, you can proceed directly to installation. The finishing itself must be carried out at a temperature of at least 10 degrees. It is carried out in the following sequence:
First of all, sheets of moisture-resistant polyethylene are laid out on top of the screed.
Then a primer is applied with a special composition, or a prepared solution of ordinary PVA glue. The next step is marking, the type of which depends on the type of masonry
It is important to control the accuracy of the markings, otherwise the tiles may be laid incorrectly. The laying itself begins from the center of the floor, while the carved pieces are laid out along the edges, where they will be invisible. We prepare the glue; the portion must be of a size that will be used within 40 minutes. Using a notched trowel, apply the mixture to the floor surface, covering an area of up to 1 square meter. The next step is to lay the first tile. Checking horizontality. Next, the laying of subsequent ones begins; floor leveling systems, or crosses, are used to form seams
In the case of porcelain stoneware, seamless masonry can be used, which creates the impression of a single coating laid with one sheet of material.
A day later, or preferably a few days later, after installation, the joints are grouted, which is done using a rubber spatula.
And the last step is to clean the tiles from dirt and remove excess grout.
This completes the work of laying the tiles.
Specifications you need
The overwhelming majority of buyers are interested in how long ceramic tiles will last them, and this is quite reasonable. In such cases, an experienced seller, usually relying on the international standard ISO 105-45-7, indicates abrasion, which can be of five classes - from PEI-I to PEI-V (the higher the number, the higher the wear resistance). In this case, he copes excellently with the function of a trader, but does not fit the role of a consultant.
Of course, floor tiles must have high wear resistance, although for an open balcony this is not the main requirement, since there is low traffic there. Here, frost resistance is in the foreground and is determined by three classes of ceramic porosity.
- B-III is the most porous tile, it is flexible when cutting and breaking, but its increased moisture absorption makes it absolutely unsuitable for outdoor use;
- B-II – here the pores are of medium size, which increases the density of the ceramic and makes it suitable for flooring. But it is undesirable to consider it as a frost-resistant floor tile for a balcony - it is more suitable for enclosed spaces;
- BI is the densest option and, thanks to this quality of water, no more than 1-6% of the total mass can be absorbed here. That is why such tiles are frost-resistant - the frozen structure of the ceramic is minimally destroyed.
The choice of floor ceramics for a balcony can also be based on the thickness of the material, which ranges from 8 mm to 12 mm. But, given the fact that the load on the balcony floor is usually minimal, the thinnest tiles are chosen. The perimeter may vary, although most often it is 300x300 mm.
It is undesirable to use ceramics with a glazed and polished surface. In the event of icy conditions, such a floor will be dangerous, since the balcony is open and freezing is quite possible.
Finishing technology
Prepare the necessary tools and equipment for laying tiles: level, hammer, notched trowel, tape measure.
To carry out installation work you will need the following tools and equipment:
- construction level;
- glass cutter (tile cutter);
- hammer;
- notched spatula;
- pencil;
- roulette;
- clean rag;
- sponge;
- wire cutters
In addition to this, you need:
- special separators (crosses);
- glue;
- sealant (silicone seal);
- grout.
A polyethylene waterproof mat is laid on the hardened screed. As soon as the mat sticks to the surface of the screed, you can safely begin laying tiles. Laying the tiles begins from the wall of the balcony.
A polyethylene waterproof mat must be laid on the previously prepared and already hardened screed. Its width should match the width. As soon as the mat sticks to the surface of the screed, you can safely begin laying ceramic tiles on top of it. Laying should begin from the wall.
Laying on the loggia should be done using a special frost-resistant elastic glue.
At the junction of the tiles with the walls of the balcony, it is necessary to do the so-called local stretching (dilatation). Special profiles are useful for this. If the area of the balcony or loggia is large, or, on the contrary, it is quite narrow and long, it is recommended to perform a transverse expansion. To do this, it is necessary to divide the balcony into two approximately equal fields, separating them with a dilation profile.
The framing row from one corner is laid first. It is final and is laid dry. Ideally, a whole quantity can be laid. But, as a rule, corner tiles are cut at 45 degrees.
Styling tips
In order to ensure that the distances between the tiles are absolutely identical, you need to use special plastic crosses.
When laying the floor, you must remember that the distances between the tiles over the entire area must be absolutely identical, so you should use special plastic crosses.
Tile adhesive is applied directly to the surface of the glued mat. The material is laid from the corners, relative to the framing row. Laying in the form of bricks looks very interesting. That is, when the seams of adjacent tiles do not coincide with each other, if one of the rows ends with a whole tile, then the other should start with a half.
Once the flooring has been installed, it must be left to dry completely. And only after the mortar on which the tiles were laid has completely dried, you can begin to grout the tile joints using a special grout. The grout can be of any color, fine-grained or coarse-grained. It is best to use a fine-grained one to avoid shedding. The color is selected based on the color of the coating. Using a silicone spatula, the seams are filled with the prepared solution and compacted until they are completely filled. After the solution has dried, the tiles must be wiped with a soft sponge soaked in water.
No other material used for finishing balcony floors has yet been able to compete with floor tiles. This material is not only durable and practical, but also aesthetically beautiful. The variety of textures and colors of this material cannot but rejoice
It will allow you to bring to life any design solutions and make your apartment stylish, interesting and eye-catching
Advantages of a modern heating system
As an efficient heating system, underfloor heating has many advantages over standard radiator systems, namely:
- possibility of use in both large and small areas;
- uniform distribution of warm masses over the entire area;
- creating comfortable living conditions;
- efficiency;
- excellent floor heat transfer;
- functional elements do not heat up to high temperatures;
- the concealment of all elements under the decor, which eliminates the need to maintain a heated floor;
- saving space and aesthetic appearance;
- ease of temperature control;
- security;
- sufficiently long service life.
Another important advantage is the ease of installation of such a heating system. Even a non-specialist can install a heated floor: this does not require special skills or equipment.
Recommendations
When decorating the interior of a balcony, you must consider the following:
- If you want to visually increase the area of the room, use materials, furniture and decorations in light colors.
- The best furniture for a balcony is compact. Therefore, use folding or transformable furniture. The theme will include pull-out or built-in cabinets, tables and chairs.
- Flowers will add grace and comfort to any balcony. You can place them in elegant flower pots or on special shelves. Plants need maximum sunlight to grow and bloom, and therefore a balcony is an ideal place for them.
- If your balcony is very small, do not clutter it with massive chandeliers and lamps. Spot ceiling lights will be more relevant here.
- Blinds, Roman blinds in light colors or nice roller shutters would be very appropriate on the balcony.
- Glossy surface design also visually expands the space due to its reflective ability.
Step-by-step instructions: do it yourself
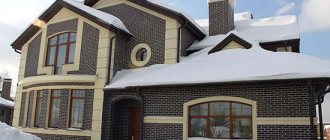
Decorating a loggia yourself is not that difficult. You need to start by selecting samples of materials for cladding, as well as determining an exact budget. To do this, you need to use a calculator to calculate the cost of all elements of finishing the loggia. In addition, for the balcony of a country house, for a loggia in a country house or in an ordinary five-story building, it is necessary to select the most suitable material, depending on the appearance and cladding of the house as a whole. The balcony must fit into the structure of the house.
The price of the entire loggia will depend on the material from which the external decoration of the balcony is made. Once you have decided on all the sizes and materials, you can proceed to laying the floors and inserting windows if this room is glazed. Then you can begin to create the frame part in the form of a sheathing.
In addition to the quality of the wall surface, it is necessary to evaluate their smoothness. They shouldn't have any dimples or bulges. You can check the walls for unevenness using a building level. By applying this tool vertically and horizontally to all walls, you can see all the problem areas. If the deviation from the norm is more than one centimeter, such a wall will need to be leveled.
The next step is to create the frame. You should not place blocks under such a structure, as they may dry out and fall off. This can lead to the entire structure being unreliable and may even wobble.
After the frame is ready, all its parts must be treated with a special solution that will prevent it from rotting or rusting, as well as the formation of fungus on it
It is very important to do this, since the balcony will constantly be exposed to sudden changes in temperature. After this, you can move on to insulating the balcony and covering it
After you decorate it with panels, tiles, lining or other materials, you need to leave it for several days, and only then you can use the balcony room and equip it.
Where can I put it?
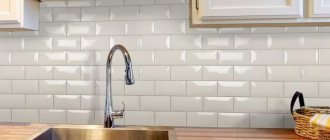
Most often, tile covering acts as a beautiful floor design. But some people also use building tiles for wall cladding. Models made to imitate brick or wood are most often placed on walls.
Sometimes smaller samples are used to lay out the space under the windowsill.
In this case, the material used for the floor and wall sections may be different in shape and structure, but in any case, all products must be combined with each other in color.
Material selection
Before laying tiles on the balcony, you need to decide on its choice. First, let's look at the main types of tiles, and then move on to the selection criteria.
Types of tiles for balconies
- The first option is tiles. It contains clay, sand and some additives. The tile is also covered with glaze, which determines the color, pattern and overall texture.
- Porcelain stoneware is the next choice. The material, due to its production technology, is resistant to temperature changes, has good frost resistance, and matches the characteristics of natural stone, in particular in frost resistance, strength and water absorption. The disadvantage is the high cost.
- Another fairly reliable and, most importantly, durable coating is clinker tiles. This material is cheaper than porcelain stoneware, but its characteristics are not much inferior to it.
- One of the new types of tiles based on polymer materials is quartz vinyl. Contains 80 percent quartz sand and PVC. It has a high level of strength and practically does not wear out. A polyurethane film is applied over the decorative layer, which ensures wear resistance.
- And the last type is Cotto tile. Recently it has become increasingly popular due to an increase in the range, which is due to the beginning of the application of glaze, which was not the case before.
Tile selection criteria
And now it’s time to decide which tiles to put on the balcony. There are some nuances of choice here, so let’s look at them in order:
First of all, the material should not be heavy so as not to exceed the permissible load on the balcony
This is especially important when glazing and finishing are already installed. That is why massive types of tiles are not suitable
You should give your preference to a material with a wear resistance level of PEI-3. It is also undesirable to choose large materials, as they will visually reduce the already small space. Another factor is dark tiles; it is also undesirable to take them for the same reason as large ones. Materials in light or bright colors work well. If the balcony has not been glazed, it is necessary to purchase tiles, as well as adhesive mixtures with a high level of moisture resistance, since the floor in this case will be under constant influence of climatic conditions. Also, the surface of the tile should be selected to be rough so that it does not become the result of injury in conditions of high humidity. Relief tiles would also be a good option.
Thus, following the recommendations, you can decide which tiles can be laid on the balcony.
Overview of species
Today, manufacturers can offer a considerable number of different models of these finishing bases. Let us highlight some of the varieties separately.
tiled
This option is considered the most common. These products are made on the basis of sand, water and clay. They have a huge variety of colors and patterns.
Ceramic samples are moisture-resistant; they can easily withstand even frequent exposure to moisture.
The tile is also particularly wear-resistant. The surface coating of the tile will not be destroyed by friction with abrasive materials or chemicals. These models also have good frost resistance, so they will be a suitable option for decorating balcony rooms. They are easy to clean with plain warm water and a soft cloth.
Clinker
This variety is produced on the basis of shale peat clays, which are subjected to severe heat treatment. Such models are considered quite reliable and durable. They, like the previous version, can boast of increased water resistance. Clinker tiles are quite frost-resistant. These types of tile coverings are distinguished by the most beautiful decorative external design.
They are often also used to decorate the facades of houses.
Porcelain tiles
This tile has an attractive appearance. It is made on the basis of special white clay, quartz and feldspar. Porcelain tiles have a high level of hardness and strength. Coatings made from it can easily last for many decades.
Due to the almost uniform structure of porcelain stoneware and the absence of voids in the inner part, the material has a rather low water absorption coefficient. Porcelain tiles have excellent moisture resistance and frost resistance. It also has an increased density. This tile can resist the accumulation of various contaminants and can be easily washed using abrasive compounds.
PVC tiles
PVC tiles
Vinyl tiles are an excellent solution for an enclosed balcony. Thanks to the variety of colors, you can independently create an original pattern on the floor that will decorate your balcony.
Advantages:
- ease of installation;
- water resistance;
- non-flammability;
- resistance to aggressive substances;
- highly decorative;
- small thickness;
- durability;
- environmental friendliness;
- practicality.
PVC tiles - a variety of shades and textures
In addition, the top layer has antistatic and anti-slip properties. The material is easy to cut, and therefore, when laying, you can even make an applique on the floor by choosing the appropriate pattern. There are plain models, wood, marble, and other natural materials. No glue or mastic is required to attach the covering to the base: the bottom layer of the tile is self-adhesive.
The material is laid on both a wooden and concrete base, the main thing is that it is as level as possible. If you have a wooden floor on your balcony, you can freshen up the interior by laying tiles on top of the boards. Such repairs will take a minimum of time, and the result will be very impressive. If laying is done on a cement screed, first grind and clean the surface from dust, then prime it. When installed on a dusty or uneven substrate, the quality of the coating will be very poor.
| Name | Characteristics | approximate cost |
| Bamboo parquet | Durable, wear-resistant, environmentally friendly material | from 1950 rub./m2 |
| Marmoleum | Non-flammable waterproof material with high decorative properties | from 980 rub./m2 |
| Liquid tile | Unique coating with 3D effect, impact-resistant and UV-resistant | from 14990 RUR/m2 |
| Leather tiles | Elite coating with high decorative properties, strong and durable | 2500-4000 rub./m2 |
| Glass floor | High-strength non-flammable coating, resistant to abrasion, mechanical stress, and chemicals | from 4000 rub./m2 |
Plastic sheathing
Plastic panels are a budget option for finishing a balcony. They do not need careful care. There is a wide range of such finishing materials on the market, which allows each owner to choose the most suitable option for himself. The use of plastic panels makes it easy to level the walls without carrying out complex work.
When using plastic panels, you need to be aware that they can become deformed at high or low temperatures. Therefore, the fastening must be non-rigid, which will prevent the destruction of the material.
The work includes the following steps:
1. First of all, the sheathing is made from wooden blocks.
We build the sheathing
2. Before starting the sheathing, it is necessary to insulate the walls. Mineral wool, polystyrene foam, isolon or ordinary polystyrene are used as thermal insulation materials.
We insulate the walls
3. Plastic panels are mounted on top of the sheathing. Nails, glue or dowels are used as fastening elements. The panels are connected to each other by grooves. Every half meter you need to strengthen the sheathing with nails. This will give it strength and reliability.
Installation of plastic panels
The most convenient option is to mount PVC panels using a mounting profile. Slats are attached along the perimeter of the balcony. In this case, the panels will fit into the grooves and snap onto the rail itself. The use of such a profile will significantly reduce the time of cladding. Under such a coating, electrical cables can be laid unhindered.
In the video: the technology of covering a balcony with plastic panels.
Laying rules
Before decorating your balcony, it is recommended that you carefully read the rules and recommendations for finishing. There are several installation options, each of which has certain features.
Calculations
Before going to the store, it is recommended to carefully carry out the calculation: measure the walls, floor, calculate the number of square meters (subtract doors, window openings). You should purchase the material with a small reserve. It is recommended to give preference to medium-sized tiles - too large squares or rectangles are not used for finishing the balcony.
Selecting a laying scheme
There are several options for laying tiles. The simplest is the standard one, which is usually used by beginners. More complex - diagonal, requires experience and strict calculations. Taking a run is another method of laying, which will require certain skills.
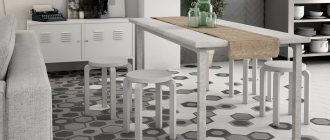
Standard
Tiles are laid in a row or vertically. The tile is located longitudinally. Thanks to this installation scheme, it is easy to visually increase the space of the room. Trimming of slabs is minimal. For standard installation, rectangular or square tiles are used.
Diagonal
The plates are arranged diagonally. When laying, you will need to trim the tiles to form the selected pattern. The scheme is used for large or medium-sized balconies - installation slightly reduces the room. A diagonal arrangement of tiles is recommended for square tiles.
Taking a running start
Reminds me of laying parquet. The first row is laid longitudinally, the next rows are shifted by about a fifth. It is allowed to shift the row even by a sixth of the tile. Typically, staggered laying is used when choosing rectangular tiles.
Preparation of materials
Before finishing the balcony, in addition to purchasing tiles, it is recommended to prepare the materials and tools necessary for the work. You will need:
- hammer (it is recommended to take a special tool made of hard rubber);
- roller;
- tile cutting tool;
- plastic crosses for leveling the surface;
- roulette, level;
- putty knife.
It is also recommended to purchase putty, primer and special glue.
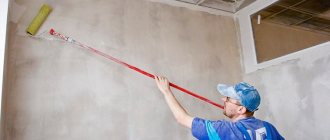
How to properly prepare the surface
Seal the entire surface and go over the cracks with putty. The next step is applying a primer. If the balcony is characterized by high humidity, it is additionally recommended to evenly distribute an insulating layer over the surface. If the balcony has a warm floor, first apply a layer of elastic adhesive.
Operating Instructions
Laying the tiles begins with the first row, which should overlap the floor cladding. Be sure to leave seams that will protect against wall deformation, which happens when exposed to moisture or frost. Use crosses to help make the seams even and neat. The optimal seam width is 3-4 mm, although much depends on the chosen design solution.
It is better not to rush with installation - it is recommended to cover no more than 1.5 square meters in one go. m area, allowing the glue to set. Fix each tile with a hammer
It is especially important to allow the glue to set when decorating the walls, otherwise there is a risk of deformation of the finish and sliding of the tiles. The only way to remove the “wavy” row is to completely remove the material and repeat all the processes - leveling, priming and laying
After completing the work, let the glue dry thoroughly (1-2 days). To make the appearance of the finish look neat, it is recommended to seal the seams with a special putty. The solution will have to be selected to match the color of the tile, although, as an option, it is allowed to use contrasting shades.
Grouting joints
This work is done when installation is complete. It is necessary, first of all, for filling joints with special compounds called grouts.
Grout is selected according to certain criteria:
- color - it gives an attractive look to the entire coating. The universal color is white, which can be changed by any color;
Grout with a decorative effect
- composition - the basic properties of the grout depend on it. For example, mixtures containing cement and gypsum cannot be used for grouting floors, as they will quickly crumble. Grouts with epoxy resins are universal. They have water-repellent qualities and do not wear off quickly. For open balconies, it is recommended to use only such grouts, although they are quite expensive;
- purpose - the packaging indicates the maximum width of grout joints and recommendations for use. Selecting it according to its intended purpose allows you to extend the service life of the grout for as long as possible.
The technology for grouting joints is not very complicated.
- A square is selected on the surface to be treated, for example, 4 by 4.
- A small portion of grout is applied to a rubber spatula and gently rubbed in a circular motion into the seams of the selected square.
- Excess mixture that collects around the seam is periodically removed with a sponge. In addition, these movements level the grout layer inside the seam.
- To create a groove inside the seam, and therefore highlight each tile, a slot is made with the corner of a spatula.
You can buy a round spatula that allows you to form beautiful seams
- After the mixture has dried inside the joints, the coated surface is finally cleaned with a sponge.
So, finishing a balcony with tiles requires time and diligence. If you follow the recommendations given in the article, the walls and floor of the balcony will have an attractive appearance, and most importantly, the coating will be able to serve for many years.
Please note: How to make a floor on a balcony
How to decorate a loggia yourself
In any case, finishing of the loggia must be done - any specialist will agree with this.
What tasks is this room ideal for? For a wide variety of people. Namely:
- Many people dry their clothes here;
- Store certain things and accessories;
- The space can be designed as a place to relax without any problems.
It doesn’t matter what material it is decided to use for cladding the walls of the loggia - the sequence of work will differ minimally
Decorating a loggia yourself is quite possible
Step-by-step instruction
- First, a frame is installed around the perimeter of the loggia. It is needed in order to install windows, fix materials for external and internal cladding;
- Installation of fastening elements is carried out in steps that are selected depending on the type of glazing system. The selected materials are also taken into account at this stage - both for finishing and for insulation;
- The finishing of external walls is done by hand. This or that high-quality sheet material is perfect for this. The most popular today are galvanized sheets, siding, and moisture-resistant plywood;
- Next, the master needs to strengthen the parapet posts;
- Install the top part of the fence;
- Install slats on the metal fence;
- The end J profile is ideal for connecting siding to the wall;
- Set up a starting profile;
- The loggia is being covered with siding;
- The supporting structure is being installed;
- The wooden beam is treated with an antiseptic (it must be thoroughly saturated), then shielding is performed with special foil penofol;
- The loggia is glazed. The system itself can be made of aluminum, plastic, or wood.
Namely:
- Frame elements are fixed to walls made of metal profiles or wooden slats;
- Install polyethylene film or some other suitable material through which waterproofing can be obtained;
- Mineral wool or foam plastic boards are glued onto “liquid nails”;
- The vapor barrier material is attached;
- The slats are fixed to the bottom sheathing so that the finishing coating can be attached;
- The selected finishing material is installed;
- When the walls on the loggia or balcony are finished, you can begin finishing the floor. For a loggia, excellent options would be: tiles, laminate, linoleum.
Cozy, well-equipped loggia
Also, you should definitely watch a video from experts on how to finish a loggia, what materials can be used for this and how to handle them correctly.
Installation
Installation of a heated floor should begin with high-quality thermal insulation of the surface underneath. Materials with a foil layer are optimal, due to which the heat will be reflected upward to the tile.
Penofol is very convenient to use, one side of which is self-adhesive, the other is foil. It is produced in rolls, which are cut to the required length and glued end to end. In order to increase thermal insulation in the room, penofol is glued slightly over the walls. After this, a damper tape is glued to the insulation around the perimeter of the room, thereby avoiding expansion of the material when heated.
A metal mesh is laid on top of the insulation, which will prevent overheating of the heat-insulating material and simplify installation.
The next step is to install a thermostat, which is a mechanical or electronic regulator that sets the desired temperature and turns the floor on/off. It is mounted on the wall next to the sockets.
Next, a groove is made in the wall from the thermostat, which descends strictly perpendicular to the floor. A corrugated pipe is mounted in the groove, where the temperature sensor is placed. The pipe runs along the floor to the temperature control point. The last point is the middle between 2 turns of the cable
It is important that there are no intersections at this point
Due to the fact that the sensor is placed in a corrugation, it is protected from damage. If the sensor is damaged, you can easily remove it from the tube and repair or replace it.
To carry out these measurements you will need a multimeter. It will also help you find the phase if there is no special marking on the cable. After making sure that the resistance is within normal limits, you can begin installation.
The technology for laying the electromat is simpler - just lay it out according to the diagram and connect it to the thermostat. If we are talking about a cable system, then the cable is laid in turns with the same pitch, and for convenience it is secured with polyurethane foam. If the wires are mounted on a metal mesh laid on top of heat-insulating material, then it is more convenient to attach them directly to the mesh using special clamps.
Once installation is complete, check the resistance again with a multimeter. The result obtained should match what it was before installation.
If a thermomat is used, then tile adhesive is immediately poured onto it and the tiles are fixed. When laying a cable system, you must first pour the screed, wait for it to dry completely, and only then install the floor covering.
When laying a warm water floor, one of 2 technologies is used:
The first, concrete, involves pouring a concrete screed directly onto the pipes, which ensures the strength of the coating and uniform distribution of heat over the surface. However, this significantly increases the weight of the floor (with a screed thickness of 50 mm and a pipe, the weight per 1 m2 can reach 250-300 kg) and the height of the room decreases.
When laying heated floors, it is important to avoid making the following mistakes:
- contact or intersection of turns of heating system cables;
- installation of the system for heating devices, furniture, household appliances;
- the use of beacons that cover part of the cable when pouring screeds;
- lack of screed or tile adhesive on some section of the heating cable;
- self-cutting of the cable in places not provided by the manufacturers (in fact, only a self-regulating cable can be cut).
All these errors lead to overheating, cable breakage, and burnout along the entire core. In this case, the consequences of violations can appear both immediately and after a significant time (up to a year) after installation.
Glazing and finishing of balconies
If you decide that the balcony will serve as a place to store unnecessary things in your home or as a cozy room in the apartment where you can relax or work, then the renovation should begin with glazing. What type of glazing should I choose? The process is divided into hot and cold. Who cares? It’s worth finding out what this means and choosing the most suitable window installation option for yourself.
Cold frame
This type of work is made of aluminum profiles. It is now used much less frequently than in previous years, but is still considered important. This option is intended for those who do not intend to use the loggia during the cold season. The aluminum profile protects the room from dirt, dust, rain and snow. Such loggias will allow you to relax in comfort in the summer, as well as grow your favorite plants. In winter, this room can be used as storage for workpieces.
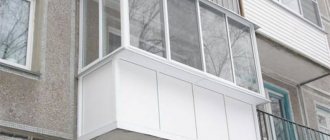
Warm plastic panels
A warm loggia includes the installation of plastic windows. Typically a two-chamber package is used. In addition, the walls, floor, and ceiling must be insulated. For this purpose, polystyrene foam (polyethylene foam) or other materials are used. It must be said that a warm loggia significantly expands design possibilities. This method will allow you to combine this room with a kitchen and bathroom, which will increase the living space.
Glass railings
Modern balconies use transparent glass walls. They give you the security of a railing but still allow for significant visibility. With the advent of minimalist lifestyles, the sleekness of clear glass walls is becoming increasingly popular. Cable railings are also often used on these balconies.
Is it possible to install underfloor heating from central heating in an apartment?
A floor heating system using coolant is one of the best ways to distribute heat evenly throughout the entire room.
Using modern materials and following installation technology, you can achieve optimal temperature conditions.
But this only applies to systems with autonomous heating.
Owners of apartments with a centralized heating system have wondered more than once - is it possible to install a water-heated floor connected to heating pipes?
It should be immediately warned that according to current legislation, modernization and changes in the pipeline layout in apartments with central heating are prohibited. However, there are many craftsmen who can perform this procedure unnoticed even by inspection authorities.
However, during the operation of such systems, problems arise not only in a single apartment, but in the entire house as a whole. So this system is recommended for owners of their own houses with central heating, but this is the exception rather than the rule.
Possible problems and their causes
The first thing encountered when designing this type of underfloor heating connection is the difference in water temperature in the system.
If this system is detected by the inspection bodies of the housing office, penalties and dismantling of all heated floor equipment will necessarily follow.
But, if, nevertheless, the desire to increase the efficiency of central heating is great, then there are theoretical schemes for implementing such a connection.
Theoretical connection diagram
To connect underfloor heating to central heating, it is necessary to install a heating point with a circular pump. This point will connect the water from the heating system with the tap water to achieve the optimal temperature.
If the apartment has only one entrance and exit of the heating main, then connecting the heated floor can be done according to the principle of connecting radiators. For a larger number of risers, a separate calculation is required.
PVC plastic pipes can be used as the pipeline material. However, it is quite problematic to arrange them in a snake for uniform heating of the floor. For this, corner connectors are used, which affects the reliability of the system.
Since the technology requires filling the entire floor area, in the event of a leak, prompt dismantling work will be problematic.
There is an option for parallel connection from the radiator return pipe. In this case, it is necessary to provide for the installation of shut-off valves (tap) both at the inlet and outlet.
The safest, but most labor-intensive way is to install an autonomous underfloor heating system with closed water circulation. The coolant can be heated through a heat exchanger, which is installed on the central heating pipe.
But the efficiency of this system will be low due to large heat losses.
Flaws
- It is illegal to install such a system.
- High probability of breakdown.
- Inability to adjust the floor heating temperature.
- The emergence of areas of uneven distribution of coolant throughout the entire heating system of the house.
- The complexity of the process.
As an alternative, you can consider installing an electrical underfloor heating system. It's easy to install and completely legal. In addition, electric heated floors do not need to be filled with cement screed.
Of course, this will result in additional energy costs. But they will be much less than fines for illegal connection to central heating.
Balcony and loggia design: ideas and photos
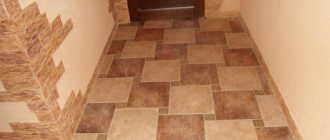
First, about the design of the balcony, which is used for its intended purpose: for a pleasant relaxation almost in the fresh air. Even an open balcony is suitable for this purpose. The interior decoration of the balcony shown in the photo is not super complicated or expensive, but the idea is great. The ceiling, floor and low long drawers around the entire perimeter are made of clapboard. Most likely painted with oil and pigment. A few pillows or soft mats will turn this space into a great place to relax.
Open balcony design
With a glazed balcony or loggia, everything is simpler: install what you consider necessary
It is important to choose the right shape and size to make the most of the space. Most often they install a small table and one or two chairs, small armchairs
This set will easily fit even on a loggia or balcony with an area of 3 meters, and so that the table does not interfere, it can be folded.
Small balcony design
The design style can be any, but it is desirable that it be in the same vein as the style of the entire house. The general idea should be traced in the design of all rooms. This is logical and looks more organic.
The relaxation corner can be decorated in any style
If the apartment is small and there is simply nowhere to put things, cabinets or shelves are installed on the balcony or loggia. They can be placed so that there is still room for a chair, or at least for a folding chair.
Storage systems on the balcony
They even make dressing rooms on a large loggia or insulated balcony. But few people can squeeze in anything larger than a wall cabinet that stands at the end. The only advice: if you are going to use shelves for storage and not for decoration, make them closed: few people can maintain ideal order in storage systems.
Kitchen on the loggia: design and finishing ideas
It is the kitchen area that is not being built on the loggia: neither the maintenance services nor the firefighters will allow it. The dining area is brought out onto the warm balcony. It's possible.
It’s not difficult to create a dining area on a balcony or loggia - a wide window sill under the glazing frames, high chairs, appropriate lighting
When combining these two areas, the window sill can be removed, but the wall cannot be touched. Unless you order a project and strengthen the remaining parts: it still won’t be possible to completely demolish it, otherwise the house may collapse. To make the existing opening look like a decoration, you can round it, make a semi-arch, or choose another type of design.
The idea is the same, the decoration of the balcony inside is different
With this approach, the decoration of the balcony inside should echo the design of the kitchen. The brick finish looks good in combination with smooth plasterboard walls.
Study
Solitude is often necessary for productive work, but finding a secluded corner in an apartment is not easy. You can organize your workplace on a warm balcony or loggia. After all, all you need is a small table and a comfortable chair or armchair.
Workplace on the loggia - a small office for work
To create the maximum working atmosphere, the interior decoration of the loggia must have soundproofing properties. This is wood, cork or vinyl wallpaper on a non-woven backing.
A shelf in the place of a former window - let’s not let the place go to waste
Bedroom on the balcony
In small apartments, sometimes there is not only nowhere to organize an office, but even with a separate sleeping place problems can arise. If you have a balcony, even if it’s 3 square meters in area, it can be turned into a small bedroom. And if the area is 6 square meters or more, then on the other side you can also arrange a work corner.
A bedroom on a balcony is not a myth. Everyone has their own approach, but it can be done
Even on a very small balcony you can make a “lying” place.
The main thing is desire, there is always a solution
An example of “green” arrangement - a garden
If none of the above methods for decorating a balcony warms you up, you might like the idea of turning it into a garden. Well, maybe not to the garden, but to the kindergarten. This arrangement option can be implemented on an open balcony, but then it is necessary to plant annuals that quickly produce greenery.
Summer garden on the open loggia
You can bring out flowers in pots for the summer. There are even more options here. If there is little space, you can make special shelves or a niche on one of the walls.
Green wall on a balcony or loggia for flowers
By the way, a good idea in the photo above: lay a wooden board on the tiled floor and build yourself a place to rest on it. Comfortable and easy.
The same ideas can be implemented on a glazed and insulated structure, but the choice of plants is wider - you will still maintain the temperature, so you can even try to grow tropical plants.
Rules for organizing space
Living space in a modern style is:
- comfort of movement;
- abundance of air and light;
- strictly verified composition;
- clear geometry of all elements.
Spacious and laconic room
This is true both for spacious rooms and for a small balcony or loggia. However, if there are no problems with lighting there, due to the large glass area, then what about the free space?
Designers advise buying only furniture that matches the purpose of the room. And do not overuse accessories. Select 1-2 main pieces of furniture. Place them in a suitable location. Usually this:
- The space along the parapet or directly next to the windows - with panoramic glazing. Usually there is a long tabletop and high chairs.
- The end of the room. This is the most common solution. Suitable for organizing an office, bedroom and rest area.
- Near the section of wall separating the balcony from the adjoining room. This option often occurs when they are combined.
Comfortable tabletop along the window opening
This loggia creates an analogy with a terrace
All flat surfaces should be as open as possible. The shelf with books should not be filled to the brim, and the window sill should not be filled with pots of plants. The surfaces must be really smooth. Even the wood is polished to a shine. Gloss is also characteristic of this direction.
Glass and gloss in a modern interior
What is important is the clear geometry of the room and its contents - furniture, decor: straight lines, the angles they form and simple figures familiar from childhood (circle, oval, square, etc.).
The strict geometry of the tabletop, shelf and doorway attracts attention
Materials
In the modern world there are many different finishing materials. The choice remains with the apartment owner: what he wants to see on his balcony and how it will fit with the interior of the apartment as a whole.
Lining
Most often, lining is used to decorate the balcony. It can be different. Ordinary lining is wooden slats or planks processed until smooth. This material got its name a long time ago, when it was mainly used to decorate railway cars. Plank-shaped lining is usually made with a ledge or tongue-and-groove lock. The slats are simply laid end to end.
Plastic lining is similar to plastic PVC panels. However, its dimensions, profile and lock exactly correspond to the wooden lining. The lining can be chosen in any color, even textured like wood.
Eurolining consists of boards of standard parameters with an asymmetric tongue-and-groove lock. On the back side there are 2 longitudinal grooves for draining excess moisture or condensation. Eurolining comes in different profiles - with right angles and rounded chamfers. This does not affect the ease of installation in any way, but the finished cladding looks very stylish.
MDF panels
It is very popular to cover the inside of a balcony with MDF panels. Partly because this is the most economical finishing option and, moreover, it is easy to do it yourself. This also reduces the cost of repairs, because paying specialists is now expensive.
Siding
Contrary to popular belief that siding is a material for exterior decoration, it is also quite suitable for interior decoration. This material is very durable and practical, resistant to temperatures. But if your balcony is located on the sunny side, then there is a high probability that the color of the material will fade in the sun and fade. Therefore, most often, when a balcony is sheathed with siding from the inside, a white material is chosen.
Decorative rock
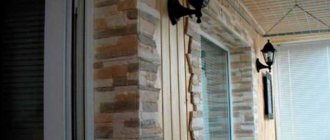
If you are prone to romance and you like castles, knights and other paraphernalia of romanticism, you can decorate your balcony with decorative stone. This finish will look stylish and original.
Decorative stone is a special type of tile whose front surface is made in the form of natural stone. After finishing with this material, it seems that your balcony is made of stone masonry. And it can be completely different. From the colors and textures of wild natural cobblestones to neat and smooth walls tiled to look like brick.
Such tiles are usually made of cement using a special technology with the addition of various technical mixtures. In terms of composition and environmental friendliness, it is very close to natural material, and therefore such cladding is becoming increasingly popular.
In addition, artificial stone is many times cheaper and lighter than natural stone. It is evenly textured and painted inside, and therefore, even if you accidentally chip off a part or cut it in the place you need, the tile will look natural when cut.