Putty mesh is necessary for high-quality repairs of any complexity. When plastering walls, most often the surface remains uneven, and the mesh allows you to remove roughness. It greatly simplifies the process of finishing the premises. A flat wall will ensure high-quality repairs and will not require additional costs. The artist can choose painting or reinforced mesh to achieve the desired result.
Painting mesh for putty
The painting mesh for putty plays the role of a reinforcing material, which consists of parts for ease of laying. It is produced by pulling quartz glass. The walls are not only smooth, but also high-quality and reliable fixation of the joints. The durability of the structure depends on the quality of the mesh and putty. Will discuss the benefits of the products:
- Provides high protection against wall deformation and makes ceilings even and smooth.
- Prevents putty from peeling off.
- Shockproof effect.
- Prevents moisture from entering and withstands rooms with high humidity.
- Fireproof effect.
- Environmentally friendly material.
- Resistant to temperature changes.
IMPORTANT! Painting mesh is valued for its wide range of applications. It strengthens concrete and brick products, fiberboard, chipboard and other materials.
In what cases is it used?
If all the planes in your house are relatively flat and the repairs are supposed to be purely cosmetic, light leveling with a mixture not exceeding one centimeter in thickness can be done without strengthening. However, if your home is new and may shrink, or in cases where the mortar will be applied thicker, it is better to use strengthening bases.
If the applied composition will be applied to a thickness of more than three centimeters, the use of reinforcing materials becomes a mandatory part of the work. Without reinforcement, in this case the plaster will no longer hold on and will fall off.
However, to obtain a better result when leveling surfaces even with a small leveling thickness, a polymer painting mesh for the ceiling is often used. It is somewhat thinner than the metal used when working with thick layers of mortars, but it significantly strengthens the surface and prevents the formation of cracks in the coating.
Purpose of the reinforcing mesh
Reinforcing mesh for wall putty allows you to hide all imperfections. After its installation, further puttying takes less time and eliminates the possibility of cracks. Allows for ideal coating of joints and guarantees a smooth surface. Most often, when producing a mesh, it is impregnated with polyacrylic dispersion. This ensures the durability of the structure.
The material does not deform even under high loads and is adapted to any weather conditions. It is a flexible lattice that can take any position. It can be laid in several layers and this will prevent the putty from peeling off, and if the mixture crumbles, this will inform the master that the mixing technology has been violated.
Conclusion
Now you know what types of mesh there are, and you can independently choose the right option for the work. The video in this article will reveal the topic in even more detail, and if something is not clear to you, then ask questions in the comments.
Did you like the article? Subscribe to our Yandex.Zen channel
June 22, 2022
Tools and materials, Plastering and wall putty
If you want to express gratitude, add a clarification or objection, or ask the author something, add a comment or say thank you!
Types of putty mesh
Reinforcing mesh for putty comes in several types. This determines the size of the cells and their appearance. Let's analyze each type separately:
- Wide diameter fiberglass mesh. Most often, experienced craftsmen buy these gratings measuring 2 by 2 mm. This variation of the reinforcing structure is not susceptible to alkalis. Even after a long period, rust is not noticeable. This type has a long service life. The advantages also include the lightness of the material. It significantly increases the service life of the putty and resistance to stress. Prevents deformation. Prevents the appearance of cracks. Increases adhesion between materials.
- Serpyanka consists of ordinary cells in the form of a square. It is most often used to reinforce the joining faces. Most commonly used for drywall, fiber sheets, cement and concrete. Sometimes builders reinforce the connecting corners of internal and external rooms. They mask cracks and strengthen slopes in door and window openings.
- Spider mesh is made from a similar material, only the fiberglass is pressed during the production process. Masters note that it is more elegant.
The mesh is laid due to the territorial alignment of the ceilings and the plaster layer on the walls of the building. This prevents cracks from appearing during operation.
Working with paint mesh
Let's look at a step-by-step algorithm for applying and filling the mesh:
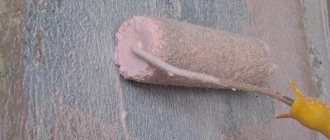
- First, the surface is treated with a primer. Then you need to give it time to dry thoroughly.
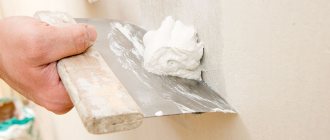
- After complete drying, the first layer of putty mixture is applied.
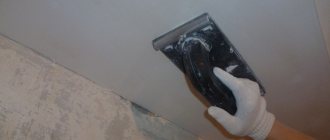
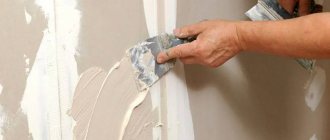
- While the putty is wet, the mesh is installed. It needs to be pressed in using a spatula. Then a second layer of putty mixture is applied.
- After complete drying, sanding is carried out. The surface is cleaned of dust and irregularities are removed.
- The final layer of putty is applied in a thin layer, and this must be done slowly and carefully.
IMPORTANT! It’s better to go over it again with fine-grain sandpaper at the end and then you can move on to painting the wall.
Using serpyanka
Serpyanka perfectly reinforces joints and corners. Let's consider a step-by-step algorithm of actions:
- It must be remembered that the joints are carefully cleaned and primed.
- After complete drying, you can place the serpyanka.
- Only after this the putty is applied. Do this with pressing movements so that all the cells are filled.
After drying, a new layer is applied. After this cleaning and painting.
Application of gossamer mesh
The web should be glued to a surface that is already primed. Let's consider a step-by-step algorithm of actions:
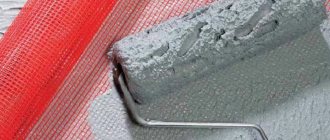
- The wall is first coated with glue.
- The web is evenly pressed down with a roller.
- After complete drying, putty is applied.
This is followed by sanding and priming. Remember that the web needs to be glued overlapping and leaving an average margin of 5-6 cm.
Choosing material
Putty paste is used for work. This is a thick plastic mass designed for leveling various substrates. Mixtures vary in several categories.
- The basis. It can be gypsum or cement. Lime, vinyl, and polymers are used as additives.
- Dispersion. The particle sizes in the mixture vary. They produce coarse, medium and fine compositions.
- Type. The material is available in powder form, then before use it is diluted with water, or in a ready-to-use form.
- Permissible layer thickness.
- Additives. To obtain additional properties, plasticizers, hardening regulators, pigments, etc. are added to the paste.
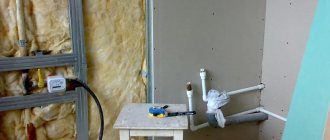
Preparing walls using putty mesh
The wall must be well prepared; if it is dirty, the adhesion of the putty and the mesh will not be of good quality. Therefore, you need to clean it thoroughly. Serpyanka has different lengths and widths of rolls. Reinforcing mesh is most often used. The room should have a comfortable temperature. The density of the putty over the entire surface should be the same. If the wall has high humidity or there is mold and mildew, then treatment with an antiseptic is required. The putty must be applied in two layers and distributed evenly. The first layer should dry thoroughly, and the mesh should be installed carefully. The second layer is applied using finishing putty.
On a note! There is more choice in Moscow, but there are also a lot of construction stores in other cities.
Varieties
Even such a simple thing as a reinforcing grid for ceiling plaster has several types. They are selected depending on the type of plaster, the thoroughness of the finish and the base with which to work. Most often, the following types are used:
- Putty mesh made of plastic or fiberglass. It is used for layers from three millimeters to thirty. Easy to attach and very easy to cut with regular scissors.
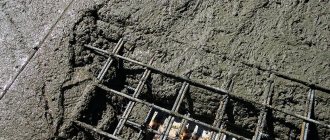
- Metal galvanized. Necessary in cases where it is necessary to make a layer of more than 30 millimeters. For cutting you will need metal scissors or a hacksaw.
- Wooden shingles. Currently, it is used only for finishing surfaces in old buildings and is practically not in demand in modern construction. You can make it yourself from thin wooden slats.
- A self-made grille from any metal wire. How to use an airbrush on cakes video? Used when restoring old houses or in cases where no other variety is available. Can be used in conjunction with shingles.
Applying finishing putty and sanding walls
The finishing layer creates the aesthetics of the wall, so it needs to be given special attention. Let's consider a step-by-step algorithm of actions:
- The putty must dry thoroughly before carrying out the final phase.
- Check the strength of the layer.
- During processing, one must not forget about precautions.
- You need to remove all the bumps with a spatula.
- You need to process the wall from top to bottom in small sections. Don't put too much pressure on the instruments.
- Sanding should only be done on uneven areas. If there are holes, they will be covered with putty.
- First, the entire wall is sanded, and only then the corners and protrusions.
Bottom line! At the end it is the turn of the primer layer and complete drying. Most often it's due to haste. Do not forget that the decorative coating is an equally important stage in the renovation.
We putty the ceiling with our own hands
We start by mixing the solution. This is an important point that is not always covered in recommendations on how to properly putty a ceiling. Whereas the quality of its application depends on the mixing of the composition. The packaging of the dry material indicates the proportions in which it is diluted. They must be strictly followed. There will also be a hardening time. If the paste dries quickly, such as gypsum, the batch for mixing should be small.
A measured amount of clean water is poured into a container of suitable size. Then the powder is poured there in small portions. Each time the mass is mixed well.
How to use
The reinforcing capabilities of painting grids are maximized when they are placed inside the processing layer intended for leveling. The probability of crack formation decreases in proportion to the approach of the mesh to the outer layer of the surface. Technological process for reinforcing the putty layer:
- Prime the plastered wall.
- After the primer has hardened, apply the putty base.
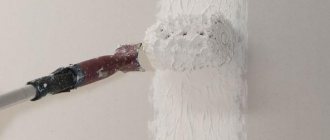
- While the putty is wet, place a fiberglass mesh on the wall and press it into the solution with a tool (trowel).
- Cover the network with an additional layer of putty, leveling it with a wide spatula.
When the reinforced layer has hardened, it is time to process it with a sanding mesh or sandpaper. In order to achieve an ideal aesthetic effect, a finishing compound is applied to the second layer of putty, which, after hardening, is sanded with fine-grain emery cloth. A completely flat plastered wall is coated with a finishing primer, after which it has hardened, painting can begin.
The technology for using mesh with an adhesive layer on drywall is somewhat different:
- The joining boundaries are expanded, cleaned and primed.
- Serpyanka is glued to the frozen joint.
- Putty strokes are applied with force so that the mass squeezes through the mesh and fills the space between the sheets of drywall.
- Without interruption, apply the second layer of putty, gradually leveling it with a spatula.
After sanding the surface and making sure that the primer has completely polymerized, you can begin painting and wallpapering.
The web is also initially glued to the primed surface: the glue is spread with a roller, the strips of fiberglass are leveled and pressed with the same adhesive roller. The putty mixture is applied after the glue has completely hardened. The following steps are identical to previous finishing technologies: sanding and priming.
Note! The next mesh for puttying fiberglass walls should overlap the previous one by at least 5 cm.
In order to reinforce the putty layer at the outer corners of the openings, you can use a specially designed corner with attached fiberglass. The corner forms an auxiliary barrier against careless chipping as a result of severe mechanical damage by a person carelessly leaning on these areas. Internal corners are often reinforced with a standard grille or fiberglass.
Useful tips
When using self-adhesive tape, you should also follow some recommendations:
- Serpyanka should be stored in an airtight package that protects the material from dust penetration and sudden drying of its side with the presence of glue.
- During gluing, the tightness of the seal should be monitored.
- It is necessary to prevent air from penetrating under the serpyanka, otherwise swelling will occur in the future, which will cause the formation of cracks.
- When cutting it, extreme care must be taken to avoid detachment of the threads, which will lead to a violation of the integrity of the putty layer.
Familiarization with the processes described above allows you not only to understand how to glue serpyanka onto drywall correctly, but also to do it with your own hands, avoiding possible mistakes that can cause cracks to appear at the joints. Video:
Advantages of using serpyanka when gluing drywall seams
The high demand for self-adhesive tape is due to a number of the following positive qualities:
- Ease of use. Serpyanka is easily glued and cut using ordinary scissors.
- Resistance to harsh environmental conditions. It withstands high levels of moisture, sudden changes in temperature and exposure to alkalis.
- Increases the strength of the surface being glued. The material does not shrink and withstands vibration and movement of individual components.
- Does not interact with rust.
- Forms strong adhesion to the binder solution. Provides reliable connection with putty.
- Guarantees a high level of strength. Serpyanka can withstand quite significant loads.
- Reliably held on the surface after the gluing process.
- Affordable material.
- Has a long service life.
An alternative to serpyanka is a special paper tape, as well as fiberglass divided into strips, which are superior to it in some respects, but due to the ease of pasting, it is often preferred.