Beton-House.com
Website about concrete: construction, characteristics, design. We combine the experience of professionals and private craftsmen in one place
Reinforcement of structures
Mesh for concrete reinforcement is the most important element of reinforced concrete structures, serving to strengthen the structure of the product. Accordingly, the characteristics of the structure as a whole largely depend on its quality.
Reinforcement of concrete with mesh is an effective protection of coatings from cracks and other unwanted defects that arise during the construction or operation of structures. How it is performed, and on what principle the elements for internal reinforcement of concrete are selected, will be described in this article.
What kind of technology
Reinforcement is an integral building material. Reinforcement strengthens structures and also extends their service life. When finishing structures, they often encounter defects that are difficult to hide. The only way out is to apply a thick layer of plaster. To ensure adhesion and strength of the coating, reinforcement is used.
It is recommended to use in cases where the coating layer exceeds 2 centimeters. Different materials are used for reinforcement. It is attached using the same technology. All that remains is to decide when it is better to use mesh for plastering walls, as well as which material to choose.
Why and when is it used?
Plaster mesh for interior work is used to solve various problems:
- Elimination of irregularities. After building a house, we are often faced with uneven structures. This is especially true when construction work is carried out by inexperienced specialists. To remove defects, plastering is carried out. If the layer is large, then you cannot do without reinforcement. Otherwise, the plaster will swell and peel off. The use of reinforcement will increase the strength of the coating.
- Increased adhesion to the structure. Compliance with all rules and regulations allows you to build structures that are even. Reinforcement with mesh for walls will ensure reliable adhesion of the cement-sand mortar.
- Repairing cracks. Plaster mesh allows you to eliminate cracks in the structure. The technology eliminates the emergence of new defects that negatively affect the strength and integrity of the coating.
Reinforcement with mesh for plastering walls is an integral process in creating a durable finish that will last for years.
With my own hands.
You can install the reinforcement by inviting specialists, but you can do it yourself. The main thing is to follow the instructions exactly and remember important nuances. When installed correctly, a mesh for plastering ceilings and walls can prevent various problems from occurring in the future:
- the plaster will adhere firmly to the surface;
- there will be no swelling on the surface of the plaster layer;
- the plaster will not peel off from the wall or ceiling;
- the service life of the plaster will increase;
- the quality of decorative finishing will improve;
Advantages and disadvantages
The advantages of the mesh include:
- light weight, which allows it to be used on any structure, including light interior partitions;
- ease of installation - different elements are used for mounting on the wall;
- affordable price - depends on the material, as well as the manufacturer;
- easy processing - easy to cut into pieces, which simplifies finishing work;
- Convenient packaging - available in rolls, which simplifies finishing;
- withstands significant weight of cement-sand mortar.
Each type has operational characteristics. Plastic does not rust, which prevents the formation of red spots on the finish. Metal cells are highly durable. Often used for finishing facades and structures with a large area.
The features also concern the weaknesses of the material. Metal mesh is susceptible to corrosion. You need to work with them carefully. Do not leave it outdoors for long periods of time.
Polymer materials are characterized by low strength. It is not recommended to use for applying a thick layer of plaster.
How to properly reinforce a concrete or cement-sand screed
Metal mesh is often used in construction work. It is located in the thickness of the structure. The reinforcement is raised 1-2 cm from the base, installed on plastic stands (rubber, plasterboard). This strengthens the screed from the inside.
Strengthening the floor contributes to:
- free distribution of concrete under the reinforcement bars;
- no oil stains on the base;
- the solution should completely cover the mesh frame.
Types of reinforcing mesh for walls
The mesh for finishing work acts as a frame that holds the entire structure from destruction.
Before using reinforcement, other building materials were also tested. Experts wanted to get strength, high adhesion, elasticity and durability from them. However, not all options survived testing. Special requirements are imposed on materials that are used for exterior finishing, because... Temperature changes, moisture and other climatic factors have a negative impact on the surface.
The following meshes are most often used for plastering facades:
- metal;
- fiberglass;
- polyurethane;
- fiberglass;
- lavsan;
- from modified basalt glass (only for wooden surfaces).
Basalt
Basalt mesh has become widespread in the reinforcement of buildings made of foam blocks. Benefits include:
- low thermal conductivity;
- resistance to mechanical stress and chemicals;
- light weight;
- durability;
- environmental friendliness.
Basalt is not inferior in strength characteristics to metal reinforcement, but it is more durable and better resists corrosion.
Basalt mesh is more durable than metal mesh, because it is not subject to corrosion
Fiberglass
Fiberglass reinforcing mesh boasts all the performance characteristics of a plastic material. But unlike polymers, fiberglass exhibits chemical resistance, increased strength and higher tensile strength. The parameters of the fiberglass sheet largely depend on the size of the cells; also, to evaluate the characteristics of the mesh, the so-called density is used, which is measured in g/m2. Based on network density, they can be divided into three groups:
- Density within 50-160 g/m2. Suitable for work inside the house. Grids are divided into plaster and painting - the latter demonstrate lower density, and the standard cell sizes are respectively 2x2, 3x3, 2.5x2.5 mm. In plaster sheets, the cell size is significantly larger - the most popular options are 5x5 mm, the density of such a product is also higher.
- Density within 160-220 g/m2. – used for plastering and puttying on facade walls. The most common cell sizes are 5x5 and 10x10 mm.
- Density within 220-300 g/m2. – this mesh is used for the basement and underground part of the building. The use of reinforcement provides the finish with anti-vandal properties, since it is able to withstand severe mechanical and impact loads. Due to the larger amount of material used in the production of such materials, their price will also be higher.
In order not to be mistaken about the purpose of the mesh, it is worth understanding the rules for marking such material:
- C – network;
- CC – fiberglass sheet;
- N – exterior finishing;
- B – interior decoration;
- Ш – for painting work;
- A – base anti-vandal;
- U – with amplification.
Manufacturers indicate information about the technical characteristics of the material on the packaging.
In production, fiberglass mesh goes through the stage of increasing resistance to an alkaline environment, which is relevant for putty and plaster solutions. To prevent the fabric from dissolving in a weak or medium alkaline solution, the fiberglass is impregnated with a polyacrylic dispersion, which reduces the aggressive effects of an alkaline environment.
This mesh is sold in the form of a 1m wide sheet, sometimes the material is sold in the form of cut rectangles. The material is actively used for reinforcing seams, corners, etc.
Plastic reinforcing mesh
Modern polymer materials are very different from the first plastics. Thanks to this, not only massive products appeared, but also mesh ones that demonstrate high strength. This is how a new material appeared for reinforcing masonry and plaster coating. Polymer mesh fabric is made from polyurethane or polypropylene (for example, Plurim). In some qualities these materials are superior to metal ones.
For example, the advantages of plastic plastering mesh are as follows:
- no fastening to the base is required, since polymer materials are lightweight;
- light weight of rolls, ease of transportation;
- moisture resistance (no corrosion or rust stains);
- no rotting;
- environmental friendliness;
- resistance to vibration loads and elasticity;
- retain properties when temperatures drop to – 40°C or rise to + 100°C;
- lower price than metal and fiberglass products.
Flaws:
- some plastics are not resistant to chemical “aggressors”;
- A layer of solution thicker than 6-8 mm cannot be applied on top of a plastic mesh product.
Polyurethane mesh for plaster is inert to chemicals, therefore it is allowed for use in industrial buildings.
Products are distinguished according to two main parameters:
- shape and size of cells;
- degree of density (the maximum allowed load on the plaster coating depends on this value).
Polymer network meshes come in two configurations. For reinforcement, fabrics with cells are used:
- square shape (the letters PCF or SQ are indicated in the marking);
- diamond-shaped.
The latter are easier to manage when plastering is done alone. For interior work, mesh fabrics with 5 mm cells are used, for facade work - larger ones (from 10x10 mm).
In terms of density, products with values ranging from 70 to 165 g/sq.m. are universally used.
There is no need to attach the polymer mesh to the base with additional devices. It is enough to apply a layer of plaster or adhesive mortar to the wall, apply and straighten the canvas, running a spatula along the top with slight pressure, and “drown” the product into the layer. There should be no areas on the surface uncovered with the plaster mixture.
Serpyanka is the thinnest of the meshes. The scope of use is not limited to the cases already described. Serpyanka is used to cover the places where window and door blocks are attached to the wall.
Tapes vary in:
- material;
- weaving density;
- the presence of an adhesive layer (self-adhesive or without glue);
- strip width;
- place of use (indoors or outdoors).
Separate fastening of the serpyanka to the base is not required. It is applied to a layer of putty or plaster mixture, leveled with a spatula and, if necessary, an additional thin layer of composition is applied on top. Instead of serpyanka, fiberglass is sometimes used, the difference being that it does not have cells.
The tape, intended for interior work, has cells with a side of up to 4 mm. Serpyanka for facades has thicker threads and a cell size of 5 mm.
Metal
Metal facade mesh for plaster can strengthen not only the plaster layer, but also the walls themselves. This mesh is the most common option for finishing facades, plinths, and so on.
The choice of material is determined by its purpose, which determines the size of the cells, the thickness of the wire, and the method of fastening metal rods/wires:
- When plastering, a woven metal mesh is used, the structure of which resembles the structure of fabric, only metal wire is used instead of thread. The main characteristics of this material are small cells measuring from 1 to 2 mm or more. The wire used for the manufacture of such networks is protected from corrosion destruction, and therefore can be made of either stainless steel or carbon steel, but with protection from a layer of zinc or polymers.
- Chain-link is also considered in demand - due to its large cells, it creates a reinforcing relief layer that allows you to hold a thick layer of finishing material on the wall.
- Welded mesh made of wire rods welded to each other is also used to strengthen the masonry of walls, installation work, strengthening load-bearing surfaces, foundations, and so on.
- Masonry mesh is another version of a metal reinforcing material that is used for strengthening walls, plastering, pouring screeds, and so on.
- Plaster network made of metal is used exclusively for plastering. It is made from hot-dip galvanized wire, and therefore is not susceptible to corrosion.
Features of mesh installation
We install the reinforcing mesh for plaster in such a way that it is in the mass of the solution.
The choice of fastening depends on the composition of the plaster mortar and the type of reinforcement:
- directly onto the solution, onto the first plaster layer;
- install using screws or self-tapping screws, then filling the cells by spraying liquid solution.
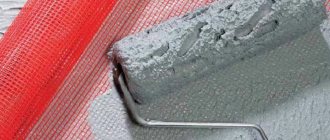
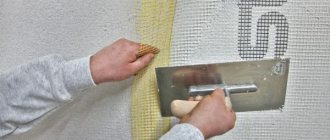
How to attach fiberglass mesh
For reinforcing a plaster layer from 3 to 30 mm, fiberglass with a cell size of no more than 5x5 mm, density 110-160 g/m2, resistant to the aggressive effects of alkali, is suitable.
We attach the fiberglass reinforcing mesh in such a way that it is embedded in the plaster mass of the reinforced walls.
To do this, apply the solution to the wall surface along the width of the mesh and level it with a comb spatula.
We lay fiberglass fabric on the wet plaster and press it into the solution using a grater or spatula. We lay the canvases with an overlap of more than 10 cm.
Apply another layer of mortar evenly on top, leveling with a wide spatula.
If it is necessary to apply a thicker layer, after the solution has dried, we attach another row of mesh, finally plaster and rub the surface.
When reinforcing a putty layer with a thickness of less than 10 mm, it is allowed to fasten the reinforcing grid to the wall surface with staples or screws.
Installation of metal mesh
When the thickness of the plaster is more than 30 mm, it is advisable to reinforce the walls with galvanized metal reinforcing mesh with cells of 10x10 or 12x12 mm.
Expanded-extract galvanized grating is also suitable. It is easy to cut and adapts to any surface, even with a minimum thickness of the plaster layer.
The work is performed in the following sequence:
- degrease the metal mesh using acetone or solvent;
- cut into sheets using metal scissors;
- Make holes on the wall or ceiling using a hammer drill with a 6 mm diameter drill. The hole spacing is 25-30 cm. There should be about 16 holes per 1 m2;
- We fasten the grille with screws and mounting tape, placing the panels overlapping by 10 cm, paying special attention to the junctions with the walls and ceiling;
- to create an even layer of plaster, install guide beacons;
- spread the plaster mortar with a trowel and level it with a long grater or spatula;
- After the first layer has dried, apply another layer of plaster, level and rub.
If an expanded metal mesh is used, the layer of plaster can be from 5 mm.
How to choose the right mesh for wall reinforcement
The choice of material depends on various factors:
- composition of the plaster mixture;
- material of plastered structures;
- plaster thickness;
- operating conditions.
To reinforce cement-based plaster mortar, a mesh that is resistant to alkalis is selected. When using gypsum solutions, any reinforcing material will do.
It is not economically feasible to use heavy-duty, expensive imported reinforcing materials. It is better to opt for domestic meshes, which are not inferior in technical characteristics to foreign analogues.
Advantages and disadvantages
The use of such products in construction creates the following advantages:
- high quality with a significant increase in strength;
- ensuring the perception of bending influences;
- the possibility of reducing the thickness of concrete screeds while maintaining the specified strength, thereby achieving savings in expensive concrete;
- standardization of the range of standard meshes simplifies the design of structures;
- factory production ensures compliance with technical specifications and exact dimensions of products;
- convenience and ease of use;
- reducing the labor intensity of work and the time it takes to complete it;
- reducing waste of fittings, which leads to saving material resources;
- light weight of the reinforcing mesh;
- resistance to temperature changes;
- high fire resistance;
- ease of transportation and storage, especially for rolled materials;
- increasing the service life of structures.
Despite the many advantages of metal products, they have one big drawback - inevitable corrosion.
Which one is best to use for plastering?
Reinforcing mesh is produced for a specific type of work. To determine the choice, there are several rules:
- A 3 cm layer of applied mortar should be made of fiberglass.
- Metal gratings are used when applying a solution with a thickness of 3 cm or more. When carrying out external work. And also for plastering baths and swimming pools.
- The plastic cell is designed for coating with gypsum solutions.
- Serpyanka and other tapes are used to reinforce plasterboard joints and cracks.
- Chain-link and fiberglass are used to finish the stove and fireplace. The first option is for cement-clay mortar, the second is for thin plaster.
These rules will help in choosing cellular fabric for certain jobs.
For interior work
For interior work, several types of mesh are used.
- Polymer material. Used for plastering surfaces with gypsum-based mixtures. A 2x2 cell will withstand gypsum mortar and will not crack the surface.
- Fiberglass. Mounted on a rough foundation made of brick or concrete. Holds cement mortar perfectly. It shrinks less, and when dry, cracks do not appear on the surface.
Attention. Using cellular fabric, the work goes quickly and easily. The surface is durable and has a long service life.
For outdoor
To work with outdoor surfaces, you need to choose the right mesh. To do this, follow the rules:
- the choice depends on the plaster used;
- dimensions of the surface on which the work will be carried out;
- thickness of the mortar layer applied to the walls;
- humidity, temperature changes.
Fiberglass cloth. Working with small square meters of facade surface.
Metal applicable:
- The wall area is large;
- a wall made of aerated concrete or brick, as well as wood;
- if there is high humidity or sudden changes in temperature;
- if the mortar used is cement-based;
- if increased strength is needed for the walls of the building.
Reinforcing metal is available in the following options:
- Chainlink.
- Welded type.
- Expanded metal mesh PVA;
- Solid drawn PVA.
I use different types of meshes for different jobs.
For the ceiling
Light nets are especially suitable for gypsum plaster ceilings. When thin-layer plastering, the threads of synthetic products overlap more easily, which reduces the consumption of plastering materials.
Often the ceiling in old-type houses is “decorated” with rustics - they are sealed with mortar with sickle reinforcement, or a mesh fabric is placed in accordance with their direction. The entire ceiling surface must be covered with canvas (the joints overlap by at least 10 cm). The corners of the junction of the wall and the ceiling plane are also reinforced with overlap.
Used grades of reinforcing steel
In regulatory construction documentation, all reinforcing steels are divided into 6 classes: from A-I to A-VI. All classes, except A-I with a smooth section, have a periodic (ribbed) profile. Roman numerals indicate the strength levels of steels. The designation of hot-rolled steels with thermal hardening includes the letter “T” (for example, AT V). Reinforcing wire is divided into 2 classes. B-I is used as distribution structural reinforcement, and B-II is used as working reinforcement in light-type meshes. If the wire has a ribbed surface, the letter “r” is added to its designation (for example, VR-1).
In accordance with current state standards, the following types of reinforcing steels are used for the manufacture of building mesh:
- hot-rolled reinforcing steels A-III, with increased strength, sections from 12 to 40 mm, as well as thermally strengthened properties when rolling steel of class At-III-C, for working reinforcement of heavy-type meshes;
- reinforcing bars made of hot-rolled steel AI and A-II as working reinforcement for light meshes and structural distribution for heavy ones;
- wire BP-I and V-I for working reinforcement in light types of meshes and structural reinforcement in heavy ones.
To provide additional protection against corrosion, galvanized reinforcing mesh is used. The zinc layer is applied to products using the following methods:
- electrolysis of rods performed before welding the meshes (about 10 g/m2);
- electrolysis of finished meshes (layer thickness 20 g/m2);
- hot galvanizing (up to 130 g/m2).
The greater the thickness of the protective layer, the higher the protective characteristics. Although galvanized products are more expensive than black ones, their high quality, durability and good appearance fully justify the higher prices.
Technology of plastering walls on a grid
The technology itself is quite simple and if you have at least minimal experience, the process takes very little time. The main thing is to do everything in strict sequence in order to get a truly high-quality processing result.
Preparing the walls
First of all, it is necessary to prepare the surface of the walls for further treatment with plaster. Some may think that if a mesh is used, this stage can be skipped, but in fact this is not the case and preparation should never be skipped.
- First, the wall must be freed from the old coating. Everything is carefully removed so that the surface is perfectly clean.
- Then you need to try to remove the dust as efficiently as possible. If there is fungus or mold on the surface of the wall, each affected area is carefully treated using a special metal brush.
- Only after this can you begin to treat the walls with a primer. Due to this, the quality of grip will be several times better. The base will be more durable, and in the future the risk of mold, mildew or corrosion will be much less.
It is very important to approach this stage responsibly, because the final result will largely depend on how well the facade surface was prepared.
Installation work.
The installation process is divided into several steps.
First of all, the surface to be plastered is degreased and coated with a special primer. This is necessary to ensure good adhesion of the mortar to the wall or ceiling.
Then the chain-link mesh for plastering walls is cut into sheets to make it easier to work with. It is worth considering that along the joints of walls or rustications on the ceiling, reinforcement should be placed in the form of solid sheets. In this case, it is good when the edge touches the adjacent wall or the bend of the wall is ten to fifteen millimeters. This strengthens the corners. It is very important to make a right angle with plaster.
Each type of construction mesh for plastering uses its own technology. For example, fiberglass material is attached to the first layer. Press it in a little, then apply the next layer. The fiberglass mesh for plaster ends up inside the plaster layer.
To ensure that the facade fiberglass mesh under plaster holds firmly, some experts prefer to use different fastenings - screws and self-tapping screws. First, the surface is marked at the rate of sixteen holes per square meter.
Then holes are drilled at selected points where dowels or screws are placed. So that their caps protrude slightly above the wall or ceiling. Spread the first layer of plaster mixture. Put a net on the hats. Cover with plaster.
An important point is that it is better to apply the mixture throughout the entire space, but it is worth distributing it starting from the middle - in different directions. At the same time, the edges of the canvas are pressed at the corners with a wide spatula. And the second spatula is used for smoothing.
When plastering the ceiling, it is suggested to first make holes, then insert fasteners into them. After this, glue the plaster fittings to the ceiling with mounting tape. This option is suitable if lightweight material is used. Then metal plaster beacons are installed. The mixture is applied. It is important to ensure that it fills the cells and adheres to the surface of the ceiling.
Methods for attaching different types of nets to walls
Each type of mesh that can be found on sale today has its own fastening features, which are very important to consider. Otherwise, the result will not please you, and the finish may soon begin to deteriorate.
Synthetic reinforcement products
In this situation, it is necessary to attach the material to the wall surface exclusively along the perimeter of the mesh. First, you need to securely secure the upper edge of the canvas using self-tapping screws, and then gradually attach all the other sides of the mesh used. There is no need to use any more additional products for fastening, because in the future the mesh will be secured as securely as possible using a layer of plaster.
As a rule, synthetic mesh is sold in rolls. To make installation take less time and require less effort, it is best to start fixing it along the wall parallel to the floor. You can start attaching the top part from absolutely any angle. It is worth paying attention to the fact that the joints must be overlapped with an overlap of up to 20 centimeters. Experts recommend cutting the canvas in such a way that a solid mesh is stretched over the entire wall. Due to this, it will be possible to increase the strength of the plaster layer several times.
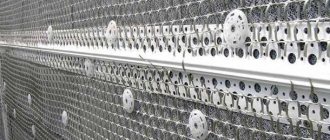
Metal reinforcement products
In order to be able to work with metal materials, the additional use of self-tapping screws, construction dowels, and special metal mounting foam will be required.
All these materials should be prepared in advance.
- Before proceeding with installation, you need to cut the required piece of mesh. In this case, the builder must measure the area of the area on which he intends to apply plaster in the future. Metal scissors are used for cutting, because the mesh is made of a fairly thin material. If wire with a thickness of more than 2 mm was used for the mesh, then it can only be cut using a grinder. The canvas must be thoroughly degreased. To do this, a rag is moistened in a solvent, and then the surface of the mesh is wiped with it.
- The fastening in this situation will start from the ceiling. The top of the material must first be attached along its entire length using self-tapping screws. In this case, special cut pieces of polyurethane foam must be placed under the caps. You can also replace gaskets with wide washers, but the cost of such products is much higher than metal tape.
- When installing the mesh on a brick or concrete surface, you will need to make a certain number of holes in the wall into which plastic dowels will be inserted.
- The distance between the dowels used will depend on the exact thickness of the mesh used and the size of the cells. At the same time, experts recommend that the step width be no more than half a meter. In those places where the canvas is securely fixed, most often it is adjacent to the wall. In the case of those places that are between the fastenings, it should under no circumstances come into contact with the wall. Otherwise, the quality of the plaster layer will be several times worse.
- It is worth paying attention to the fact that at the joints the metal mesh must be installed with an overlap of up to 10 centimeters.
- If the canvas is fastened correctly, it will be very well stretched. If the mesh vibrates in some places, it means something was done incorrectly. Because of this, voids will form under the mesh, which will negatively affect the quality of the finish.
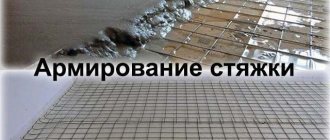
Reinforcement of structures
Mesh reinforced concrete
In individual construction, such concrete reinforcement is most often performed when constructing a monolithic floor with your own hands. In this case, the mesh for reinforcing the concrete screed can be used either factory-made, of the types listed above, or made independently by tying reinforcing bars with steel binding wire (see video in this article).
Work order:
- Clear the room of debris.
- If the mesh is in a roll, then cut into pieces of the size required for reinforcement.
- If the mesh was supplied with factory-made cards (metal or plastic composite), then lay out the sections and tie the joints with wire or plastic clamps.
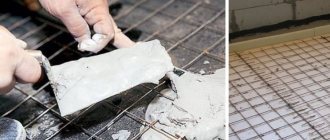
Plastic frame
- In the case of making nets by hand, you need to acquire a hook and knitting wire; cut the reinforcement and knit frames of the required size from it. Further see point 3.
- For better contact of concrete with the reinforcement frame, we do not place the frame on the base, but install it on special “chairs” (see photo).
Frame on "chairs"
- After completing all the work described above, we proceed to preparing and laying the concrete mixture.
Mesh for reinforcing concrete screeds is produced in a wide range by specialized reinforcement and welding plants or, in the case of plastic composites, supplied to the retail chain by specialized enterprises. The selection of the necessary reinforcement must be made taking into account the type of monolithic structure and the required performance characteristics of the coating.
Options for plastering walls
A very important stage in finishing the facade is directly plastering the surface of the walls. It is necessary to approach this process as responsibly as possible, because the final result largely depends on it. Plastering walls on a grid should be carried out in several stages. At each stage, one layer of the solution prepared in advance will be applied.
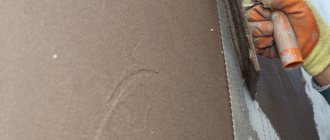
Experts recommend doing two, or better yet, three layers of plaster. It is worth choosing the number of layers taking into account what kind of surface will be processed. The very first layer of finish must be applied by “spraying”. That is why, when preparing the solution, it is worth remembering that its consistency should be similar to fairly liquid sour cream. When the solution is ready, it must be applied to the wall surface using a special trowel. It is worth noting that this can be done in any order, whichever will be most convenient in each individual case. Of course, the solution can be spread on the surface of the wall, but the first method will take much less time. Then the mixture is leveled using a spatula. The thickness of the first layer should not be more than one centimeter.
When the first layer is completely dry, you can begin the second stage of plastering the surface.
To do this, make a thicker solution that will resemble dough. It is applied to the walls using a trowel and then leveled using a rule. It must be pressed against the installed beacons and carefully inserted from the bottom up. This layer must completely cover the mesh that was used for reinforcement. When the solution has set well enough, it is necessary to carefully pull out the profiles, and carefully seal the grooves that remain after them with the solution.
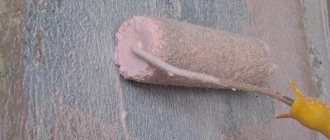
The last stage is leveling the surface of the walls. To do this, a fairly liquid solution is made, which must be applied to the walls in a circular motion with a trowel and thoroughly rubbed over the surface.
Installation of beacons
In order to properly install the beacons, you will need to use a building level. It must be set so that the outer profile is in a vertical position. Then the profile needs to be secured using two self-tapping screws. After this, the lighthouse is fixed by using a small amount of gypsum mortar. Only after this can you begin to place a beacon on the other side of the wall. In order for all profiles to be in the same plane, a thread must be stretched between the outer guides. After this, you can install all other beacons. It is worth paying attention to the fact that they should be set so that the distance is less than the length of the rule used.
Meshes from popular manufacturers
The Italian concern Tenax produces mesh for plastering walls and other structures. In the product line:
- Armaflex is a biaxially oriented network made of polypropylene for plaster coatings with a thickness of 1-3 cm. Weight 100 g/m2. Withstands tensile load –
- Armatek – plastering fiberglass mesh. Density 110-138 g/m2.
- Polypropylene Sintaflex E can fully replace hardware in terms of strength. It is used for plastering walls up to 7 cm thick, reinforcing concrete screeds, and also for protection against moles.
- Plurima is a polypropylene product with small cells 5x5 mm. The area of the rolled fabric is 250 m2. Roll weight – 10.4 kg. Chemically resistant. Used for thin layers of decorative plaster and brickwork.
All products are universal, chemically inert, resistant to UV rays, and geometrically stable.
As for the plaster facade mesh sheets Valmiera, Alabuga, Bautex Eurofacade, Vertex, Textile Glass, they cannot be used inside the plaster layer, since they do not strengthen, but separate the plaster into two layers. They are used only by placing them inside a reinforcing layer of polymer glue, into which they are embedded.
Experience shows that the mesh for plaster is a very important element that helps prevent the appearance of cracks and destruction of the plaster layer under vibration loads and settlement of the building. It also protects facades covered with thermal insulation from destruction. The correct choice of reinforcing product and adherence to technology guarantee durability and long-term preservation of the appearance of the finish.
When is it necessary to reinforce
It is known that concrete can withstand compressive loads very well, 10-15 times better than tensile and bending loads. Therefore, places in building structures that must withstand tensile and bending loads must be reinforced. The class of reinforcement, its diameter and the structure of the frame are included in the design of the facility under construction based on calculations.
There are working, transverse, mounting and distribution fittings.
Working rods
pass perpendicular to the direction of bending and tensile forces. They must be installed:
- in the foundation strip;
- in the span of the beam;
- in lintels above openings;
- in masonry of stone walls;
- in columns.
Distribution fittings
installed when concrete is being poured during construction
- slabs;
- concrete floor;
- paths;
- entrances;
- blind areas.
Regarding Cross Clamps and Mounting Rods
, they are used when tying or welding a metal frame.
Question of price
The price of reinforcing mesh depends on the material, technical and operational parameters and manufacturer.
In different stores and construction markets, reinforced lattice of even the same type can vary significantly in cost.
To purchase the material at a favorable price for you, it is better to contact the manufacturer.
Average prices for 1m2:
- metal, made of galvanized wire Ø 0.25 mm - 470 rubles;
- welded galvanized, made of steel Ø 1mm - 250 rubles;
- fiberglass - 25 rubles;
- plastic - 20 rubles;
- polypropylene - 22 rubles;
- foam propylene - 65 rub.
You can take advantage of sales and seasonal discounts that large shopping centers offer at the end of the construction season.
Any reinforcing material is suitable for strengthening the plaster layer. The main thing is to choose the best option for your premises.
Possible mistakes
Novice craftsmen often encounter mistakes that can lead to peeling of the solution and reduced surface quality:
- No primer. The primer increases the adhesion of the material. It must be used to ensure that the mortar adheres securely to the wall.
- Violation of proportions. Lack of water leads to increased density. Such plaster slides under its own weight and cracks.
- Adjustment of consistency with powder. The consistency of the working mixture should only be changed with water. To do this, it is administered in small portions, bringing it to the required volume.
- Refusal to reinforce joints and walls in new buildings. Joints made of different materials have different technical characteristics. They differ in behavior under changes in temperature and humidity. Therefore, cracks often appear at the joints. Reinforcement helps to avoid them.
- Incorrect position and fastening of the mesh. It is enough to secure the lightweight fabric around the perimeter. When using metal sheathing, fasteners are made over the entire area.
- Attaching beacons to a continuous layer. To install beacons, straps with a given pitch are used.
- Failure to comply with drying conditions. It is unacceptable to dry walls in direct sunlight, with a heat gun or at elevated temperatures. This leads to uneven drying of the mixture and cracking.
Drying the wall with a heat gun leads to uneven drying of the mixture and cracking. Frequent mistakes also include too thick a mixture, an excessively thick or thin application layer, and the use of low-quality materials.
Marking of welded mesh
When choosing the required type of mesh, you need to be guided by the designations printed on the products; several letters and numbers contain all the basic information about this mesh, allowing you to make the right choice.
The first digit indicates the following product type:
- 1 - heavy, reinforced with longitudinal working rods of large sections;
- 2 - heavy, in which the working rods are located mutually perpendicular along and across the card;
- 3 - heavy, working rods of larger cross-section are located across the web;
- 4 - light type with reinforcement across the canvas along its entire width;
- 5 - light types, with a mixed arrangement of transverse reinforcing bars.
Welded structures are designated with a capital letter “C”. When supplied in rolls, the product is designated “Sr”. The diameters of the longitudinal rods are designated by the letter “d”, and the diameters of the transverse rods by “d1”. Additionally, the class of steel used in manufacturing, the pitch and size (a) of the release of transverse rods and (a1, a2) longitudinal ones are indicated. The Latin letters “b” and “l” indicate the dimensions of the width and length of the canvas in cm.
So the following marking of the product 2C - 30 A-III / 25 A-III - 205 × 665 indicates that we have a welded mesh of the 2nd type with working reinforcement A-III with diameters of 30 mm in the longitudinal direction and 25 in the transverse direction , the width of the product is 205, and the length is 665 cm.
In the marking of metal woven netting, the chain-link first indicates a number indicating the accuracy group of the mesh sizes. If square letter designations are not used for the cells, the letter “P” is indicated for a diamond shape. Next, indicate the size of the sides of the cell in mm and the wire diameter used.
For example, the marking 2-P-25-1.6 means that the presented grouse is made of reinforcing wire with a cross-section of 1.6 mm with diamond-shaped cells measuring 25 mm according to the 2nd accuracy class.
Recommendations from experts
It is possible to obtain a high-quality and reliable wall only if you follow advice from experts:
- Alignment. The walls should be carefully leveled. The level is checked using a plumb line or laser. The better the work is done, the better the finishing is.
- Taking into account the characteristics of materials. Compatible materials should be selected. Aggressive solutions are capable of dissolving the reinforcing structure.
- Taking into account the maximum load and possible shrinkage of the building. In the case of new buildings and facades that are severely deformed, it is recommended to use metal reinforcement.
- Final revision. Plaster is not a finishing coat. To give it decorative properties and prepare it for subsequent finishing, it requires sanding and sanding.
Experts recommend that you always sand the walls after applying plaster.
Reinforcing mesh is a necessary element for rough finishing of house facades and walls in new buildings. Its correct fastening and adherence to the technology of applying plaster allows you to create a reliable and strong coating that will last a long time.
Sources
- https://mirbetona.info/finishing/setka-pod-shtukaturku
- https://1beton.info/shtukaturka/setka-shtukaturnaya
- https://PoShtukaturke.ru/steny-vnutri/shtukaturka-vyravnivanie/oshtukaturivanie-sten-po-setke.html
- https://1pofasady.ru/shtukaturka/setka-dlya-shtukaturki-sten
- https://DekorShtukaturka.ru/instrumenty/setka-dlya-shtukaturki-sten
- https://oshtukaturke.ru/raznovidnosti/armiruyushhaya-setka
- https://arbolit.org/sovety/tehnologiya-vypolneniya-shtukaturki-po-setke.html
- https://1pofasady.ru/shtukaturka/tehnologiya-shtukaturki-fasada-po-setke