The Russian hut has always been nice, solid and original. Its architecture testifies to its fidelity to centuries-old traditions, their durability and uniqueness. Its layout, design and interior decoration were created over many years. Not many traditional Russian houses have survived to this day, but you can still find them in some regions.
Initially, huts in Russia were built from wood, with their foundations partially buried underground. This ensured greater reliability and durability of the structure. Most often there was only one room, which the owners divided into several separate parts. An obligatory part of the Russian hut was the stove corner, to separate which a curtain was used. In addition, separate areas were allocated for men and women. All corners in the house were lined up in accordance with the cardinal directions, and the most important among them was the eastern (red), where the family organized an iconostasis. It was the icons that guests were supposed to pay attention to immediately after entering the hut.
Porch of a Russian hut
The architecture of the porch has always been carefully thought out; the owners of the house devoted a lot of time to it. It combined excellent artistic taste, centuries-old traditions and the ingenuity of the architects. It was the porch that connected the hut with the street and was open to all guests or passers-by. Interestingly, the whole family, as well as neighbors, often gathered on the porch in the evenings after hard work. Here the guests and owners of the house danced, sang songs, and children ran and frolicked.
In different regions of Russia, the shape and size of the porch were radically different. So, in the north of the country it was quite high and large, and the southern facade of the house was chosen for installation. Thanks to this asymmetrical placement and the unique architecture of the facade, the whole house looked very unique and beautiful. It was also quite common to see porches placed on pillars and decorated with openwork wooden posts. They were a real decoration of the house, making its facade even more serious and solid.
In the south of Russia, porches were installed from the front of the house, attracting the attention of passers-by and neighbors with openwork carvings. They could be either two steps or with a whole staircase. Some home owners decorated their porch with an awning, while others left it open.
Fairytale hut
A dense forest hides Baba Yaga's home on chicken legs. It’s probably settled on swampy hummocks and is surrounded by fly agaric mushrooms, but you’ll figure that out later, now let’s get down to drawing:
- we draw the configuration of the trough, that is, the bottom is narrower than the top;
- we add a high triangle roof on top, and apply wavy decorations along its edges;
- from below, one window repeats the outline of the house, the other - any shape in the attic and under it there is a canopy;
- We place, as usual, round corners in the corners, decorating them in spirals;
- we finish drawing the shutters and the smoke pipe, highlighting the horizontal lines of the logs;
- Thick legs with chicken feet were attached to the floor.
A forest thicket is depicted around; you can put a crow on a ridge. Color the masterpiece to your taste, giving the picture an ominous shade or a bright, cheerful look. If it turns out clumsily, it’s okay, because the hut was made by evil spirits. So feel free to present your creation in front of your family or at school.
Drawing huts is very interesting; once you have acquired the initial skills, you can move on, creating an entire village with a cozy homely image against the backdrop of nature. The seasons will bring a new enchanting atmosphere to the canvases - in winter they will be covered with snow, in rainy weather they will be shrouded in subtle nostalgia. Both adults and children will enjoy this activity. Create it yourself and teach it to your children!
Seni
In order to retain the maximum amount of heat from the stove in the house, the owners separated the living area from the street. The canopy is exactly the space that guests immediately saw when entering the hut. In addition to keeping warm, canopies were also used to store rockers and other necessary things; this is where many people made storage rooms for food.
A high threshold was also made to separate the entryway and the heated living area. It was made to prevent cold from entering the house. In addition, according to centuries-old traditions, each guest had to bow at the entrance to the hut, and it was impossible to go inside without bowing before the high threshold. Otherwise, the guest simply hit the doorframe naked.
General form
How did our great-grandfathers build huts? This largely depended on the region of residence. Indeed, even now, having visited the south and north of Russia, one cannot help but notice the difference in the houses. The traditions of architecture also depended on climatic conditions and the availability of necessary materials. For example, in the northern regions there was moist soil and, accordingly, a large amount of raw materials for building houses.
In the southern regions, it was difficult to obtain wood, so until the fifteenth century, mud huts were built there, resembling dugouts, dug one meter into the ground. The northerners quickly came to the land type of housing, thanks to the humid climate and a large amount of forest.
The ninth century hut was a square building with a side of four to five meters. The log house was brought to the construction site in finished form or assembled log by log.
The floor in the home was most often earthen; a little later they began to cover it with boards. Wealthy Slavs built two-story towers. A canopy, about two meters wide, was usually attached to the hut.
| The roof was made of wood, planks or shingles. Since the sixteenth century, the roof was covered with birch bark to protect against dampness. Window glass appeared in the tenth century; before that, housing was built without openings, equipping only small windows to allow smoke to escape. |
Russian stove
The life of a Russian hut revolved around the stove. It served as a place for cooking, relaxation, heating and even bathing procedures. There were steps leading up, and there were niches in the walls for various utensils. The firebox was always with iron barriers. The structure of the Russian stove - the heart of any hut - is surprisingly functional.
The stove in traditional Russian huts was always located in the main area, to the right or left of the entrance. It was considered the main element of the house, since they cooked food on the stove, slept, and heated the entire house. It has been proven that food cooked in the oven is the healthiest, since it retains all the beneficial vitamins.
Since ancient times, many beliefs have been associated with the stove. Our ancestors believed that it was on the stove that the brownie lived. The garbage was never taken out of the hut, but burned in the oven. People believed that this way all the energy remained in the house, which helped increase the family’s wealth. It is interesting that in some regions of Russia they steamed and washed in the oven, and were also used to treat serious diseases. Doctors of that time claimed that the disease could be cured simply by lying on the stove for several hours.
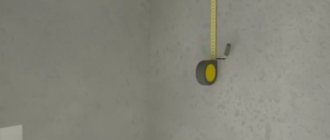
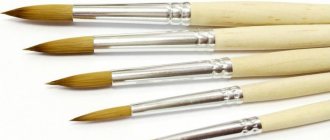
What you will need
In order to draw a hut we may need:
- Paper. It is better to take medium-grain special paper: beginning artists will find it much more pleasant to draw on this kind of paper.
- Sharpened pencils. I advise you to take several degrees of hardness, each should be used for different purposes.
- Eraser.
- Stick for rubbing hatching. You can use plain paper rolled into a cone. It will be easy for her to rub the shading, turning it into a monotonous color.
- A little patience.
- Good mood.
Stove corner
It was also called the “woman’s corner” because all the kitchen utensils were located there. It was separated by a curtain or even a wooden partition. Men from their family almost never came here. A huge insult to the owners of the house was the arrival of a strange man behind the curtain in the corner of the stove.
Here women washed and dried things, cooked food, treated children and told fortunes. Almost every woman did needlework, and the quietest and most comfortable place for this was the stove corner. Embroidery, sewing, and painting were the most popular types of needlework for girls and women of that time.
Utensil
It is difficult to imagine a peasant hut without numerous dishes and household items. Utensils (cast iron pots, frying pans, clay patches) were stored in the oven or near it. But porcelain products were placed in a prominent place so that every guest could appreciate their beauty. It symbolized prosperity and was a source of pride for Slavic housewives.
Dishes for festive events were placed in the upper room, and plates were placed in the watch cabinet. Hanging shelves were used to store everyday utensils. Dinnerware consisted of a clay or wooden bowl, a spoon, a salt shaker made of birch bark or copper, and cups for kvass.
| Painted boxes, decorated colorfully and brightly, were used to store bread. This highlighted the item, symbolizing its importance and significance. They drank tea from a samovar. |
A sieve was used to sift flour. The most common utensil is a clay pot. They prepared delicious porridge and rich cabbage soup. The farm also used barrels and tubs for pickles.
They fried it in a frying pan and kneaded the dough in wooden containers. Buckets or jugs were used to store and carry water.
A grip was used to remove food from the oven. In the nineteenth century, clay pots were replaced by metal utensils called cast iron pots.
For eating, they used a bowl that varied in size. Often along the edges of the object there was a painting of floral patterns. For drinking, a wooden or clay mug covered with patterns was used.
Benches in the hut
In the Russian hut there were movable and fixed benches, and chairs began to appear in the 19th century. Along the walls of the house, the owners installed fixed benches, which were secured using supplies or legs with carved elements. The stand could be flat or tapered towards the middle; its decoration often included carved patterns and traditional ornaments.
There were also mobile benches in each house. Such benches had four legs or were installed on solid boards. The backs were often made so that they could be thrown over the opposite edge of the bench, and carved decor was used for decoration. The bench was always made longer than the table, and was also often covered with thick fabric.
Road
The road goes through the village to the forest. Close to the viewer it is wide, but as it moves away it narrows, and near the horizon it can even converge into one point. The road usually has two tracks, with a strip of grass in the middle. A village street can be uneven - sometimes a hill, sometimes a hollow. If you're drawing a hill, the width of the road doesn't change much as you get closer to the top. At the edge of the depression, the lines break off, and if the opposite slope is visible, the ruts on it are much closer to each other.
The road does not have to be straight; you can draw it with an arc. But in any case, the farthest part will be narrower than the closer one.
Men's corner (Konik)
It was located to the right of the entrance. There was always a wide bench, which was fenced on both sides with wooden boards. They were carved in the shape of a horse's head, which is why the male corner is often called “konik”. Under the bench, men stored their tools intended for repairs and other men's work. In this corner, men repaired shoes and utensils, and also wove baskets and other products from wicker.
All the guests who came to the owners of the house for a short time sat down on the bench in the men's corner. It was here that the man slept and rested.
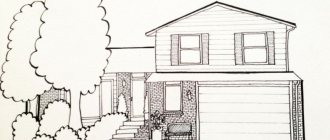
Houses and fences
Mark the outlines of houses on both sides of the road. They are drawn quite simply: a square or horizontal rectangle, with a triangular roof on top. It is better to place houses with their facades facing the viewer. In the middle of the front wall, mark the position of the window. Mark where the shutters and trim will end. The edges of the platbands can be straight or have a more complex and bizarre configuration. Draw the logs using long horizontal lines. Several houses can stand at an angle - then the side parts of their roofs look like diamonds. Bushes usually grow around village houses. At this stage, these are just white spots, limited by a contour of any shape.
We recommend reading: Cake decorating: original options for beginners
Women's corner (Seda)
This was an important space in a woman’s life, since it was from behind the stove curtain that the girl came out during the viewing party in elegant attire, and also waited for the groom on the wedding day. Here women gave birth to children and fed them away from prying eyes, hiding behind a curtain.
Also, it was in the women's corner of the house of the guy she liked that the girl had to hide the sweeper in order to get married soon. They believed that such a sweeper would help the daughter-in-law quickly become friends with her mother-in-law and become a good housewife in her new home.
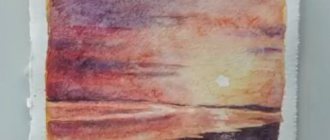
Fields and forests
Lay the sheet horizontally. You need to convey a large space, because the village is surrounded by fields and meadows. Draw a horizontal line approximately in the middle of the sheet. However, the horizon line may be a little higher or a little lower, depending on what kind of buildings you are going to draw. Behind the village there may be, for example, a forest. Draw a curved line above the horizon line. The easiest way is to draw it with zigzags of different heights, because the tops of the trees have different heights.
Christmas trees have sharp tops, while other trees have more rounded tops, so it’s better to draw them by alternating zigzag and wavy sections.
Red corner
This is the brightest and most important corner, since it was considered a sacred place in the house. According to tradition, during construction, he was allocated a place on the eastern side, where two adjacent windows form a corner, so the light falls, making the corner the brightest place in the hut. Icons and embroidered towels always hung here, as well as in some huts - the faces of ancestors. Be sure to set up a large table in the red corner and eat food. Freshly baked bread was always kept under icons and towels.
To this day, some traditions associated with the table are known. So, it is not advisable for young people to sit on the corner in order to start a family in the future. It is bad luck to leave dirty dishes on the table or sit on it.
People stored cereals, flour and other products in hay barns. Thanks to this, the housewife could always quickly prepare food from fresh ingredients. In addition, additional buildings were provided: a cellar for storing vegetables and fruits in winter, a barn for livestock and separate structures for hay.
Step by step lesson
It is best to depict any objects by looking at them in person. This way it will be much easier to draw a hut if you draw from life. Also, I advise you to thoroughly study the subject of drawing before starting to draw. This can get rid of many design errors. Look in Yandex.Pictures what it looks like and imagine how it should work to bring maximum benefit.
By the way, in addition to this lesson, I advise you to pay attention to the lesson “”. It will help improve your skill or just give you a little fun.
Simple drawings are created using contours. It will be enough for you to repeat what, and only what is shown in the lesson, to get an acceptable result, but if you want to achieve something more, then try to present that. What do you draw in the form of simple geometric bodies? Try making a sketch not with outlines, but with rectangles, triangles and circles. After some time, with constant use of this technology, you will see that drawing becomes easier.
Tip: create a sketch with as thin strokes as possible. The thicker the sketch strokes are, the more difficult it will be to erase them later.
The first step, or rather the zero step, is always to mark a sheet of paper. This will let you know where exactly the drawing will be located. If you place the drawing on half of the sheet, you can use the other half for another drawing. Here is an example of marking a sheet in the center:
First we draw a sketch. It should consist of visible walls and a roof outline.
We are finalizing the window, making the shutters more complex, and highlighting the hay on the roof. We draw an ornament above the window and insert the frame into the window. It's time to erase the auxiliary lines and mark the log house at the corners of the hut. We draw it using ovals.
In the end, we complicate the design as much as possible: we finalize the ornament, unite the frame with lines, and add small chips.
Remember: the more detail in the drawing, the better it looks.
I sincerely hope that you enjoyed the lesson on how to draw a hut. If you put in the effort, I believe you will achieve everything you set your mind to. Now you can pay attention to the lesson “” - it is just as interesting and exciting. Share the lesson on social networks and show your results to your friends.
Every modern person must necessarily live somewhere: in an apartment or in a house... Human dwellings were called differently before and are called now. Among such names we can recall: house, hut, kuren, tent, hut, yaranga, wigwam, apartment and others. But there is another, ancient Russian name for a person’s home. This is a hut. Huts were built in Rus' from logs, the so-called log huts. The gaps between the logs were laid with special fluffed ropes or grasses (for insulation) so that the wind would not blow. Skilled craftsmen used to be able to build huts without a single nail. But for this it was necessary to study for a long time from experienced masters. Huts are often present in Russian folk tales and epics. Let's learn how to draw a hut step by step on our website.
Stage 1. First, as usual, we draw the auxiliary lines of our future hut. The straight line of the ground on which the hut stands, with two straight lines extending upward from it at a short distance. We intersect them with roof lines crossing each other. The hut will have two windows - these are squares or small rectangles.
Stage 2. Under the hut we draw an elongated closed curve extended along. This will then be the green lawn on which our home stands.
Stage 3. Now on the sides of the hut along the straight lines of the walls we draw circles with curls. These are the logs from which this dwelling is built. And the curls on the log houses are the lines on the transverse cuts. The logs go right up to the roof.
Stage 4. Now let's draw the roof. Along the intersecting upper straight lines we draw the contours of the planed logs. They form the roof itself, raised at the top and lowered towards the walls.
Stage 6. Let's do a little decorating of our hut. Let's draw beautiful sashes around the window frames. They are carved from wood and form the patterned frame of our windows. On the sides of each window there are two sashes, which are usually closed at night.
We recommend reading: Autumn leaves made of paper: templates and stencils for cutting
Stage 7. Now, using horizontal lines, we will draw the logs that make up our hut. We carry them from one side to the other.
Stage 8. Next to the hut we will draw a fence. It consists of straight lines - boards. We place lines often. On the fence near the huts there were usually pots and cast iron pots - utensils for cooking in the oven.
Stage 9. Let's draw the second part of the fence from the other side.
Stage 10. Now we will connect all the vertical boards of the fence with transverse lines like a ladder. Immediately delete all unnecessary lines, leaving only the main lines of the drawing.
Interior decoration
First, let's sketch out the perspective of the room. Having drawn a large rectangle, we fit a smaller one into it, connecting their corners. Progress:
- the resulting walls must be drawn with vertical lines under the logs, things will be placed clearly parallel to them;
- in the distant projection there is a stove;
- we will define a bench under the window on the right;
- on the left is a doorway above which kitchen utensils are stored on a shelf.
It is not forbidden to change the location of the components at your discretion and even experiment by hanging a cradle, curtains, installing a samovar and other household appliances.
Russian stove
When starting the task, circle a figure that looks like a large, low bottle, whose neck is a pipe going into the ceiling. Using the law of perspective, give it volume. Starting from the base of the throat, we introduce the rear silhouette, similar to a rounded trailer. Its top is a couch, to which a three-step staircase leads. The hemisphere, lined with brick, in the center is the place where food is prepared, the same cutout in the lower area is the firebox with firewood. Nearby there is a grip, a poker, and a wooden tub.
Red corner
In the past, this was the main area of the room where the iconostasis was located. We draw an angular perspective with outlines of log parallels. At the top point we draw one under the towel or several icons on the shelf. On the left under the window we will place a table and a bench next to it. Everything will work out without difficulty if you follow the exact placement of objects in relation to the wall markings.
Draw with a pencil
Drawing with a pencil has its own techniques, so in this part of the lesson we will separately look at how to draw a Russian hut with a pencil. Use the basics of construction from the first part of the lesson, add details from your imagination, change their places, the main thing here is to draw a house with a pencil.
Draw the general outlines of the house with a thin line.
We outline the roof lines as shown in the figure. You can put more pressure on the pencil, or superimpose some strokes on others.
Draw windows and logs on top of the wall line.
We draw the details: shutters, pipes, boards and carvings on the cut of the logs.
The surface of the logs has a rounded shape, so a shadow is formed at the junction between them. Let's depict the shadow with light shading.
A glare forms on the protruding part of the logs - this place should remain light. Let's paint over the turns of the logs so that the shading is slightly lighter than the shadow area. This will create the volume.
Now let's complete the drawing. Using the same principle as shown above, we will depict chiaroscuro on the windows, roof, pipe and other details that will be in your drawing. Using strokes we will depict the sky and grass - the closer it is to the viewer, the thinner the grass will be, and vice versa. You can experiment, the main thing is that the lines are light and confident.