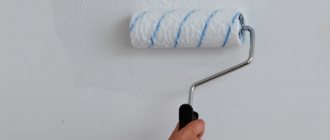
Varnish for polymer coating (plastic) - properties of the product
Plastic doors and windows are usually painted to match the color of the interior, and sometimes coating with varnish or paint makes PVC communications less noticeable.
Painting protects plastic surfaces from destruction and fading. The material has such a feature - it is resistant to destruction and burnout.
For this reason, it is worth knowing which varnish for plastic is best suited, and also which paint will interact with the surface 100%.
Fashion Striped Vinyl Car Sticker
A line of 9 matte stickers from a Chinese manufacturer in the form of stripes applied to racing cars. There are 8 color options. Made by plotter cutting. They don't have a background.
Fashion Striped Vinyl Car Sticker
Car stickers under varnish cost about 300 rubles.
Features of the interaction between plastic and varnish
The adhesion of paint and varnish material to a plastic base is a quality that is worth paying attention to first of all. Polyvinyl chloride is characterized by a dense and hard structure, as well as a slippery surface. Such surface properties will reduce adhesion to paint.
In addition, paint for polyvinyl chloride plastic is required, which has the following technical characteristics:
- Resistance to interaction with moisture.
- Indicators of coating strength.
- Resistant to various mechanical damage.
- Tolerance to exposure to direct sunlight.
- Color fastness.
- The composition is harmless, as well as components harmful to health that are not released after drying.
- Resistance to temperature changes.
- Long service life.
- An assortment of shades and the ability to create different textures on plastic.
Most often, polyvinyl chloride is painted independently at home, and therefore easy-to-use paint is required.
How to work with self-adhesive film
Self-adhesive film has almost unlimited possibilities in realizing your design fantasies. It is safe for health, not afraid of high temperatures, waterproof, durable, and quite cheap. It can be used to cover the bathroom, kitchen, walls and doors in the room, and update old furniture.
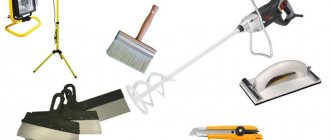
Required tools and materials:
- self-adhesive film in rolls
- dishwashing liquid
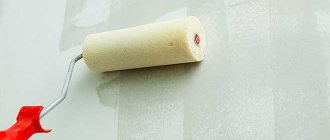
- primer, varnish
- scissors or knife
- ruler
- hand hair dryer
- wallpaper glue
Process:
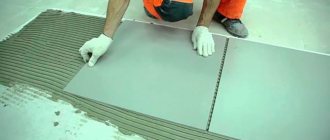
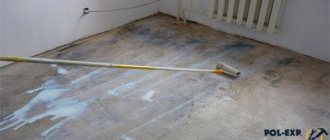
- We are preparing the surface that we are going to cover with film. It should be clean, smooth, free of grease and dust. To degrease, we use dishwashing detergent, and in difficult cases, an alkaline solution. Before gluing, lightly moisten smooth surfaces (glass, metal, plastic) with water and detergent. Rough porous surfaces (wood, plywood, fabric, cork, ceramic tiles, plaster) must be dry before gluing. For maximum adhesion strength, unvarnished wooden surfaces are primed using polyester or primer varnish or methyl wallpaper glue. Uneven or cracked bases are leveled using putty, sanded and coated with an acrylic-based primer.
- We cut the film. Cutting is facilitated by a centimeter grid (scale), which is printed on the back paper side of the self-adhesive film. When cutting long, even pieces, it is recommended to cut with a knife along a ruler. It is recommended to cut with a margin of 2-3 cm. If the pattern is on a film with repeat, we cut it along the front side.
- We paste the film. Separate the paper from the film by approximately 5 cm. Apply the film to the surface and glue the separated edge. After this, slowly and evenly pull off the paper with the remaining part of the self-adhesive film with one hand. With the other hand, smooth the film with a soft towel. It is necessary to smooth from the center to the edges - this will avoid the formation of air bubbles. If bubbles do form, they should be pierced with a needle, carefully releasing the air.
- We glue the corners and edges. To paste round edges, heat the film with an ordinary hand-held hair dryer. After this, it is very easy to bend it and glue it on the inside. When pasting smooth corners and edges (for example, book bindings), it is best to cut the protruding corners of the film at an angle of 45 degrees. After this they are folded and glued.
- We make several panels. Make an allowance of about 1.5 cm and overlap the panels over each other. Then we cut both layers with a sharp knife along a ruler, remove the cut strips and only then press the edges tightly. The joints can be sealed on top with a border.
- We cover large surfaces. Self-adhesive film will adhere well to large surfaces only if they absorb moisture well. We cover the surface with wallpaper glue and, while the glue is wet, glue the film, adjusting it to the desired position. Then we press it with a rag or sponge and smooth it out. If the film sticks too quickly, sprinkle the surface with powder or talcum powder - this will slow down the gluing and allow you to move the film to the desired position.
Rules for pasting furniture with self-adhesive film, recommendations
In order to hide scratches and defects received during the use of furniture or to renew the surfaces of facades and panels, a special film is used. It is durable, has an attractive appearance and a rich color palette. To figure out how to glue self-adhesive film to furniture, you need to consider in detail its features and application methods.
- Material characteristics
- Choosing a film based on the type of room
- Application technology
- Common mistakes
- Video
Material characteristics
Furniture film helps to visually refresh furniture panels that have become boring over time in a short time. With the help of simple manipulations, the procedure can be done with your own hands in a few hours. To do this, you only need the material itself and sharp scissors or a construction knife.
Today, the range of this raw material occupies a leading position among other methods of furniture restoration. Using the material, you can bring any design solutions to life without spending a lot of money.
The popularity of using self-adhesive is due to its following advantages:
- the material is supplied in rolls, making it easy to cut rectangles and squares of the required dimensions;
- the film helps protect furniture from future scratches and chips, and if they do appear, replacing the material will not be difficult;
- self-adhesive film will help save the family budget: you won’t have to purchase a new set if it is possible to update old products;
- no additional tools are required for work;
- well suited for kitchen furniture, protecting it from grease, dirt and other damage;
- the material is easy to clean, self-adhesive compounds can be treated with detergents and gels.
The raw material consists of several layers: front, adhesive, protective. Each of them performs its own function. The very first layer, the front layer, is made from different types of materials:
- polymer film - represented by a self-adhesive type of vinyl, which perfectly covers surfaces. She looks very beautiful on furniture, and her decorative abilities are invaluable. In addition to vinyl, PVC or polyester is used;
- foil - used for lining less used pieces of furniture, most suitable for wall cabinets;
- paper - paper-based material can be glued to the ends of the shelves, since such a film does not withstand constant mechanical stress.
Decorative film can imitate a large number of surfaces: leather, wood, natural stone, ceramics, tiles and fabric. Thanks to this, it has a wide range of applications not only in updating facades, but also in ordinary decor.
Depending on the material of manufacture, self-adhesive film is divided into:
- single-layer roll products - produced on the basis of polymers, additives in the form of plasticizers, which give the raw material strength: all components are mixed together and flat rolls are formed by extrusion;
- two-layer models - in this case, two fabrics are used in production: the base and the surface; such material is technically worse than its single-layer counterpart.
Anyone can glue furniture on their own; no special skills are required. Before you start working, choose the surface structure of the film; it can be glossy, matte, transparent, mirror and holographic. Each type is used in individual cases, so it is important to determine in advance the purpose of the raw material.
Choosing a film based on the type of room
In order for pasting furniture with self-adhesive film to be successful and to serve for many years in the future, you need not only to purchase high-quality material, but also take into account the type of room in which the surface will be used. Raw materials for the kitchen and bedroom have their own characteristics, so when choosing, use the following tips:
- film for furniture intended for the bedroom or living room should not only have an attractive appearance, but also fit into the interior. If previously the fronts of cabinets and tables had a certain color, it is not at all necessary to repeat it - you can purchase rolled products of a different shade, but do not forget about compatibility with upholstered furniture and decoration. For well-lit rooms, a matte film is ideal - its structure will be perfectly visible in sunlight. When choosing a self-adhesive base for the bedroom, pay attention to products that imitate natural materials. Such options would be appropriate for decorating the facades of cabinets and chests of drawers;
- To make the kitchen set look like new, it can also be covered with vinyl material. For this room, the strength characteristics of the raw materials and the ability to constantly withstand mechanical stress are very important. Gloss would look good here, but remember that the surface requires careful care. Many designers recommend using self-adhesive compounds with photo prints and bright images. The pattern of citrus fruits will suit the kitchen space;
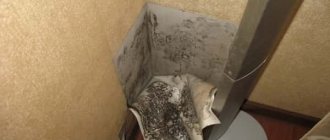
- You can also update the furniture in the bathroom or toilet using this raw material. Thanks to its properties of not absorbing moisture, the pasted surface will not only look beautiful, but also be practical. For the facades of cabinets and cabinets in the bathroom, use options that are consistent with the color scheme of the floor and wall tiles;
- To freshen up the children's room, glue on material depicting your favorite cartoon characters. Children always enjoy new things, and such a surprise will delight them. An assortment of films with fairy-tale characters will help your child make the right choice. The raw material is used to process wardrobes, bedside tables and even tables for doing homework. If your plans do not include a complete replacement of the appearance of the furniture, you can stop at using individual patterns for decoration.
To update the outside of glass cabinets and display cases, treat the furniture with a transparent self-adhesive film. This material often has a small printed pattern that will help diversify glass facades.
When choosing a material, think carefully about the future design. Some varieties of holographic or glossy films can have the opposite effect and create a cluttered feeling in the room.
Application technology
Before sticking the self-adhesive film on the furniture, you need to prepare the tools for the job. These include:
- scissors and a sharp utility or construction knife
- soft fabric to smooth out wrinkles;
- roller for removing air from the material;
- solvent;
- primer mixture;
- medium-dispersion sanding paper.
In the process of pasting furniture with film, it is first necessary to prepare the surface of the products by treating them with a special composition. For this, a primer is used, which improves the adhesion of the two planes.
Preparation proceeds as follows:
- tighten all hinges and fasteners of the furniture product. Also check that all screws are screwed in completely; if this is not done, small protrusions will be visible on the glued surface, which will significantly affect the aesthetics of the appearance;
- examine the furniture for cracks and chips. If there are any, they must be removed using putty. Gently apply the mixture to the defect areas and fill the voids. After drying, treat the areas with sandpaper - this will give greater adhesion to the surface to be pasted;
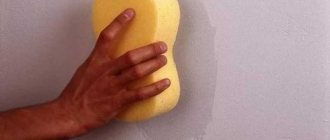
- The next step will be degreasing the plane. Before gluing the film to furniture, soak the fabric in a solvent and go through all the corners and hard-to-reach areas of the furniture panel that will be treated with the material.
How to glue self-adhesive film? The main stages and secrets of high-quality gluing
Author: Olga Bilovitskaya · Published 12/07/2018 · Updated 12/09/2018
When a thorough renovation has long been completed and the created interior with new pieces of furniture has already become boring, you want to refresh it again. Spending money on new renovations is impractical, but investing a little in giving the old interior a new lease of life would be a great idea. A material such as self-adhesive film can come to the rescue, which allows you to very quickly, conveniently and efficiently update both walls and furniture. If you know how to glue self-adhesive film correctly, you can even use it to mask any defects on surfaces, cracks and other imperfections.
Coating features
Material such as self-adhesive film has appeared on the building materials market for a long time. But over the years it has managed to improve and transform, and is now regaining its lost popularity. Self-adhesive film, which can be glued to various surfaces, has a low cost, a huge range of colors and textures, and is also very easy to use. Therefore, it can be used for decoration everywhere. It is worth understanding the main characteristics and features of such a material in order to know how to properly glue self-adhesive film to furniture, walls, even cars.
Among the huge range there are varieties for any surface and purpose. Adhesive coating manufacturing technologies are similar to the production of adhesive tape. At the same time, the finished material combines the properties of wallpaper and adhesive tape.
It is worth noting several advantages of self-adhesive tape:
- Resistant to moisture.
- Inert to high ambient temperatures up to 80 degrees.
- A huge number of different patterns, textures and colors.
- Acceptable affordable price.
- Easy to use and stick.
- Makes it easier to care for pasted objects or surfaces.
Self-adhesive film also has another characteristic feature - it can cover absolutely any surface made of metal, wood, glass, plastic, drywall, plywood, cork.
Note! The main difficulty that may arise when working with this material is a perfectly leveled base for gluing. How to glue self-adhesive wallpaper correctly onto a platform without defects, irregularities, cracks, bulges, or dents. In the future, they will all serve as the main prerequisite for the formation of bubbles on the surface of the film. Because of this, it may deteriorate or begin to come off.
Gluing self-adhesive wallpaper to the wall is not difficult. In order to glue them, you do not need to have any special skills or abilities. To apply the film, you just need patience, a little free time and an assistant, especially when working with large surfaces.
Also, to glue such material, you need to prepare the appropriate tools:
- Ruler.
- Scissors.
- Construction knife.
- Pencil.
- Industrial dryer.
- Felt spatula.
Note! Using a hair dryer, you need to heat not only the joints or corners of the wallpapered surface, but also the entire perimeter of the sheet as a whole.
Under what conditions can it be used?
Since the finished coating is not affected by moisture and high temperatures, self-adhesive wallpaper can be glued to walls under any conditions convenient for the master.
MDF facades: PVC or paint?
Kitchen with MDF film facades MDF facades are very popular. Kitchen furniture with such fronts is preferable to solid wood furniture. Firstly, because solid wood is more expensive. Secondly, such material is less practical.
Despite the fact that MDF is essentially sawdust. MDF facades have the following advantages:
- strength
- durability
- resistance to external negative influences
Environmental friendliness is another advantage. No harmful substances are used when pressing sawdust. They stick tightly to each other due to the release of a special substance contained in the wood. The problem of choice does not end there.
Which ones should you choose?
Each of the facade options proposed above has its own disadvantages and advantages. In general, thanks to modern production technologies, they all work perfectly in the kitchen, but there are nuances. For example, painted facades, unlike film ones, cannot have a wood structure or pattern, but we have the opportunity to give them absolutely any color. The disadvantage of plastic facades is that milling cannot be done on such facades. At the same time, there is a definite plus: they can withstand temperatures up to 240 degrees Celsius (according to some experiments, even more).
Solid wood facades are a very individual product that is not suitable for everyone. Firstly, they are quite expensive compared to all other options. Secondly, they require proper conscious care. But with good care they will last in the kitchen for up to 50 years, and possibly longer.
Honda car sticker - sticker
Products of a Russian company from St. Petersburg. The company's catalog contains more than 30,000 items. Vinyl applique can be customized with a choice of color, size and material.
Honda car sticker - sticker
Self-adhesive product with the logo and name of a famous car manufacturer. It is produced by color printing using original Roland eco-solvent inks on high-tech Japanese equipment from high-quality cast films ORACAL and ZM. The peculiarity is the absence of a background.
You can buy it by paying from 140 rubles.
DECORETTO / Car sticker “Lone Wolf”
Image of a predator's muzzle and paw prints. Color – black-gray, background – white. The PVC surface is glossy. The product can be repeatedly used in interior decoration for gluing on various surfaces, including glass, ceramic tiles, metal, plastic, wood, and non-paper wallpaper.
DECORETTO. Car sticker "Lone Wolf"
Price – from 300 rubles.
An interesting example of developing chipboard painting technology from True Factory
Let's give a practical example from True Factory, which concerns the painting of melamine-coated chipboards. The manufacturer encountered poor adhesion of the paint and varnish coating, which is, in principle, expected for surfaces with low porosity.
The low-quality soil from a little-known manufacturer used by the company did not help. True Factory technologists conducted a series of tests using different options for adhesive primers.
The best results were obtained using the following combination: Sayerlack TUL3530/00 Adhesive Primer for Melamine Paper (100%) + TH0790/00 Hardener (10%) + DT0452/00 Solvent (40%).
See the results in the photo below, in the photo test before and after using the TUL3530/00 adhesive primer. For testing, we used a familiar adhesion test - lattice cuts.
What does this experience from True Factory show us? First of all, do not be shy and contact the technologists of paint suppliers in case of problems with painting chipboard, laminate in terms of adhesion and more, to select the required adhesive primer and obtain stable painting results.
| Rice. 3. Adhesion of paintwork materials before applying adhesive primer |
| Rice. 4. Adhesion of paintwork after applying adhesive primer |
Feedback from site visitors:
I’ll tell you about my own experience in painting chipboard and film facades in furniture production.
Painting chipboard
Chipboard was painted, but rarely when the project indicated that, for example, the outer side wall of the kitchen or the details of the portal had to be the same as the painted or patinated facades.
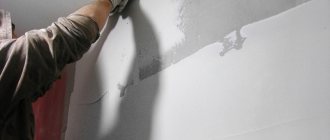
In this case, the surface of the chipboard was sanded with paper of P220 grit or coarser in order to break the top protective layer of the laminate on the chipboard to a matte surface. Next they applied paint, but more often they worked according to the scheme - sanding, one layer of primer, sanding, finishing. No adhesives were used.
Problems arose if the edge was poorly glued and after finishing the paint fell into places where the edge did not fit well, worse if it peeled off, but again this was due to poor performance of the gluing equipment, a violation of the gluing technology.
Painting facades covered with PVC film
We had to resort to the technology of painting film facades in order to simplify the technology of painting facades with complex internal milling.
What were the difficulties: the main ones were the labor intensity of grinding complex milled profiles and the risks of damaging the profile itself, which already required reworking the facades.
In addition, it was necessary to apply sealing primer, sand it, apply base primer, sand, apply primer again, and sand again. In the case of film, the surface and profile of the MDF facade in PVC film were simply pre-grinded and finishing layers were applied.
It turns out that the technology was reduced to a minimum, well, sometimes they could apply primer to the film before painting, but sanding the primer in this case was much easier than sanding unlined MDF.
An important point in all this is how well the film is glued to the MDF facades. If the film peels off from the edge, if there are inclusions under the film, glue sagging, poor-quality milling, poor preparation of the facade surface before pressing, then we will get not the advantages, but the disadvantages of this technology.
Therefore, the technology for pressing facades in a membrane vacuum press must be at a high level.
In addition, the film itself must be selected for the facades. Firstly, it should be white, and secondly, it will be better if it is intended just for painting, that is, without a protective top coating.
Film suppliers called this film primer. In principle, you can use just white film, but a trial application and an adhesion test are necessary.
Interestingly, no adhesive primers were applied to the film facades; it was enough to matt the film by sanding. But, in any case, experiments are always needed, and then mass application of the technology, otherwise primer may be needed to improve the adhesion of paint to film or chipboard. For such primers, contact your suppliers, they will help you select the necessary paints and varnishes.
Often, a wardrobe, a chest of drawers, or even all the furniture that has served us for many years, no longer meets the changed needs. They become unfashionable, do not match the color of new tiles or wallpaper, become boring and simply not pleasing. Of course, you can buy new ones, but not everyone is ready to spend a considerable amount on this. And old things, although not fashionable, familiar and comfortable, often have pleasant memories associated with them.
The best way out is to repaint them a different color. If successful, familiar things will not just get a second life, but will turn into a real element of the author’s design.