To prepare the soil mixture, you need to gradually add alabaster into water (0.2 liters per 1 sq.m.), stirring constantly. The final consistency should resemble thick kefir. Then add PVA and mix everything again. You can also buy ready-made primer concrete-contact
(quartzite). We prime the walls with a thin layer, putty in two layers, then apply primer again. We are waiting for the walls to dry. By using this method, you can be completely sure that the wallpaper will stick firmly to the wall.
How to paint walls before wallpapering
Have you read the technology of gluing wallpaper on walls with your own hands in the previous article, but there are still a number of less significant questions to which you could not find the correct answer? This article will help you decide what to paint the walls with before wallpapering, because some craftsmen use painting instead of priming the wall.
For example, paint the base with latex paint Tex “Interior paint white matte” or an alternative can be paint from Tikkurila. This is how you can apply these paints to the walls of the room as a kind of preparation. But it is better, they say, to use acrylate-based primers with deep penetration, for example, GLIMS-Grunt.
Painting walls before wallpapering
If the master decides to glue wallpaper rolls to walls that have not been previously primed, then the plaster mixture will not behave in the best way: it will begin to absorb glue from the wallpaper. How to paint walls before wallpapering , read the entire article.
In accordance with this fact, the strength of the adhesive will decrease. It is recommended to spread wallpaper glue (diluted more thinly) on the walls before gluing the wallpaper, so that the walls are better able to hold the wallpaper glue from the wallpaper. Preparing walls for wallpapering before painting means that the painted wall will not absorb water.
But remember, acrylic or alkyd paints do not adhere very well to wallpaper glue. Therefore, the first statement that what to coat the walls with before wallpapering is also wallpaper glue has no basis.
How to paint walls before wallpapering video
To improve adhesion, you better saturate the wall with acrylic primer. And then glue wallpaper on it.
What to do with the walls before wallpapering
When deciding how to prepare the walls for wallpapering, how to paint the walls before wallpapering , paint the walls and then cover them with primer like “betokontakt”, ST-16, etc. Then prime again, but with a mixture with deep degrees of impregnation.
And then coat the walls with diluted wallpaper glue. Can I paint the walls before wallpapering ? This will result in proper painting of the walls before wallpapering.
Painting walls before wallpapering - should I remove the old paint?
What if there are several layers of old paint on your walls? Often the master tries to find out whether it is possible to paste wallpaper on previously painted walls. Run a trowel over the wall where the old paint is. (This is, of course, an old-fashioned method, but it works great). If the paint crumbles under the spatula and comes off in rags, it will not be possible to hang wallpaper on such a wall.
You cannot glue wallpaper on a damp wall. What to apply to the walls before wallpapering Fungus and mold are carefully scraped out and then treated with an antifungal agent. Then the irregularities are filled with putty. This is how the walls are finished before wallpapering.
Read similar articles on the site:
Wallpapering painted walls
Having figured out the brand and type of paint on the wall, we can predict whether the wallpaper will stick here. Please pay special attention that if there is whitewash on the walls, there is no use in gluing wallpaper. Other options are water-based emulsion, enamel, oil paint.
Prepare the walls for wallpapering with your own hands - on a base of water-based paint, then we delve carefully:
- We have a wall covered with water-based paint
- First, prepare the primer solution (primer and solvent are taken in half proportions),
- Then we apply this mixture to the walls before wallpapering and let it dry.
- Then apply primer and dry again.
- Now you can glue the wallpaper.
- For better adhesion, mix wallpaper glue with PVA glue.
prepared using foreign sources
How to cover the walls so that the wallpaper does not show through
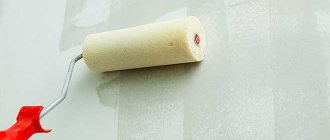
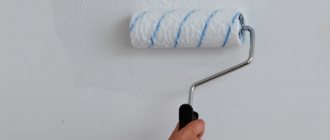
After puttying, you need to check the uniformity of the color of the walls in the room. The reason for the differences may be that different leveling compounds with different shades were used. Spotting must be eliminated, otherwise it will appear through the pasted wallpaper. In this case, you can use a primer to even out the color of the walls. Tikkurila Varma is suitable for this. It is very plastic, fits well and gives a uniform coating.
There is another solution - to paint the room with liquid water-dispersion paint. To do this, it is diluted with water to reduce consumption (in a ratio of 1:3), then applied to the walls using a roller. You can also take a regular water-based emulsion, the main thing is that after drying the surface does not “dust” and gives a uniform coating.
To avoid having to make repairs or figure out how to hide unpleasant stains on the finish, you need to follow some simple rules:
- Do not neglect surface preparation: level, clean from dirt, apply special paint or primer supplemented with pigment.
- If you buy materials that will not be translucent, you can test them in the store.
- You should consider the color scheme of the rooms. Sometimes it’s easier to finish in dark colors than to spend money on complex wall preparation.
- Do not skimp on small things, use only high-quality certified glue.
How to “paint” the walls before hanging light wallpaper
It is planned to wallpaper the plasterboard. The seams between the sheets of drywall are sealed well, but they are white. The sheets of drywall themselves are gray. These seams between the sheets will be visible through light-colored wallpaper. What is the best way to “paint over” sheets of drywall to obtain white color? Are there inexpensive white paints for this that will stick wallpaper well?
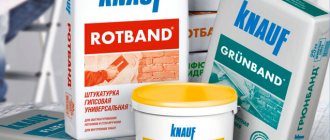
Sergey. , Vetonit lr+, Shitrock, Rotband paste - after all, the wallpaper will have to be re-glued at some point! Don't save money.
But without additional putty, the wallpaper listed above will not stick? Or, on the contrary, will they be too good and cannot be removed from the drywall? The drywall is very smooth, the surface is excellent, I don’t understand why you should spread a layer of putty over it with a spatula. A roller can be used to apply a thin and even layer of white paint. How is this worse?
Sergey. , master master! drywall - who makes it? GKL, a priori, cannot be even, although it will go under wallpaper. I always put putty under the wallpaper, but use a covering primer if you find it, but it’s expensive!
Why is the word “painted over” in quotation marks? - Just take the paint and paint. The wallpaper goes well with the paint.
You can apply a thinner diluted putty with a roller.
Sergey. , as far as I know, if you putty and paint everything else, the difference in color will still be noticeable even if you prime it before painting. In my opinion, it is better to putty everything with the same solution and a thin layer.
strider1978 wrote: You can apply a thinner diluted putty with a roller.
Or a wide brush, but a wide spatula is faster.
why is the word “painted over” in quotation marks? - Just take the paint and paint. The wallpaper goes well with the paint.
Gray, Thank you! Can you recommend a type of paint? And what types of paint are undesirable here?
All the dirty plastering/putty work has been completed, everything has been primed, and there is no desire to add putty again. And there is no dust from the paint.
Related article: Mesh for sanding walls
baikal, materials must be used for their intended purpose. Paint must be used for painting, and putty must be used for leveling. One layer of paint is ALWAYS enough for any wallpaper, even the thinnest and whitest. For special perfectionists, I especially advise you to paint it, maybe three or more times. This is better than putting putty, look at the next topic.
Paint type: moisture resistant. That's the minimum. Ideally, washable and super washable.
Almost any paint, with the possible exception of the cheapest ones, is stronger than general-purpose putties (there are very strong putties). Therefore, not the cheapest paint will solve your problems, unless, of course, you have adequately assessed the evenness of the walls.
Gray, I agree, but it’s not so easy to soak a regular ceiling one. It’s probably more important to let it polymerize properly, which takes 5-7 days.
Oleg V wrote: if, of course, you adequately assessed the evenness.
Oleg, this is already unnecessary.
Gray, I’m not imposing my opinion, but before painting the plasterboard needs to be puttied, otherwise the paint tone will not be uniform. Primer and a thin coat of finish or primer and several coats of paint. The girls putty in one room for me, not a drop of dirt and no stains. Before that, I did it myself in one room. The seams are putty, the rest is paint on a primer in three layers, before wallpapering it was not noticeable, but after gluing the stripes are noticeable if you look closely, of course. Maybe I did something wrong, I don’t know.
Possible solutions
How to prevent show-through?
If you plan to do the repairs yourself, then it is easier to prevent the problem than to eliminate its consequences. Fortunately, there is nothing impossible about this:
The contrasting pattern together with the high density of the base is sufficient insurance against stains.
- We choose the material correctly. You need to initially assess the condition of all surfaces and think about which wallpapers will not show through the walls. Sometimes it’s easier to adjust the color scheme than to spend large sums on putting the walls in order.
- We do not skimp on the adhesive composition. Glue stains very often appear under the finish, so you need to choose high-quality materials that do not leave streaks after polymerization.
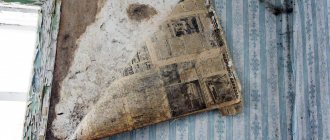
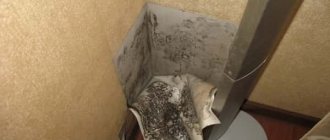
The glue stains look something like this photo.
The probability of problems with finishing such a wall is close to 100%
- We prepare the surface with high quality. This recommendation should not be neglected in any case, but if we are gluing light-colored wallpaper, then the quality of preparation comes first. Here it is important not only to level the wall, but also to give it the most uniform color possible. This task can be quite labor-intensive, especially in the case of plasterboard surfaces, on which areas of putty on joints and screw heads can be visible.
Contrasting areas on the putty surface may be visible even after finishing.
If we spend time and money on putty, we will save ourselves from worries in the future.
- We paint/prime the walls to match light wallpaper. An alternative to puttying the entire surface can be painting or primer. A white pigment with good coverage helps in the vast majority of cases.
A high-quality monochromatic primer can solve a lot of problems.
For painting, choose a composition with good adhesion. The fact is that the paint, which will weakly adhere to the base, risks peeling off when adjusting the position of the just pasted roll.
The higher the hiding power of the material used for preparation, the better the camouflage.
- We use a substrate. Rolled materials, which are glued to the wall before final finishing, are mainly intended for leveling and thermal insulation. But in our case they will help too.
This backing is a great solution!
Yes, the preparatory work is often very labor-intensive, and materials for leveling and painting are expensive. But in any case, their price will be lower than the price of the wallpaper needed for plywood - so there’s no point in saving here.
How to fix the situation?
If the problem with stains or marks showing through appeared after the sticker was applied, then the chances of a successful solution are much less.
The instructions in this case will be as follows:
Once we have pasted it, we wait until the wall dries and don’t panic ahead of time!
- If stains appear immediately after the wallpaper has been pasted , it makes sense to wait for the glue to dry completely (about a day, rarely more). The thing is that when the paper or non-woven fabric is moistened, the transparency of the base increases, and when it dries it returns to normal. So there is still a chance that the stains will not be visible.
The more thoroughly we level the material, the better!
- If thin non-woven trellises for painting were used for finishing , wait for them to dry and paint them. Naturally, if the stains appear quite brightly, then it is worth choosing a material with good hiding power (even if we have to make changes to the design).
How to glue wallpaper for painting, what glue to choose?
With the development of construction technologies and repair methods, the range of options for finishing walls is truly diverse. Therefore, anyone who reaches this stage inevitably begins to think about what to choose.
Painting the walls, covering them with wallpaper, draping them with fabric, applying Venetian and decorative plaster - all this is worthy of attention, however, as a rule, a person proceeds from his financial well-being and, often, looks at more practical options.
One of these could be wallpapering the walls for painting. Therefore, let’s pay attention to what options to consider and how to properly glue wallpaper for painting.
Paint or glue - which is better?
It is necessary to add up all the pros and cons again and draw the appropriate conclusion. If you decide to paint, it is better to hire a team of craftsmen to level the walls and prepare them for painting. The coating procedure itself is also not simple; a beginner cannot cope with it efficiently, so again hired labor is required, and qualified ones at that.
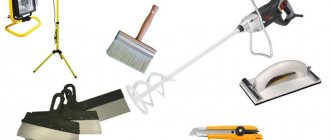
Wallpapering walls can be done by an ordinary home craftsman, even alone. At the same time, there is no need to buy complex home appliances that are used extremely rarely. Here you can get by:
- scissors;
- with a knife;
- brush;
- brush;
- roller;
- a basin for applying the adhesive mixture.
In terms of financial investment, it is better to say “yes” to wallpaper rather than paint. When preparing the walls with a hired team, you will have to spend a lot of money. But it’s worth noting that if you paint walls that were perfectly aligned in previous renovations, then buying the required amount of paint will probably be cheaper.
It all depends on the material used. When calculating, it is necessary to take into account that high-quality paint is no cheaper than expensive non-woven or vinyl wallpaper.
In terms of the durability of paint or wallpaper, nothing definite can be said. Currently, wallpapers are produced that are so strong and durable that they will give a head start to any paint. On the other hand, it is easier to change the interior by simply painting the walls a new color.
Types of wallpaper
Correctly chosen, with an original texture and unique embossing, painted with paint that harmonizes with the surrounding interior, they can turn your home into a real palace, or add modesty and grace to it. In addition, such wallpaper can be easily repainted later, changing the boring tone.
Basically, the following types of wallpaper are distinguished, designed and intended for repeated repainting:
- Vinyl wallpaper with paper backing.
Such wallpaper is impregnated with a special water-repellent composition, which allows it to be repainted several times.
Such wallpapers have excellent masking characteristics and are perfect for hiding flaws and uneven walls. Often chosen by residents of new buildings.
glass wallpaper intended for painting.
They are widely used for renovations in offices and hotels due to their increased wear resistance.
Pros and cons of wallpaper for painting - read here.
Sometimes in the process of DIY repairs, questions arise that people who don’t understand this don’t know the answers to. For example, should you paint the walls before gluing wallpaper for painting and is it possible to glue such wallpaper on old , already painted wallpaper.
Such cases often arise when the finishing coating of the walls is already present and it can be difficult to prepare the surface properly. However, there are principles that should not be neglected. Because the result can simply be wallpaper that doesn’t stick and bulges unsightly on the walls.
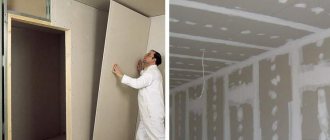
Stages of preparing walls for wallpaper and features of the work
In the process of preparing walls for wallpapering, it is not enough to simply buy high-quality materials. It is important to correctly perform the preparation technology, adhering to the following steps:
- Cleaning the wall of old wall materials;
Old wallpaper or painting must be removed 100%. The wall must be perfectly clean.
- Initial application of primer. The first layer of primer is applied as an impregnation in order to eliminate microcracks and neutralize the surface from moisture. It will give the surface a slight smoothness and will be completely translucent;
- Sealing cracks and defects;
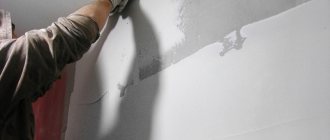
- We carry out the most important stage - finishing and preparing the wall: we fill existing cracks and chips with a gypsum mixture, plaster the surface and putty;
- Leveling the surface using sandpaper or other abrasive material;
- Secondary application of primer. It can act as the best finishing composition for adhesion of the wall to the wallpaper and gluing dust residues.
Do I need to paint the walls before wallpapering before painting?
According to the standards and rules, before wallpapering for painting, the walls must be treated. In practice this means that the walls should be:
- plastered;
- primed;
- puttied;
- sanded for wallpapering,
- primed in two layers.
These are the processes that must be carried out for proper high-quality wallpapering , including wallpaper for painting. Painting walls specifically in order to subsequently paste wallpaper on them for painting is simply an extra waste of paint. Although the paint layer itself, carefully primed, is a good basis for wallpapering.
However, it happens that the walls in the room are already painted. What to do in such cases? It all depends on the type of paint. If it is old Soviet blue enamel that is peeling off the wall, it would be wiser to get rid of it if possible. If not, then you should plaster the walls and perform the above operations.
And in cases where the walls are painted with water-emulsion or water-dispersion paint, but for some reason you don’t like the color and want to cover them with wallpaper, the best solution would be to simply prime the walls and get a ready-made surface for gluing.
What to do if the wallpaper is see-through
If the unpleasant effect of translucence is revealed at the initial stage of work after gluing 1-2 canvases, and it is not possible to cover them with furniture or decorate them, then it is worth removing the pasted wallpaper and leveling the surfaces of the walls. It’s better to buy one roll and work a little extra than to worry about the whole room being ruined.
- The uneven color of the panels can be evened out by painting them with liquid water-dispersion paint using a roller, and after drying, pasting them over again.
- Another simple option is to level the walls with a high-quality primer, such as Tikkurila Varma, which has pigment added to give it a color that matches the tone of the wallpaper. This primer is easy to apply, compares the absorbency of different textures, and does not become wet from water or glue.
If the see-through appears later, when the entire room has already been covered with wallpaper, you can try other options to solve the problem.
Vinyl
You can paint them with acrylic or dispersion paint to match. The paint adheres well to the vinyl surface and will even help give the interior a new look.
Non-woven
It all depends on the type of canvas - if it is non-woven wallpaper for painting, then 2-3 layers of paint applied on top will definitely solve the problem. If the finish is not intended for painting, the coating will have to be changed.
Paper
It is not advisable to paint such materials or seal them with other layers on top - the thin fabric will get wet and the situation will become even worse. You can consider decorating the spots using appliqués, panels, or other solutions (paintings, watches, photographs). If none of the above is suitable, all that remains is to change the wallpaper to a denser one, or level the walls.
Shines through wallpaper for painting
If the coating was glued to a poorly prepared surface, and after painting all the irregularities and stains appeared, you will have to apply two or more additional layers of paint on top to eliminate the problem.
Don't worry in advance if the paint hasn't dried yet. It will become more uniform after drying completely.
Is it possible to glue it to old painted wallpaper?
This question usually arises among many who decide to do the repairs themselves. Experts do not recommend doing this. Yes, paintable wallpaper can withstand repainting several times, but heavy sheets of new wallpaper with glue can become an excessive burden for it.
They will get wet, swell and may come off the walls along with the new layer. In addition, old painted wallpaper is a textured coating with embossing, design, and pattern. It will be difficult for wallpaper glue to bind old and new fabrics together on such a surface.
Therefore, the option of saving any old wallpaper should not be considered. It is best to remove them . Moreover, there are a considerable number of products for this on the market - for example Metylan, Axton, etc.
Related article: Artificial stone for interior wall decoration
Features of repainting dark wallpaper in a light tone
With dark wallpaper, which was painted a different color several years ago, the situation is somewhat different. To lighten such canvases, more effort must be made. First of all, you need to lighten the tone. To do this, paint a wall with dark wallpaper with white paint. Do not try to seal all visible gaps the first time. It happens that even after adding a second layer, streaks remain.
Apply the paint using gentle, non-pressing movements. Apply each layer of lightening only after the previous one has dried. Only after obtaining a uniform white shade, proceed to pigmentation of the surface.
Please note that wallpaper that has a shallow pattern will have a smooth, non-relief surface after applying several layers of paint. Therefore, in this case, it is better to think about re-gluing.
How to prepare the walls?
Wallpapering for painting begins directly with surface preparation and includes the following implementation points:
- If there is old wallpaper on the walls, it must be removed completely, leaving a clean surface of the walls.
- The walls are inspected for defects, irregularities, and depressions.
We scrape off everything that sticks out with a metal spatula, pull out the old nails, and cut off the protruding pieces of metal. We fill holes and depressions with gypsum plaster.
- If the base for the old wallpaper was cement-sand plaster, we carry out mandatory plastering and puttying of the surfaces.
- Align the corners, achieving 90 degrees.
- Sanding all putty surfaces.
- Priming the resulting maximally smooth surface in two layers.
When preparing walls, it may be necessary to remove old wallpaper. Previously, this was done by thoroughly soaking them in hot water. Today there are many effective products on the market, such as Metylan, Axton.
They are simply added to the right amount of water, depending on the area of the walls and types of wallpaper. The solution is applied to the old wallpaper and after 10 minutes you can begin to remove it.
Such products are odorless and do not contain a solvent, but when using them it is best to use gloves and a respirator to prevent the occurrence of individual allergic reactions.
How to carry out the procedure correctly?
One of the advantages of paintable wallpaper is that it can be repainted from time to time. At least that's what most consumers think. But many who tried to do this were very disappointed with the result. In what cases is this idea good, and when is it better to just re-glue new ones?
Evaluate how well the coatings adhere to the wall. If they have already started to show noticeable bubbles and have sagged in some places, then an additional layer of wet paint will make the canvas heavier and make it completely peel off (how to remove bubbles on wallpaper and what to do if the coating peels off?).
If they hold up well, you can start painting. There are several rules.
- First, according to the relief: the finer it is, the greater the chances of painting it over.
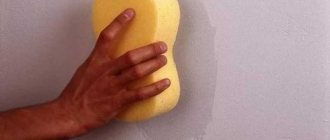
- The second is the cleanliness of the paintings. The less dust on them, the better the paint will adhere. To clean the wall, you can use a vacuum cleaner or simply walk over it with a damp cloth. The surface must be completely dry.
- If the color is not too saturated or the previous color is still striking, you should wait until the painted canvases are completely dry, and only then try to paint them again, with a second layer.
Glue selection
In stores you can find any wallpaper adhesives designed for a specific type of wallpaper. The most common high-quality brands of glue are the long-established Metylan and Quelyd. Depending on the type of wallpaper chosen, you should purchase:
Each package contains a table describing in detail the proportions and amount of water in which the glue is diluted, depending on the area to be covered.
How to Paint a Kitchen and Bathroom
Water-based bathroom paint should have good resistance to elevated temperatures and water-repellent properties. For the bathroom, it is better to use styrene acrylic paints or water-based paints with latex added. This option allows you to paint the bathroom in the same way as the walls of the hall, and at the same time get a surface that can withstand a fairly large number of washing cycles.
This paint is heavier and has a higher viscosity. Unlike the hall, first of all you need to paint the corners and the ceiling part of the walls, as well as areas and areas adjacent to the pipes, and only after that you can paint the part of the wall that is accessible for work with a roller.
The most difficult part of finishing an apartment is painting the walls in the kitchen with water-based paint. Water-based paint adheres very poorly to any surface on which a layer of fat and gas combustion products settles. Such a surface must be thoroughly prepared, all contaminants must be thoroughly removed, and it must be primed. Unlike a bathtub, it is better to paint the kitchen walls with regular water-based paint and, after thoroughly drying, cover them with colorless acrylic varnish.
Sticking
Wallpaper gluing technology can be divided into processes inherent in working with all types of wallpaper, and individual for individual types. When working with paper-based vinyl wallpaper, we do the following:
- We cut the required number of canvases with a height margin of about 10 cm.
- We dilute the glue in accordance with the proportions indicated on the package.
- Apply glue to the canvas, leave it temporarily and apply glue to the wall.
- We paste the first strip along a vertical line drawn in advance using a level or plumb line.
- The wallpaper is carefully smoothed from the middle of the canvas to the edges using a plastic spatula, a rubber roller and a clean rag.
- The remains of wallpaper near the floor and ceiling are cut off with a sharp stationery knife.
- The next wallpaper sheet is glued end-to-end without overlap, matching the pattern.
Non-woven wallpaper is glued in a similar way, with the convenient exception that in their case the glue is applied only to the wall.
When gluing fiberglass wallpaper, we proceed as follows:
- we prepare in advance the required number of strips with a small margin in height;
- dilute special glue for fiberglass wallpaper in water in accordance with the proportions;
- After waiting the required amount of time, apply glue to the wall, to a width greater than the width of the wallpaper;
- glue the first strip exactly vertically from the corner or window;
- level and smooth the canvas with a plastic spatula, expelling air bubbles from under it;
- cut the fabric at the floor and ceiling;
- We glue the next panel end-to-end, matching the pattern.
Attention! An important condition under which work should be carried out is the complete absence of drafts and air currents. Otherwise, there will be guaranteed to be wallpaper coming off the walls.
Conclusion
If the wall is visible through the white wallpaper, the fault is most likely due to improper surface preparation. This is exactly the case when “a disease is easier to prevent than to cure.” So before starting work, you should carefully study the tips and videos in this article, and if you have the slightest doubt, seek advice in the comments.
what to do if non-woven vinyl wallpaper is see-through?
Tatyana, If the walls were not covered with finishing putty, then they have contrasting stains from plaster and putty mixtures of different colors. And light or non-woven wallpaper will show through all these colored islands and putty seams. There are many tips here: cover it with white paper, paint it with water-based emulsion, etc. But in the age of modern technology, I want to avoid “folk fiction” and use high-quality solutions from trusted manufacturers.
If for some reason you do not want to use finishing putty to prepare the surface, then a white primer for wallpaper will give you the ideal result. For example, Tikkurila Varma (Varma). Why she:
Firstly, excellent adhesion, it can even be applied to galvanized metal.
Secondly, which is very important for wallpapering, the primer does not soften when exposed to water (glue).
In addition, it evens out the absorbency of the base, that is, there will be no situation where the glue has already been absorbed and thickened.
And what is important, this product is recommended by the manufacturer for application under wallpaper.
How long after can I paint?
There is no need to rush into painting newly pasted wallpaper. Wallpaper glue is a fairly viscous substance and its drying time is determined by a combination of various conditions - the time of year, the weather outside the window, room temperature, the quality of the glue and wallpaper, the quality of applying the glue and smoothing the canvases.
This may take 2-4 days. In any case, you need to wait until the wallpaper is completely dry. Only after this can you begin to prime them and begin painting.
The paint is applied in two layers with an interval of about 12 hours.
When choosing wallpaper, special attention should be paid to its quality. Wallpaper itself is very capricious, and any deviation from the quality of the choice of material and during the work is fraught with negative consequences.
Therefore, the matter should be approached responsibly and in an organized manner. This is the only way to achieve a unique interior and cozy home, renovated with your own hands.
How to glue wallpaper for painting - watch the video:
Read also
You can refresh your interior without making a big investment: simple renovation tips
The main thing in this difficult matter is not to get confused.
Kitchen design: 30 best photos
In order to create a cozy and sophisticated style for your kitchen, sometimes you need to add a couple of design elements to its appearance. We will tell you what they can be in this article.
Where to start renovating an apartment
A clearly formed action plan and analysis of each stage of repair will help you avoid mistakes and find the best solution for yourself.
Apartment renovation and design in Chelyabinsk
Expert advice, turnkey repairs, purchase of doors and upholstered furniture, prices
5 mistakes we make when repairing
What to consider when deciding to refresh your home [male view]
7 fashionable “tricks” from builders that won’t ruin you
Making your nest modern for minimal money
Choose your UP block: an apartment for the price of two cups of coffee!
I came to an interesting conclusion. So, by giving up just two usual cups of coffee* a day, you can buy a long-awaited home
Roof coatings: time-tested and modern
Roofs are: flat, single-pitched, gable. Each option has its own engineering calculations, waterproofing, and durable sheathing. We explain the difference, advantages and disadvantages
Rustic style: back to the past
In the interior of an ordinary apartment, you can recreate the distant past - this is called rustic style
Six cool ideas for DIY country furniture
Where else than outside the city can you try yourself as a romantic inventor
Hedge: saving the house and dacha from noise and exhaust
How to gracefully isolate yourself from civilization
With a block - through life
Why is building houses from blocks so popular?
Five main mistakes when choosing apartment design
How to avoid spending extra money and getting divorced during renovations
Lucky land gives Muscovites comfort and stability
That is why more and more people are interested in the opportunity to build a house or dacha in neighboring regions
How to build a cottage without being disappointed?
A dacha, a country cottage, a villa - this is where space opens up for the collective imagination of the architect and the client
Do you need solar panels at your dacha?
Let's figure out whether newfangled technology will help save money in central Russia
Is it possible to glue wallpaper to painted walls?
Depending on the paint that covers the walls, the further sequence of actions will be chosen. Wallpaper can be safely glued to some types. These include:
- water-based;
- water-dispersed;
- adhesive.
If there are areas of paint on the wall that are peeling or flaking, then before you begin the pasting process, they must be properly filled with primer.
Related article: Finishing uneven walls without leveling
Canvases cannot be glued to walls that have previously been treated with paints that create a smooth surface or a moisture-proof film. Among them are such types of paints as:
- latex;
- moisture resistant;
- oil;
- alkyd and pentaphthalic enamels.
To ensure reliable adhesion between the material and the wall, these types of paints must be completely removed. If this process is too labor-intensive and time-consuming, you can try sanding the surface and then applying a primer to it.
Advice from professionals
A new product – primer-putty – combines the properties of two coatings. Allows you to save time on finishing and money on materials. Apply when high demands are placed on the evenness of the base, under thin light wallpaper. It is a thicker mixture than a primer, which is applied to the base layer of putty, fills all microcracks and creates a smooth surface. It differs from finishing putty in depth of penetration and ease of application. The process is the same as priming the walls before puttying.
Professionals can check the quality of the primer experimentally. A drop is applied to the thumb, dries for a minute, then pressed down with the index finger. When unclenched, you should feel the stickiness and tenacity of the composition. For visual comparison, it is better to use several samples.
Conditions for gluing
Today, stores offer a huge number of different wallpapers. But not all types are suitable for painted walls. It is recommended to immediately exclude simple paper and vinyl sheets. It is better to pay attention to wallpapers such as:
- Non-woven. They absorb glue well, so the risk of paint getting wet is almost completely eliminated, as a result of which it can simply come off the wall.
- Fabric or vinyl. It is desirable that they be on a non-woven basis. They will not only look luxurious in any interior, but also have all the positive properties of ordinary non-woven fabrics.
- Liquid. A distinctive feature of the coating is its rapid drying. Therefore, the composition does not have time to penetrate deep into the paint and dissolve it. Such fabrics can be applied even to uneven surfaces.
Which glue to choose?
The quality and strength of the adhesion will depend on the quality of the glue. If the wallpaper will be glued to a painted wall, then it is better to choose a polyvinyl acetate emulsion for this.
When choosing an adhesive composition, it is recommended to pay attention to the manufacturer and strictly follow all instructions on the packaging.
How is pasting done?
The method by which the walls are covered depends on what kind of paint covers them. Each of them has its own characteristics, but is not anything complicated or time-consuming.
- Acrylic or water-based paint. The top layer of the surface is removed with a solution of solvent and primer in a 1:1 ratio. After which you need to give it time to dry. Next, a primer is applied to create a rough appearance on the wall. This will ensure reliable adhesion between the wall and wallpaper. They begin gluing the canvases only after the building material has dried thoroughly.
- Oil paint. Before you start wallpapering, you need to remove the old layer of paint. This is done using a spatula. When the paint is removed, the wall must be carefully primed. After all the composition has dried, the surface of the wall is treated with sandpaper. Then another layer of primer.
If the paint applied to the walls has bright and catchy colors, then even the thickest wallpaper will not be able to cover it up. Therefore, in this case, the only correct solution will be to completely remove the old coating.
If you have any doubts that the paint on the wall will withstand the new finish, it is recommended to conduct a small experiment. To do this, take adhesive tape, apply the adhesive side to the wall, and then sharply tear it off. If the paint does not begin to peel or crack, then new wallpaper is glued on top of it.
How long does it take to dry?
Depending on the type of wallpaper and the quality of the glue, the drying time of the surface varies.
- vinyl sheets with a non-woven backing dry from 24 to 48 hours;
- the rest dry within 18-24 hours.
Why does wallpaper show through?
Not everyone in the store thinks about how finishing materials will behave in their work, falling for their attractive appearance.
But knowing the properties and features of different types of finishes is necessary to obtain an excellent result. There are several reasons that can cause the effect of wallpaper on the wall to show through:
- material too thin;
- the canvases are designed for further painting;
- low quality glue used;
- The surface to be glued is not sufficiently prepared.
If the wallpaper is too thin
Before gluing thin, light-colored materials, it is necessary to carefully prepare the walls, otherwise unevenness and various defects of the plaster will appear through the delicate canvas. You can determine whether the coating will be translucent in the store; just put a bright picture under it.
The thinnest of all wallpapers, which will certainly reveal defects in the walls during repairs, are single-layer paper “simplex” and thin vinyl with a non-woven backing.
When purchasing paper wallpaper, it is important to consider the quality of the paper. If it is loose and loose (up to 110 g/m²), you should not expect a good result from the repair.
Canvases are intended for painting
The material is very thin due to the translucent base made of non-woven fabric or paper. Such canvases are not intended for gluing in a “bare” form - they must be covered with one or several layers of paint.
Low quality glue
Cheap wallpaper paste, passed off as an “analogue” of a popular brand, also risks causing stains. It may not be as good as the store clerk described it. Due to the low quality of the glue, it often comes out during the polymerization process, which leads to the formation of streaks and yellow spots on the coating.
To avoid mistakes, it is better to buy glue from well-known manufacturers.
Poorly prepared surface
If the panels were not leveled with special compounds and were not completely cleared of old coatings, the gluing result is almost always unsatisfactory. Depressions, irregularities and bumps in walls are clearly visible on light-colored materials. On particularly neglected surfaces, even dark thick wallpaper will not mask defects.
Recommendations after wallpapering painted walls
Caring for pasted surfaces will directly depend on the type of wallpaper.
- Vinyl sheets. They differ in quality, which determines density, wear resistance, and moisture resistance. You can maintain cleanliness using wet cleaning. The wallpaper does not need to be rubbed hard or additional equipment used to avoid damaging the wall. It is recommended to carry out cleaning from time to time.
- Paper wallpaper. Do not use water or soap solutions for cleaning. Cleaning is done using a vacuum cleaner and dry rags.
If the wallpaper was glued in rooms with high humidity, then mold or mildew should not be allowed to form on it. In this case, you will have to remove the finish and treat the infected surface.
What to do if the wallpaper is see-through: 3 main reasons, prevention and solution to the problem
Walls under finishing are a potential source of problems
Probably many people have encountered the problem “we put up wallpaper and it’s see-through.” In 99% of cases, this happens with thin light-colored trellises, but even when using other materials, no one is immune from such developments. Why this happens, how to avoid it and how to correct the situation - I’ll tell you about it.
Walls made of chipboard and fiberboard
Walls made of these materials are primed with special alkyd primers or alkyd paint. For chipboard, the seams between the sheets are puttied and covered with reinforcing tape or serpyanka, then the entire wall surface is puttied. Chipboard, as a more textured material, requires careful putty. Fiberboard material is smooth and it is necessary to putty it only at the joints of sheets and you can limit yourself to one primer.
Preparing chipboard walls for wallpapering
vote
Article rating
How to hang wallpaper over whitewash and not regret it
In Soviet times, in many apartments and almost all houses the walls were simply whitewashed, which continues to cause trouble for many home craftsmen these days. Of course, whitewash can always be washed off, however, this procedure is quite lengthy and unpleasant. If your situation is similar, then after reading this article you will find out whether it is possible to glue wallpaper to whitewash and how to do it correctly.
Wallpapering on whitewash
Is it possible to glue on whitewash
First of all, let's figure out whether it is possible to glue wallpaper to whitewash? I’ll say right away that it is possible, but the question is different - how long will the wallpaper last on such a surface? After all, such a solution is a violation of technology, and a quality result cannot be guaranteed.
Without noise and dust, or how to remove whitewash from walls yourself
Removing whitewash from walls is one of the stages of construction work when renovating premises.
Removing a layer of lime or chalk is dirty and labor-intensive work. Knowing how to clean whitewash from walls and applying them in practice will help you cope with the task as quickly and easily as possible.
We'll tell you in this article how to remove whitewash from walls.
Preparation
Regardless of the means used to whitewash, preparation is required before removing it. Since the upcoming work is accompanied by the formation of a large amount of dust and dirt, it is necessary:
Remove as many furnishings as possible from the room. It is especially important to remove upholstered furniture.- Those pieces of furniture that will remain in the room during repair work should be well covered with polyethylene film. Fabric covers are not suitable for these purposes.
- Prepare a stepladder, the height of which will allow the worker to reach the top of the wall.
- You need to prepare tools for work in advance (their list depends on the approach to cleaning the walls).
- Place a wet rag on the threshold of the room being repaired.
- It is important to ensure that the room is isolated from other rooms. This is necessary so as not to spread whitewash throughout the house. In addition to closing the door tightly, you should fill the cracks with foam rubber or seal them with tape.
- If you need to protect the floor from whitewashing, it is best to use cellophane. Newspapers are not effective for such purposes, as they have low strength, and upon contact with water they tear, allowing dirt to pass through.
Before starting work, it is necessary to take care of personal protection - clothing and headgear for repairs, as well as a respirator and safety glasses.
How to quickly remove an old layer?
There are several options for removing whitewash from walls. In terms of simplicity of execution, mechanical ones lead. In its pure form, dry coating removal is accompanied by a large amount of dust.
Sander
Using a sanding machine is the fastest way to remove whitewash from walls. The disadvantage of this method is the formation of dust and dirt in large quantities.
Procedure:
- put a coarse nozzle on the device;
- turn on the device;
- walk the tool along the surface of the walls;
- after large parts of the layer are removed, the surface of the walls needs to be finalized.
Putty knife
Cleaning walls from whitewash using a spatula allows even a non-specialist to carry out the work.
The thicker the layer of coating on the walls, the more labor-intensive the work ahead. The principle of surface treatment is to pry up a layer of chalk or lime and scrape it off onto the floor .
If it is necessary to remove the whitewash completely, areas that are not easily removed the first time can be further treated with sandpaper or a small scraper.