After laying the tiles on the floor, the only remaining task is to grout the seams. However, the type of floor depends on the quality of this work. Let us consider in detail the sequence of work on grouting joints on the floor, from preparing the surface to caring for the tiles, as well as typical mistakes that occur at each stage.
The grout is characterized by high adhesion, however, if the application technology is violated, the material loses its properties, which leads to a reduction in service life. For this reason, it is important to take into account all the subtleties of such work.
Which mixture should you choose?
There are a large number of varieties of such material. They differ in composition. The main components of different mixtures are:
- epoxy resin;
- polymer additives;
- cement.
Thanks to them, the durability of the coating is ensured and the service life is increased. Grout can be single- or multi-component.
Cement
Cement of different brands is used as the main component.
To grout joints on the floor, it is recommended to use mixtures that contain M400 material or more. Without additives, the composition can last a long time, but this is only possible under normal conditions. However, the floor covering is constantly exposed to deformation loads in compression and tension. This is especially important to consider when it is planned to install heated floors, since in this case the material undergoes expansion when exposed to temperature.
To increase the resistance of the mixture to negative factors, additives are used that increase the elasticity of the grout of floor tiles. Components can be used to ensure moisture resistance of the cement composition. Moreover, this material is not universal. It can be used to fill joints of different widths: from 1 to 5 mm, from 3 to 15, and a mixture option for joints up to 30 mm is considered separately.
A one-component grout is designed for treating surfaces with narrow joints between tiles.
Polymer-cement
Due to the fact that the material contains a polymer additive, moisture resistance, strength, and service life increase. This mixture is used for indoor and outdoor work. The room may have different environmental parameters: increased humidity, constantly changing temperature. In this case, the grout does not crack or deform.
Polymer cement mortar can be used to work with different types of tiles: tiles, porcelain stoneware, clinker, products made from natural and artificial stone.
Thanks to its composition, the solution not only gained strength, but also became unaffected by ultraviolet radiation. In addition, the composition includes antibacterial additives that prevent the formation of mold on the tiles.
Polymer
This is an elastic, waterproof material. Used for surface treatment in rooms for various purposes. However, it is better to apply such grout to the walls. To treat the floor, it is necessary to consider more durable options (cement, epoxy). Thanks to the polymer components, this mixture prevents the formation of cracks and tolerates temperature changes and exposure to high/low temperatures.
It is recommended to use this composition for processing seams up to 6 mm wide.
The material hardens at different temperatures. The advantage of this grout is a wide range of colors. In addition, after application, the mixture is easily removed from the surface of the tile. This simplifies installation and reduces repair time.
Epoxy
The main component is the resin of the same name. Additionally, the composition includes a hardener.
The advantage of this material is strength, and epoxy grout has a sufficient level of elasticity, which allows it to withstand increased tensile and compressive loads
. For this reason, this type of mixture is more often used in facilities with high traffic (industrial, administrative, commercial buildings).
Epoxy grout is distinguished by its high price. Because of this, the material is less often used in everyday life. In addition, for processing seams in a private house or apartment, it is not advisable to use a material with the highest strength indicators. However, due to their moisture resistance, epoxy mixtures are popular among consumers.
Grout based on epoxy resin has high adhesion and excellent adhesive properties, which helps strengthen the coating, but makes it difficult to work with the material.
This grout hardens quickly. It is extremely difficult to remove it from the tiles after drying.
Read more about epoxy grout in the article - Properties and subtleties of using epoxy grout for tiles
Epoxy-cement
A mixture of this type is characterized by the properties of epoxy and cement compositions. It is durable and elastic and can withstand moderate loads. This allows you to use grout in different rooms of private housing.
The recommended thickness of the space between the tiles is up to 12 mm.
The material is resistant to chemicals and moisture.
Thanks to the cement additive, the mixture is easier to wash off . It is much easier to work with such grout, because it is not prone to instant hardening.
Polyurethane
This material is produced on the basis of an aqueous dispersion of polyurethane resins. The main advantage of this option is increased strength. In addition, the grout is elastic and moisture resistant. A polyurethane composition is used for finishing glass mosaics, natural stone and ceramic tiles.
The material is completely ready for use. Unlike previously discussed analogues, polyurethane grout does not require the addition of components to obtain the desired consistency. In addition, if the cement and epoxy mixture cannot be used a few hours after preparation, then this type of material retains its properties for many months (subject to proper storage).
Over a long period of operation, polyurethane does not lose color.
The material is easy to work with and is quickly removed from the surface.
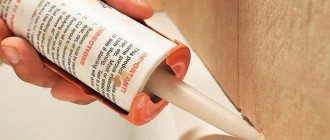
Polyurethane foam
A simple, yet effective method. The only negative is that it looks unaesthetic. However, the seams can be additionally painted over, and the foam is inexpensive.
Polyurethane foam is more suitable for sealing a cast iron or metal bathtub if the wall is tiled. For acrylic and plastic panels, it is better to choose other materials.
Grouting procedure:
- Clean the area and wash off the dirt. Then treat the seams with an antiseptic and let dry. To improve adhesion (adhesion level), sand the sides with a piece of medium sandpaper.
- Degreasing. Acetone or another solvent will do.
- Having prepared the foam, carefully seal the seam. Please note that after application it will increase significantly in size, so squeeze out a little at a time.
- After waiting for it to dry, cut off the excess with a sharp blade or a construction knife.
- Paint the treated seams with nitro oil paint, choosing the desired shade, or with regular white.
What to look for when choosing a fugue
The following criteria are key when purchasing:
- composition, properties;
- special purpose;
- color.
First of all, you need to determine for which room the material is selected. For example, moisture-resistant and wear-resistant mixtures are used for the bathroom and kitchen. The following options are suitable: cement-epoxy, epoxy, polyurethane.
For rooms where air humidity is not high and traffic is low, cement grouts are considered.
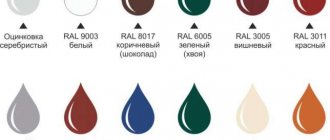
When choosing a mixture, take into account the shade. It is possible to implement 3 design options:
- the grout is matched to the color of the coating;
- a mixture is used that is 2 tones different from the color of the tile;
- an accent is created in the room using a contrasting composition.
The color of the grout is of great importance. To emphasize the geometry of the tile, you need to choose a composition that is contrasting in color, that is, choose a dark grout for light tiles, and light grout for dark ones. Bright colored grouts give the cladding a fresh and elegant look, but at the same time highlight the slightest installation errors. But muted pastel colors add restraint and smooth out defects.
To ensure that the color of the seams harmonizes with the finish, it is recommended to choose the color of the grout according to the darkest or lightest shade that is present in the tile pattern. If the cladding is black and white, the seams should be gray. In general, gray is a universal color, it suits any tile, so if you can’t decide, choose it and you won’t go wrong.
It is not recommended to use white grout for floor tiles: the slightest dirt is clearly visible on white joints, so you will have to clean them much more often. In addition, over time, such grout acquires a yellowish tint, and the seams have a less attractive appearance. The best option for floor tiles are grout compounds of all shades of brown and gray.
To increase the decorativeness of tile joints, special additives are produced - mother-of-pearl, luminescent, as well as silver and gold chips. All of them are designed for epoxy grout, and mixing with a cement composition does not give the desired effect. These additives are sold separately and before grouting are simply mixed with the working composition until smooth. The treated seams look very impressive, and, depending on the type of additive, they can shimmer in the light with brilliant sparks, cast like mother-of-pearl, bronze, platinum, or glow in the dark.
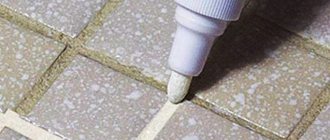
Cleaning and care recommendations
After the bathroom has acquired its final appearance, it is necessary to take care of the attractive appearance of the room. You can use a tile grout marker to remove traces of grout. Usually the surface is rubbed down in 2-3 approaches; if the mastic has not yet completely dried, cleaning is postponed until it is completely dry.
Remains of the solution on the ceramics are removed using water and a spatula. Wet the excess and then carefully scrape it off with a scraper. Remaining stains can be removed with a damp cloth or sponge. If the tile has a ribbed or uneven surface, then cleaning is carried out with a toothbrush. At the final stage, it is better to use a glass cleaner that polishes the surface well.
Need to know! It is necessary to clean the mastic that has not yet completely hardened, otherwise it will be very difficult to soak it, and for products with a relief surface this becomes very difficult.
Caring for bathroom ceramics is, for obvious reasons, different from a regular room. About once every two months, you need to carry out a thorough cleaning here using special or folk detergents in the form of lemon, vinegar, soap and others. Bleaching is carried out using hydrogen peroxide and soda. They cope well with harmful microorganisms, dirt and fungus.
Width of grout joints
The width of the joints also affects the overall perception of the cladding and the quality of the grout. For square and rectangular tiles, the optimal joint width is 1.5-3 mm; for irregularly shaped tiles, the joints can be increased to 12 mm. The wider the seam, the higher the likelihood of cracking under the influence of intense loads on the floor, so making seams wider than 12 mm is undesirable. In addition, with large joint widths, grout consumption unnecessarily increases.
At the same time, joints less than 1.5 mm wide are difficult to fill, especially if a thick epoxy mixture is used. And poor-quality filling promotes moisture penetration to the ends of the tiles, accumulation of dirt, and the development of mold. It is also difficult to clean seams that are too narrow, and over time the cladding takes on a sloppy appearance.
Why is this necessary?
Grouting (fugue) is not required when laying seamless walls - tiles without chamfers are used for this. A perfectly even, tight butt laying is assumed. At the same time, it is almost impossible to find joints on a textured surface.
But ordinary citizens are unlikely to lay out designer collection tiles in their baths and kitchens, so the grout that is needed for ordinary tiles is a pressing issue.
For ordinary tiles with chamfers, grouting is necessary - this is the only way to achieve the tightness of the wall.
Without proper treatment of the joints, moisture will accumulate under the tiles, which will ultimately lead to the tiles falling off.
Grouting process
If you plan to lay tiles on the floor instead of linoleum, installation is carried out in stages. After completion of the work, the space between the tiles must be decorated in accordance with the color scheme of the room. In addition, grout also performs a protective function. For this reason, it should be applied in accordance with a number of rules.
If the technology is violated, cracks may appear during operation, and moisture resistance and strength may decrease.
Tools you will need for the job
Before you properly grout the seams between the tiles on the floor, you need to prepare the following tools:
- a spatula-former to give the seams the desired shape (uniform depression along the entire length) or use any cable of sufficient diameter;
- sponge, rags;
- rubber spatula;
- container for preparing the solution;
- brush;
- a construction mixer or a wooden spatula are tools for mixing the mortar.
Surface preparation
At the initial stage, you need to put the treated coating in order. To do this, you need to remove dust; use a brush to remove dirt from small cracks in the space between the tiles.
The degree of adhesion of materials depends on how well the coating is cleaned.
Applying the mixture to a dry surface is not recommended for various reasons. So, if you pre-moisten the coating, adhesion improves. This increases the service life of the material.
In addition, treating the joints with liquid will avoid a situation where the adhesive will draw moisture from the grout mixture onto itself. This may cause cracks to form.
Additionally, it is recommended to use an antiseptic solution.
It is applied to avoid the appearance of fungus in the future.
Preparing the mixture
If you use ready-made grout (polyurethane), just remove the lid from the container. Then they immediately move on to performing the work. Cement-epoxy, cement-sand, cement, epoxy compositions are prepared according to a more complex scheme. For example, water is used to prepare cement-based grout. If you plan to use an epoxy analogue, then the kit includes a sufficient number of components, which are contained in separate packages.
The instructions for preparing each product are different. A general condition for preparing different mixtures is the need to mix the solution in small quantities. You can use a spatula in the process. However, if you plan to process a large room, and the work will be carried out with assistants, then it is permissible to immediately prepare the mixture in larger volumes. Then use a construction mixer.
Filling tile joints step by step
Grouting is sometimes performed several times. This is due to the additive material. At the initial stage, the seam is filled to the top edge of the tile.
It is necessary that the mixture is flush with the tile covering.
It is applied using a rubber spatula. Moreover, the direction of movement of the tool is transverse. Otherwise, part of the solution will be removed along with the spatula, and the period of work will increase. When the grout dries a little, it is lightly moistened with water. This will avoid cracking. This recommendation applies to cement-based mixtures.
If the test rubbing showed that the composition leaves traces on the porous surface of the tile, or if the cladding has a complex topography and is difficult to wash, then it is recommended to cover the surface near the seams with masking tape.
Before applying the composition, it is advisable to lightly moisten dry seams and ends of the tiles using a spray bottle.
The finished grout mixture is taken from the container using a spatula, after which it is driven into the seams with transverse and diagonal movements.
Important! Wide seams, for example, between natural facing stone or clinker tiles, are filled using a pressure syringe gun or a “pastry” cone-shaped bag, followed by leveling with a narrow spatula.
Preliminary formation of the seam surface is obtained by diagonal and slight longitudinal movement of the spatula. At this moment, the main excess mass is collected from the surface. The fugue should be approximately flush or slightly above the front surface of the tile.
There are two methods for grouting tile joints. The first is to work only in the seam area. In the second case, the fugue is distributed over the entire surface of the tile using a large spatula or grater. None of the methods has decisive advantages.
After about 10-20 minutes, the grout in the joints begins to harden: it no longer presses through and does not reach for the spatula. This means that it needs to be smoothed with a sponge.
Rinse the sponge regularly and wring it out well, but keep in mind that over-wetting will cause discoloration. The sponge is moved along the seam in a circular motion, the final one is a longitudinal pass - this is how we get the final shape of the seam.
To better see all the possible irregularities of the fugue laid between the tiles, some professional tilers grout under a spotlight installed at an angle to the working surface (painters who grout putty work in much the same way).
A colored coating always forms on the surface of the tile; in some places, fugue fragments may remain. They must be removed with a soft cloth no later than five hours after filling the seams.
If some local sagging is found on the surface of the rubbed seam, they can be removed with “zero” sandpaper or even with simple thick cardboard.
Technological passage over the rubbed cladding is allowed after 5-7 hours. Floor heating can be turned on no earlier than after 72 hours. If necessary, after 7 days the seams can be treated with a water-repellent compound.
Manufacturers of construction chemicals produce special solutions (essentially, deep-penetrating soils) that make rubbed tile joints more resistant to moisture and dirt. This is a good solution for floor tiles, but you should keep in mind that after impregnation, the grout is covered with a film that is resistant to aggressive cleaning compounds such as Domestos.
Formation of the seam surface
If it is necessary to make a recess in the space between the tiles, use a special tool. This is a spatula-shaper. If you don’t have one at hand, you can take a large cross-section cable. It is applied to the seam, which has not yet hardened, and slightly pressed. As a result, a depression is formed.
The smaller the cable cross-section, the more obvious the curvature will be in the space between the tiles.
Surface cleaning
The best way to avoid stubborn stains is to remove excess grout from the tiles immediately during the grouting process. Gradually the mixture hardens more and more. You can remove fresh stains with a damp cloth and soapy water.
If the grout has hardened, use the mechanical method, special chemicals and improvised means.
However, in this case there is a possibility of damaging the tile. Moreover, solvents and home remedies cannot be applied to seam joints.
Finishing tiles
First you need to check whether the grout has hardened. This is done using a damp sponge: it is passed along the tile seam; if the solution remains on the sponge, then you should wait for subsequent processing. When the mixture does not linger on the sponge, you can proceed to applying the finishing coating - an antiseptic solution. Seam joints are reprocessed. No antiseptic is applied to the tiles. Then all that remains is to remove any remaining dirt.
Cleaning the tile surface after work
Regarding how to remove grout from tiles, it is worth noting the following products: ammonia, table vinegar, mustard, diluted lemon juice, fine table salt and also regular toothpaste. By the way, all these methods are excellent alternatives to chemical agents. To do this, take a clean cloth and wet it. We try to wash the solution well. After the base layer has been removed from the tiles, wash the floor with a regular mop. Let it dry, and after a while you can walk on it.
We recommend that you also use a steam cleaner, which is another proven method, in the fight against pollution. It cleans the surface thanks to jets of hot steam.
When finished, you will need to wash off any remaining dirt with plain water and wipe dry with a cloth.
How to restore grout that has lost its appearance
There is an opinion that tile joints can be restored quite technologically. However, this is not quite true. The fact is that grouting compounds are not intended for sealing irregularities of small thickness or width. In such conditions, they easily fall out and do not gain their “catalogue” color.
The only way to properly repair the grout is to completely clean out the old grout with a knife, a special diamond-coated cutter, or a renovator, and then lay new grout in its place.
Keep in mind that when mechanically cleaning grout joints, there is a very high probability of damaging the tile itself.
This is what one very authoritative person writes in the instructions.
If the old grout in the seams has lost its appearance (for example, faded or stained) but has retained its strength, it can be restored using special cleaners, or even painted. There are specialized compounds for this.
Only test processing of the seams will show how effective such restoration methods will be. But the decision will almost certainly not be easy. This means that the choice of grout, as well as the process of filling the joints itself, must be taken as responsibly as possible.
Floor preparation
Grouting tile joints with your own hands will take a lot of time. But the result is undoubtedly worth it. So, initially you need to clean the seams from debris and unnecessary dirt. It is also necessary to remove all the “crosses” remaining after the tile laying process. Many manufacturers of dividing crosses unanimously declare that their product can be safely left in the seam itself, and a layer of grout can be applied on top of them, but all these are just words, since when applying grout, its thickness on the cross is much less, which will affect the final the result after hardening is the color of the entire surface. In the places of the dividers it will be different, lighter. There are differences when working with glazed and unglazed tiles. You can immediately apply grout to a glazed one, which cannot be said about an unglazed one. First you need to moisten the top and side parts of its surface, this is done to protect against large suction of moisture from the grout. But you shouldn’t overdo it either, because due to excess moisture the grout can simply spread.
Popular brands of grout mixtures
| Name | Description |
| Grout LITOCHROM | A popular cement-based composition with the addition of organic, polymer and mineral components. Intended for processing joints with a width of 1-6 mm, used on cladding made of ceramics, glass and natural stone. When applied, it is characterized by high plasticity, easily penetrates into all voids, and firmly adheres to the surface. After hardening, it is characterized by minimal shrinkage, excellent resistance to mechanical stress, resistance to fading, and low water absorption. Available in powder form, packaged in bags of 5 and 2 kg. Available in 32 different colors |
| Mapei Ultracolor Plus | Cement-polymer composition with improved characteristics. Designed for joints 2-20 mm, suitable for ceramics, natural stone, agglomerates, marble and glass mosaics. The mixture is easy to apply, dries quickly, and can be easily removed from the surface. After hardening, it provides color fastness, dirt- and water-repellent properties, and resistance to abrasion and stress. Available in powder form, packaged in bags of 5 and 2 kg |
| Ceresit CE 79 UltraPox | Epoxy composition with mineral fillers. Designed for seams up to 10 mm wide. Suitable for all types of tiles, porcelain stoneware, natural stone. After hardening, the grout is resistant to chemical detergents, water, ultraviolet radiation, and intense mechanical stress. Available in the form of a paste, which must be mixed with a hardener before application. Packaged in plastic buckets of 5 kg, gray color |
| Ceresit CE 40 Aquastatic | It is made on a cement basis and is intended for processing joints up to 10 mm wide in rooms with high humidity levels. Contains antifungal additives, is easy to apply, and after curing forms a perfectly smooth surface. The seams do not crack for a long time, withstand intense loads well, and do not fade. The grout is resistant to temperature changes, so it can be used on heated floors. The color range includes more than 30 shades |
| Axton | It is made on the basis of cement, intended for joints with a width of 1-5 mm. When properly diluted, the mixture has good plasticity, is convenient to apply and easy to clean from the surface of the tile. The main feature of this grout is the absence of streaks on the tiles after washing. The hardened composition provides the seams with durability and uniformity of color, and reliable protection against moisture penetration. Axton grout also tolerates temperature fluctuations well and can be used to process the seams of tiles laid on heated floors |
Plastic border
Relatively popular due to ease of use and inexpensive cost. In addition, the border is universal - suitable for acrylic, cast iron, metal or plastic bathtubs and fits perfectly into any environment.
Consumers are offered enough model options, the most popular being a design that is attached to special liquid nails.
Installation process:
- Clean and degrease the seams at the same time. Once finished, allow the surface to dry completely.
- Marking. Measure the caulking areas, including the corners.
- Installation. After opening the packaging, coat the lower parts of the border adjacent to the wall with glue. The most difficult thing is to form the corner of the plastic strip. Two options - cut the baseboard (you need an angle of 4 degrees), or use special fittings.
After installation, do not use harmful abrasives or aggressive chemicals.
Sometimes curbs are installed earlier, when the tiles are laid. First, the plinth is installed - its edge remains on top, on the side, the second is hidden, starting to drown it in glue. After this, the tiles are attached.
Overview of methods
Ribbon
Convenient, but expensive. This product does not guarantee perfect waterproofing, but it looks decent in appearance. Having cemented the joint, instead of painting it, you can decorate it with such tape.
Narrow, medium and wide products are available for sale. It is glued in the same way as a self-adhesive border. To enhance the tightness, it is worth treating it with a transparent sealant or liquid nails.
Before installation, the surface must be cleaned, degreased and dried.
Shelf instead of border
Plastic borders are usually laid at an angle. What to do if the gap is huge or you need to nicely hide part of the bathroom riser?
Typically, sanitary containers are significantly smaller than the actual width of the room. They try to install them closer, reducing the gaps, however, at the head, where the washbasin is installed, the distance is greater. Or vice versa, below.
Creating a shelf will save the situation. It is functional and looks great. Put soap, shampoo when washing, sponge, and other accessories.