For owners of private houses who want to quickly, beautifully and relatively inexpensively decorate the facade of their home, siding is the best solution.
The material is easy to use, light weight, installation is simple and can be done independently.
The result of such finishing is very effective from both an aesthetic and functional point of view - the so-called a ventilated facade capable of removing water vapor and condensation from the wall pie; the cladding does not have a tight mechanical connection with the wall material, which eliminates the possibility of deformation or destruction due to temperature changes in size .
In addition, there are every opportunity to disguise any flaws in the walls - unevenness, curvature, the presence of any flaws or other shortcomings.
Siding is produced in various types; according to the material used, it is divided into two main groups:
- Metal;
- Plastic (vinyl, acrylic, etc.).
Let's consider metal siding under timber as a material with specific surface properties and finishing capabilities.
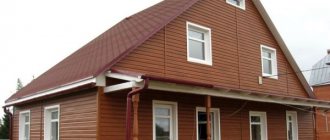
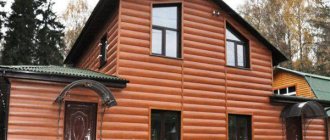
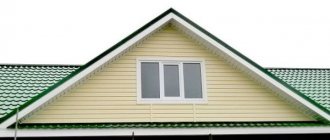
Metal siding under timber
Metal siding under timber is a facing material consisting of strips connected into one continuous sheet, the surface of which imitates a wall made of timber.
The advantages of metal siding under timber include :
House with metal siding under eurobeam logs
The disadvantages of metal siding include:
The existing disadvantages are inherent in all types of metal siding, but with proper use there are usually no consequences from them..
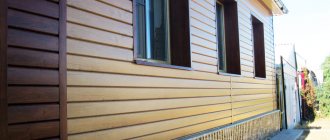
Colors and design
Siding under timber
Taking into account the design features of metal siding under timber, it is worth highlighting the following varieties of these products:
- rounded panels, which are made with shaped profiles;
- profiled strips, which are straight metal elements.
The color schemes used in the manufacture of siding allow us to distinguish the following two groups of products:
- a profile that has a shade and texture that accurately replicates the appearance of natural wood;
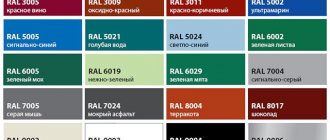
- products, the color of which is selected in accordance with the RAL table.
Metal siding for timber is made with imitation of the following types of wood:
- bog oak;
- textured pine, which can be either matte or glossy;
- cedar imitation;
- panels with a glossy surface imitating maple products;
- walnut siding, similar products come in different shades;
- cherry.
When choosing metal siding for large facades, it is better to opt for panels of dark shades. For small buildings, many designers recommend siding in lighter shades. When purchasing panels from different manufacturers, the same color may differ slightly, so all material and additional elements should be purchased from one manufacturer.
Equipment
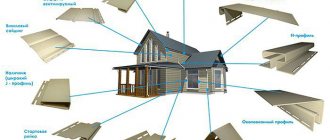
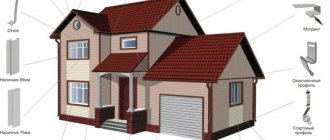
Metal siding requires additional elements to design corners, slopes of window or door openings and other necessary details.
The siding package includes:
- Start and finish bar;
- H-profile for connection along the length;
- External and internal corner strips;
- Soffits;
- Platbands, J-platbands;
- Moldings;
- Window slopes, near-window profiles.
How to go around windows and doorways with siding
The technology for designing window and door openings is almost the same, only ebb sills are additionally installed on the windows. For the installation of slopes, platbands, J-planks or, for large depths, a set of short pieces of panel are used .
To install all the elements, a sheathing of wooden or (better) galvanized metal strips is pre-installed. Installation of extensions is carried out based on the installation depth of the window or door.
For blocks installed in the same plane as the panels, platbands are used . In other cases, a J-profile or pieces of panels cut to length are used. To install, first a finishing strip is attached around the perimeter of the box, and the corner joint is formed with a regular corner.
Installation of window openings
Setting the starting bar (starting strip)
The starting strip is installed strictly horizontally at the bottom line of installation of the panels. You need to select the lowest point, draw a horizontal line along the perimeter of the house 40 mm above this point (necessarily horizontal, which is checked by level).
Then, the top edge of the starting bar is attached to the line. The self-tapping screws are located exactly in the center of the oblong holes; they should not be tightened tightly; the material must be allowed to move due to thermal expansion .
For the same reason, the next plank is not attached end-to-end, but at a distance of 6-10 mm from the previous one, so that when expanding, the panels mounted on it do not begin to bulge.
Setting the starting bar
Installation of vertical strips - corners and H-shaped connector
Corner strips have two types of design - complex and ordinary. Complex corner profiles have special recesses into which the ends of the panels are inserted.
They are installed strictly vertically along a plumb line, fastenings with self-tapping screws are made in increments of 0.2-0.3 m . Installation of complex corner profiles is carried out after installation of the starting strip.
It is also installed immediately after installing the starting strip; the vertical is checked with a plumb line.
Installation of vertical strips - corners and H-shaped connector
Covering a house with siding (video)
Comments
0 Dmitriyagoxy 09.16.2018 01:04 Wafer disk valve AquaFix PN16 DN50 gray cast iron here Tiles decor Kerama Marazzi Agatti 250x400x8 mm here Rack profile Standard 75x50 mm 4 m 0.50 mm here Galvanized plumbing bolts 8x50 mm DIN 57 1 (2 pcs) here Border tiles 201x62x9 mm Navarra Baroque here Linoleum Sinteros Spring GRETA 2 here Corner connector g/g 3/4x3/4 for heated towel rail here Tiles floor insert corner 330x330x8mm Delma gray (9 pcs = 1 sq.m) here Vinyl wallpaper on non-woven backing 1.06x10.05m Erismann Primavera art.
4373-4 here Flash 100x2000 mm white RAL9003 here Quote
Update list of comments RSS feed of comments for this entry
Installation of finishing strips
The finishing strip completes the paneling, covering the top edge of the panel. To install, the last panel is cut to the required width and the edge is tucked under the curl of the finishing strip.
The presence of such an element protects the canvas from rainwater entering from above . Installation of the finishing strip is carried out simultaneously with the installation of the top panel.
Installation of finishing strips
Installation of Eurobrus metal siding
The technology for finishing facades using metal siding Eurobrus is standard, but requires the use of special connecting elements.
Material calculation
Metal Eurobeam has clear geometric parameters, so it’s not at all difficult to independently calculate the required materials. First you need to determine the exact area of the facade.
If the surface to be covered has the correct geometric shape, you need to multiply its length by its height and subtract the area of doors and windows. It is better to entrust the calculation of materials for cladding facades of complex shapes to specialists.
When purchasing material, you need to add 7-10% for waste when cladding rectangular facades. Waste from decorative finishing of facades of complex shapes will be at least 15%.
Preparing the object
Before covering with Eurobrus siding, preliminary preparatory work is carried out: lighting fixtures, drainpipes, cables are dismantled, and the walls are cleaned of dirt.
The preparation of load-bearing walls depends on the material of manufacture. Reinforced concrete and brick foundations require high-quality sealing of seams and cracks.
Wooden surfaces require special attention. The peeling wood is removed, all seams are repaired with oakum or sealant. Clean walls are treated with antiseptic agents that protect the wood from mold and bugs.
Finishing of a newly built wooden house does not begin immediately: at least a year after completion of construction. This will prevent the siding from deforming.
What will you need for work?
For installation of a ventilated facade and further finishing of external walls with Eurobrus siding you will need:
Metal siding Eurobeam is a durable material that requires the use of specialized devices for cutting. Cladding work requires the use of the following tools:
- laser level;
- roulette;
- Bulgarians;
- screwdriver.
Installation of sheathing and wall insulation
Using a laser level, they mark the walls and install the corner elements of the sheathing. The metal profile is fixed with screws to special fastenings. The pitch of the lathing depends on the size of the insulation and vapor barrier material.
To prevent the formation of condensation and natural air circulation, a vapor barrier layer of film or membranes is laid. Any heat-insulating material is placed tightly between the metal profiles.
In the northern regions, multi-layer insulation is practiced.
Windproof membranes are laid on top to protect the walls from blowing, and the insulation from moisture and condensation.
By the way! It will be interesting to know: Finishing with brick siding according to all the rules
Siding installation
The final stage in finishing the facade is the installation of siding. Cladding work begins from the corners of the house. Metal panels are fastened from bottom to top.
To prevent deformation of the material during thermal expansion, the screws are not tightened completely, leaving a small gap for natural movement.
That's all. Installation of Eurobrus siding is completed. With minimal labor costs, a nondescript house was instantly transformed and looks like new.
How to install imitation timber: preparing the base
Finishing a wooden house with imitation timber begins with preparing the wall surfaces.
Clean the walls from dust and dirt. You may need to apply a primer solution (we wrote about it above).
Then, you need to put a waterproofing layer for the wood - most often it is a film membrane, sometimes it is replaced with glassine - a coverless, rolled material, impregnated with petroleum bitumen.
Fastenings for imitation timber may differ - the film sheet is attached from below, connected with construction tape, glue or self-adhesive strips, while the overlap of the membrane should be no more than 15 cm.
Plastic dowels are not suitable for attaching profiles to a concrete wall - only self-tapping screws, clamps to imitate timber (a curved plate with a hook and two holes) or galvanized nails.
If the wall is without flaws - unevenness, potholes or chips, the sheathing is installed tightly. If there are defects, then synthetic linings are inserted into the gaps.
To prevent the sheathing from turning out crooked, apply a level to it. The distance of one beam from another should be no more than 80 cm.
Then pipes and wires are laid, a layer of insulation is laid, another sheathing frame is installed and a film membrane is stretched over it. The second sheathing is necessary for air circulation.
Preparing timber before installation
The next step is to unpack the panels. It is not recommended to lay the canvas right away; wait a few days for the wood to absorb all the moisture (the wood may increase in size). This way you will avoid possible distortion after installation.
Installation of imitation timber for the exterior of the house begins only after applying a protective composition to the surface of the wood.
Install panels from bottom to top only.
Where to begin? Facing and fastening of false beams
Imitation of timber for exterior finishing of a house should be carried out only in sunny, dry weather. It is better to mount light-colored timber on the sunny side - if it fades in the sun, the differences in color will not be as noticeable as on dark panels.
Attach the first board to the sheathing using a screw, clamp or nails. Drive the nails into the longitudinal groove of the panel (ridge).
The first (starting) board should be placed with the ridge up - level it with a building level and secure it. If the first panel is placed unevenly, then all subsequent boards will lie crookedly. The result will be a severe bevel.
The next step is to install the second board.
When attaching the second panel, insert the tenon into the groove of the first board. Do not drive it close to the first block, leave a small gap (no more than 4-5 mm). The gap is left so that the canvas does not deform due to possible temperature changes indoors or outdoors.
Using this technique, install the boards to the top of the ceiling. To ensure that the parts fit together beautifully, file the corners (a 45° angle is suitable for external wall mounting) or install a decorative strip.
Imitation of timber vertically will “raise” the ceilings, making a room with a low ceiling higher.
Installation of imitation timber inside rooms
The interior decoration of a wooden house with imitation timber differs little from external installation work on the street.
The only thing is that when installing vertically in the rooms of a house, to fasten the boards you do not use screws, but nails intended for furniture.
Otherwise, all actions are repeated.
New panels can be attached to an old wooden surface using a construction stapler.
The last step is to treat the surface with a protective solution.
How to attach imitation timber to the ceiling: installation sequence
Ceiling cladding is considered the most difficult job due to the intense pressure on the hands during installation.
To reduce the load, choose boards that are not too wide (a wide panel visually makes the ceiling smaller).
The length also needs to be selected - the fewer joints, the better.
Ceiling installation begins with the installation of a wooden frame and film (if the beams are crooked). Start attaching the boards from the side of the window (width no more than 3 cm).
The technique is the same as for wall cladding - if necessary, place a layer of insulation between the crossbars.
If there are already floor beams on the ceiling, then it is enough to stretch a layer of vapor barrier, without sheathing.
General information
These instructions provide all the necessary information regarding the installation of Metal Profile siding. Before you begin, please read these instructions carefully.
ATTENTION! A mandatory condition for providing a guarantee is compliance with the rules of transportation, storage, loading, unloading and installation!
Transportation
Loading and unloading, storage
Types of siding
Siding - decorative metal panels intended for cladding facades and lining cornices. It is possible to produce three types of profiles:
“Shipboard”, “Lbrus”, “Woodstock®”, as well as “Lbrus” soffits. The panel is made of thin galvanized steel with a polymer coating in various colors, including imitation of various natural materials.
“Shipboard” siding is the classic, most popular siding profile. Thanks to its shape, it is easy to install and convenient to use. Most often used for wall cladding. Source material: rolled galvanized steel with polymer coating.
Panel characteristics
| Siding name | Metal thickness, mm | Length, mm | Full width, mm | Working width, mm | Profile height, mm | Weight 1m2, kg |
| Ship board MP SK 14x226 | 0.4; 0.45; 0.5 | up to 6000 | 260 | 226 | 14 | 3.96; 4.24; 4.71 |
| Lbeam 15x240 | 0.4; 0.5 | up to 6000 | 264 | 240 | 15 | 5.19; 5.69 |
| Woodstock ® 28x330 | 0.45; 0.5; 0.7 | up to 6000 | 356 | 330 | 28 | 4.13; 4.59; 6.42 |
Additional elements
Installation
Installation of metal substructure
Before installation begins, it is necessary to clean the surface of elements unrelated to the base (detached plaster, paint, etc.), as well as dismantle elements of the drainage system, antennas, signs, etc.
A hydro-windproof membrane with an overlap of 150 mm is installed on top of the insulation.
The L-shaped profile is installed perpendicular to the direction of the siding panels. For horizontal installation – vertically.
The design of the brackets allows for leveling (straightening) of the sheathing plane up to 30 mm to create a flat surface for the siding. If this is not enough, then it is necessary to install brackets of a different length or a bracket extension.
To remove condensation from the insulation in the system, it is necessary to provide a ventilated gap of at least 40 mm.
Installation of additional elements
Additional elements are decorative elements used for cladding walls with siding, at joints, corners, slopes, etc. Additional elements are divided into complex and simple.
For the normal functioning of the ventilation facade system, it is necessary to leave gaps (40 mm) between the surface of the insulation (hydro-windproof membrane) and the internal structure of the cladding, as well as: at the base, under and above the windows, under the roof eaves.
Installation of simple shaped (additional) elements is carried out after installation of wall panels.
Installation of “Shipboard” siding
For ease of installation, the edge of the siding lock must be cut at an angle of 45 degrees with metal scissors on both sides.
The first strip of “Shipboard” siding is inserted under the lower part of the initial strip, providing a locking grip; the upper part of the siding is attached to the guides with 4.2x16 self-tapping screws in the perforated holes.
After installing the siding panels, the last row with perforations, the junctions with the roof, and the joints of the window and door opening are closed.
Installation of siding Lbrus
Installation of Lbrus siding is carried out from top to bottom, from left to right. This is due to the geometry of the lock, since when installed from the bottom up, precipitation may enter the siding lock, which can lead to negative consequences.
Installation begins with the installation of the PZS-30x25x3000 strip. The first row of siding is inserted into the strip and fixed with 4.2x16 self-tapping screws to the substructure: the self-tapping screw is placed in the center of the perforation hole with some clearance to compensate for temperature deformations.
Installation of Woodstock ® siding
Woodstock ® siding accurately reproduces the relief of log masonry and has a deep profile geometry that completely recreates the pattern of natural wood.
The Woodstock ® siding lock creates a barrier for water, thereby preventing it from penetrating inside and freezing, damaging the integrity of the structure.
This lock makes it possible to install Woodstock ® siding both from the bottom up and from the top down.
Top-down installation option.
The first row of siding is hooked onto the starting strip PNW-12x15x3000. The bottom of the panel is fastened with self-tapping screws to the substructure: the self-tapping screw is placed in the center of the perforation hole with a gap to compensate for temperature deformations.
Subsequent rows of siding interlock with each other and are fastened in the same way. Using a level, you can check the horizontal installation of the siding panels.
By the way! It will be interesting to know: Decorative plaster from ordinary putty
If the last panel of siding is larger than the size required for the project, it must be trimmed to the required size, install a Z-bar and rivet the last panel of siding.
If there are any external objects in the wall, such as drainpipes, electrical wiring, you need to cut a hole 6-10 mm larger than the device itself.
Installation of window and door frames
Adjusting siding around windows.
- First, the panel is tried on so that the edges protrude from both sides of the window opening. Then the width of the window is noted, with the addition of 6-10 mm. The resulting marks will show the locations of the vertical cuts.
When installing door and window frames, you must first install the top parts, then the side ones.
Completion of installation.
The final touch is framing the top edge of the cladding. Depending on the situation, it can be done: with a window sill, a fastening strip or an internal corner.
All these elements are fastened with self-tapping screws. Step 300 mm.
Metal siding “under timber” - main characteristics
Metal siding under timber is a fairly popular material, which is understandable, since it has a number of advantages over its competitors.
Material characteristics
The main feature of this material is its unusual shape, which imitates the wall of a log house:
Subsequently, the base is covered with a special material, which is then primed. The highest quality models of this material are coated with a special varnish.
Preparatory work for installation
Metal siding is mounted on the sheathing, which is pre-installed on the walls:
- A steel profile can be used for lathing:
- Metal siding l beam is mounted in a horizontal direction, since a vertical sheathing is used for its installation.
Note. If such material is used for the purpose of finishing permanent fences, then it can be installed on a cardboard or brick base, while the sheathing is not erected.
Wall cladding
If you want to make the cladding yourself, then it is very important to follow the general algorithm.
If you follow the above recommendations, you can get a decent result in the form of a beautiful and durable structure.
The need for material depends on the shape of the building and on numerous factors:
So, in order to calculate the area, you need to add up the areas of all the walls (length*height*2, width*height*2):
Of course, this is one of the most inexpensive types of siding; there are also more expensive options. According to the recommendations of experts, you should not save on purchasing original parts, because the cost, although it will increase, will not be much.
Types of siding coatings
In order for the service life of such an element as metal siding timber to be long, it is necessary to cover it only with high-quality proven materials:
The seller can offer the buyer absolutely any items at different prices, depending on a number of factors:
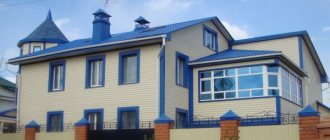
High-quality eurobeam siding
If we talk about such a parameter as price, then the range is significant and depends on numerous factors:
- The average price is from 250 rubles per piece, but it is worth noting that there are original parts and non-original ones.
- It’s better to spend a little more, but get a high-quality product with an excellent service life.
The most important thing is to choose the material wisely, and then imitation timber siding may be the best option for you.
Manufacturers and price of material
Today the list of metal siding manufacturers is very large. Among them there are both Russian and foreign companies.
In the line of domestic ones we can highlight such manufacturers as:
- Lipetsk roll forming equipment plant;
- ;
- Trademark "Grand Line";
- the city of Kazan and others.
Among the foreign companies in our market we can note:
- Finnish siding “Ruukki” On the market for more than 50 years;
- American. Uses aluminum in the production of siding;
- British-Dutch. The material is additionally covered with polyester.
Siding from Russian manufacturers competes in price and quality with imported siding and perfectly imitates the construction of a house from profiled timber.
The market price is based on many indicators: manufacturer, physical characteristics of coatings, material used, service life and others.
Let's look at the table of prices in different cities:
| City | Price (Russia) rub./m.2 | Price (Import) rub./m.2 |
| Moscow | From 390 to 500 | from 520 to 650 |
| Saint Petersburg | From 390 to 500 | From 390 to 500 |
| Kazan | From 325 to 420 | From 550 to 680 |
| Ufa | From 360 to 450 | From 540 to 700 |
| Samara | From 400 to 520 | From 550 to 750 |
Connecting elements are required for installation. Manufacturers produce them in the same shades as the main panels. The price of components depends on the same indicators as for the main product.
| Accessories | Product length, m | Price, rub./m.p. |
| H-shaped docking strip, 75mm | 2 or 3 | From 140 to 210 |
| External compound corner plank 75*75mm | 2 or 3 | From 160 to 250 |
| External/internal corner strip 50*50mm | 2 or 3 | From 95 to 150 |
| Internal compound angle plank 75*75 | 2 or 3 | From 140 to 260 |
| J – profile, 30x32 mm | 2 or 3 | From 80 to 130 |
| Slope 75x90 mm | 2 or 3 | From 100 to 250 |
| Final plank for slope | 2 or 3 | From 70 to 120 |
| Starting bar | 3 or more | From 50 to 100 |
| Low tide 100x20 mm | 3 | From 80 to 130 |
Specifications
All types of wood-look metal siding have identical characteristics:
Service life of modern material
The average lifespan of modern metal siding Eurobrus and block house is 30 years.
However, this indicator is influenced by the type of protective coating on the surface of the panels:
- polyurethane - up to 50 years;
- polyester - up to 25 years.
Thermal conductivity
Weight and dimensions
The thickness of one sheet, depending on the manufacturer, can vary within no more than 1 mm. The length, as a rule, is from 200 to 600 cm, and the width is from 20 to 25 cm.
The weight of the material is approximately 3.5 kg per 1 m2. This is a fairly high figure, so during installation, special attention is paid to the strength of the metal frame, which is attached to the external wall of the building, and then sheets are installed on it.
For example , metal siding “ship plank” dimensions:
- thickness - 1.4 cm;
- width of one panel - up to 26 cm;
- length - up to 600 cm.
Additional elements
Each series of metal siding is completed with a set of special elements for decorating corners, door and window openings, as well as finishing and starting strips. offers additional elements, the front sides of which, in color, shade and texture, completely coincide with the main series of metal siding.
Depending on the selected series of metal siding, various fasteners may be required during installation. For example, the Woodstock series allows installation using simple self-tapping screws.
To create a load-bearing frame, you will need fastening brackets, and to fix sheets of metal siding and decorative elements, fastening clamps and screws. Depending on the selected series of siding and the length of the sheets, a different amount of fasteners will be required.
If the space under the siding is planned to be filled with insulation, then it is necessary to calculate its quantity, as well as fasteners for the heat insulator. Consultants or measurers will help you accurately calculate the required amount of a particular fastener.
The warranty on a metal profile can be up to 20 years, but the installation technology must be followed. If installation is incorrect, no warranty is provided; corrosion or destruction of the siding as a result of mechanical stress during transportation, installation, or operation is also not covered under warranty.
Metal siding installation technology
The technology for installing wood-look metal siding is so simple that you can do the work yourself, without resorting to the services of construction teams and organizations.
By the way! It will be interesting to know: How to paint OSB slabs for exterior decoration on the facade of a house
Setting the starting bar for the starting strip
The evenness of the entire façade finish depends on the correct installation of the initial strip for any arrangement of metal siding panels.
If you set markings with large horizontal errors, then there is a high probability that the metal siding will gradually move out, and errors in the installation of vertical profiles can even lead to the collapse of the entire structure.
Horizontal arrangement
The panels are installed from bottom to top. The starting strip not only serves as a fastening for the first row of slabs, but also as a guide for the even laying of all wood-look metal siding panels.
Horizontal installation
Before work, markings are carried out using any type of building level. The plank must be mounted strictly horizontally. The distance from the base or blind area to the starting line must be at least 4 cm.
Vertical arrangement
Vertical installation
Installation of corners and connections
When installing corner elements, do not forget about the building level, since the evenness of the vertical planks directly affects the strength of the entire structure.
Arrangement of obtuse, acute angles and H-shaped connector
All corner elements - external and internal corners - are fixed plumb.
Self-tapping screws or rivets are used as fasteners. The distance between fasteners is 30 cm on both sides. Similarly, an H-shaped strip is installed in the places where the joints are planned.
How to go around windows and doorways with siding
Installation of siding around window openings is carried out as follows:
Installing panels around the doorway is done in the same way. All places of cuts and cuts on metal siding must be treated with a special tinting paste.
Installation of finishing strips
The last stage is strengthening the finishing strips along the top edge. Here, taking into account different conditions and the structure of the building, a flashing or finishing strip is installed. Fastening is carried out in increments of 30 cm.
Varieties
The production of L-beam metal siding includes two main types - premium and economy.
Economy L-beam is made of steel, with polyester on top, which provides decorative and protective functions.
For the production of premium siding, Korean steel is used, which has high strength indicators. A high-quality application of the top layer cannot be distinguished externally from natural wood by color and texture.
Siding installation
Like any other siding, this type of cladding is installed on guides. To install the profile, use brackets that are fixed to the wall with anchor bolts. The distance between the guides is from forty centimeters to a meter. Installation of siding panels, according to reviews from builders, can be done in any direction, both horizontal and vertical.
For insulation purposes, slabs of mineral wool, expanded polystyrene and other materials are mounted on the wall. A waterproofing membrane is placed on top of the insulation layer, which will not allow moisture to accumulate.
Wood siding is installed using standard self-tapping screws. The special system has a special geometry, so installation must be done from top to bottom. The first panel is fixed into the guide bar until it stops. It is recommended to start laying from a corner. A finishing strip is attached to the bottom of the structure, which is aligned with the guides and secured with self-tapping screws. If there are no holes for fasteners, you should make them yourself in advance.
Otherwise, the installation of L-beam siding is carried out using the same method as installation of any other type. Self-tapping screws must be screwed into the center of the perforation, at a distance of no more than forty centimeters.
This siding is ideal for walls made of stone, brick, wood and other building materials. Possessing excellent characteristics, it will transform any building into a beautiful, noble structure, shown in the photo. And after watching the video, you will be able to install the siding l beam yourself, without involving a team of specialists.
What are the advantages of metal siding under timber?
- This is a very stable material compared to plastic siding and wooden lining. It is less susceptible to deformation that occurs as a result of regular temperature changes. 50 years is the guaranteed service life of this material; at the same time, the external façade will remain attractive for a long time, maintaining freshness and novelty. A wall covered with it will not be visually different from a wall made of natural wooden logs.
- Metal siding has high fire safety and corrosion resistance.
- The cost of metal siding that imitates timber compares favorably with the price set for natural material.
Advantages of metal eurobeams
- Reliability and high strength compared to vinyl or wood siding. Due to the convexity of the lamellas, the eurobeam made of metal acquires additional stiffening ribs and becomes insensitive to either time or mechanical stress.
- 100% fireproof. Steel is indifferent to fire and does not spread flames in the event of a fire.
- 100% moisture resistant. With proper installation, the material maintains the integrity of the coating for decades and does not allow moisture to seep under the finish.
- Easy to install. Euro beams are connected to adjacent elements using a tongue-and-groove method, which can be easily mastered even by a beginner in the construction business. In addition, you can assemble this material in any season and in any weather.
The nuance of using metal siding is the need for additional heat and sound insulation of the house and regular monitoring of the integrity of the coating (each scratch will have to be painted over immediately after detection to prevent metal corrosion).
Metal profile
Metal Profile siding is especially often used in cladding the facades of large enterprises, but this material is also widely in demand in the private sector.
You can also read about entrance doors with good sound insulation at this link.
- high strength and resistance to external influences and fire;
- wide range and variety of color shades;
- high guarantee of durability.
You will be interested to know what types of locks there are for a metal entrance door.
This material will be a particularly good choice when finishing the façade of old buildings with weak foundations. The load on the walls and foundation will be minimal.
General rules for fastening metal siding
- Leave a gap of up to one and a half centimeters between the screw and the panel. When the temperature changes, the siding expands or contracts: the free space will facilitate the unhindered movement of the material.
- Self-tapping screws are screwed in without drilling.
- The panel is attached at each step of the sheathing.
- When installing additional elements, it is also necessary to leave a gap of up to 10 mm in order to prevent deformation of the siding under conditions of temperature changes.
Step 1: Preparing the facade for metal siding
- Carefully inspect the facade, tap the crumbling areas of the surface.
- Remove everything unnecessary from the walls: old putty, plants, various elements of drainage fastenings, roller shutters and other structures that interfere with the cladding process.
- Use a spirit level to check the surface is even. Walls with existing differences of more than 2 cm must be leveled using lathing, which will make the surface flawless.
Step 2: Installing the sheathing
The grate can be made of wood, but a metal structure is still considered the best option - it is more reliable and durable. The pitch of the sheathing is determined by the width of the insulation. Usually it varies between 400-1000 mm.
The sheathing is installed in the corners, around doors and windows along the perimeter of the opening and at the junction of the panels.