This article will help solve the problem of attaching a countertop to a kitchen unit.
Tabletop installation
Modern countertops can be made of stone, wood, metal and laminated chipboard or MDF. More rarely, concrete countertops are used, which are manufactured directly at the installation site.
Finished countertops are installed in several stages:
Let's analyze all the stages in more detail.
Preparing the countertop
After manufacturing, the tabletop, as a rule, differs slightly from the specified dimensions. Therefore, before installation, it is necessary to completely adjust it to other kitchen furniture.
This process can be carried out according to the following scheme:
- all kitchen cabinets on which the countertop will be installed are assembled, mounted and, if necessary, secured;
- the surface of the cabinets is leveled. If the furniture is equipped with adjustable legs, then you can place pieces of furniture on the same level using the adjustment method. If there are no adjustable legs, then for leveling it is necessary to place wedges under certain places;
Determining the level of the tabletop position
- We determine the optimal dimensions of the tabletop. Depending on the type of wall covering, the tabletop can be installed close to the wall (smooth apron, wallpaper, textured putty) or with a gap of 5 mm (tiles, uneven decorative finishing);
- mark the cutting lines. The surface of the tabletop in front of the cutting line is covered with masking tape for additional protection;
- The table top is trimmed and holes are prepared for installing kitchen appliances;
Cutting the tabletop to size
- the sections are processed with a file or other tools to remove irregularities.
Removing irregularities and burrs after cutting
Hole preparation
The next stage of installation is preparing the holes for the sink and gas stove. The work is carried out in the following order:
- The location of kitchen appliances is determined. To do this, the tabletop is temporarily installed in place;
- the contours of the sink and stove are indicated on the surface of the countertop;
Determining the location of the kitchen sink
- for ease of cutting, it is recommended to remove the tabletop and install it on a stand;
- the surface of the tabletop around the contour is protected with masking tape;
- in several places (at least 4) holes are drilled around the perimeter of the contour, the diameter of which does not exceed 10 mm;
Preparing to cut a hole
- The hole is cut and the sections are processed.
Cutting out a hole for a sink
Holes for the stove and additional kitchen appliances, if any, are cut in the same way.
Installation
Fastening the tabletop can be done in two ways:
- using self-tapping screws (the most common method);
- into grooves on furniture (used individually by prior order).
To attach the tabletop using the simplest and most common method, you will need:
- self-tapping screws;
- mounting angles;
- screwdriver;
- silicone sealant;
- end edges;
- plinth.
The tabletop is attached to the set according to the following scheme:
- the tabletop is installed in place in compliance with all the provided gaps;
- fastening to kitchen cabinets using self-tapping screws (on the sides) and mounting angles (along the inner perimeter);
How to install a concrete countertop
In the kitchen, you can install a concrete countertop, and then tile it or polish it to resemble artificial stone. In this case, production and installation are carried out simultaneously. Here's how it's done:
- The cabinets are aligned so that their height along the wall is the same, after which a base (made of plywood or chipboard) is laid on them. In this example, concrete is poured onto the old tiles.
- The base is securely attached to the top of the furniture, after which formwork is installed on its sides.
- The formwork is sealed with polyethylene, and reinforcement is placed inside it. The area where the sink will be installed is fenced off with a ring of metal strip.
- A cement mortar is prepared - cement M400, sand and crushed stone in a ratio of 1: 2: 2, and a plasticizer must be added to it.
- For countertops imitating stone, dyes are added to the solution.
- The solution is poured into the formwork, leveled (so that the height along the wall does not have differences) and covered with polyethylene. The solution is left to dry - this will take about a week.
- Finishing a concrete countertop begins with rough sanding, after which the tiles are glued and the seams are grouted. If an imitation of stone is created, the concrete is processed with a grinder, after which a foam filler is applied to it.
Support the project - share the material with your friends on social networks:
Distinctive features of overhead models
If we do not take into account sinks that are a thing of the past, which are attached directly to the wall on special brackets and do not require a cabinet or countertop as a support, all products for washing kitchen utensils can be divided into 2 categories: overhead and mortise.
The main difference between the two types is the installation method. The first ones, chosen exactly to size, are “put on” the top of the cabinet, and to install the second ones, you need to cut a hole in the tabletop.
From here follow the distinctive features expressed in design, material, and shape.
Products that do not require additional processing of the base are preferable for self-installation, and they are on average cheaper.
However, design features rarely allow the use of “overlays” in modern kitchen sets with a single countertop and built-in appliances. Overhead models are also quite often chosen for installation in the bathroom, but these plumbing fixtures have a more attractive design, material and size than kitchen fixtures.
But there are similarities between the two types of sinks. For example, installation of a tap and siphon, as well as connection to water supply and sewerage, is carried out using the same technology.
Basic fasteners
To install the countertop you will need several types of fasteners. Their number depends on the dimensions and shape of the plate attached to the table. The master must prepare in advance:
- Tongues. These are elongated parts with locks that connect several elements into one monolithic structure.
- Metal or plastic corners with self-tapping screws - two thin plates connected perpendicular to each other. Used to prevent deflections when working with chipboard.
- Eccentrics. These are cylindrical bushings with plugs for screwing the tabletop to the base.
- Eurobolts are long screws used for tightening corners.
Also, fastenings can be combined. To do this, two types of connections are used simultaneously - mechanical and adhesive. In this case, tongues are used together with corners. This method is considered one of the most reliable when working with chipboard. It is what is most often used by professional furniture repair and installation specialists.
Sink mount
The final stage of installation - attaching the sink to the countertop - is carried out in the following way:
- the cut hole around the entire perimeter is treated with silicone sealant. This is required to protect the countertop from moisture;
- a rubber seal (mostly) or a layer of sealant is applied to the edges of the sink;
Sealing the joint using special tape
- Using special clamps, the sink is attached to the countertop;
Forming a hole for the sink
The next step is to shape the hole. Here you need to do this:
Place the sink on the lower surface of the countertop. We make a stroke using a standard pencil. Then we draw a line along which it will be necessary to cut the hole.
Afterwards, you need to lay the tabletop on a convenient stand, drilling holes in the four corners of the pattern. This must be done using a drill. They should be ten millimeters in size. For a round sink you need to make holes around the perimeterWe insert a jigsaw blade into one of the holes and cut through.
As you can see, installing a kitchen countertop yourself is not that easy. Many skills required
DIY installation - pros and cons
Let's figure out whether it's worth taking on the installation yourself and, if you decide that it's worth it, we'll learn how to install the countertop.
- If you have some skills, installing a surface made of chipboard, MDF, wood or veneered wood will save you 1500-2500 rubles. – that’s exactly how much the whole complex of work costs.
- It is better to do a concrete countertop “like a stone” or tiling the surface yourself, the work will be of better quality.
On the other side:
- If you don’t have the skills to work with chipboard, MDF, or wood, then it’s better not to take risks. It is impossible to restore the previous appearance from chipped cuts and other deformations;
- Countertops made of difficult-to-process and expensive materials, such as glass, must be installed by craftsmen;
- Sometimes installation is included in the cost of the countertop.
Have you decided to do the installation work yourself? Countertop installation includes:
- Removing the old countertop;
- Measurements and cutting of a new one;
- Edge processing;
- Fastening the tabletop and joining two sheets if necessary;
- Sealing and installation of baseboards;
- Hole cutout for sink and faucet;
- The finished product must be moved very carefully so that additional stress is not created in the cut areas - otherwise they can lead to cracks. Smooth and glossy surfaces have increased fragility .
- Measurements are taken very carefully, preferably based on an already installed kitchen unit.
Before ordering a tabletop, it is better to make a template.
How to properly replace a countertop
If we are talking about replacing the surface on an already installed headset, then you will have to proceed as follows:
- The old surface is dismantled without damaging the kitchen unit - the sink and baseboard are removed and all fasteners are removed.
- The new surface must be adjusted to the wall and to the existing dimensions of the furniture.
- The height is controlled very carefully as it is important that the structure rests evenly on the existing pieces of furniture.
- The resulting edges on surfaces made of chipboard, artificial stone, or wood must be sealed. This is especially important for laminated surfaces - moisture getting inside will lead to swelling and destruction of the structure.
- Fastening the tabletop also involves connecting several elements into one, so that their height along the wall is the same, and there are no gaps between the elements.
In this video, the master shows how to replace the surfaces of free-standing cabinets with a single tabletop without joints.
Workflow Features
It may seem to you that it is quite easy to install a countertop, but still, you should not take this issue so lightly.
Here are a few more recommendations and features of countertop fasteners:
- If you install the tabletop on furniture corners, you should do it this way: step back 1-2 mm from the top edge of the cabinet and mark the center of the corner. Afterwards, secure the corner with a self-tapping screw. 4 corners are enough for one meter.
- For chipboard, be sure to use kitchen sealant, otherwise, after a few weeks of use, the plastic surface (near the sink) may swell.
- It is advisable to level the kitchen set. Try to avoid sagging of the wooden tabletop.
- When choosing hardware, choose stainless materials, this will help extend the life of the headset as a whole.
Headset assembly
Experts install kitchen cabinets as desired, some start hanging upper cabinets, while others find it easier to install the base. But this is everyone’s personal preference, so you shouldn’t rely on someone else. The main thing is to start.
Lower (base) cabinets
- Place the legs as close to the corners as possible. The load will be on these parts.
- Hang the doors at the last moment, first assemble all the buildings.
- Fix all the cabinets together and level them.
Advice! If you started with the lower cabinets, then it is better to install the countertop after installing the upper cabinets. This way you will protect yourself from unnecessary defects and accidental damage.
Upper (top) cabinets
- It is advisable to mount it on special hangers that are attached to a metal strip. Such cabinets are easier to hang and remove.
- Install doors and removable shelves only after the cabinet is securely attached to the wall.
- The minimum distance between the table top and the bottom of the wall cabinets is 550 mm.
However, you can mount it however you like, it all depends on your height. The only thing worth paying attention to is the cabinet above the hob or stove - a very high temperature will adversely affect its condition.
But this only concerns the assembly of the set, but there is another important question: how is the countertop attached to the kitchen?
Complexity of work depending on materials
Installing a countertop yourself is not a very difficult undertaking, but a lot depends on the type of material used:
- Laminated chipboard (fiberboard) is the actual chipboard covered with a high-strength laminate. The difficulty of installation mainly lies in the careful cutting of the table top. Mechanical damage leaves unsightly marks on such surfaces.
- Wood is considered the traditional material for kitchen furniture. Such a surface will need to be regularly restored using protective coatings or lubricated with polishes. Although, if necessary, the wooden surface can be sanded with your own hands - and it will become attractive again.
- Metal surfaces are becoming increasingly popular - joining countertops made of this material will not be difficult. However, mechanical stress will leave scratches and marks on them that will need to be sanded down with your own hands.
- A stone countertop (made of natural or artificial stone) is resistant to moisture, temperature, and scratches. However, attaching a natural stone countertop can be difficult due to the heavy weight of the product, and cutting and cutting out holes is difficult and requires skill.
What about the bathroom?
Installing a DIY bathroom countertop works on the same principle as it doesn't require much modification.
The only thing that is different is the installation. In the kitchen it is done a little differently. For example, installing a concrete countertop would be much more difficult to achieve in a bathroom.
Using slotted spacers
In this case, two or three additional spacers with rectangular grooves 10-15 mm long are attached to the side frames of the headset. When changing the width of the tabletop, the screws will move freely in the grooves, thus preventing structural deformations of the wood. Additional strips act as a tie; they increase the rigidity of the body and protect the drawers from deformation.
Basic rules for choosing skirting boards
Additionally, there are several important points for those who are just starting to furnish a room and purchase furniture:
The color and design should be the same as the entire kitchen and module. You can’t buy a baseboard that doesn’t match the tone; it will always catch your eye. When choosing decor, you need to start from the set
If handles and various small parts are made to resemble copper, it is necessary that the plinth have a small part of this direction. This can affect both the pattern and the painted border. Important attention should be paid to the material from which the fillet will be made. The plastic comes away from the sealant very quickly, and within six months the first problems will be visible.
The baseboard should not only be beautiful, but also easy to clean. A large number of textures can lead to contamination. It is almost impossible to wash such a baseboard without using strong chemicals.
Installation of surfaces made of chipboard, MDF, artificial stone
Do-it-yourself installation of countertops made of artificial stone, chipboard, or MDF follows the same principle.
Fastening the tabletop also involves installing additional moisture-insulating elements - jumpers, plugs, corners made of aluminum and plastic. They will be required for surfaces made of both chipboard and artificial stone.
- First, most likely, you will need to take measurements and then cut the sheet based on them. In this case, the length is measured taking into account the strip overlapping the ends. You can cut off the excess from the sheet with your own hands using a wood saw or jigsaw. If there are protrusions on the wall, then all the required recesses are cut out on the tabletop in advance.
- Now we lubricate the ends with silicone sealant, apply an aluminum strip and level it flush. Then you need to secure the bar with small self-tapping screws. Excess silicone can be wiped off with acetone.
- The edge of the surface that remains closed must be decorated with edge tape. In order to attach it with your own hands, you first need to heat the tape, and then glue it and cut off the excess. After gluing, the edges of the tape are sanded.
- According to the building level, you need to adjust the legs of the floor cabinets of the kitchen unit. If the legs are not adjustable, you can place adjusting wedges and plastic spacers under them.
- Now fill the back top edge of the cabinets with caulk as shown in the photo. We also generously lubricate the back end of the tabletop with the same silicone. We attach plastic or metal corners in the cabinet under the sink.
Materials and tools
When working with a chipboard countertop you will need:
- Glue. Must be of high strength, as it is used to connect parts.
- Silicone. Makes the surface smooth and is used to lubricate the ends.
- Sealant. Prevents air from entering the holes; needed to fill voids.
In order for the slab to be securely installed, sealing tapes and a connecting profile should be prepared.
| Tool name | At what stage is it applied? |
| Electric jigsaw, sander, drill bits | Preparatory work |
| Aluminum connection strips in various sizes | Connecting parts to each other |
| Miter saw, pliers | Installation of the canvas |
| Screwdrivers of different calibers, hammer | Installation of skirting boards |
You should prepare wire cutters and a standard set of keys in advance. To take measurements at the first stage of work, you will need a tape measure and a metal square. To make marks on the material in the right places, you should use a marker that writes well on chipboard.
Fitting and fitting
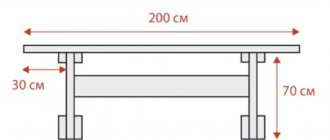
It should be noted that there is a certain dimensional ratio between the width of the countertop and cabinets. The first should be 3-5 cm wider than the second. And this allowance should stick out from the front side, forming a kind of visor. This is done with one sole purpose - to protect the furniture facades from water and utensils that may drain or fall from the surface of the tabletop.
Therefore, the tabletop is laid on top of the cabinets and pressed tightly against the wall surface. It’s good if the latter is aligned to the maximum. If not, then you will have to trim the back of the tabletop. This can be done if this element of kitchen furniture is made of MDF or chipboard. It is clear that a stone or polymer product cannot be trimmed.
It is optimal if the trimming is carried out at a slight angle, thus making it possible to adjust the plane to the curved surface of the wall. This operation is best performed with a hand-held circular saw. It is better not to use a jigsaw for this work. They can be used to trim thin products, and the thickness of the table tops is 4-6 cm, so it will be quite difficult to work with this tool.
If the wall, or more precisely, the laid apron, is a flat plane, then you can do without trimming. But it is better to grind the end, thereby removing small differences, no more than 3-5 mm.
Step-by-step instructions on how to replace your kitchen countertops yourself
Content:
- Measurement and calculation of dimensions
- Required Tools
- Replacing the countertop
- Dismantling the old
- Installation of a new
- Advice from professionals
Repairing or updating any furniture will sooner or later affect the kitchen unit, because a beautiful updated kitchen, pleasing to the eyes of the owners, can guarantee a pleasant process of cooking and eating. The most important element of the kitchen set, which should be given special attention, in particular its condition, is the countertop, since almost all the main processes associated with cooking are carried out on it. Naturally, the housewife in the kitchen, with a rotten and swollen countertop near the sink, or a cut or burnt countertop near the stove, will be in the appropriate mood when preparing food. If the kitchen frame itself is in good condition, then it will be enough to replace only the countertop, but if you want to update and refresh the kitchen, then you can change the facades along with the work surface, then the kitchen set will look like new. To properly replace a countertop, it is important to clearly understand what you want and the sequence of your actions.
Measuring and calculating the dimensions of countertops, aprons or facades
When ordering kitchen furniture, special attention should be paid not only to its beauty and convenience, but also to the quality of materials and fittings, so that you can cook and eat there with pleasure and convenience for many years. No matter how high-quality the kitchen is, if the countertop is made of chipboard with plastic, then sooner or later it can deteriorate, and this is natural, since it is used as a work surface. If all other modules and facades are intact and the fittings are in working order, you can get by with minimal expenses for kitchen renovation and replace only the countertop.
You can buy a new countertop for the kitchen in Maxidom, Leroy Merlin, OBI, IKEA, as well as in other construction stores in the city. For the longest possible use, a countertop made of artificial or natural stone is ideal; such countertops do not deteriorate and do not change their appearance throughout the entire service life of the kitchen unit, but this option is also the most expensive, since it will cost from 50 to 200 thousand. there is no point in buying an inexpensive kitchen in a store and putting an expensive and heavy stone countertop on it. It will simply fall apart. If you have a smaller amount to replace the countertop, the most economical option made from chipboard is suitable - the most common type of countertops used in the production of kitchen furniture, which looks good, and even with active but careful use can last for many years. For lovers of natural wood, the ideal option would be a tabletop made of laminated veneer lumber, which has significantly lower strength and wear resistance than chipboard in plastic, but if it is not barbarically used instead of a cutting board and properly cared for, then a wooden tabletop can retain its original appearance and wood texture for a long time . Important! A wooden kitchen countertop, after its installation, is treated with vegetable oil, not varnish or paint.
As we have already found out, the most durable and expensive are countertops made of natural or artificial stone, and if you are thinking of replacing the old countertop with a stone one, then it is better to order a new kitchen with such a countertop, rather than engage in a pointless task. Moreover, stone countertops can only be installed by kitchen furniture installation specialists, and it is not realistic to replace such a countertop yourself.
When choosing a countertop in a store for your old kitchen, it is important to take with you a photo of the kitchen furniture and the kitchen area, and choose the right color so that it matches the color scheme of the kitchen as a whole, so that it stands out with the set or stands out sharply, separating the top and bottom of the kitchen furniture. Sharp color transitions will attract the eye. For countertops in the kitchen and for facades, it is better not to use a glossy surface, because any stains, debris or scratches on a smooth surface immediately catch the eye. A matte light surface is ideal for a kitchen countertop; it visually expands the space of even a Khrushchev kitchen and hides any imperfections. For kitchen front materials that are practical in quality, use and maintenance, the best material is Phoenix plastic. It's expensive, but worth the money. You can read about its quality here >>>
If we talk about the size of the tabletop, then you need to buy a whole piece, and not cheap and buy pieces into modules so that all the cabinets fit under it. To do this, you need to take measurements of the room and estimate the size in the store, whether you need one countertop to replace or two. When buying a tabletop, when measuring, you need to take into account the reserve for the overhang of the tabletop in front and behind for communications in order to ensure convenient use of the set and the installation itself. Without a canopy in front, as in the first IKEA kitchens, any debris and moisture spilled onto the doors of the lower cabinets, and when using the kitchen, the owners constantly clung to the handles of the facades. According to the technology of Italian and Finnish kitchen furniture manufacturers, the overhang is 120 mm, 40 on the front side and 80 on the communications, but in Ikea kitchens it was only 25 mm.
It is better to replace a tabletop with a thickness of 38-44mm, which ensures its rigidity and smooth surface, even when the modules sag. When calculating the dimensions of kitchen furniture according to its dimensions, do not forget about the height of the countertop in the places where the sink and hob are embedded. It is better that these two elements of the working triangle are on the same level. The size of the new tabletop directly depends on the depth and width of the furniture on which you want to replace it. If you will be replacing the countertop in the kitchen yourself, it is better to cut it to the size of the cabinets by making a small margin, or by subtracting 5-7mm from the width of the opening, because trimming the canvas is always easier than having it spoiled and buying a new one.
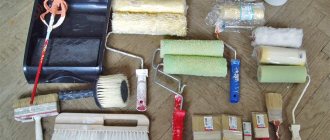
Tools needed to replace a countertop
To replace the tabletop yourself, you need to have all the necessary tools that will help you easily dismantle the old tabletop and install a new one. The most basic tools:
- screwdriver or screwdrivers with different bits;
- if there is no screwdriver, then a drill with drills;
- marker for marking, if the tabletop is light, then dark, if dark, then white;
- tape measure and carpenter's corner;
- soft emery block or paper;
- silicone sealant or mastic;
- for silicone, a spatula (although it is better to rub it in), for mastic, a brush;
- electric jigsaw.
If you bought an expensive countertop and have no idea how to replace it yourself, then it is better not to use the recommendations from this article, but to order a replacement countertop from our craftsmen, who will come and correctly install, install and connect the sink, hob and other communications and equipment. All services provided are carried out using professional power tools and laser measuring equipment. If you already have experience behind you and have at home the necessary power tools for installation, then of course you can replace the countertop yourself from measurement to installation.
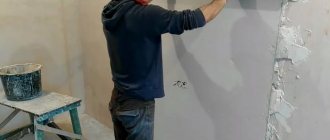
Kitchen countertop installation
So, everything is ready, you can start installing the countertop. Let's start with products made from MDF and chipboard. But let’s immediately make a reservation that there is one installation method - on metal corners. The tabletop must be turned over and the corners attached to the back side. Their location is determined by the location of the sidewalls of the cabinets, because it is to them that the upper plane is attached. Therefore, even during the fitting process, it is necessary to draw on the back side of the tabletop with a pencil the lines where it joins the side walls of the cabinets.
How to attach the tabletop to drywall or window sill?
It happens that the basis for attaching the tabletop is not a hollow, but a cast structure. This could be a window sill or a specially created plasterboard ledge. It will not be possible to attach a tabletop or shelf from the inside to such a base. There is only one option left - glue it.
For this, the well-known liquid nails are used. Any leftover after renovation will do. Regardless of the composition, almost all options are suitable for gluing chipboard, MDF or solid wood to plasterboard or concrete (in the case of attaching a window sill).
For better adhesion, the base must be carefully leveled, dust-free and degreased. The glue itself is applied to the underside of the tabletop. After the recommended time, the tabletop is pressed to the base in the desired position. It is better to leave the press until it dries completely.
ADVICE! To avoid possible deformations, avoid circular motions when applying adhesive to the countertop. Longitudinal or transverse stripes, as well as spot application, work better.
Slicing
For your product to fit perfectly, it must be the right size. This is quite difficult to achieve. Even if you took measurements accurately enough, there is always such a thing as error.
At home, you need to think about how to trim the excess or adjust it so that the new tabletop does not become deformed. There should be no chips or cracks during your work. Cutting can be done in the following ways:
Features of gluing edges to tabletops
To perform high-quality gluing of the material to the tabletop, you need to take into account many nuances, since this process has its own characteristics. Proper preparation will allow you to avoid mistakes during the edging process and will allow you to get a high-quality result, which, firstly, will perfectly cope with its functions, and secondly, please the eye with an aesthetic appearance. Next, we’ll look at what an edge is, why and where it is needed, as well as other important features.
To perform high-quality gluing of the material to the tabletop, you need to take into account many nuances, since this process has its own characteristics.
Types of products
Products are made from different materials. The complexity of installation depends on the selected material. Countertops are divided into 4 types:
Wooden crafts. Despite the fact that products made from natural wood have a number of disadvantages, they are especially popular. This is a beautiful and environmentally friendly material that is resistant to moisture. Therefore, the countertop needs to be maintained regularly. In case of damage, protective agents or polish will help restore the surface of the kitchen unit.
Laminated products. The laminate surface comes in a variety of colors and is easy to care for. At the same time, the material is afraid of high temperatures and mechanical damage.
Cutting the tabletop is done carefully, as damage may remain on it that is difficult to repair. Metal surface. Increasingly, consumers began to use products made of metal
This is a cheap and easy-to-use material. The metal surface has a beautiful appearance, is not afraid of humidity and high temperatures, and is resistant to abrasion. But steel has disadvantages: it often develops scratches and small marks. Scratches will disappear if the surface is sanded and rubbed thoroughly. Stone surface. The leading place among all materials is occupied by stone countertops. Such surfaces are resistant to mechanical damage and are not afraid of scratches and cuts. High temperatures are not scary for them. Different types of stone have their own advantages. Common materials are granite and marble.
Stone and acrylic
A DIY stone kitchen countertop is attached with glue. However, it will take experience to properly cut the panel and install the heavy slab. On the positive side, they note that the surface does not scratch, does not absorb dirt and is easy to clean.
“Liquid stone” or acrylic is poured onto the surface while it is hot. The resulting coating is not scratched and can withstand high temperatures and water. However, acrylic is expensive.
Chipboard and MDF
Many people are interested in how to install a countertop based on laminated chipboard or MDF. The material consists of resins and wood shavings, so it is prone to swelling from moisture. The laminated coating does not allow water to penetrate the structure and deteriorate the texture.
However, the sides are often open because the surface needs to be sawed to fit. To prevent the ingress of moisture, be sure to treat all open areas with silicone sealant and install an end strip for the countertop.
Laminated fiberboard (chipboard)
It is a panel whose top layer is covered with a durable laminate consisting of wood chips and resin
It is easy to work with such material; the only thing is that special attention should be paid to cutting, it must be neat. In addition, the laminated surface must be protected from mechanical damage, since traces of scratches and impacts may remain on it.
The slabs are affordable and come in a variety of textures and colors, allowing them to be used in any design. As for the disadvantages, such countertops can absorb moisture and swell, this mainly happens in places where the lamination is damaged.
Tree
It is not uncommon to install a wooden tabletop. How is a wooden tabletop attached? With self-tapping screws, of course
But it is important to treat all parts with water-repellent agents. To maintain the original appearance, constant restoration is necessary, but durability and long service life are guaranteed.
Metal
Among the metals used in kitchens, stainless steel is used. It is durable and resistant to high temperatures. But it is not scratch-resistant, so you need to use it carefully. The metal surface can have a matte or glossy texture.
Glass
It is not recommended to independently attach the tabletop to kitchen floor cabinets made of glass, due to its fragility. Although the glass for them is tempered using a special technology, you cannot hit it too hard to prevent microcracks from appearing. With careful handling, glass will last a long time.