Decorative wall lighting created by modern lamps is of great practical importance. In addition to improving the aesthetic properties of the interior, it enhances general lighting. This reduces visual tension and the associated psychological fatigue of a person, which generally increases the comfort of staying in the room.
Let's consider what are the features of arranging such a system and what are the purposes of its installation, how to choose the right lighting fixtures, what is built-in lighting, in what cases is it appropriate to create panels and stained glass, as well as using laminate and what are the main steps of the procedure for installing it yourself.
Features of lighting in different rooms
An apartment or house consists of rooms for various purposes, so the lighting for the walls should have characteristic features for each of them. The following areas are distinguished:
| Stairs and landings, entrance. | In addition to a purely decorative function, illumination of walls and steps allows you to indicate the boundaries of movement, increasing the safety of movement in the dark. | On the side of the wall above or at each surface of the step. | A switch combined with a motion sensor. |
| Kitchen. | Providing additional lighting for the work area, as well as increasing comfort. | In niches or near the lower border of cabinets and aprons. | Standard manual switch. |
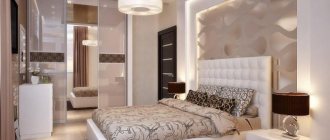
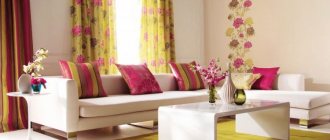
| Living room, bedroom, children's room. | The ability to highlight individual areas and interior elements, carry out zoning, and create a visualization effect. | In niches, in the form of panels or stained glass. | Manual switching with light level control. |
| Windows, doors, niches. | Gives a light illusion, for example, the effect of creating a “sun glow” behind curtains. | In a cornice niche or around the perimeter of the opening. | Standard switch with the ability to control the intensity of the glow. |
Preparation
One of the most important stages of all work. The overall impression of the work done depends on how well the foundation is prepared. If your choice is paint that glows in the dark, you don’t have to redo anything at all, but simply use it to paint the desired designs on the old coating. A white wall with such decor will look especially impressive. During the day it will simply not be visible, and the glow will appear only at night. In addition, you can paint the entire surface, giving it the desired color - paintable wallpaper is just right for such a finish.
If you have to paste wallpaper or assemble an arbitrary composition with lighting, then preparation is required. In the case of wallpaper, the walls must be leveled and primed, and electrical wiring is required to connect the lighting. It’s better not to joke with electricity, and if you don’t have experience in such work, it’s better to invite a specialist who will do everything without your help. Without any preparation, you can only use stickers - they are simply attached where needed and that’s it.
Purposes of backlight installation
Wall lighting in your own apartment, private house or other building can be installed for various purposes:
- Decorative lighting to highlight any interior design features.
- Visual elimination of room design deficiencies.
- Decoration of walls, partitions, niches, pieces of furniture in honor of an event, holiday, event.
- Practical improvement of visibility of work areas, for example in the kitchen, bathroom, toilet, dining area in the living room, study corner in the nursery.
- Changing the style of the room (instead of rearranging it).
Note! When choosing lamps and other lighting fixtures for wall lighting, it is very important to harmoniously combine the color of the interior decoration with the tone of the lamp. For example, cold light is better for metal structures, and warm light is better for wood texture.
Objectives of decorative lighting
Decorative lighting does not replace the main one - it becomes a stunning addition. The main goal of designers is to make the design of rooms more expressive.
It is important not to overdo it when implementing ideas. You should immediately decide what is best to highlight with light: walls, decorative elements or furniture.
You can combine different lighting effects in one room. Dynamics, color, shimmer - winning solutions for creating a unique interior.
Beautiful lighting in the room
Selection of lighting fixtures
When choosing a lighting system to create effective lighting for walls, you need to take into account at least two criteria:
- Type of light source.
- Type of lighting device (design).
Based on the first feature, lamps used in wall lighting are divided into the following modifications:
- LEDs. They are widely used to create a system of primary and additional lighting. They have various forms - light bulbs, ribbons, point sources. Their main properties are efficiency, durability and safety. However, due to the high brightness of the light stream, it is recommended to install them built into the wall surface - in a recess.
- Neon lights. Gas discharge tubes are characterized by low heating and a large palette of light emission spectrum. They are also quiet in operation, durable and economical. The downside is that it is difficult to select specific sizes; individual production is required, which significantly increases their cost.
- Fluorescent lamps. Although they are economical, they are short-lived and very bright. Therefore, it is better to install them in matte shades, so that they can be quickly replaced in case of failure.
Based on their design characteristics, wall lighting fixtures are divided into the following types:
- Hanging lamps. The ability to adjust the glow and change the direction of lighting differs.
- Plafonds. Fixed lamps of various geometric shapes. The main place for their installation is hallways, stairs, corridors and bathrooms.
- Sconce. They are characterized by a wide variety, which allows you to choose them for any interior. Installed on special brackets.
- LED lamps of various types for wall lighting. They have different designs - from chandelier bulbs to strip modifications. Their main advantages are efficiency, fire safety, environmental friendliness, durability, and water resistance.
- Built-in. Mounted recessed into the wall. The backlight is quite diffuse.
A couple more exclusive photo examples of finished design projects from the Domoff Interiors studio:
Decorative lighting is built into the hall staircase to achieve greater effect from the interior
Decorative light above the playing table in the room with billiards
Built-in backlight
Recessed lighting devices require placement in wall panels, be it plasterboard, concrete, wood, bricks or any other building material. Naturally, the easiest way to make this type of wall lighting is from an easily processed base. In any case, a number of recommended rules should be followed:
- Before starting installation work, you need to make markings.
- Calculate the power of the installed lamps so that they do not turn out to be excessively bright, because this is not the main lighting.
- The lighting characteristics of lighting fixtures must correspond to the style of the interior design.
- To ensure uniform illumination of the room, the light bulbs in the wall should be located evenly at approximately the same distance from each other.
- When installing in plasterboard and other hanging panels, you need to make sure that there is no frame or wires behind the marking area.
- Lamps must be installed strictly according to the rules of electrical installation work in compliance with safety regulations.
Ice elements or fluorescent light bulbs are best suited as light sources for built-in lighting in the wall. For example, the most popular models suitable for this installation are LED-A03B, LED-J04, LED-L02B and LED-HH02.
Advice! You can create effective wall lighting by placing LED strips around the perimeter of the niches at a depth of no more than 10-15 cm from the surface.
floating ceiling
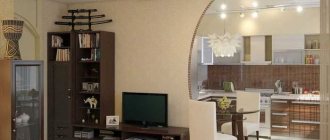
In old-plan houses, the ceiling height often does not exceed 2.5 m, which does not fit with the framework of “free” modern styles. An LED strip attached along the entire perimeter of the ceiling can visually lift it and create the effect of not being attached to the walls - floating.
Panels and stained glass on the wall with lighting
A very popular trend in interior design today is wall lighting in the form of luminous panels and stained glass. It also has a number of its own features:
- Installation of such decorative lighting is best done in spacious rooms with no excess objects - for example, in a living room, office or bedroom.
- Various materials can be used as a base - onyx, glass, stones.
To illuminate walls of this type, ready-to-install light sources are best suited. Decorative lighting for panels and stained glass is available in several variations:
- Under a transparent base. LED strips, gas-discharge tubes and light bulbs are used. The latter are relevant when you need to highlight specific areas of the structure.
- Along the contour it is open from the outside or hidden from the sides, when only the light is visible, and not the devices themselves. Ice strips are used (the most convenient option due to the high plasticity of the lamp material).
- Outside. If light sources are not part of the decoration, then they are mounted separately from the composition - on walls, ceilings and other interior items using brackets. Directional lamps and lanterns are best suited here.
As an example, let's look at how to install LED strip lighting discreetly along the contour of a panel on the wall:
- To ensure the functionality of the backlight, you will need an LED strip, a power supply for it, additional equipment (control unit, dimmer, if you plan to programmatically change its lighting characteristics during operation).
- The structure of the panel should involve the hidden placement of an ice strip for illumination along the contour. These can be either individual elements or around its perimeter.
- The LED strip must be secured to double-sided self-adhesive tape, or to plastic or aluminum strips, which themselves are attached with self-tapping screws or glued.
- Then you need to connect it to the wiring, power supply and other related equipment.
- Turn on and check the functionality of the wall lighting.
- Disconnect electrical appliances, install panels, and make sure the lighting is working.
LED strips: description, types, advantages
LED strip is a board with LEDs connected in series. The device operates by passing electric current through the elements of the system. Voltage control is carried out using special transformers.
The brightness of the lighting depends on the number of LEDs per meter of base. Possible options: boards with 30,60, 90, 120, 240 elements. The more details, the brighter and more saturated the glow.
Types of LED strips:
- Monochrome (SMD): strips that glow in only one color. For example: blue (B), red (R), green (G), white (W).
- Multi-colored (RGB): ribbons that can change the color of the glow. Effects are easy to control using controllers. Some models are equipped with a system of algorithms that allow you to set a specific work program. Multi-color ribbons most often glow in green, red and blue, but sometimes white joins this palette. Possible cold or warm shade. In the first case, the products will be designated by the abbreviation RGBW, in the second - RGBWW.
- Side glow strips: products with LEDs located on the end part. The only difference from standard models is the emission of light at an angle of 120 degrees.
- Running fire strips: strips with addressable chips for changing lighting scenarios. The main advantage of the products is the ability to change the brightness and color of individual LEDs.
Some types of tapes are available in a moisture-proof sealed case. Such products are suitable for installation in rooms with high humidity or on outdoor structures. Open-type devices are often used to illuminate furniture and decorative elements in dry rooms, since LEDs are not protected from mechanical influences and moisture.
The main advantages of LED strips: economical energy consumption, safety, ease of installation. With the help of such lighting, you can organize a spectacular decorative design in a few minutes.
Colored monochrome LED strip
Backlighting using laminate
Wall lighting using laminate is one of the cheapest and most accessible ways to diversify the interior of your home. In this case, gas-discharge tubes or LED strips are the best choice for lighting devices. When installing such a system, a number of rules must be observed:
- The installation of lighting devices must be done so that in the end only the light on the surface of the panels is visible, and not the communications themselves.
- Laminate panels/boards are mounted in a cascade from bottom to top.
- Wiring and devices must be secured in accordance with safety rules and requirements for electrical installation work.
- Installing the backlight in a niche (behind the panel) will allow you to avoid exposure to the eyes, and observe only the flow of light coming from top to bottom.
Direct wall lighting can be installed in a similar way. However, if the light source is not hidden behind the panels, then it is better to choose dim lamps, since otherwise they will simply irritate the eyesight.
Ideas for using tape in the bedroom interior
Just like a child's room, a bedroom is primarily a place for rest, relaxation and peace. Excessively bright light will irritate the nervous system and provoke its activity. Therefore, LED lighting must be used with caution.
- The picture that is one of the first to appear after the request “LED strip in the bedroom” is a bed, the bottom of which is decorated with a strip. So why not? Especially if your room is decorated in a modern style. Even if the bed is not equipped with mirror panels around the perimeter or does not have a special design that creates the effect that it is hanging in the air, the floating effect will still be achieved. Plus, it’s an additional light source, soft and pleasant;
- The ribbon can be used instead of wall lights, placing it at the head of the bed. Especially if the bed is installed in a specially designed niche. The reading process will be very comfortable. And energy consumption is economical;
- The dressing table must have a bright light source, which will allow you not to miss a single detail while getting ready. Diode tape can be glued around the perimeter of the mirror;
- Illuminating the cornice will help create a source of soft light;
- If the bedroom is adjacent to a balcony or loggia, which in principle do not need bright lighting, it is advisable to use diode strip to illuminate them. And when you need to create an intimate atmosphere in the bedroom, you can turn on the lights only there and close the curtains;
- Most modern interiors cannot do without walk-in closets. To illuminate each section, you can also use an LED strip.
Installation of decorative LED wall lighting in a niche
To install decorative LED lighting in a niche in an apartment wall, you must proceed in accordance with the following instructions:
- First you need to prepare all the necessary materials - LED strip, wiring, power supply and control unit.
- If the base of the wall allows it, the ice strip for illumination can be attached to a self-adhesive double-sided base. If this is not possible, then the tape can be glued, for example, to a plastic or aluminum strip. In this case, the latter must be secured with screws, nails or dowels to the wall.
- It is better to place the decorative lighting system so that lamps with lamps do not illuminate it, otherwise there will be no effect from it. Therefore, it needs to be fixed in the niche at a depth of about 10-15 cm.
- Next, after the tape is secured, it is necessary to connect its contacts in exact polarity with the power and control unit (which, like the wires, must be installed either outside the illuminated cavity in the wall, or taken outside away from the decoration).
- The assembled backlight must be connected and tested for functionality.
Recommendation! You can create bright, uniform lighting if you place the lighting fixtures at a height of at least 2 meters from the floor. On the contrary, for dim light it is better to place lamps on the wall as close to the floor as possible.
Types of decorative lighting and the principle of their operation
- Gas-discharge lamps (with high pressure) - a high-power electromagnetic field ionizes the molecules of a special gas that fills the bulb, which leads to the burning of a gas-discharge arc, then the voltage is reduced to the desired level. Such lamps can be sodium, halogen or mercury.
- Halogen incandescent lamps - current passes through a filament in a bulb with an inert gas, heating this body until it glows.
- Vacuum-type incandescent lamps - electric current flows through a filament in a vacuum, thereby producing light rays (lamps come in different shapes and colors).
- Fluorescent lamps (with reduced pressure) - the filament heats up the mercury, the vapor of which, when current passes, produces UV radiation, which is converted into light by contact with the phosphor (the inner coating of the bulb).
- Side-section optical fiber operates according to the classical scheme of light transmission with minimal losses: the glow occurs due to losses during internal reflection (some of the rays pass outward).
- LEDs - Light is produced by the recombination of electrons and holes in semiconductors under the influence of current applied in the forward direction.
Decorative lighting decorates the buffets in a luxurious classic dining room in white shades.
Recently, the most fashionable option among the types of decorative interior lighting is considered to be LED strip: it is plastic, almost weightless, gives a very beautiful and pleasant to the eye soft glow, which does not at all adversely affect the organs of vision . Designers and architects use it both to focus attention on a specific area and to highlight the necessary functional areas in the room.
Decorative lighting can be monochrome or color, and work in different modes:
- Static (has two states: on or off).
- Dynamic (launch using a remote control, application, program, etc.).
Lighting is divided into natural and artificial:
1. The first is street (daylight) light. It is impossible to stay indoors for a long time without it. Sunlight solves many problems.
- light is a natural antibiotic that disinfects the room. According to sanitary rules and building regulations, insolation (lighting by direct sunlight) of a living space should be at least 2 hours a day. All microdistricts and residential buildings in Russia are designed with this in mind.
- Natural lighting has a good effect on a person’s health and psychological state, increases immunity and reduces the risk of depression.
2. Second - all light sources inside the house. It is they and their proper placement that will help make the interior not only beautiful, but also comfortable for life (by this I mean the level of a person’s physical and psychological state). Let's talk about this.
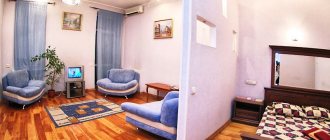
Corridor lighting
Let's consider several options. Let's say we have a wide, spacious hall with a width of at least 1.5 meters with a console table for keys or a banquette. For such a room, central lighting with a chandelier or overhead lamp is suitable. You can make sconces on the walls. Place them, for example, above a table or near a mirror. The installation height of sconces can vary from 1.6 to 1.8 m above floor level.
If your hallway is narrow and long, the best option would be to use recessed or surface-mounted accent lights.
Recessed lamps would be appropriate in a minimalist interior. These can be either spotlights or linear ones.
Advice! If you have a long corridor, you can visually make it smaller by making the far wall an accent wall and highlighting it. All bright or illuminated surfaces appear visually closer.
Shower and toilet
In addition to general lighting, it is also good to have mirror lighting in the toilet. This could be a sconce or lighting mounted in a mirror. Its main purpose is to shine light on the face without creating cast shadows. Therefore, it is good if the sconce has a general flood light or with the ability to rotate the lampshade.
Interesting solutions can be obtained with LED backlights. It is only important to remember that it makes sense to highlight something beautiful. This could be a wall made of an unusual material (for example, stone, wood or relief) or a separate interesting element on the wall.
When choosing lamps for wet rooms, you must also look at the level of protection against moisture. It is designated IP44, where the first is protection against penetration of solid objects and dust on a scale of 0-6, the second is the degree of protection from moisture on a scale from 0 to 8. More about this in our other post about the protection class of devices - here . If the lamp is marked IP44, it is suitable for wet rooms.
Wall lamps (sconces) – which ones and why?
Wall lamps are sources of additional lighting mounted in a wall or on a wall. There are two types - built-in or overhead (sconces).
Overhead sconces come in different designs:
- Carobaceae. The most familiar and widespread type of sconce.
- Wall (surface). Appropriate in cases where the room is narrow so as not to interfere with the passage. Most often used in corridors and staircases.
- Lighting for pictures.
- Stationary. Sconces that do not have additional scenarios illuminate only in one position.
- Adjustable. The design of such sconces has movable elements, by controlling which you can change the lighting.
- With reflected light. Such sconces give a soft, light light. Most often, wall sconces are found with reflected light.
- With directional light.
The type of sconce largely depends on the style of the interior and its purpose.
Switch the main light to the sconce and achieve a subdued, cozy atmosphere. They will help organize a work area, a place for reading, and highlight an interesting wall texture.
If you want to use a sconce in your work area instead of a table lamp, try an option that can be adjusted from the wall up to 60 cm so that you can control the light as needed.
Remember, the lamp should not interfere with the passage. If the room is narrow, use surface sconces that do not protrude too much. Or ditch them altogether and use accent ceiling lighting.
Any lamp needs space, so choose a place for the sconce so that it is not “crowded” on the wall.
Plasterboard cladding
Before installing the gypsum boards, electrical wiring is laid, placing it in cable ducts or fireproof corrugations.
The gypsum board sheet is cut into suitable fragments.
Mr. Build recommends: take the required dimensions from the frame, not from the drawing. During the installation process, changes in the dimensions of the structure are possible, and if the measurements are incorrect, the pieces of plasterboard do not fit together.
The cutting is carried out as follows:
- Marking lines are applied to the plasterboard.
- A paint knife is used to cut through a layer of cardboard on one side of the sheet, after which it is carefully broken and turned over.
- The top covering is cut through on the second side (as in the picture).
- The cut is processed with fine sandpaper. If a joint of fragments is planned in this place, then using a special plane a chamfer is made at an angle of 45˚.
- Sheathing begins from the inside of the niche. Fragments lying in perpendicular planes are mounted so that one element covers the end of the second.
- The drywall is fastened with self-tapping screws in increments of 25–30 cm, slightly recessing their caps into the material. When using a special bit, the risk of damaging plasterboard sheets is minimized.
- Special corners are attached to the outer corners of the structure to protect the fragile drywall from damage.
After cladding, the surface is prepared for finishing:
- The seams are glued with fiberglass reinforcing mesh and covered with putty. The rules for processing seams are described in detail here.
- After the putty has dried, they are rubbed down with fine sandpaper.
- The entire surface of the niche is treated twice with a universal primer. After applying the first layer, wait until it dries completely, and only then apply the second.
- The last stage is puttying the entire structure using standard technology. If the niche will be tiled, putty is not needed.
Decor
Then the actual decorating process begins. Using luminous paints for walls is simple - the desired area is painted in the same way as with conventional compounds, and if the entire wall is treated, it will be even easier, since there is no need to carefully draw individual elements of the design. Here it is only important to decide whether it is necessary to change the basic tone of the wall. Some paints have a rather flashy shade that does not look very good in standard interiors.
In other cases, you will have to work hard. For backlit compositions, you need to carefully consider the placement of all its elements, draw up a detailed drawing with all the dimensions of the parts, and only then begin assembly. Wallpaper is also pasted onto a previously prepared surface for a reason. In some cases, it is necessary to use special ultraviolet lamps to illuminate the patterns, and in other cases, they must be glued very carefully, observing the order of the stripes and combining all the details of the images on adjacent panels.
Light in the nursery
A child’s room is a whole world with many tasks and functions - it is a bedroom, a playroom, and a workplace. There should be general lighting in the form of a chandelier or spotlights, a sconce by the bed (or pendant lamp), a table lamp, and possibly some other additional decorative lighting.
It is advisable to choose a sconce by the bed in the nursery with a power button on the body and a rotating one so that you can adjust the direction of the light. The installation height of the sconce is at least 50 cm above the bed.
Lighting scenarios in the apartment
You can create several scenarios in one space:
- bright main lighting (chandeliers and any ceiling lighting).
- muted evening, when bright light is not needed (sconces, floor lamps, decorative lamps, hidden lighting).
- accent lighting for an area or object. When you need to highlight something (ceiling and wall lamps with directional light).
- festive (decorative lamps, garlands)
When we talk about lighting options, we assume that different lamps will be turned on from different switches. You can also use pass-through switches for convenience. You can turn on the lighting from two switches located at different ends of the room. Such switches are convenient to use in long rooms, corridors, and bedrooms.
Using dimmers will also help in creating different lighting scenarios. The invention, of course, is not new, but very useful. Using a dimmer switch, you can adjust the illumination from each lamp. It is important to remember here that not all lamps are dimmable. Most LED lamps are non-dimmable.
Thinking through scenarios and making electrical wiring is one of the first stages in repairs.
Benefits of using niches
A recess in a gypsum board wall solves several problems at once:
- Partially compensates for the space wasted when leveling the walls.
- Provides convenient and reliable placement of household appliances. It is problematic to attach shelves or hang a TV on the gypsum board surface. A specially equipped niche will save the situation.
- Replaces stationary furniture: in the niche you can equip shelves for storing things.
- Allows you to divide the room into separate zones. The use of backlight greatly enhances this effect.
- It brings a certain “zest” to the interior of the room, thanks to which it becomes one and only.
It is not difficult to build a niche from plasterboard yourself. The work will not require specific skills or expensive equipment, and the necessary materials can be found at the nearest large hardware store.