MesterulManole
27031 0 2
MesterulManole June 22, 2017Specialization: many years of experience in finishing works of residential and office premises, dachas, country cottages, etc. Hobby: cycling in all its forms
An arch is an opening in which there are no doors, and that is why the quality of the finish is so important, because any flaw will be noticeable
Are you going to finish the arch in your apartment and don’t know where to start? I'll tell you about 10 simple ways to finish an opening, and you can choose the option that suits you. I will also offer three simple instructions for finishing wall openings yourself.
How to cut
When the project is ready, we begin scaling the product on drywall.
While maintaining the proportions of the product, they draw out the layout of the arch within the given parameters. Cut out a piece of drywall to the desired size. To do this, use a special knife to draw along the drawn line and break off excess pieces of drywall with your hands. You need to prepare two identical sheets. One of them is placed on a flat surface and a line is drawn through the center. Make a mark 2-3 cm above the bottom of the sheet and screw in a bolt or self-tapping screw. A rope is put on the bolt, the free part of which is tightened into a loop and a pencil is inserted into it. This system (similar to a compass) will allow you to draw an even bending line of the arch radius. Having determined the desired radius, pull the cord and draw a bend line with a pencil.
After this, the markings are repeated in a similar way on the second sheet of drywall. To avoid unnecessary steps, you can cut out the product blank on one sheet, place it on another sheet and trace it with a pencil along the contour of the product. This way you will get two identical pieces. It is best to cut products using special scissors for metal, carefully cutting off everything unnecessary.
Some tips
Interior partitions are better and cheaper.
What to make interior partitions from Decorating an arch in an apartment is a process that is carried out after the main work has been completed. The fact is that such structures are made from different materials using different technologies. The resulting architectural element serves to decorate the entire interior, giving it some individuality. We must not forget that cladding can play not only a decorative role, but also perform a protective function.
A few tips to help achieve the desired effect:
- The easiest way to decorate an arch in an apartment with your own hands is to highlight the arched opening with the desired color. Often shades are selected that will contrast with the walls. Thus, it is possible to obtain a completed design with a minimum of effort. This method can be used for other materials.
- Decorating material can be matched to existing colors. For example, if the cladding of interior arches is done with MDF panels, then it is advisable to combine them with closely spaced door leaves.
- The design can be decorated using various embossing and patterned ribbons that correspond to the general direction of the design.
- Nowadays stucco molding is becoming increasingly popular. Indeed, this is an excellent option that allows you to highlight an interior decorated in a classic style.
- The mosaic looks quite unique. Its use requires experience in installation. But if everything is done flawlessly, the effect will be amazing.
Decorating an arch with mosaics is an unusual solution that deserves attention
You can go much further by replacing any materials with living plants. For this, special indoor vines and vines are selected, which create a real masterpiece.
At the intersection of different materials
If tiles or wall panels are laid only on part of the wall, the transition from tiles/plastic to a flat wall does not look very presentable. In order to make this transition more attractive, they use special border tiles, but they are too expensive - much more expensive than regular ones. No less interestingly, you can design this joint using molding. The decorative strip is mounted so that it covers the joint.
If the tiles do not lie up to the ceiling, the transition can be made using molding
The width and thickness are selected for the specific interior and the thickness of the materials being joined. Since we are usually talking about a bathroom, toilet or kitchen, it is more advisable to use materials that are easy to clean and are not afraid of high humidity. The optimal choice for tile joints is polyurethane. It can then be painted the same color as the wall or tile.
The transition from one material to another is best accomplished using molding
If you are decorating the transition between plastic panels and a painted/bleached wall, you can use a plastic plinth. Wooden panels or MDF panels are best joined to walls using wooden moldings.
The same technique works very well when you have to combine two colors or two textures. Moldings are used to separate and harmonize joints. This can be an accent wall, which is very fashionable now.
You can separate material of a different color using moldings
But an accent wall doesn't have to be a different color or pattern from start to finish. It is for such a case - if a canvas or material of a different color occupies only part of the wall - that moldings come in handy. They give a finished look to this finishing element.
https://youtube.com/watch?v=wqutjRsDq3M
Buy inexpensive polyurethane niches and arches made of polyurethane at a discount in Moscow online store
Sliding interior doors in the interior 35 photos
To create a unique interior in your home, you need to use unusual decorative elements. Niches and arches made of polyurethane are perfect for this.
Polyurethane niches
A niche is a recess in the wall that can give the interior of a room a unique image. This decoration will add a touch of antiquity to a modern interior.
This detail will attract everyone's attention. The recess in the wall does not have to remain empty
It can successfully accommodate bookshelves, indoor plants, various small items, and even a small fountain. Figurines from the era of Ancient Greece and the Roman Empire will correspond to the antique style of the niche if they are placed in it. An interesting design solution would be to decorate a polyurethane niche with an antique fresco.
To give such a design element a spirit of antiquity, the fresco can be covered with craquelure so that the painting on it cracks. It is good to provide such a fresco with an additional source of lighting directed into the decorative recess.
Since polyurethane decorative elements are not afraid of temperature effects, it is possible to install candelabra in niches. But the niche is not limited to the function of decorating the room. You can successfully hide electrical wiring and other communications behind it.
Our online store and show room in Moscow always offers to buy high-quality polyurethane materials for stucco decoration at a low price.
Decorative polyurethane arches
An arch is a decorative architectural element used to frame openings above doors, windows, niches and other round-shaped surfaces in the interior. The arched frame does not include polyurethane pilasters, columns or semi-columns.
Since a polyurethane arch is a ready-made rigid element of architectural decoration and its radius is predetermined, the opening under it must be clearly measured. Arched frames can be made in different styles and have different sizes.
The choice of polyurethane arches depends on the size of the room, the height of the ceilings in it, the purpose of the arch and the style in which the rest of the decoration of the room is done. Arched openings and other polyurethane stucco moldings are successfully complemented.
At all times, niches and arches were made of plaster and wood. Their photos can be seen on the pages of guides to the best palaces and museums in Moscow, St. Petersburg and the world. Today, in the vast majority of cases, all stucco decoration is made from polyurethane.
This material not only has excellent technical characteristics, but also an affordable price. To decorate your home with niches and arches, you don’t need to go to the construction market.
A huge assortment of all stucco decors can be offered by our online stucco store in Moscow, which has affordable prices for all products, including polyurethane panels.
How is molding different from cornice?
Molding
- an element of interior decor that has a straight back side and is designed to be attached to one plane. They are used to frame mirrors, windows, doors, highlight arches, panels on walls, etc. Moldings are used at the junctions of different finishing materials, for example, when the lower part of the walls has one finish, and the upper part another. Moldings can create luxurious accents by zoning or highlighting decorative elements. On the outside, they can have a variety of ornaments, patterns, or be made in a restrained, simple style.
Cornice
on the back side it has two planes and is designed for mounting in a corner, between the wall and the ceiling. The design of cornices can also be very diverse.
Variety of arches
How to make a portal for a fireplace from polyurethane
Today there are countless types of arches. Thus, along with traditional forms, modern solutions are constantly appearing. The latter may have the most unusual shapes. Therefore, the classification can only be made approximately. But interior design with arches involves not only taking into account the shape of the opening
It is also important to choose the right finishing material. Therefore, before starting repairs, be sure to think about both of these points.
Types of arches
All classic arches can be divided into the following types, differing in the characteristics of their shapes:
Semicircular. It first appeared in France. Today it is often used in the design of many types of historical styles. Its peculiarity is the regular geometric shape of the arch, constituting half of a regular circle. An arch may or may not have columns. Its upper part is usually decorated with ornaments. Persian arch. Its peculiarity is that the vault has the shape of half an ellipse. As a rule, such openings are wide and are used when decorating large rooms. Moroccan arch. It is shaped like a horseshoe. The upper part of the opening is widened. The peak may be rounded or pointed. Gothic arch. Characterized by a pointed shape. The opening seems to consist of two arcs intersecting at the top at an acute angle. Arch Tudor. It also has a pointed shape. However, in this case, the upper ends converge at an obtuse angle (at least 90 degrees). The side lines of the opening remain for the most part clearly vertical. Only at the very top do they sharply move towards each other. As a result, the upper part of the arch resembles a triangle with a blunt apex. All its corners are rounded. Arch in the Renaissance style. It has a classic semicircular shape, but is distinguished by the presence of a keystone at the base and rich decoration. Modern types of arches. They are distinguished by a variety of forms, depending only on the designer’s imagination. Can be symmetrical or asymmetrical
In order for such an arch to fit well into the interior, it is important to “tie” its shape to other details.
in gothic style
Materials for the manufacture and finishing of arches
To achieve harmony and unity when creating an interior design with arches, it is important not only to choose the right shape for the openings, but also to select suitable finishing materials and decor. The most commonly used types are:
Made from natural stone or brick
Natural stone or brick. The opening itself is laid out from them; no additional decor is required. Such solutions fit perfectly into the Mediterranean style, country, loft, Provence. As a rule, arches have a regular semicircular or ellipsoidal shape.
brickwork
with stone trim
Made of wood
Different types of wood. Used for the manufacture of platbands and columns for arches. Depending on the chosen decor and color, they are suitable for the classic style and modern trends based on it. Wood will look great in interiors that convey a mood of rigor, elegance, and solidity.
Made from polyurethane
Polyurethane. Many modern apartment interiors with an arch are decorated using this synthetic material. From it you can create elements of various shapes and sizes. They are durable and easy to care for. Polyurethane is used to finish arches of a wide variety of stylistic styles.
polyurethane construction
From plasterboard
Drywall. It is a building material. With its help, you can easily create openings of a variety of complex shapes. After this, they can be decorated with tiles, artificial stone, polyurethane elements, etc.
plasterboard construction
wide plasterboard
plasterboard arch
Polyurethane arches
If you are interested in where to buy arches, pay attention to the products that our company makes. Arches are one of the components of architectural details of facades in different styles of European and Middle Eastern architecture
Decorative arches, unlike load-bearing arches used in the construction of historical buildings, are not part of the building structure and are façade elements that do not bear load. A decorative arch on the wall of a house will become a sign of the Gothic, classical, Moorish style and will make the house visually taller and lighter.
This kind of decor can become an accent of the facade. You can buy an arch of various styles on our website by choosing the appropriate product from the catalog.
Decorative arch styles
A decorative arch can be made in one style or another. For example, it could be a semicircular arch with a different arc radius, characteristic of the classics, Renaissance, Baroque. At the same time, the bow arch was also popular, which consisted of components - an arc and beveled elements.
With the help of such arches you can support a particular design in a historical or national style. Many modern developers are interested in simple and complex pointed arches, consistent with the Gothic style. They will go well with high steep roofs and sharp spiers.
If you plan to create a house in one of these styles, arches of this shape will be very appropriate.
Material for creating arches
Stone and brick arches were present in feudal castles, palaces and mansions in different historical periods. Decorative arches on the wall decorated window and door openings, niches, and emphasized artistic facade painting, mosaics, and sculptural compositions. The shape and size of the arches were determined by the style.
The arches could be of a strict form, or they could be decorated with relief stucco. Previously, decorative elements for arches were made from wall masonry materials: natural stone, brick, or from materials that were easier to process: soft rock (sandstone, dolomite, limestone, tuff), gypsum.
This decor was created by sculptors, artists, and stone carvers. The work on creating arch decorations was labor-intensive and required professionalism. Each detail was created individually. In modern construction, arched decorative elements made of artificial stone, plaster, concrete, and alabaster are often used.
This polymer has high strength coefficients: bending, tensile and compressive. It does not react to the effects of chemically aggressive substances and is resistant to moisture and temperature changes. Polyurethane arches will not crack over time or crumble.
Polyurethane is lightweight, so polyurethane arches will not impact the walls and foundation. If the products are painted, polyurethane arches can resemble similar decor made of plaster, marble, limestone, sandstone, or tuff. Thus, you can buy a white arch in order to subject it to subsequent priming and painting.
Without dyeing, the product will remain white, but traces of processing will be visible on it. In addition, staining will create additional protection for the decor from external influences. Therefore, in the factory, products are primed and painted.
Where to buy ready-made arches or elements of arches?
Nowadays, purchasing an arch at an affordable price is not difficult, since factories produce products in batches, which reduces their cost without reducing the aesthetic properties. You can buy a polyurethane arch of any configuration by choosing from the catalog of finished products on our website.
Our managers will help you choose a ready-made model if necessary. Decorative arches made of polyurethane are often made up of several parts, which can be selected on our company’s website. You can buy elements of arches of complex shapes and then combine them to create a solid decorative element.
By combining different numbers of segments you can create an original arch to decorate the facade. It is possible to buy a ready-made arch by choosing it among the products of our company. In the catalog you can find arches of different sizes, semicircular, pointed, with simple and complex profile relief.
Before buying an arch, most buyers are interested in the price of polyurethane arches. In our catalog you will find not only various options for decorative forms, but also the price for polyurethane arches.
More about polyurethane
Polyurethanes are a class of synthetic elastomers with programmable properties. They are very often used in industry as a rubber substitute. At the same time, they can be used in aggressive environments, with temperature changes. For a short time, the material can be heated even up to 120 degrees; the permissible operating temperature ranges from minus 60 degrees to plus 80 degrees.
In addition, the material is slightly susceptible to aging, resistant to abrasive wear, solvents, ultraviolet radiation and sea water.
Let us separately consider the advantages due to which polyurethane is so effectively used for framing arches.
DIY plasterboard arches
Before starting work, you should clearly imagine what exactly the arch will be like, think about its height and shape. These indicators will help you choose the most suitable material. If you decide to do the work yourself, then you will need to know not only how to do it, but an arch with your own hands is an engineering structure that requires preliminary calculations.
It’s not difficult to calculate the arch; of course, you’ll have to remember a few geometric formulas from the school curriculum. Next, the work will consist of drawing the outline of the future arch on graph paper on a reduced scale. Then, from thick cardboard or plywood, you will need to make a template in real dimensions. Using such a template will simplify the work - by attaching it to the location of the arch, you can mark the installation points of fasteners and calculate other parameters.
It should be noted that this option does not involve an in-depth study of the topic, which is not the simplest and most extensive section of architecture, however, it will help the owner of a house or apartment to do the work independently. Converting a standard door or window opening into an elegant arch can add a touch of originality to a typical room.
how to calculate an arch
Three initial parameters are required for calculation:
- arch height,
- the width of the span that will be covered by the arch,
- wall thickness.
The first step is to calculate the optimal radius of the arch. The easiest way to do this is on a sketch made on graph paper. Having drawn the boundaries of the opening, we determine the axis of symmetry, using a compass we draw several arcs, choosing the most successful option, we remove all unnecessary lines. If desired, you can make the shape of the arched arc more complex, consisting of fragments of several arcs of different radii.
If you plan to create an asymmetrical arch, then you will need to calculate and draw each of the arcs separately. A calculation performed in this way is called graphical.
The second method is mathematical, it is based on the Pythagorean theorem. Initial formula: R² = L² +(R -H)², where:
- R is the radius of the circle,
- H - lifting height,
- L - 1/2 chord of the arc.
From it it is not difficult to find the value R=(L² +H²)/2H. This, in fact, will be the radius of the arc we need.
If you plan to build an arch in the Gothic style, then first of all you should find the radius of curvature of the ends of the arch. It’s easier to do this experimentally by selecting a rounding point in the drawing and lowering a line from it running parallel to the line of the wall. On the other side you will need to follow the same procedure. By placing the leg of the compass on the line, we measure the radius and, moving up and down, find the point at which the line of the wall and the arc of the arch will be closed by a smaller arc. We perform a similar operation on the other side of the drawing. The resulting outline will be the arch of our arch.
If you are not lazy and make several drawings, you will be able to choose the most successful option. This method has two undeniable advantages:
- the ability to adjust the drawing until the desired result is obtained,
- the ability to clearly see what the product will be like.
Having settled on the best option, we create a life-size template; having a template, making an arch will not be difficult at all. Moreover, if plasterboard is chosen for the work - a pliable and easy-to-process material. Although a plasterboard arch will not be as strong as a stone one, in an apartment it will last quite a long time.
arch assembly
First, a frame is constructed from a metal profile, then it is sheathed on the sides with plasterboard. To get a beautiful bend, it is sheathed in segments, i.e. sheets of material cut on one side and curved. The sheet is fastened with self-tapping screws. The formed edges are smoothed using putty.
If you want to create a brick arch, then the work will become more complicated - the brick material is heavy, and you will need to assemble a strong frame from reinforcement. First, a durable metal frame is welded in accordance with the stencil made. Its fastening to the wall should be just as reliable - pins are knocked out into the holes made, to which the arch frame is then welded.
When assembling the frame, it will be necessary to provide for the possibility of filling the space enclosed by it with bricks, or fragments of bricks with cement mortar. After the solution has hardened, the arch is plastered, giving it a shape as close as possible to the template. The plaster is applied in several stages.
Watch the video on how to make an arch from plasterboard:
After completing the installation work, you can begin finishing the arch.
Dimensions
The size of the arch usually depends on the width of the passage. Also, their size depends on the height of the ceilings. Arches can be narrow. Such designs replace single-leaf swing doors. There are also wider models that replace double doors or accordion doors.
Narrow models are used more often for installation in rooms whose exit leads to a corridor, and wide ones - in passages leading to the hall or dining room, as well as for zoning spacious rooms. The arch must also be selected according to its height. So, if the ceiling is 2.5 meters high, then the arch should be slightly lower, about 2.2 m.
The radius of the arch should be determined by the width of the doorway. Before purchasing, be sure to measure the height and width of the opening
It is also important to use the depth indicator, which reflects the thickness of the walls. Moreover, the depth should not be greater than the thickness of the arched structure
Door finishing example
Plastic products have a rigid structure and are installed in corners. There is a type of plastic skirting board that is specifically designed to seal the joint with the floor. Fasteners of this design are made using glue. The floor plastic plinth is secured using a special system of provided locks at the junctions of its individual elements.
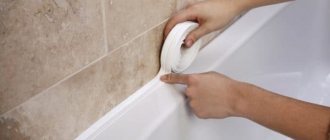
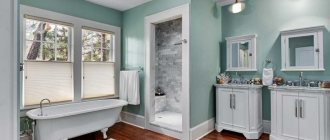
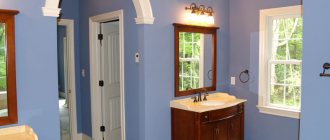
There are also self-adhesive models, which are classified as a separate group of interior elements. They are made from plastic and foam rubber. Adhesive-based molding is used to cover the joints. An example of such decoration is a border strip, which is installed at the junction between the bathtub and the tiled cladding.
Installation of the Palermo arch
Installation of the arch begins with measuring the width of the opening. Using a level, you can outline the future contour of the arch, as shown in the first photo.
Dowels are carefully driven into the decorative lock so that they pass through and protrude evenly on both sides of the lock.
The lock assembled in this way is installed with dowels into holes in one of the arched elements.
By placing the arched elements on the floor the width of the arch, the length of the arch extender is measured. A piece of the required size is cut.
Since the sawn-off piece no longer has holes for dowels, the decorative lock is glued to the arched element with glue or liquid nails.
Following the outlined contour on the wall, the assembled arched element with the arch expander is secured with self-tapping screws to the opening profiles. Holes drilled with a drill with a diameter of 4 mm must be slightly deepened with a drill with a diameter of 8 - 9 mm.
The concealment is done in order to hide the heads of the screws.
Subsequently, decorative stickers, which are included in the package, are glued to the screws.
The second part of the arched element is docked to the first and secured.
The second side of the arch is assembled in the same way.
It is necessary to use a level to align them in the same plane and at the same height.
Next, the internal intermediate plate is inserted.
The width of the arch opening is measured with a tape measure. One centimeter is added to enter the grooves.
The length of the internal intermediate plate must be measured with a margin, then it is better to cut it in place.
The plate is cut to length and width.
For ease of installation and to ensure that the decorative laminated coating of the plate does not chip off when inserted into the grooves, the edges of the plate can be treated with coarse sandpaper on the reverse side.
One of the parts of the assembled arched element must be loosened by slightly unscrewing the screws.
The inner intermediate plate is inserted into the fixed part of the arch element.
Here you need to be patient and do it carefully so as not to damage the laminated layer of the plate. The plate is inserted into one part of the arch, and at the same time the screws on the second are tightened. The plate must fit into the grooves of the arched elements along the entire length.
Dowels are driven into the imposts like into locks.
They are inserted from below into the arched elements.
It must be remembered that imposts are divided into left and right.
The inserted internal intermediate plate is cut off with a knife approximately in the middle of the impost.
Adjustment of vertical posts in length is carried out as follows.
The stand is turned over and measured according to the impost. Three millimeters are added, which is approximately how much the post fits inside the impost and is cut off.
The remaining three racks are adjusted in the same way. Then the stand is secured with three self-tapping screws to the profile.
It is necessary to control the level so that the stand is strictly vertical.
Palermo arch side pillars installed.
Vertical intermediate plates are measured and cut in the same way as the top, horizontal plate.
The width between the posts is measured and one centimeter is added. Their length is from the floor to the middle of the impost.
The cut vertical spacer plate is inserted after one of the vertical posts is removed.
Having inserted the plate, the stand is screwed into place, since the screws have already been screwed in.
The joining strip is cut to the width of the arch and inserted between the impost and the intermediate plates.
All that remains is to glue decorative stickers onto the screws, and the installation of the Palermo arch is complete.
Kinds
A classic plasterboard arch is a structure installed between adjacent rooms and supported on the sides by columns. Bypassing the usual plasterboard option, you can create an original asymmetrical shape that emphasizes the modernity of the interior.
According to the shape of the vault, arched structures are classified into the following main types:
- Roman. The most common type of arch. Its semicircular arch will be appropriate in any interior;
- square or portal. They are used to decorate wide openings;
- trapezoidal. Also often used when decorating wide openings;
- ellipsoidal. This type is similar to the classic design, but with a larger radius of curvature at the corners;
- gothic It has an ovoid arch with a pointed apex;
- Turkish. Ornate design in oriental style;
- British. This type has strict forms. Will highlight the sophistication of any room;
- Thai or half arch. Asymmetrical vault: on the one hand there is a classic arch, on the other there is an arch in the form of a portal.
In addition to lamps, there is another design technique that adds useful properties to an ordinary arched opening: the design of shelves and niches both inside the structure and on its outer sides. This idea helps to create additional coziness, because souvenirs and family photos can be perfectly placed on small shelves.
Lighting solution
The beautiful design of the arch is complemented by built-in lighting devices, which can be point, side or contour types. The easiest way is to integrate lamps into a plasterboard element at the end.
The decorative opening is equipped with recesses where light bulbs are subsequently installed. To slightly hide the backlight, you need to mask the recesses with glass. It is important to use colored or translucent glass, which in itself will serve as an additional detail of the interior and the structure itself.
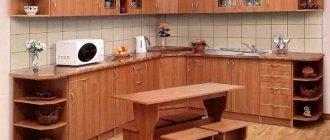
The arch that divides the space of the kitchen and living room looks very beautiful, and its lower part smoothly turns into a bar counter.
Arch device
When a private house is just being built, the easiest way is to immediately design arched openings and complete them during the construction work. In multi-storey construction, arches are designed extremely rarely, especially since a modern apartment, after the building is completed, is often a large studio room.
Arches in load-bearing walls
If you want to have an arch instead of a standard rectangular opening in a load-bearing wall, you will have to think about it seriously, and our short instructions will help you. So:
Let's say you live in a brick house and want to make an arch where you have an interior door. Removing its box, you will see a transverse concrete lintel above your head. Its function is to strengthen the wall in a place where it does not have support, namely, in the opening.
Arch in load-bearing wall
- You don't need to be an expert in the field of construction to understand that you can't remove this lintel - you can only widen the opening a little. That is, in this case, you won’t be able to achieve a high round arch; it will be slightly lower than the height of a standard door, and approximately the same shape as in the photo above.
- It’s good if the height of the openings in your apartment is 2.1 meters, that is, it corresponds to the European standard. Because the domestic standard provides only a two-meter height.
Strengthening the opening with a channel
Before the decorative finishing of the interior arch is completed, the perimeter of the opening must be strengthened. To do this, use a steel channel from which the letter “P” is welded - its vertical posts will take the load from the wall.
Arch frame
Only after this will the arch fit into this rectangular opening. To create the desired configuration, you need to make a frame from a regular ceiling profile. Notches are made on it, allowing it to be bent to the desired radius.
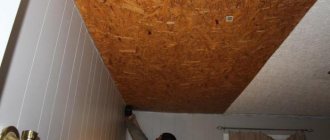
Arch body covered with fiberboard
- Watch the video to better understand the process of this work. Once the frame is ready, you can begin covering the arch body. For this purpose, plasterboard is most often used, but fiberboard and even plywood are quite suitable - much depends on what finishing material will be used in further finishing.
- In a panel house, the doorway is a recess in the wall panel, provided at the time of its manufacture. Naturally, the panel is designed for a certain load, so not only the height, but also the width of the opening cannot be violated.
Arch finishing with solid wood
You'll have to be content with the size of the arch that you end up with. But you won’t need to reinforce it with a channel. It is enough to choose a more durable finishing material, for example, solid wood.
Arched partitions
Few people will dare to make an opening in a partition, even a brick one. Especially in a place where there was none before - this is a very labor-intensive task. So:
It is easier to remove this partition completely and build a new one. Many people do this when remodeling their apartment. You can contact a specialized company and order interior arches with decorative trim.
Arched wooden partition
Most often, companies offer arched partitions made of solid wood or MDF. As for their design, the manufacturers’ ideas are almost inexhaustible: geometric shapes and smooth lines, slotted grilles and carvings, colored stained glass windows.
Plasterboard partition with arch
And if you want the price of the arch to be budget-friendly, you should use your imagination, look for possible options and try to do this work yourself.
Decorative arched niche
A plasterboard partition with an arch is a frame structure. Its frame is also made of aluminum profile, which is covered with sheets of plasterboard. After this, the arch and partition are finished. Wall arched niches are installed in the same way, which do not zone the space of the room, but only decorate it.
Decorative arches
As already mentioned, building an arch from natural stone, brick or valuable wood is a difficult job, requiring skill and experience; ordering such work from craftsmen is not a cheap pleasure. But if you wish, you can still decorate your apartment with an imitation of an arch, which is easy to do with your own hands.
Materials for creative work can be plasterboard or polyurethane. You can choose any shape for such an arch; it will not be difficult to build, and it will look no less attractive than the real thing. Usually, a decorative arch marks out a place on the wall where it is planned to install a large mirror, a television panel, or a beautifully designed shelving unit.
Decorative arch:
- will give a special style to the room,
- will make it more voluminous,
- will highlight certain interior items.
Design options
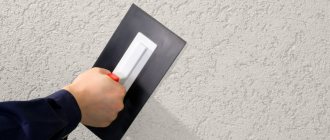
The framing of an interior doorway can be very diverse. Most often, the design of the passages of a square arch is done using decorative plaster. This method of decoration will allow you to create the most diverse and unusual shapes. Moreover, you can create an interesting texture and relief.
The arch can be covered with bright contrasting wallpaper, thereby highlighting it in the interior. You can also use patterned wallpaper for decoration, the color of which will match the color of the wall coverings in neighboring rooms. For the hallway you can use mosaic tiles or mirrors
Such a design at the entrance will attract the attention of guests and add additional space to narrow corridors.
The arch in the living room can be decorated with a pattern. These can be either geometric or abstract images, or entire works of art in the form of paintings. The edging of an arched door can have three-dimensional shapes.
Balconies with an arch opening into the living room can be decorated with large, interesting columns. This is a pompous and luxurious option that is perfect for decorating a room in a classic style. A very inexpensive finishing option is painting. In this case, the arch must first be plastered and then covered with several layers of paint. Moreover, it is better if the paint color is combined with the color scheme of the rooms connected by the passage.
Frosted glass or glass with a lumpy structure looks very beautiful in the design of an arch. This is an excellent solution for dark rooms. You can also make a transparent glass arch with LEDs located inside. This design looks very stylish and modern. Moreover, in the arched structure itself, you can provide shelves and decorate them with beautiful vases or other accessories.
Some people use such a design move as an arched corridor when finishing. In this case, several decorative arches are made in a long corridor, each of which complements the other. This way you can carry out proper zoning of the corridor and make it more elegant.
You can decorate an arch not only with the help of unusual finishing materials, but also in another way. Lamps are often used. By correctly placing light accents, you can transform the interior space and expand the room. In this case, spotlights with LEDs are often installed.
Also, arches are often decorated with beautiful curtains or tulle. Moreover, in this case, they use both thick sliding curtains and lighter translucent ones.
The arches are also decorated with mirrors. If the mirror is directed towards the window, it will fill the room with light and make the passage more spacious. Glass is often used to decorate arches. Moreover, these are usually blocks installed at the full height of the doorway and small glasses of different widths installed along the arch.
Arched structures are often decorated with colored glass or mosaics. They are usually decorated using stained glass. This design will look very bright and aesthetically pleasing. Moreover, mosaic or stained glass can decorate both the entire arch and its individual elements.
Moldings on the walls
Wall moldings are not just strips. Frames are made from these elements, which can simply limit part of the space in which a mirror or picture will hang. This selection helps to more clearly organize the space and highlight the subject.
Pictures framed from moldings
Frames made from moldings can also be filled with other finishing material. Previously, tapestries, brocade and other expensive fabrics were inserted into such frames. Today, they are increasingly using a different type of decorative putty, wallpaper, or simply a different shade of paint.
Inside the molding frame is a different color
Another common technique is the design of doorways. In addition to the standard frame of the opening, there is also a frame above the door. This space usually remains empty and is not used in any way. To ensure that there is no imbalance during complex decoration, molding is also glued here.
Slats over the door
Using wall moldings, you can visually make the ceilings higher. To do this, strips are installed at a certain interval. You can use them not only to make frames. These are decorative strips and are not too difficult to create patterns with.
Molding patterns on walls
All these decoration techniques require a large space, otherwise the room turns out to be too “overloaded”. In small rooms, if they are used at all, it is usually only planks at the junction of the wall and ceiling, and maybe a couple of thin strips to separate different textures or colors. Most often you can see moldings in the interior of the living room - these rooms are usually the most spacious. Moldings look good in bedrooms, but not in small ones, but at least in medium ones.