To work with plastic concrete, various decorative tools are used, which you can buy or make yourself.
Textured rollers, tampons, sponges, brushes, smoothers, graters, stamps, knives, trowels and palette knives, seam cutters and other devices can be used as such decorative tools.
Previously, on the pages of kamsaddeco.com, in an article about the manufacture of metal frames for decorative concrete products and in an article on marble painting, examples of tools that professionals, as well as homemade craftsmen, use in their work were given.
Today we will try to expand this list, and also tell you how some of them can be made with your own hands.
Content
1. Decorative tool for painting and obtaining a relief surface.
2. DIY decorative roller and stamp imitating tree bark.
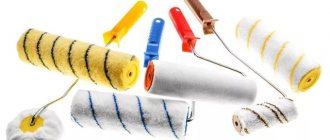
Textured and structural rollers - what they are, features of their use
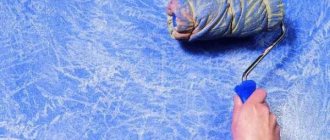
The device consists of a rotating cylinder on a curved handle with a variety of coatings that create artistic elements. The textured roller imprints a three-dimensional pattern on the newly applied plaster layer. For example, this way you can imitate brickwork or, using a variety with fur, create an aesthetic roughness. A structural roller is used to apply repeating decor with paint on a dry surface; working with this technique may seem more difficult due to the fact that you need to avoid smudges, but it is easy to learn. This technique is used to decorate wood and fabric.
The textured roller imprints a three-dimensional pattern on the newly applied plaster layer.
How to apply plaster
The first recommendation is to determine the thickness of the applied layer. The method of carrying out the work and the consumption of material will depend on it. Naturally, the thinner the coating, the cheaper it is.
The simplest thing is if you have to veneer an already prepared, level base (plastered masonry, gypsum board, concrete, aerated concrete). In this case, the thickness of the plaster can be made about 5-7 mm. A smaller depth will not be enough to make the jointing between the stones look natural.
You can learn about the intricacies of applying plaster in this article.
When decorating an unprepared surface, for example, brickwork, there are two options:
- Apply with a thick carpet, and then level it at the same time creating a texture. However, if the walls are uneven, then it will not be easy to do this without the appropriate experience;
- First remove the leveling layer, after which it has hardened, apply a thin layer, followed by embossing.
The second important stage is the choice of plaster mixture. The main condition is the compliance of the material with the base on which it is applied, as well as with the operating conditions. There should be no large particles in the finished solution.
Practice shows that it is most convenient to work with cement plaster mixtures or tile adhesive. In addition, they are suitable for use both indoors (even damp) and outdoors. Gypsum compositions are easier to apply, but it is more difficult to obtain the desired texture due to the good viscosity of the solution. Naturally, they are afraid of moisture.
Before applying plaster to the wall, the latter must be primed.
For spreading, it is convenient to use a smoothing iron or a medium-sized spatula. The layer of material should be made uneven with chaotic strokes. This method will provide the finishing with additional relief, giving the future masonry an angular, protruding shape with imitation of chips.
Classification of decorative rollers by pattern texture
Rollers for decorative plaster can recreate almost any motif. Thus, they are used to imitate marble or other stone, brick, wood, textiles, and sand. The thicker the layer of plaster coating and the deeper the coil is pressed, the more voluminous the pattern is.
There are more tricky patterns:
- Waves;
- Braids;
- Shells;
- Ferns and dried flowers;
- Birch bark.
In addition to all kinds of forms presented in stores, the designer can develop a stencil to create an exclusive ornament on a single object, or even several.
Rollers for decorative plaster can recreate almost any motif.
Painting with a texture roller is like creating your own wallpaper design. Typically, floral or abstract themes are chosen, but, if desired, images of birds, waves, and leaf veins can be applied.
Also, tools come in different widths; the wider, the process goes faster there, but narrow ones allow you to repeat the pattern in stripes and provide a clear depiction of small details.
Painting with a texture roller is like creating your own wallpaper design.
Decorative tool for painting and obtaining a relief surface
To paint a flat surface (for example, a wall) to obtain a repeating pattern, use a decorative roller.
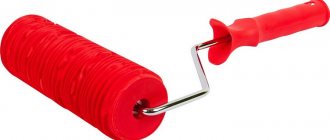
The most commonly used are foam, pile or fabric rollers. But they are not durable and wear out quickly.
Rollers made from polyurethane last for many years and are usually black or red in color.
There are a lot of design options for decorative rollers: these are various ornaments or imitation of natural surfaces of stones or wood.
Here are some examples.
You can make a roller to create a custom design yourself using foam rubber, tape, rope and scissors (watch the video at the beginning of the page - 7 ways to create a roller for decoration).
A decorative roller may have other names: structural roller, relief roller or textured roller.
They are mainly designed for working with decorative plaster and their names speak for themselves.
Since plaster, unlike paint, has volume, these rollers allow you to obtain a different surface structure or texture: fabric, fur, leather, stone, wood, etc.
Such decorative rollers can also be used when working with a concrete surface.
To obtain simple designs, you can use a decorative tool such as a comb, broom or ordinary broom.
It is necessary to dip the tips of this tool in the dye. Then, hitting it against a hard object (for example, a stick located near the surface to be painted), spray paint.
By combining the work of various decorative tools, you can obtain a unique and inimitable pattern both in volume and on the surface of the object being decorated.
To further complicate the color pattern, soft tampons are used.
This decorative tool is the simplest and is made from natural sponge, foam rubber or fabric.
Decorative tools for concrete include trowels, trowels, joint cutters, and tampers.
They are made of good stainless steel.
Polyurethane stamps are also used to decorate concrete surfaces. They imitate stone, brick or wood.
Why polyurethane is used as a material for stamps was described earlier in the article about making a hollow angel from cement (we choose the material for the angel shape).
Materials for making decorative rollers
The production of rollers with patterns from all kinds of materials opens up enormous possibilities for flights of fancy. By type of stamps, almost everything is used. What varieties can be found in construction stores:
Rubber or silicone
They are the ones most often purchased to create three-dimensional ornaments. The price for them is approximately twice as high as for all the others, but as you proceed, it becomes clear why. Patterned rollers intended for coloring compositions are called rigid decorative ones.
They are the ones most often purchased to create three-dimensional ornaments.
Foam rubber
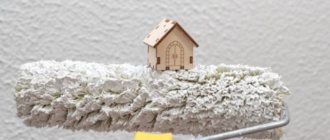
Foam rubber usually has deep pores, the spongy structure allows you to create a mark that looks like tiny craters. The plaster should not contain large fractions or solvents, otherwise the desired effect cannot be achieved, and aggressive substances will destroy the structure, then fragments of foam rubber will remain in the most visible place. Embossed polka dots do not create the expected imprint due to their softness. To treat a large area, purchase several pieces.
Foam rubber usually has deep pores, the spongy structure allows you to create a mark that looks like tiny craters.
Foam
Inexpensive. Disadvantage: it quickly fails, the embossing is flattened, and does not come out at all as expected. You need to buy more and be on guard all the time.
It quickly fails, the embossing is flattened and does not come out at all as expected. You need to buy more and be on guard all the time.
Leather
Leather is used for Venetian techniques, it can form a beautiful marble relief. It is important to choose a natural material of high quality; artificial analogues can slide without giving any result or quickly fail.
Leather is used for the Venetian technique, it can form a beautiful marble relief.
Wooden
Mixtures do not stick to wood, so it is suitable for those who are taking up creativity for the first time. It does not react with chemicals, but does not last long, as it absorbs moisture and delaminates.
Mixtures do not stick to wood, so it is suitable for those who are taking up creativity for the first time.
Plastic
A budget option, they become deformed and crack during use. They are suitable for decorating a small area with an ornament, but it is unclear how the plastic will react to the composition of solutions and paints.
A budget option, they become deformed and crack during use.
fleecy
Made from a variety of materials. Natural fur does not mix well with lime in solutions. Artificial - has a good distribution, but a short-lived coat. Polyamide ones are selected according to the length of the pile, they can be cleaned and can serve for quite a long time. Velor ones leave a barely noticeable mark. The longer the pile, the more textured the effect. At the finish, the same rollers are used to paint walls with a textured pattern.
Low-quality products often fall apart right on store shelves. It is better to immediately refuse the purchase, since it will be impossible to remove lint and pieces of foam rubber from the plaster.
The longer the pile, the more textured the effect.
Types of tools by type of material for applying textured plaster to the wall or facade
To make the roller, materials of different hardness and composition are used. The choice of tool depends on the drawing and the expected result.
Rubber
Rollers with a rubber base are well suited for applying relief figures to the surface. When using them, images look sharpest. In addition, there are rollers made from porous rubber. They are used to obtain the required texture. This material is not suitable for creating figured drawings on walls. Working with a rubber roller requires experience.
Plastic
Plastic materials differ in hardness. Therefore, rollers made from them are divided according to their purpose. Tools made of hard material are suitable for applying figured patterns, while tools made of soft material are suitable for leaving light patterns on the surface.
Pile
The pile base of the roller is made of polyacrylic, synthetic or natural fur, and polyamide. The tool is used on fresh plaster mortar. The severity of the wall relief depends on the length and shape of the pile: the shorter it is, the smoother the surface will be.
Foam rollers
Foam rubber tools are used mainly for applying fine-grained plaster mixtures. In addition, a roller is used to create a pattern on the surface treated with fresh plaster mortar.
Leather
The material of the working part of the roller is artificial or natural leather. It may have a smooth or wrinkled surface. In the second case, the pattern will depend on the size and shape of the folds. If they are fastened well, the pattern on the wall will look regular. The mobility of the folds will give the pattern a natural look. Leather rollers are used to apply Venetian plaster to achieve the effect of a marble surface. Working elements made of genuine leather are more durable than those made of artificial material.
What to look for when purchasing
A rubber roller designed to form a deep impression can be compared to a pressure paint roller. For such activities, a rubberized handle is desirable, since some effort will have to be made for a long time. The design must be strong and not bend when pressed.
To style it like a fur coat, select a roll with long pile, and the plaster can be applied with a broom. Complex floral patterns are applied with a wooden or rubber roller, but it should be taken into account that wood absorbs water from the paint, among other things. The stencil design on the print must be clear, closed in a circle, have smooth edges, without cracks or scratches. The fibers on textile rollers should be smooth, not caked or crumble.
To create voluminous motifs, the relief on the roller with a pattern for wall decor must match the thickness of the decorative layer.
The fibers on textile rollers should be smooth, not caked or crumble.
Beautiful doesn't mean expensive
Yes, this phrase fits our proposal perfectly. And it consists of decorating the walls using decorative plaster, paint and a textured roller. That's how simple it all is.
Why is it cheap?
- Firstly, the plaster mixture is one of the cheapest finishing materials, just like paint for its decoration.
- Secondly, even a non-professional can do the job, which means there is no need to hire a team. And thirdly, you can also make a roller yourself.
If you don't want to DIY, no problem. Just visit a hardware store or order online, for example here.
How to make your own decorative roller
Using scrap materials to make a textured roller with your own hands is an exciting activity; it is recommended to first test such a device on paper or plywood. Some modification methods:
- Wrap a pressure roller or wooden roller (or a rolling pin) with rubber cords or silicone sealant. The print will be slightly uneven, but will not irritate with too clear geometry. If you take thick threads and a fluffy paint roller, you will get something like flowing splashes or streams. For the same purpose, you can use old transparent tights;
- A plastic bag wound on a reel, secured with a vegetable net. The result will be a picture of uneven wrinkles. Using this conversion, you can apply small splashes of paint of a similar color;
- The leather instrument is made with a large number of voluminous folds, intercepted with wire. You can also fasten the skin in the form of triangles, squares and other shapes with free edges. This can be done with pin buttons or another method of fixation that can withstand all manipulations;
- A real designer exclusive can be cut from a rubber roller. To do this, you need to transfer the motif using carbon paper or a stencil and purchase cutters for linography. The task is very painstaking and requires artistic skills;
- Another skillful option may appeal to woodcarving craftsmen: create an engraving with a depth of 0.5 cm on a cylinder with a hole inside;
- Cut out circles, squares and stars from a silicone mat. Secure with silicone glue. Glue on a piece of burlap or matting with a large weave;
- Cut grooves in the old foam roller;
- The tamponing method can replace the coil; for these purposes you can use: natural sponges, rough cloth, crumpled plastic bags;
- Stripes can be drawn with a stiff brush or comb - massager.
Even indoors, it is recommended to maintain temperature and humidity levels. Do not proceed with operations in abnormally scorching sun or fog.
Using scrap materials to make a textured roller with your own hands is an exciting activity.
Useful tips
- Large patterns visually reduce space, while patterns consisting of a large number of elements, on the contrary, increase it.
- Small and medium patterns are ideal for the hallway. Living rooms can be decorated with bright landscape designs. In the bathroom and kitchen, the roller is used to decorate not only walls, but also plumbing fixtures.
- Using a combination of different patterns, you can easily divide the room into zones.
- If you have never worked with pattern rollers before, choose simple designs without a lot of complex lines, weaves and curls. Geometric or floral prints and small ornaments are perfect.
- Preliminarily think over the design layout of the room. Even a roughly executed sketch will help to avoid critical mistakes at the preparatory stage.
Technique for applying plaster with a structural roller
The process is gradual and does not involve arbitrary breaks due to the pot life of the solutions. First, you should determine the motive and create a sample so that you can repeat its contours if you need to do the drawing not in stripes, but in a conditionally chaotic manner.
Prepare the necessary plastering supplies: rule, level, corner leveler, scoop, spatula, textured roller for decorative plaster. Particular attention should be paid to the kneading device; if there is no mixer, attach a whisk attachment to the drill. Check the compliance of the quantity of purchased mixtures with the area of work, and the compatibility of the compositions.
As with all plastering work, high-quality preparation is necessary, cleaning surfaces from old coatings, chemical stains, and removing dust. Then the cracks and chips are sealed and rough leveling is carried out with grinding. The dry surface is primed and beacons are placed.
Then a starting leveling layer of plaster is applied. It is recommended to prime the wall again before applying decorative layers. At the next stage, you can add color, or if you plan to apply several layers or paint, then start creating a relief.
It is recommended to prime the wall before applying decorative layers.
Each method will be different. For example, for a fur coat, you need to apply the composition with a broom and evenly treat the entire wall with a roller. The complexity of the method is that it is necessary to ensure that the solution is applied evenly. Punching the pattern can be done immediately if the plaster is of normal consistency; as a rule, it takes 10-15 minutes for the master to level one plane. The design can be applied using a paint spatula or a patterned roller, and the movements can be wavy or strictly straight.
Venetian plaster has its own application and tinting technology, which is more complex than other types.
Punching the pattern can be done immediately if the plaster is of normal consistency.
Execution of work
To obtain a uniform result, a flat surface is a prerequisite. This will create a texture with identical depth, and the paint will be applied in the same layer. Also, the seam from the edge of the roller will not stand out on the plane.
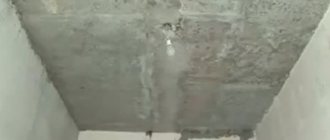
Preparing the base
The behavior of the decorative coating depends on the condition of the surface. Thus, cracks and looseness lead to a rapid spread of similar consequences to the finish.
A common defect that needs to be fixed Source pixabay.com
The same applies to rust, fungal formations, and some oily substances. As a result, before applying decorative plaster or a pattern with a roller, it is important to eliminate any damage, contamination, or defects in the base.
After strengthening and cleaning the base, preventive treatment and continuous priming are carried out. The last action is aimed at removing dust from the surface, strengthening it, and improving adhesion between different materials. That is, among other things, peeling of plaster or paint from the working surface is prevented.
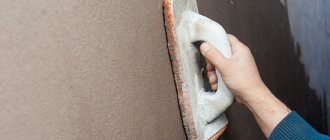
Decorative plastering
The work is performed on a flat surface after priming and drying the surface. The entire event includes several activities. First you need to prepare a homogeneous solution in accordance with the recommended recipe from the manufacturer. The following is done:
- a uniform coating of 2-4 mm is formed using a spatula (width 300-600 mm);
- after distributing and smoothing the solution, wait 10-30 minutes for the composition to begin to set (gypsum faster, cement longer);
- An impression is formed with a textured roller in one pass without strong pressure in the direction from bottom to top.
Creating a pattern using a short-haired nozzle Source amazonaws.com
Another option is to apply decorative plaster with a roller. Here the task is performed with a working solution. The texture is created without clear forms.
Some craftsmen perform the last step from the ceiling to the floor. But there is a risk of the mortar lingering behind the roller settling due to its own weight. If you work upward, the mixture returns to its original position, and the small protrusion can be sanded down.
Technology for correct coloring of textured surfaces
If the color is not mixed with the plaster solution, then a special painting technology will be required. The wall at this stage is matte and white. What colors are selected:
- Oily. The coating is thick with a slight gloss, but has many disadvantages: they do not allow air to pass through and therefore can peel; in order to make a new repair you will have to remove it, and this is a long and unpleasant task; the smell is pungent and toxic, long drying time;
- Alkyd. The advantage over drying oils is only in the setting time: 1-2 days;
- Water-dispersed based on acrylic or silicone. After just a few hours, you can apply a second layer; it becomes lighter as it dries;
- Acrylic. They don't dry for long and are great for all-over coloring. Mother-of-pearl and sparkles are sometimes added to the compositions;
- Azure. They are used for toning, add depth to the relief, and take a long time to dry.
If the color is not mixed with the plaster solution, then a special painting technology will be required.
If you plan to work using several colors, you should prepare a set of brushes for each color.
For painting you will need: rollers, sponges, brushes, containers, masking tape on baseboards, paper or cloths for tools. The decorative layer is dried for at least two days, cleaned of dust particles, and a suitable primer is applied. Paints are mixed with one or more colors. Monochrome. Surfaces with shallow relief are painted using a roller. Two or three colors. The lightest base color is applied to the entire wall area. Using a sponge or roller, apply a darker shade so that the first color remains in the recesses. In the finale, you can use glaze or decorative coatings.
If you plan to work using several colors, you should prepare a set of brushes for each color.
Dry brush. After painting the base color, a wide brush without excess paint is brushed across the wall, touching only the tips of the bristles, as a result, the protruding parts of the pattern stand out.
Wax can be tinting and finishing, and can be part of a decorative mixture. It extends service life, can change color, make the surface matte or glossy. As a final layer, take a little wax on a spatula and level it, polishing it with a cloth.
Wax extends service life, can change color, make the surface matte or glossy.
The varnish protects against dust and moisture, has various effects: glitter, mirror gloss, satin, cracks or can be tinted.
The more prominent the wall, the more paints are required.
The varnish protects against dust and moisture and has various effects.
Caring for a textured roller
This instrument must be washed and dried before each use. Mixtures and paints should not dry on it. This is easy to do if the roller is rubber; the wood requires high-quality drying, preferably in fresh dry air.
This instrument must be washed and dried before each use.
Using the technique of embossing a pattern with a textured roller does not require serious preparation and the purchase of expensive mixtures and tools. You can evaluate your abilities by taking a small board for sketching. If plastering technology is followed, the interior will remain unchanged for many years.