The kitchen is one of the most visited rooms in the house. Its convenience and appearance are of great importance for creating a cozy atmosphere. Kitchen furniture is constantly subjected to tests: temperature changes, humidity fluctuations, frequent wet cleaning using household chemicals. Over time, there becomes a need for its repair or replacement. One of the most common operations is replacing kitchen countertops. Is it possible to perform this operation on your own? And what points must be taken into account?
Replace or restore?
The countertop is the most eye-catching element in a kitchen set. It carries a considerable functional load: food is constantly prepared on it, heated dishes are placed on the surface, liquids are spilled, and it is scratched with various objects. Because of this, over time it loses its attractiveness.
What is more profitable: restoring an old countertop or installing a new one?
Minor damage such as scratches and chips are fairly easy to repair on all types of countertops except glass. The easiest way to restore work surfaces is made of wood or laminated chipboard. But it should be remembered that in appearance a new part will almost always have an advantage over a restored one. And the new one will last much longer. In case of significant damage, there is only one option - replacement.
Stages of work implementation
Replacement of countertop facades
is carried out in several stages:
- Dismantling the old coating. This stage includes disconnecting all household appliances and other fittings - stove, sink, oven, as well as cleaning the surface from sealant.
- The cutting of the new countertop according to the prepared sketch will be done at the factory. The master installer will process the material at home in accordance with the selected form and previously taken measurements.
- Installation of a new surface and subsequent connection of the sink, stove and electrical appliances.
Depending on the size of the surface, replacement may take up to 5 hours of continuous operation.
Chipboard countertops are from 1 meter to 2 meters in length, calculated as a minimum of 3 meters. Egger countertops Skif countertops Union countertops Duropal countertops Remember that even the best quality furniture needs updating. By contacting the Stolekhov company, you can be sure of quick and high-quality restoration of the headset at reasonable prices. Call a technician Installing a dishwasher
Replacement of kitchen facades
Why do countertops deteriorate and why change them?
The main reasons for part damage:
- Using abrasive or aggressive detergents.
- Temperature changes upon contact with heated dishes, hob or gas stove installed nearby.
- Moisture penetrating and leaving marks on the surface.
- Pressure on the edges and corners of the slab, leading to their delamination or fracture.
- Burnout when exposed to direct sunlight.
- Mechanical wear and tear from routine kitchen operations.
- Incorrect or poor-quality installation.
A countertop that has lost its external beauty or structural integrity will have to be replaced.
Types of countertops and their main defects
The working surface can be made of different materials. Each of them is susceptible to the appearance of different defects that will have to be dealt with:
- Natural stone is the most popular and durable material, least susceptible to wear and tear, and has a long service life. A kitchen table top made of natural granite is not afraid of either temperature or mechanical influence, and is also not susceptible to damage due to chemicals.
- Acrylic. This type of artificial material looks very attractive. But it has its drawbacks. Acrylic is resistant to scratches and cuts, while other artificial stone kitchen countertops, such as colored concrete, are more durable.
- Quartz agglomerate. Resistant to all types of impact, as durable as natural granite. But over time it loses its aesthetics.
- Casting stone is a type of thin-layer polymer that has a base. The material cannot withstand grinding with force, so you need to be extremely careful when doing this.
- Plastic is the most budget-friendly option for decorating a kitchen work surface, which explains its low performance characteristics. When cutting without using special boards, it wears out quickly.
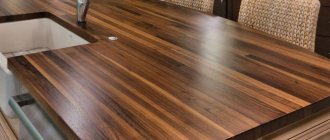
- Tree. The tabletop uses material treated with impregnations and varnishes. Since the top polish can wear off over time, you need to think ahead about how to refinish your wood countertop.
How to avoid frequent countertop replacements?
As with any other product, you can extend the service life of the product by following the operating rules:
- Carry out wet cleaning with a soft cloth, using non-aggressive, non-abrasive products - for example, dishwashing liquid.
- Place hot dishes or heating kitchen appliances on special stands.
- Immediately wipe off any moisture that gets on the work surface and reliably protect it from penetrating into the thickness of the material.
- Do not perform heavy operations on the edges and corners of the slab.
- Be sure to use a cutting board.
- Equip the legs of household appliances located on the countertop with soft pads to prevent scratching the surface when moving it.
- Protect from direct sunlight with curtains or blinds on kitchen windows.
USEFUL INFORMATION: Is it possible to lay tiles on a wooden floor in the kitchen
How to install a countertop in the kitchen with your own hands: step-by-step instructions
You can independently install a canvas made of artificial stone, MDF or chipboard. It is better not to use other materials due to the rather complex installation, which requires certain skills. The installation is approximately the same and includes several steps.
1 step. Preparatory work
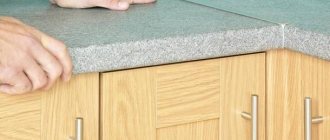
They begin with fitting and adjusting the slab or slabs, if they are intended to be joined. Alignment is carried out along the facade of the cabinet. The tabletop should protrude in front of it by 30-50 mm. This is done in order to protect the facade from splashes and drops flying from above. Taking this into account, measurements and markings for trimming are carried out. It is optimal to carry out the latter in two stages:
- We make an oblique cut. This is necessary so that the edge of the slab pressed to the apron is parallel to the facade. Cut off the excess using a hand saw or electric jigsaw. In the second case, some experience will be required, since the board is thick and it is difficult to cut it at a right angle. If your hand slips, the material may be hopelessly damaged. It is optimal to leave a small allowance and process it with a belt sander. To ensure that the cutting line is smooth, we use a guide rail.
- We trim the edge to accommodate the unevenness of the wall. We make recesses for pipes, protrusions, etc. If there are bumps on the vertical surface or the tile has a pronounced relief, additional trimming or sanding will be required if the unevenness is small. Using a thin marker, mark a line on the board along which the cut will go and very carefully perform the trimming.
Instagram aksenov_country
Pruning must be done very carefully. If a power tool is used, this is especially important.
We prepare fasteners for the base. They fix it to the box, which will prevent possible displacement. These are steel corners, which are attached with one side to the bottom side of the stove, and the other to the side wall of the cabinet. Their fastening depends on the material. Self-tapping screws are used for wood boards and boards. They secure the brackets. They are glued to the composite or stone.
To do this, we clean the areas where the parts will be installed and then degrease them. We take a suitable two-component glue, apply it to the surface of the corner and press it firmly to the surface. We wait for the composition to dry, which will take an average of 24 hours. After this, you can begin installation.
Instagram tkani_mebel
You can use furniture corners to secure the tabletop.
- Kitchen
Dimensions of kitchen countertops: what you need to know so as not to make a mistake with your choice
Step 2. Joining fragments
Necessary only for prefabricated countertops, more often for corner ones. It is assumed that there are two or more fragments that need to be connected into a common canvas. Regardless of the material, ties are installed at the joint area. It is advisable to prepare areas for their installation in a workshop; it will be easier to carry out drilling and milling there. The fragments are trimmed so that they can be joined.
If you are working with a fabric coated with polyester or acrylic, the connection can be made without an additional profile:
- We process the ends of the parts with glue.
- We connect the elements, lay and tighten the ties.
- Remove excess glue.
- After the composition has dried, polish the joint. It becomes almost invisible.
- We reinforce the seam with an overlay strip on the reverse side.
Instagram furniturenaiaidvernaia
This is what aluminum joining strips look like, which are used when joining tabletop fragments
For chipboard, MDF, etc. An aluminum docking strip is used. Several varieties are supplied to stores. The one that is intended for the connection being made is selected.
- We treat the end areas with silicone.
- Apply the strip and align it flush. We secure it on one side with small self-tapping screws.
- We connect the fragments and place the clamps in the prepared seats. We tighten them.
There is another way to join parts. This is the so-called euro saw. It involves the design of the joint area without any additional details. A pattern cut is carried out on a milling machine, which results in an interlocking joint. Its quality largely depends on the correctness of the work. You need to know that the use of a Euro saw requires precise fitting of parts and the absence of even slight curvature of the corners of the room. Otherwise, installation will not be possible.
Instagram resopalru
This is what the area where two slabs join together using Euro sawing technology looks like
- Furniture
How to arrange the connection of countertops in the kitchen beautifully and correctly
When can you install a countertop yourself?
The desire to save money by doing the installation yourself does not always lead to good results. Installing a countertop yourself is not that difficult, but the process requires certain skills and tools. Therefore, self-installation is possible if:
- The part is made of soft, easily processed material. For example, wood or laminated chipboard.
- The installation technology is completely clear.
- There are the necessary tools, consumables and fasteners.
- There are certain skills in using tools and assembling furniture.
Having decided to install it yourself, you must clearly assess the risk of damaging the countertop. It may be cheaper and easier to turn to professional furniture assemblers.
Content
Pitfalls of self-installation
Installing countertops in the kitchen: important points
How to install a countertop in the kitchen with your own hands: step-by-step instructions
Step 1. Preparatory work
Step 2. Joining fragments
Step 3. Installation of the canvas
Self-assembly of kitchen furniture is becoming increasingly popular. This is beneficial and practical, since it becomes possible to adjust the parts as accurately as possible to the size of the room. You need to choose a ready-made project or create your own and order cutting of the necessary elements. The main difficulty lies in careful and correct assembly. Let's look at how to properly install a countertop in the kitchen with your own hands.
When to use the services of professionals
It is better to order installation if:
- You are purchasing an expensive part. In this case, the cost of error will be very high.
- There is no special tool or skill to use it to perform installation. For example, for cutting a hole in a part made of natural or artificial stone for a sink.
- The installation technology is unknown or unclear.
- Installation services are already included in the price of the product.
What material should I choose for the tabletop?
To make this part of the kitchen set, different materials are used:
- An artificial stone made from a mixture of acrylic and quartz. By painting the entire thickness of the slab, minor damage is less noticeable. A durable and smooth surface is formed, impervious to moisture or temperature changes, easy for everyday care. This option will last a long time, but installation is complicated due to the weight of the part and the complexity of its processing.
- Chipboard with laminated surface. Lowest cost option. It tolerates temperature changes well, is resistant to dirt and mechanical damage, and is lightweight. Chipboard countertops are painted in a wide range of shades to imitate a variety of surfaces. They are easy to restore or replace with your own hands. The main disadvantage is that they do not tolerate moisture entering through the unprotected ends of the slab.
- A plastic covering fixed on top of an MDF or chipboard board. This surface is easy to keep clean, it is resistant to scratches and abrasions, and is not afraid of water.
- A natural stone. Very expensive material. And heavy: not every kitchen set can withstand such a load. The hard, smooth surface is easy to clean, withstands temperature changes well, but can absorb grease and strong odors. Does not withstand shock loads well.
- Glass table top. Stylish and hygienic, but it bursts when the temperature changes, cannot be restored and cannot be installed independently.
- Solid natural wood. It looks great, but requires constant specific care: such a tabletop must be periodically polished and impregnated with oil. The surface is easy to scratch and does not tolerate excess moisture. Easily restored.
USEFUL INFORMATION: What wallpaper to put in the kitchen: designer tips, 23 photos
Installing countertops in the kitchen: important points
To ensure that the product fits correctly and lasts a long time, it is placed only on the fully assembled lower part of the kitchen set. All cabinets are mounted and installed in place. Then they are placed so that they are equal in height. This is very easy to do if you adjust the screw legs of the furniture. The correctness of the work done is checked at the building level.
The upper part of the cabinets should form a common plane located strictly horizontally. Once this result has been achieved, all the cabinets are collected into a common block. To do this, they are tightened with special fasteners. Holes are drilled in the walls of the products through which the ties pass. There must be at least two such connections for every square meter. The base for the table top must be perfectly flat. To level out even the smallest differences, it is worth covering the ends of the cabinets with vinyl sealing tape.
Instagram kukhni_mechty_spb
Before installing the countertop, it is necessary to level the lower cabinets and level them
Another important point is the choice of the type of apron for the kitchen. It may be different and this will have to be taken into account when working. The protective coating can be solid, that is, located from the ceiling to the floor. Most often, in this case, ceramic tiles are chosen. You need to be prepared for certain difficulties with the design of the joint. The base should fit as tightly as possible to the wall, so most likely it will need to be trimmed.
This is necessary if:
- the wall is “piled up” back;
- the tile has a pronounced relief surface;
- The cladding is glued unevenly.
In any case, you will need to process the end of the slab so that it follows the shape of the wall. It is best to do this using a belt sander. This way you can avoid chipping.
You will have to act somewhat differently if you choose an apron that covers only the space between the upper and lower tier of the headset. Most likely, no pruning will be required here. In any case, it is recommended to secure the base. The easiest way to do this is with corner-type brackets. If this is neglected, over time the unfixed product may sag and a crack will appear. Even if there is a plinth on top, it will not cover it. The defect will become clearly visible.
Instagram sborkamlyginini
Before installing the countertop, you need to decide on the type of kitchen apron.
- Decoration Materials
Laying boar tiles on a kitchen apron: installation rules and bright design ideas
Color selection
The color of the countertop you buy should fit into the interior of the kitchen:
- Bright colors will tire your eyes when cooking. Such a detail will attract unnecessary attention.
- For a room made in a classic style, dark colors are suitable. But on a dark surface, especially a glossy one, any dirt will be clearly visible.
- Pastel or beige tones, especially with small pockmarked patterns, are optimal for the kitchen. Damage and minor dirt are not so noticeable on them.
- For a high-tech style, a tabletop in white or with a metal surface is suitable.
When to change
Replacing a kitchen countertop
can be carried out both due to its wear and tear, and to update the interior of the room.
Updating the countertop is inevitable in the following cases:
- it is necessary to replace a part damaged or deformed during use;
- installation of a higher quality cooking surface is required;
- you need to update the design in accordance with the new kitchen interior;
- it is necessary to add a bright accent;
- a cooking area should be allocated.
Do not forget that using the turnkey countertop replacement
from Stolehof, you will receive an updated, modern, high-quality countertop at a price lower than the cost of a new set.
Dimensions
It is more profitable to order a single countertop that combines all the elements of the kitchen set. You will get a comfortable, flat surface without joints into which moisture, crumbs and other debris can get. The only difficulty that needs to be taken into account is transporting the product and bringing it into the kitchen.
The width of the tabletop should slightly overhang the cabinets in front and behind. This will allow you to safely place pipes and communications behind the kitchen unit. The front canopy will protect the ends of the furniture from moisture and debris from entering from above, and will reduce the risk of getting caught on handles and cabinet doors during active use.
The thicker the plate of the product, the stronger it is. But you should take into account the dimensions of the built-in sink or hob, and the height of the gas stove.
When installing it yourself, it’s better to play it safe and take the dimensions with a small margin: it’s easy to trim the part, but it’s unlikely to be possible to increase it.
Tabletop installation
The procedure for installing a new countertop also has a number of features, without knowledge of which a new countertop, even of good quality, can quickly fail. So, when receiving a finished kitchen countertop, the first thing you need to do is treat the cuts and cut open edges with silicone sealant (or mastic) so that moisture does not get inside and the coating does not deteriorate. This procedure is necessary for any of the possible installations of countertops. The sealant dries quickly, which means that all work can be done quite quickly. The installation sequence will look like this: • treating with sealant the places where metal joining and end strips are used; • installation of the countertop in a new place; • correct joining of all parts so that all tabletop modules fall into place; • fixation with fasteners; • if sealant protrudes on the surface when joining countertops, planks or installing a sink, it must be removed immediately and the area must be wiped with a dry rag; • at the junction of the apron and countertop and under the wall plinth, it is also better to use sealant to minimize the ingress of moisture between them. If the tabletop is adjusted directly on the spot, then markings are applied to its surface, according to which the necessary elements are cut out. If the procedure will be done using a saw with teeth that grip upwards, then you need to mark on the back side of the tabletop. If the jigsaw file has teeth pointing downwards, then the front side is marked, although with a professional jigsaw and when using expensive files, markings can be made from any convenient side. In options with cheap countertops, in order to minimize the appearance of chips during cutting, you can use paper masking tape, which is glued along the cut line. If there are significant irregularities, they are eliminated using sandpaper. If the countertop consists of several parts, then its parts are connected to each other using a joining strip, which closes the joint, and a sealant coating under the strip protects it from moisture. In the place where the slats, hob and sink are pressed, it is necessary to clean the surface, removing excess sealant. If all the points were completed correctly, then the installation of the updated kitchen countertop will be successful.
Advice from professional installers
To ensure that the process of replacing a countertop with a new one is correct, you should avoid two main mistakes: 1. purchasing a used countertop, even if it is in perfect condition; 2. buying a very expensive countertop and trying to cut out all the necessary holes for the stove and sink yourself. In any case, old countertops already have scratches, shrinkage on modules in another room and other nuances that are not always visible at first glance. Such a countertop will fail much faster than even the most budget version of a new countertop purchased at a hardware store. Cutting holes in expensive countertops yourself can result in their damage, for which no one will return the money. In this case, it is better to order the manufacture and installation of countertops according to your measurements and drawings from professionals. Correctly selected worktop material and proper installation will make it possible to obtain a kitchen set that will have an attractive appearance for quite a long time and will become a convenient place for preparing any dishes. Replacing an old countertop with a new one is not too difficult, but before starting work it is better to read the recommendations of specialists on this issue. Video lessons on kitchen installation will be very useful, in which you can clearly see all the stages of work and problematic issues that may arise during a kitchen renovation. Armed with knowledge, tools and helpers, you can replace the countertops and make the kitchen the most beloved place for the whole family.
Preparing for replacement
Before starting dismantling:
- The water and gas supply is cut off. The electricity goes out.
- Hoses and pipes are removed, wires are removed.
- The contents of the cabinets are removed and the drawers are removed.
- The sink is detached from the countertop and the hob is removed.
Kitchen countertop replacement cost
| № | Tabletops | Qty | Price |
| 1 | Replacing a plastic tabletop (28 mm.) | 1 m.p. | 3500 rub. |
| 2 | Replacing a plastic tabletop (38 mm.) | 1 m.p. | 4250 rub. |
| 3 | Replacing a plastic tabletop (angle 800/800) | 1 PC. | 2500 rub. |
| 4 | Replacing the countertop | 1 PC. | 75rub |
| 5 | Replacement of wall panel (4 mm.) | 1 m.p. | 1200 rub. |
We strongly recommend that you check the cost of services and materials with our managers.
Set of necessary tools and materials
To replace you will need:
- Fastening elements (included in the package or purchased independently).
- Moisture-resistant sealant for countertops made of chipboard.
- For a stone countertop - sealing adhesive.
- For marking - marker or construction pencil, tape measure, square, pattern.
- Electric jigsaw with a set of files.
- Drill and screwdriver with necessary drills and bits.
- Putty knife.
Covering with decorative tiles
This method is suitable for updating products made from any materials. And this is also how the restoration of tabletops made of wood, plastic, chipboard or fiberboard is carried out. You can choose regular ceramic tiles or mosaics (using the second option has more possibilities). When choosing a color scheme, you need to take into account the color of the apron, which is located directly above the countertop.
You can make your design more original by using tiles of different sizes and shapes.
Before updating the kitchen countertop with your own hands, you need to prepare the following materials and tools:
- directly tile according to the chosen design;
- glue;
- grout.
After preparing the necessary tools and materials, you can start working:
- Clean the surface, degrease and dry.
- Apply glue to the countertop and directly to the ceramics.
- Place the tiles on the surface.
- Leave until completely dry.
- Now you can sand the seams. Apply the grout with a spatula, and then remove the remaining residue with a damp cloth.
Replacing the countertop
- Carefully, trying not to damage the cabinets, remove the old countertop. Craftsmen advise saving the fasteners and the old stove: they will be useful for various household needs.
- Using a building level, level the kitchen cabinets. If necessary, tighten connections. Clean the mounting area from old sealant.
- All open ends of the new part are treated with moisture-resistant sealant. It dries quickly, so the operation must be done quickly.
- Make careful markings. When using a hacksaw for fitting, a line is drawn on the front side, and if a jigsaw is used, on the inner surface.
- You can protect the laminated layer from chipping by gluing a strip of masking tape along the cut line.
- Large irregularities are removed using a fine file or sanding paper.
- If the countertop is prefabricated, then degrease and treat the joints with sealant. After installation they are sanded. Such a connection will be almost imperceptible.
- Secure the plate using fasteners. The cracks and gaps are filled with sealant or sealant.
- A melamine film is glued to the end of the chipboard product using an iron. It is better to use a metal baseboard near the stove. It is more resistant to heat and will not peel off.
USEFUL INFORMATION: Sewage pump: forced sewerage in an apartment
How we replace countertops in Moscow and the Moscow region
As a rule, after a client contacts us and orders the production of a countertop, we complete the order within 1 week or within the timeframe agreed with the customer. As soon as we deliver the countertop to you, our craftsmen will begin work, namely: - dismantle the old countertop, having previously disconnected the stove, hob, washing machine, oven. – a new countertop made to individual sizes will be installed; – household appliances will be returned to their place, and decorative elements (plinths) will be installed. Our craftsmen work carefully, removing construction debris after themselves. To order a high-quality countertop in Moscow and the Moscow region, use the services of our company by calling us by phone or leaving a request for a call back on our website.
Installation of sink, hob, baseboard
In a countertop made of hard materials, it is not recommended to make a cutout for a sink or hob yourself. This requires special skill and tools.
It is not advisable to use an old slab for marking: the holes in it may increase during use.
- A sink or hob is applied to the stove and outlined.
- The cutting line is shifted 1.5 cm inside the contour. It’s better to make the hole a little smaller: you can always expand it.
- Several holes are drilled to insert the electric jigsaw blade into them.
- A hole is cut out using the markings taped with masking tape. It is better to support the piece being cut from below so that the slab does not break off.
- The inner edge of the resulting hole and the surface covered by the sink are treated with sealant.
- The sink is secured and the hob is connected according to the instructions.
- The connection between the tabletop and the wall is covered with a decorative plinth.
- A faucet is installed on the sink and a sewerage system is connected.
How to replace the façade and countertops
Now many companies offer their services for replacing countertops, facades and other elements of kitchen furniture. Experts say that such work can be done independently , if you know how to carry out such work step by step, and also have all the necessary tools.
Over time, many housewives begin to think about updating the countertop, facade or kitchen apron. Currently, this service is quite popular. How do you replace the countertop and other elements of the set?
The entire replacement process comes down to several stages:
- You need to choose a company and call surveyors to your home.
- Selecting the parameters of a new product - shape, color and type of coating.
- Concluding a contract for replacement work.
- Dismantle the old countertop if it cannot be restored.
- Installation of the product.
After choosing the material and all the parameters of the countertop, the craftsmen make it. When it is ready, the craftsmen dismantle the old product . They disconnect it from the hob, sink, turn off the water supply, oven and other appliances connected to the countertop.
Installation of the new product is carried out in the same place , adjusting it to the dimensions of the main structure, with cutouts and sealing of the ends for the hob and sink in place. After installing the countertop, the craftsmen connect all the appliances and water supply. During the installation process, craftsmen use auxiliary elements:
- corners;
- connecting strips;
- self-tapping screws;
- skirting boards.
In addition to replacing the countertop, specialists replace the wall panel (apron). After completing all work, they check the connection of all communications.
Self-replacement
You can do the work of replacing the countertop yourself. At first glance, the process seems simple to remove the old work surface and install it in its original place. In fact, such work is very painstaking and requires not only theoretical knowledge, but also practical skills .
It is more difficult for a non-professional to choose the necessary tool, material, and accessories. You also need to know the features of the material and how to work with it. If something is done incorrectly, then such a mistake will be costly and, in the end, replacing the countertop will cost a decent amount.
If your attempt is unsuccessful, you will have to turn to specialists, so you should not save money, but it is better to immediately entrust your kitchen to professionals . They will complete the work quickly and efficiently, having extensive experience in working with different materials.
Materials for kitchen facades
Changing completely kitchen furniture is unprofitable financially and takes a long time. There is an alternative to such a replacement - updating the facade of the kitchen unit. What materials can a renewed façade be made from now? The most popular options are offered:
- Chipboard is the most economical option.
- MDF - its qualities are very similar to natural wood, it looks beautiful and lasts a long time.
- Solid wood is reliable and environmentally friendly, looks stylish and noble.
- Aluminum profile - looks stylish and modern.
- Glass will decorate a kitchen of any style and add a special chic to the furniture.
- Artificial and natural stone is reliable, durable, and goes well with different styles.
If the internal fittings, drawers, cabinets, moving mechanisms are fully functional, there is no need to rush to change the furniture. It is enough to simply update the façade of the furniture and it will again become like new, but brighter and more modern.
Advice from professionals
- Do not purchase used items. Even if they are in good condition, the service life of such a part will be significantly less. And soon it will need to be replaced.
- Do not cut holes for sinks in expensive countertops yourself. The risk of making a mistake is too great, and it is almost impossible to correct the mistakes made. It's better to leave it to the professionals.
- Be careful when transporting the part. There are frequent cases of damage to the surface or even fracture of the slab during delivery to its destination.