Technical properties of the material
Epoxy resins are a chemical composition based on oligomers that can, upon contact with hardeners (polymerizing components), transform into especially strong polymers. By changing different percentages of the two components, it is possible to create materials with different technical characteristics.
More hardener - the resins are hard. Less, the resin will be liquid. Mix both components in equal quantities, the material will become rubber-like in consistency. An excess of hardener, as well as a lack of it, helps reduce the resistance of the finished product to water and sunlight. Its strength also decreases.
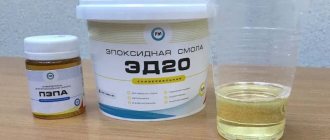
Epoxy resin and hardener Source d.allegroimg.com
Experienced craftsmen have long ago developed the ideal ratio of the initial components: 1x1 or 1x2. When manufactured in this way, the synthetic composition gives minimal shrinkage, which has a positive effect on the final result.
Compared to standard structures made of wood, products made of epoxy resin have special advantages. They:
- waterproof;
- are not subject to abrasive effects;
- have a non-standard, unique appearance.
Using the material, you can experiment endlessly and create completely different products each time, not similar to each other. Exclusivity is the main feature that any table with epoxy resin has. Unlimited possibilities for implementing design solutions are also supported by the fact that during the manufacturing process you can use not only natural wood, but also add paints with a phosphorescent effect, use rubber, and corks left over from wine bottles.
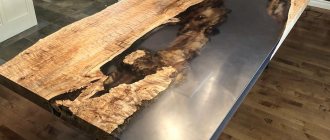
Each table made of resin and wood is an exclusive piece of furniture Source i.pinimg.com
Each countertop made of epoxy resin will be exclusive, but making it yourself will not be cheap. This is the only drawback of products of this kind. It takes several tens of liters of resin to make one table. And only an experienced master knows where and how you can save a little.
Properties of epoxy resin
Epoxy resin is a synthetic oligomer material. It is not used in its pure form. To obtain a solid fragment, the resin must be polymerized using a hardener. Different proportions of components make it possible to create materials with different physical and mechanical properties. The resin has the following qualities:
- strength and resistance to chemicals;
- no unpleasant odor when working with epoxy;
- the polymerization process occurs at temperatures from -15 to + 80 degrees;
- slight shrinkage after hardening of the material, its stable structure;
- poor moisture permeability;
- high resistance to mechanical damage and abrasive wear;
- no need for expensive care.
When using additional protective components, such a table becomes immune to direct sunlight.
The resin also has some disadvantages: when exposed to high temperatures, it can release harmful substances. To work with the substance, you must have certain skills and fully comply with the application technology. Such material has a high cost.
Durable and chemical resistant
No unpleasant odor when working with epoxy
Minor shrinkage after hardening of the material
Weak moisture permeability
High resistance to mechanical damage and abrasive wear
No need for expensive maintenance
Manufacturing technology
Making your own table from epoxy resin and wood is not difficult if you have the skills of a carpenter. The manufacturing algorithm is extremely simple. It begins with the preparation of a wooden blank.
- It is necessary to select wood with a thickness of at least 2-3 cm and sand its surface with sandpaper. The smaller the grain size, the better the surface of the wood will be closed for resin to seep through. In this way, it will be possible to reduce the consumption of the second material and preserve the natural grain of the wood. When using high-grit sandpaper (60-80), the tone of the base will be darker and the resin consumption will increase.
Polishing the countertop before applying resin Source stroy-podskazka.ru
- Then the piece of wood needs to be blown with a stream of compressed air (when you don’t have special equipment at hand, you can replace it with a soft brush). The procedure allows you to remove dust and sawdust after sanding.
- After preparation, it is important to let the wood dry thoroughly. To do this, craftsmen place it in the sun for 48 hours (in winter, it is better to place the workpiece next to a heating radiator).
Now everything is ready to create the product itself. Next we proceed as follows. We are preparing a wooden frame for the tabletop. It will serve as support and protection for the top of the new table. We knock it together from available materials: there is no need to try too hard; after the process of filling the wood with resin is completed, it will be removed and disassembled.
Frame for pouring epoxy resin Source ru-smola.com
See also: Catalog of projects of houses with a porch
Place the frame on a flat base. Next, we take a plastic film, place it inside the knocked down frame, cover the sides of the support with it (the resin does not stick to the film, so its remains can be easily removed after it has completely hardened). It is important at this stage to make sure that the film is not damaged, there are no tears or creases.
The next stage is to place a wooden blank inside the frame and arrange it the way you like best. Mix a small amount of resin with hardener in the required proportions, prepare a small amount of fill (about 300 grams). This will be enough to lubricate the tree on all sides.
First, you need to put rubber gloves on your hands, and then completely saturate all parts of the wood, all its protrusions, seals, and potholes with the prepared solution. This is necessary so that later, when the workpiece is immersed in the resin, air bubbles do not form. The treated elements are left inside the frame for eight hours. This time is enough for the impregnation layer to completely harden.
Pouring a countertop with resin Source remont-book.com
At its confluence, epoxy resin is prepared to fill the base layer. For this, take a large container. It mixes the base material and hardener in the required proportions. Afterwards the mixture is left for fifteen minutes. During this time, it will “rest” and become completely ready for further use.
The finished resin is poured evenly into the frame. It is distributed by gravity inside the mold in an even layer. If after this there are air bubbles left in the filling structure, they can be removed by heating it with a hairdryer. When exposed to heat, the bubbles burst easily. After 24 hours, the frame can be removed from the table. Within another seven days, the material gains its strength. After this, the product can be used for its intended purpose.
Note! Polyethylene film is not able to provide effective tension, so after its removal, defects in the form of unevenness, sagging or folds often remain on the surface of a new tabletop. You shouldn't get upset about this. At the final stage, you can level everything using a grinder or sandpaper. After treatment, the surface loses its transparency, but it can be easily restored by applying a thin layer of resin with a brush.
The finished product looks great Source cdn.materialdistrict.com
See also: Catalog of companies that specialize in the design and construction of small architectural forms
To prevent such defects in production, special forms made of plexiglass are used. They are sold in specialized stores and are not cheap, but their use can significantly reduce the complexity of the manufacturing process, and furniture made from epoxy resin is of higher quality.
How to make a table?
To make money by making unusual tables, it is worth understanding what the technology of their production consists of. To make a table from wood and epoxy resin you will need a base.
The manufacturing process includes the following steps:
- You can use a piece of wood or plywood as a base. In the latter case, the product can be given any shape. The future tabletop can be round or oval.
- To ensure that the fill remains on the surface, sides should be attached to the base. They may be plastic.
- The base must be dry and clean. Then you need to lay out the design blanks on the surface.
- Then the table is filled with epoxy resin. If the thickness of the countertop is no more than 0.5 cm, then the liquid mass is poured immediately.
- If the thickness is greater, then filling is carried out in several stages.
- After pouring the first layer, you need to wait two days. Then the procedure is repeated.
If bubbles appear during the process, they are dispersed with a hot hairdryer. To avoid bubbles, each workpiece must be treated with resin. After the layers have hardened, the sides must be removed and the edges and surface sanded.
Epoxy resin can be used to renew old furniture. To do this, you need to clean the surface, remove the varnish, apply a layer of paint, and then fill it with resin. The complete polymerization process takes a week.
You can do a partial fill. Flaws in wood can be natural, that is, the surface is corroded by bark beetles and fungus. They can also be made artificially. When pouring the mixture, the holes on the back side can be sealed with mounting tape so that the resin does not leak out.
Material selection rules
The service life of the finished product depends on the quality of the materials used. Creating a finished masterpiece is serious, painstaking and costly work. It will be a shame if in a couple of weeks it becomes covered with scratches or quickly becomes cloudy. Experts do not advise saving money and purchasing products from trusted brands (“Bottega Maestra” or “EpoximaxX Decor”).
Their epoxy resin for countertop pouring works best. It is sold complete with a hardener, in a convenient plastic package weighing 8 kg. After preparation, such resins have a crystal clear color that does not fade when exposed to sunlight.
Epoxy resin “EpoximaxX Decor” Source dekoriko.ru
Useful tips
To make a high quality epoxy table, it is recommended to follow some rules:
- The resin hardens poorly in high humidity. Condensation may penetrate from the air. To prevent this unpleasant phenomenon, you can hang a film over the tabletop.
- The mixture will harden faster if the tabletop is placed on the radiator. You cannot heat from above, as the surface may become uneven.
- You need to prepare personal protective equipment - a respirator, goggles and gloves.
- Exposure to ultraviolet rays may cause the countertop to turn yellow.
- All horizontal surfaces in the “resin affected” area must be covered with polyethylene.
- If the bubbles do not come out well, it is recommended to warm the surface with a hair dryer or inject acetone from a spray bottle. These manipulations will reduce surface tension.
If you follow all the recommendations and follow the technology, you can quickly master the manufacture of original tables. At the same time, your favorite business can begin to generate income.
Options for combining resin and wood
In fact, the flight of fancy when choosing the design of a future countertop is unlimited. Today, two options for making products from resin and wood are very popular.
Some people prefer to cover the base with epoxy resin. You can add dyes to it and create very original surfaces. In this option, the resin will act as a coating that can reliably protect the tree from moisture. The method is often used to restore old products. If you introduce drops of water into the finished resin composition, they will not dissolve in it and will not disappear anywhere. After the resin hardens, drops of water will remain inside its texture and form an effect similar to a cosmic nebula or milky stains.
Table, resin, wood Source voyagechicago.com
Resin for countertops: how to choose?
There are certain requirements for resin for furniture:
- good fluidity and low viscosity for an even coating and good adhesion to other materials (thicker compositions are recommended for jewelry);
- high transparency.
For countertops you can purchase the following products:
"Art-Eco"
Resin is also used for layering. The composition already includes a coloring pigment, the color palette is quite wide. The disadvantage of the product is possible yellowing during use.
EpoxyMaster
Epoxy is suitable for forming a layer up to 5 cm. The product has good fluidity and forms a smooth, even surface.
QTP-1130
The composition is designed for layer-by-layer pouring, which is ideal for a beginner. The maximum thickness of the product should not exceed 3 cm.
CHS Epoxy 520
It is used for making decor on wooden or metal tabletops, as well as for restoring wooden furniture.
Often craftsmen try to save on materials by buying budget brands of epoxy. But the savings are not justified. As a rule, cheap compounds turn yellow after drying, and the surface is not always perfectly smooth.
Features of care
The finished product will last much longer if it is periodically wiped with a soft cloth to remove dust and dirt. It is forbidden to rub the surface of hardened epoxy resin with alcohol solutions and acetone. Do not allow hairspray to splash on it.
Final polishing of the product Source alexia.by
The nuances of making tables at home
Before you start producing tables from epoxy and wood at home, you need to familiarize yourself with some of the intricacies of the process. It is important to decide on the choice of epoxy resin. These products must be transparent and have low viscosity. This will ensure excellent fluidity and dense filling even in hard-to-reach areas. Thanks to the transparency of the resin, different effects can be achieved:
- Pour in all kinds of decorative items - dry leaves, stones, pictures and shells.
- Organize original lighting.
- Tint the resin.
The room should be well ventilated. Forced ventilation can be created. The temperature should not exceed 22 degrees. Dust and high levels of humidity can ruin a slab and epoxy resin table.
For formwork you will also need certain material. The form or formwork is made of plexiglass, plastic or plywood. You will also need release agents, such as wax.
To mix epoxy resin you will need a special bowl, a stirring stick and two measuring containers. Before kneading, you need to study the instructions. The proportions of the components may vary depending on the manufacturer. First you need to measure out the resin, and then the special hardener. Then you need to wait until the resin reaches a suitable consistency. The liquid composition is suitable for filling all corners and depressions. The thick consistency is used as glue.
This is interesting:
Business idea: crafts made from cold porcelain.
How to sew a wigwam for children with your own hands?
Business idea: production of wicker furniture from wicker.
Briefly about the main thing
Even a person with no experience in carpentry can create an interesting piece of furniture. All you need is epoxy resin for the countertops and pieces of beautiful wood. If you strictly follow the instructions for preparing the casting material, do not forget about safety rules and strictly follow the manufacturing algorithm, you will easily be able to make a unique table that can last for decades. It will have excellent technical characteristics and decorative appearance.
Ratings 0
Working conditions
It is necessary to work with resin in a dry (very important!) and warm , well-ventilated room. High air humidity can have a critical effect on the surface of the finished product after hardening. It is highly recommended to use personal protective equipment when working with resin: respirator mask, gloves, safety glasses. We also recommend using work clothes - it is very easy to get dirty with resin, and it is almost impossible to wash it off the fabric.
We offer the following range of protective equipment:
- Not available
Rating 5.00 out of 5
Set of nitrile gloves
From 160 rub. More details
- Not available
Disposable polyethylene protective apronFrom 60 rub. More details
- Open safety glasses
180 rub. Add to cart
- Disposable polyethylene sleeves
From 75 rub. Choose …
- Respirator Jeta Safety J-SET 6500
2399 rub. Choose …
- Respirator Jeta Safety J-SET 5500
2299 rub. Choose …
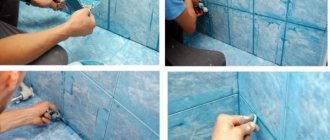
What will you need for polishing?
Polishing is carried out using polishing machines with special attachments.
and the use of
abrasive and polishing pastes
.
In our case we will use 3M paste
. The paste is applied directly to the discs and distributed evenly over the surface of the countertop.
Important!
Polish with light to medium pressure. As the paste dries, release the pressure. The rotation speed of the polishing machine is 1500-2500 rpm. It doesn’t matter what brand of paste you use, it is important to polish with circles of different hardness and be sure to remove dust and abrasive from the surface from the previous step.
Pastes for the final stage
Finally, the product is polished with a non-abrasive paste - polish
, the resin acquires a perfect mirror gloss and shine.
We recommend using the following brands of pastes:
3M (three “ums”), Koch H7, Koch H9, Runway (coarse abrasive, fine abrasive, polishing compounds), Menzerna AS30, Menzerna Heavy Cut compound 400.
Wood protection
The wood should be protected with oil or wax. We use beeswax
. Ideal for gilding and as a finishing coat. Wax can be applied with a brush or a piece of soft cloth. The material perfectly clogs all the pores of the wood and at the same time does not remain on the resin and is easily erased from it. You must wait a few minutes before polishing.
An alternative
for polishing is
a varnish coating
. Choose auto varnishes for coating: two-component polyurethane or acrylic-urethane varnishes. For example, Deltron d880/d841 or mipa CS90/ms25, coat 2-3 times through sanding the varnish.
For polishing you will need:
. We recommend that you read this article carefully
, because The video tutorial below does not fully disclose the nuances and subtleties of the topic:
Order a sample of epoxy resin for only 750 rubles! (300 gr)
Wood effect product
We will not consider the option of milling and removing wood from a decorative stump, which is then treated with epoxy in many layers. This is already for designers who have fully mastered the numerous tools.
Let's focus on a simpler shell shape - a thin-walled, simple geometric shape, that is, an oval, a circle, a rectangle with rounded corners.
To make a sink you will need the following materials:
- Polystyrene foam 8-10 mm thick – 5-6 sq. meters.
- Wall leveler “Volma” or building plaster – 5-6 kg.
- Small pine shavings after a wood router - 3-4 liters.
- Transparent epoxy resin of the "Art" class, ED-20 is possible - 5 kg.
- Hardener for epoxy resin - in the volume required according to the instructions.
- Scotch.
- Disposable tableware with a volume of 1.2 to 0.8 liters.
- Insulating wax Honey Wax 400-450 g.
The standard dimensions of countertops for sink cabinets are usually 800x600 mm. Based on these dimensions, we knock together a flat wooden box with sides 2-3 cm high, with the inner surface of the bottom well sanded.
Why do they take wood shavings after milling? They are thin, long spirals with a clear wood structure that will disperse well into the mass of epoxy resin. Any other wood waste from processing will produce a structure resembling particle board. However, if such a structure suits you, you can take pieces of chipboard (chipboard) instead of polystyrene foam. Glue these pieces together not with Volma, but, for example, with PVA. But then the processing process will become more labor-intensive and will require completely different, much more powerful tools.
Required Tools:
- Multi-speed grinder with rotating working part. It is important that it is not vibrational.
- Grinding wheels – abrasive and felt, with polishing paste.
- Sandpaper of varying degrees of grit.
- Disposable plastic spatulas.
- Paint brushes, also for one use.
- Thermal knife.
- Construction hair dryer.
A simple solution
All of the above difficulties dictate the need to somehow isolate the surface of epoxy products from contact with the environment, and the solution may be to use varnishes applied over the hardened epoxy surface. These varnishes are subject to certain requirements, failure to comply with which means dooming the product, if not to damage, then to deterioration in appearance and performance.
For all cases of using varnishes designed to protect the outer surface of jewelry or household items made from epoxy, it will be useful in advance, even during the casting of the products, to make several extra mini-castings (even if they are shapeless blots) to test the properties of certain ones on them varnishes
The fact is that these solvents can act differently on some epoxy compounds at the beginning or middle of the polymerization process and at a time when the process is already completed and the casting has acquired its final properties. In the latter case, these solvents included in the varnishes can no longer affect the ends of the frozen polymer chains in the plastic into which the epoxy resin combined with the hardener has turned.
Although the curing period at room temperature is usually indicated up to 48 hours, in the case of further coating of products with polyurethane or polyester varnish, such coating should be done no earlier than 2 weeks after casting the products. Only in this case will the process of final formation of polymer chains in the resin under the influence of the hardener be completely completed, and the varnish solvent will not be able to damage anything at the ends of these chains.
What types of paint coatings are there?
Let's consider possible options for their use in our case.
But no matter what type of protective coating is chosen, when applying it you need to follow the recommendations of the manufacturers of epoxy compounds, where cases of incompatibility of a particular varnish or dye are usually described in detail.
Which coating to choose for epoxy products, most often the same base that is used for castings is at hand, but with the addition of solvents. You just need to make sure that the ratio of the resin and the solvent added to the resin to make it thinner is no more than 1 part solvent to 12-15 parts resin. If there is more solvent, the varnish obtained in this way will not have sufficient mechanical strength, especially in terms of protection against scratches. Although in general it will hold securely, without peeling off in the form of scales.
If you prepare an epoxy varnish coating yourself, then you must also remember that the hardener is introduced into the resin only after the resin is diluted with a solvent, and not vice versa.
If the epoxy resin casting has already been coated with polyester or polyurethane varnish, applying an epoxy protective compound to it will hopelessly ruin the thing. Polyesters and polyurethanes can be applied over epoxy. On the contrary, in no case is it possible. In this case, a jelly-like boundary layer is formed between them, which will never harden.
Since ED-20 and ED-22 resin usually has a high cost, a cheaper one, for example, ED-16, can be used to make varnish. True, it is much thicker than resins with a higher numerical index, but when diluted with organic solvents it still becomes more liquid.
Yes, and density can play a positive role if rounded products are coated, from which a thick layer of liquid varnish will inevitably drain. In such cases, they make two or three layers of film over the finished products, each time waiting for the previous one to harden for 2-3 days, but this only applies to epoxy varnishes. If polyester ones are used, the rate of complete evaporation of the soluble component may be longer.
Source