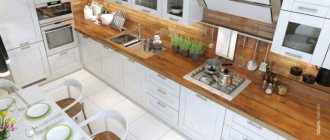
Choosing a countertop is one of the most important issues when arranging a kitchen, which must be resolved first of all. After all, this is a work area. It is noteworthy that every day she is subjected to many tests of strength. For example, hot dishes, cutting food, splashes of boiling water, fat, spilled liquids... That is, the main part of the load falls on the work surface.
And in this article we will tell you in detail how to cover a wooden tabletop so that it retains its original appearance and performance characteristics for as long as possible.
Wood is the material preferred by most. Why? Because this option is the most environmentally friendly and aesthetically pleasing of all available on the market.
Don't plan to spend money on a kitchen top made of natural wood, but want a high-quality and environmentally friendly product? Pay attention to the product line from the Kedr brand.
A catalog of more than 180 decors will allow you to choose the appropriate option for any interior concept. It contains products that are indistinguishable in appearance from real wood. And the E1 emission class guarantees the environmental safety of the material under any operating conditions.
Tabletop Cedar 7053/FL* Taxus
Advantages of wooden work surfaces
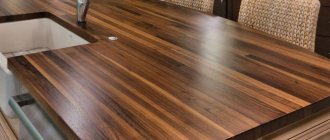
The countertop is something that is always visible in the kitchen. Of course, the beauty, durability and service life of the entire headset depend on its quality. It’s easy to guess that this is why customers of luxury kitchens, first of all, pay attention to wooden countertops.
Photo from source: ivd.ru
Table top Cedar 2075/FL Oak Kera
Wood is nobility, sophistication and environmental friendliness. Therefore, it has always been in great demand despite the impressive price tag.
Also, the advantages of solid surfaces include:
· safety both during operation and during disposal;
· amazing appearance of natural wood texture;
· pleasant and warm to the touch;
· the ability to give various shapes, that is, there are no restrictions in design;
· always remain in trend;
· possibility of use in any interior concept, that is, in all styles from classic to high-tech.
Safety precautions when working with varnish
Despite the fact that it would seem that there may be threats with the usual coating of a surface with varnish, they still exist.
Let's study the basic rules that need to be followed:
- Protect the skin of your hands and face - such substances contain many chemical elements. When spraying varnish, a lot of toxic substances are released into the room. In case of contact with human skin, there is a risk of burns.
- Use a respirator - toxic substances can enter the respiratory tract, which can also cause irreversible harm to a person.
- Wear glasses - if chemical residues get on the mucous membrane of your eyes, they can cause a burn.
If paint and varnish material does end up somewhere, follow the following instructions:
- Rinse the splashed area. If you find deep damage, immediately seek medical help from specialists.
- If you inhale a toxic substance, you must immediately leave the room for fresh air and try to cough. Be sure to rinse your nose.
If you start to feel unwell or experience pain in the lungs, dizziness and lack of oxygen, immediately call an ambulance and seek help from specialists.
Types of wooden countertops
The durability of products made from solid wood directly depends on the production method and the type of wood.
The hardest, and therefore most expensive, species are beech and oak.
Photo from source: fotostrana.ru
Table top Cedar 3829/Nw Bunratti Oak
Products made from birch, ash, walnut, and pine will be cheaper.
Table top Cedar 8215/12D Pine bourbon
Larch is especially preferred by manufacturers due to its durability. It is very resistant to stress and damage, has a dense structure, and contains gum - a natural antiseptic that will prevent, for example, wood from rotting, as well as the formation of fungus and mold.
Remember that products made from solid wood may warp over time. Glued laminated wood is assembled from several plates. It is extremely elastic, flexible, and resistant to moisture and sudden temperature changes.
Manufacturing process: step-by-step instructions
Procedure:
- Draw the details on paper according to the dimensions indicated on the diagram.
- Transfer the paper pattern onto thick cardboard. Cut out the details.
- Lay out the cardboard templates on a sheet of plywood and trace them with a pencil.
- Apply masking tape tightly to the drawn lines.
- Using a jigsaw, carefully cut out the plywood pieces along the tape line. The tape will protect the cut edge from damage.
- Sand all cuts (especially joints of parts) with a grinding machine or sandpaper.
- Mark the edges of the tabletop in a round or oval shape.
- Draw with a pencil, cover with tape and cut off the corners with a jigsaw.
- Sand the edges and surface of the tabletop.
- Cut out the stiffening bar and table legs.
- Use a pencil to mark the fasteners.
- Drill holes for fasteners with a drill with a diameter smaller than that of self-tapping screws. Then process the top of the holes with a drill whose diameter is larger.
- Connect the tabletop, legs and side inserts with self-tapping screws. The parts must fit tightly. Place plugs on the heads of the self-tapping screws.
- Cover the assembled table with stain. After drying, give the product its final look using varnish or paint.
More details in the video below.
Tabletop requirements
When thinking about how to cover a wooden kitchen countertop, keep two things in mind.
Firstly, it's durability.
Secondly, practicality.
These are the two main requirements for a kitchen top.
ALSO GOOD WOODEN TABLETOPS SHOULD:
· do not react to aggressive household chemicals;
· do not fade in the sun, do not change its color;
· have water-repellent properties;
· blend harmoniously with the overall design style;
· be heat-resistant so that hot dishes do not leave marks or damage;
· have a coating that is easy to clean - due to the fact that bacteria and microbes accumulate in the recesses of loose surfaces.
Caring for the countertop surface
It is worth understanding that no matter what material you cover the wooden countertop with, you do not need to cook dishes directly on it - use a cutting board.
Here are some tips to help increase the life of your countertop:
- Use trivets for freshly prepared food. This way you won't see unwanted marks on the surface;
- heating electrical equipment - kettle, toaster, coffee machine - must be placed on a substrate;
- wipe the tabletop along the pattern, that is, along the lines of the fibers - this will definitely remove dirt and grains of sand;
- Do not leave spilled drinks or other liquids on the countertop for a long time. It’s better to clean everything up at once;
- if the windows face the sunny side, then it is better to curtain them with at least translucent fabric - wood fades easily;
- it is necessary to maintain a normal microclimate - the room should not be too dry or humid, otherwise it may affect the countertop. Sudden changes in temperature should also be avoided;
- The surface can be washed with dishwashing detergent. It is practical, fast and does not require large financial outlays;
- full processing can be done no more than once every year. Varnish coating generally once every two years;
- take care to insulate the bottom of the countertop if you have a dishwasher or sink near or under it.
Update
Over time, the countertop still loses its fresh appearance, even if you treat it with the utmost care. The advantage of the countertop is that it can be easily updated.
The operating principle is as follows:
- Clean the tabletop with a grinding machine or sandpaper;
- treat imperfections and defects with putty;
- apply paint with alkyd resin;
- If desired, the plane can be decorated, for example, by drawing something.
Film
Another way to update the appearance of a wooden tabletop is to use self-adhesive film. The advantage of the film is its unlimited number of designs - you can leave a wood pattern or choose an image of marble, stone, leather and even metal. Before gluing the film, it is necessary to clean the countertop and degrease it.
The film must first be measured - it is better to take a little extra. Gluing is done using a plastic scraper, leaving no lumps or folds.
Recovery
If a wooden countertop doesn’t look like new over time, but you don’t want to change its appearance much, then the wood can simply be restored - this is one of its main advantages.
The process is carried out as follows:
- Damaged areas are removed and cleaned;
- The outer part is dried and sanded;
- If there are large voids or dents, fill them with a mixture of sawdust and polyvinyl acetate glue - you can also use regular wood putty;
- Leave the area to be restored under pressure for 24 hours;
- Apply a silicone-based protectant;
- Oil or varnish.
If the damage is very minor, for example scratches, then you can fight it with folk remedies:
- strong black tea;
- walnut kernel;
- machine oil;
- vinegar with olive extract.
If the scratches are deep, it is better to sand them first with sandpaper and then grind them. You can restore shine and gloss with felt.
Combination with plastic
If the damage is very serious, then you can use plastic as a patch for the countertop. Nowadays it’s not difficult to choose the plastic that matches the design; you just need to visit a hardware store.
The damage itself on the countertop is smoothed out, and a “patch” is attached to the top using liquid nails. Glue is applied around the perimeter and in the center. For reliability, a press is placed on top.
Oil
Photo from source: master-kraski.ru
Oil impregnation is the optimal method for protecting solid wood products.
First of all, it helps the wood begin to repel water due to the formation of a barrier film that prevents the structure from getting wet.
Please note that such coverage will require periodic updating.
The compositions are available in different colors. Therefore, your decorative possibilities are almost limitless.
The base can be mineral, vegetable, synthetic. But, of course, industrial tung, citrus and linseed oils will provide the most reliable protection.
Divided into drying:
· partially - the wood is impregnated to deep layers. To remove the top layer, use a mechanical method;
· completely – does not wash off with water, forms a solid top layer.
It is better to apply oil compositions in at least two layers. Before applying a new one, the previous one must dry well.
Alternative options
A good alternative to varnish for a kitchen countertop is to impregnate the wood with vegetable oils. Typically, mixtures of tung, linseed, and citrus oils are used.
A good alternative to varnish for a kitchen countertop is to impregnate the wood with vegetable oils.
The main advantages of oil impregnation compared to varnishing:
Environmentally friendly. Oils do not contain harmful substances that are necessary for film formation.
Oils do not contain harmful substances that are necessary for film formation.
Ease of use. Small scratches here are practically not noticeable and do not spoil the appearance. In case of serious damage to the surface, the damaged part can be sanded and then coated with oil again. Moreover, you can do this yourself. When restoring a varnish coating, it is necessary to treat the entire surface completely.
Small scratches here are practically not noticeable and do not spoil the appearance. In case of serious damage to the surface, the damaged part can be sanded and then re-coated with oil.
Oil impregnation does not change color and does not look noticeable, preserving the natural appearance of the wood. Oils can dry completely or partially. In the first case, they form a durable film; in the second, they can be erased from the surface of the wood over time.
Oil impregnation does not change color and does not look noticeable, maintaining the natural appearance of the wood.
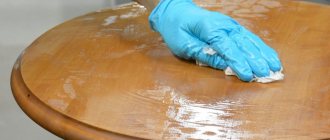
How to oil a wooden tabletop?
To ensure that your wooden work surface lasts as long as possible, treat it properly. Everything is important here - the product, the thoroughness of surface preparation, application, drying.
Photo from source: instagram.com
STEP 1: Primary surface treatment
The first stage is cleaning from traces of grease and various contaminants. After this, the wood is dried. To better absorb the oil, the material is sanded. Coarse abrasives are used first and then fine abrasives.
After each abrasive treatment, the wood is cleaned. If deep scratches appear on the kitchen top, they are repaired with putty. Wax-based restoration kits are best suited for this.
STEP 2: Prepare the product for application
Everything is simple here. To prepare the oil for use, stir it for five minutes immediately before applying.
Attention! Quality is the most important thing when choosing oil. Don't skimp on it. A good surface protectant will help avoid damage from moisture and mechanical stress, make the countertop shiny and refresh its appearance.
STEP 3: Apply
Apply the oil composition to the work surface with a cloth or brush.
Attention! Choose a fabric that does not leave lint.
Leave the first layer to dry for at least 12 hours. After this, it will be possible to apply the next one, and proceed similarly to the same principle.
The number of layers you will need is directly dependent on what you are using to apply the oil. For example, if you use a cloth, you will need to apply up to four layers, but if you use a brush, then only two.
Step 4: Dry
It may take from several hours to several days for complete drying, but nothing can be said for sure. However, information regarding the timing must be indicated on the packaging.
Oils with a natural base, as well as mixtures containing acrylic, take the longest to dry. After drying, it is important to wait and not use immediately.
Ways to protect your kitchen work surface
The work area of the room in which food is prepared is exposed to a variety of liquids, so in order for it to serve for a long time, it must be protected from water.
There are several options for this:
- Use oil to treat objects made of wood, which is absorbed into the material and prevents the fibers from swelling when wet. The following industrial products can be used for the wood surface: OSMO TopOil, Belinka, Adler Legno or others. To treat the area to be worked simultaneously with this substance or even instead of it, use specialized wax. But we must not forget that this product will have to be renewed over a certain period of time, in other words, applied again.
- Treat it a couple of times with a special varnish for wooden surfaces. If desired, a little pigment is added to it so that the deep wood fibers become darker, and the surface itself for cooking becomes more expressive.
Oil based coating for kitchen fittings
Oil protects furniture from exposure not only to moisture, but also from chemical, natural and household influences. This factory-made product is largely colorless and may be plant-based, mineral-based, or artificial.
Similar coatings differ from each other in the way they set:
- It dries completely, hardens after drying, it is not possible to wash it off with water and the initial appearance of the finished furniture is preserved for a very long time.
- Absolutely non-drying or half drying, it saturates the wood very deeply. It is made using natural elements. It is removed using the influence of mechanics.
Before applying such a product, the surface to be treated is thoroughly cleaned of all contamination and dried. If there is a need for paint that is already outdated or the varnish will have to be removed. And if there are flaws, then they need to be smoothed out with a specialized putty, and then polished with sanding tape.
The oil is applied using a brush or cloth that does not leave lint, it is applied along the entire length of the fibers. The very first layer should dry for twelve hours, after which a new layer is applied. The total number of them in a given composition depends on the method in which we apply the product itself. If a brush is used, two treatments will be done. And when using a rag, you need to do three or 4 layers. After complete absorption of the composition, the entire treated area should be thoroughly wiped with a soft and clean cloth.
The provided coverage has a number of positive parameters:
- Does not change the color of the surface for working with food, its “pattern” stands out.
- It leaves the first real exchange of moisture in the surface and prevents the formation of fungi, thanks to which the initial appearance of the finished area does not change for a long time.
- If very high temperatures are applied to the outer part of the object for such finishing, then the product does not delaminate and does not leak.
- Furniture oil is considered environmentally friendly, thanks to which the contact of food components with the surface on which the described composition is present will not harm human health.
- Oil hides small scratches, worn areas and stains left by cookware.
- If there is a need to refresh contaminated areas, then you can remove only part of this coating, and then apply it again to the necessary areas.
- The oil is perfect even for aged wood containing pores, since it is deeply absorbed, gives it plasticity and prevents it from drying out.
Wax
Wax is a natural, environmentally friendly material. But in addition to the water-repellent coating, it also creates protection against scratches and abrasions. Able to withstand common kitchen cleaning products.
Photo from source: ufa-les.ru
Attention! Wax thins out quite quickly, so you will have to polish and renew the coating more often than with oil. Before each update, the old layer will have to be cleared.
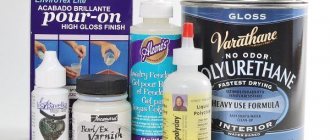
Varnish
Photo from source: kitchen-eco.ru
The varnish allows you to leave a beautiful natural wood pattern and gives a more saturated color. If you apply it in several layers, the varnish will prevent the kitchen top from deteriorating over time, will make its service life longer, protect it from the negative effects of moisture, and will prevent fungus, mold, and cracking due to sudden changes in temperature.
Tips for choosing varnish color
For beginning craftsmen, a very important question is what shade to choose varnish for a wooden table. The customer must also put an end to this issue. You can not disturb the natural texture of the wood or cover it in the color of cherry or walnut. But you don’t always get the result you expect. To prevent this, you should familiarize yourself with some features:
- Colorless varnish will not always preserve the original appearance of wood. Most often it gives the wooden surface a yellowish appearance. Therefore, if it is necessary to maintain the original shade, it is better to use polyurethane materials. They eliminate the appearance of yellowness.
- When visiting branded stores, sellers will provide a large assortment of colors to choose from. To get the color that you prefer, it is better to take a color that is 2-3 tones lighter. After all, the desired gloss on a wooden surface is formed only after applying 5 or 6 layers. With each subsequent layer, the shade will become darker.
- In the case when 2-3 layers are applied and the result is the desired surface color, but the required gloss is achieved, then this problem can be solved with the help of colorless varnish.
- Varnishing should begin only after high-quality sanding has been completed.
What varnish should I use on a wooden tabletop?
Photo from source: tiu.ru
It is recommended to use acrylic or polyurethane varnish. The area treated with them will withstand cold and hot dishes without any problems. It also creates reliable protection against contamination.
To remove the varnish coating, the surface will need to be scraped.
Varnishing process
It takes place in several stages:
REMOVAL OF OLD COATING
Clean the surface to “clean” wood. This can be done in three ways:
· chemical - a remover is used, which is applied with a roller or brush for ten minutes. The old layer of varnish is removed with a rag;
· mechanical – carried out using different-grained sandpapers or grinding machines;
· thermal cleaning - a hair dryer is used for this. After the top layer heats up and softens, it is removed with a rag.
REMOVING DUST FROM THE SURFACE
It is better to use a vacuum cleaner for this. At the same time, pay special attention to the corners of the table and other places where dirt could accumulate during the grinding process.
FILLING SCRATCHES
If there are scratches, fill them with putty. The best option is the one based on wax.
STAINING
Apply a small amount of stain. Do not allow streaks, drips, or unevenness to occur during work.
Staining is a wood processing process. It prevents mold and rotting of wood.
DRYING
Dry after application. Please note that the drying time of the varnish depends on its type, that is, it can range from 18 to 36 hours.
GRINDING
Do an intermediate sanding using sandpaper to remove any minor unevenness, if any.
Features of table decoration
When the paint is completely dry and hardened, it's time to start decorating. There are several techniques you can use at home. They are good because they do not require expensive investments and are easy to create at home. This is a great option for updating a child's room.
- Decoupage. For this technique you will need napkins with a beautiful pattern, brushes and PVA glue. Select the topmost layer of paper with a decorative element, attach it to the tabletop and apply glue on top with a brush. Make sure that the napkin does not tear, form air bubbles, or move from its original position. After the glue has completely dried, the decorative element is coated with transparent varnish.
- Tulle. Find a piece of tulle with a beautiful pattern. Wet the material, apply it to the table surface and fix it. Using spray paint or a brush, paint the tulle fabric evenly. After drying, remove the improvised stencil. It will look especially impressive if you use contrasting colors of the paint composition.
- Artificial aging of wood looks stylish in a home interior. To do this, sand the surface of the table with sandpaper and wipe certain areas with ammonia. When they darken, go through sandpaper again and varnish.
- Patination. This method produces beautiful, dark, vintage stains on a wooden surface. Apply the patina using stain or other suitable means, wait until it dries and remove unnecessary layers with a foam sponge.
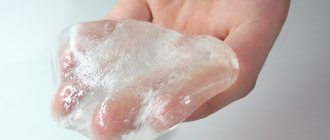
Liquid glass
Photo from source: derevoblog.ru
This is epoxy resin - a transparent polymer that contains sodium and potassium silicates.
Soda glass is the best choice for decorating a wooden tabletop.
ADVANTAGES OF COATING
· retains the original shade;
· will not peel off;
· will not crack, is resistant to wear;
· will not be damaged by spilling hot coffee;
· easy and simple care
Liquid glass is diluted with ordinary tap water. To make the coating look like real glass, the wood is cleaned and well sanded.
Liquid glass is diluted with ordinary tap water. To make the coating look like real glass, the wood is cleaned and well sanded.
The composition is applied in a spiral, leveled with a spatula towards the edges from the center. It is important to have time to give the desired shape before the liquid glass hardens.
Dye is added to create a colored coating.
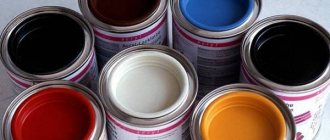
Which paint to choose?
The following types of paints are sold in stores:
- water-dispersed;
- oil;
- acrylic;
- alkyd;
- enamels for wooden surfaces.
You can paint wooden furniture using any of them. However, before purchasing, be sure to check the type of wood of the table so that the type of paint is chosen correctly. Then you will be able to do the job efficiently.
Water-dispersed
This type of paint is designed for furniture used in heated rooms. It contains no dangerous harmful substances. It is evenly distributed over the entire surface and dries quickly, so even an inexperienced painter can paint a wooden table. The paint creates a durable coating that is resistant to moisture. But it does not withstand mechanical stress when cleaning with abrasive particles. To avoid rapid wear and tear, it is better to wash such a table using a soft sponge.
Oily
The basis of oil paint is drying oil - a greasy agent, due to which the painted surface takes a long time to dry. Used for interior and exterior finishing of any wooden products. After application, a thin oily film remains, but after a short period of time it dries out and peels off.
This outdated type of painting work is used less and less, since modern enamels are more economical and wear-resistant.
Acrylic
After treatment with acrylic enamel, a beautiful glossy coating is formed on the surface, resistant to fading from the sun. The drying process does not require much time - a durable film appears within 15-60 minutes, depending on the conditions where the painting work is carried out. It is not harmed by mechanical impact, therefore, due to wear resistance, enamel outperforms other analogues.
Alkyd
If the table will be used outdoors, then it is better to opt for alkyd enamel. It has proven itself best when carrying out external work on finishing wooden surfaces. A rich color palette, glossy sheen and matte finish will allow you to get any desired result.
The paint withstands exposure to aggressive detergents, frost and direct sunlight. Available in the form of aerosol bottles and liquid. It should be taken into account that its strong smell can take a long time to disappear from the room.
Enamels for wooden surfaces
Using wood enamels allows you to repaint furniture to suit any color and taste. They allow you to protect surfaces from thermal and mechanical damage, which is especially important for countertops. Negative weather events do not harm them.
The main requirement when choosing enamel is that it matches the type of wood from which the table is made.
To increase the wear resistance of a table treated with enamel, after it has dried, the surface must be coated with waterproof varnish in at least 2 layers. This will give greater strength and extend the time until the next restoration.
Self-adhesive film
Of course, this is the easiest way to cover. Allows you to renew a kitchen top that has become old.
Photo from source: mebpilot.ru
Before you begin finishing, thoroughly clean the area to be treated with sandpaper. Achieve a perfectly smooth surface.
Attention! Clean thoroughly. Do not allow air bubbles to form under the film!
In stores you can find a huge assortment of self-adhesive films with a variety of designs - imitation stones, solid wood of any species, plain, with a pattern.
The surface with such a film is easy to clean from dirt and can serve for a long time without wear or fading.
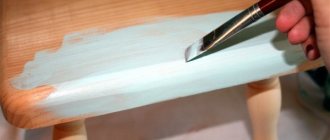
Surface preparation and painting
It is better to disassemble the table if you plan to paint all its parts. If only the countertop requires updating, then you don’t have to do this. You only need to cover with masking tape those areas that will remain untreated.
Preparing the surface for painting includes the following steps:
- Cover the floor with oilcloth or newspapers if you will be working indoors.
- Using a sander or sandpaper, carefully sand the desired area of wooden furniture. Remove any dust remaining after cleaning the table parts.
- Defective areas are leveled with putty or primer of the same color as the paint. Let the treated surface dry.
- Pour the paint into the tray and use a brush or roller to apply it to the parts, evenly distributing layer by layer until you achieve the desired effect.
- When using an aerosol, shake the bottle first. Apply paint from a distance of 30-50 centimeters from the tabletop and legs.
- Allow the previous coat to dry before applying a new coat.
To increase the wear resistance of the paint, you can apply an additional layer of acrylic varnish on top of it after drying. 10 hours after treatment, you can remove the masking tape.
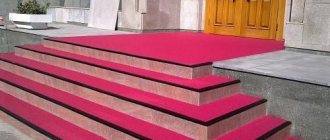
Soft glass
Photo from source: spkubani.club
You can cover it with oilcloth or a tablecloth, but they wear out very quickly.
An adequate alternative is transparent PVC film. It is also called soft glass. Withstands household chemicals, relatively high temperatures, is not saturated with water, and is not subject to deformation. No scratches left.
Excellent for surfaces made of wood, chipboard, MDF, glass, metal, artificial stone, agglomerate.
What is the best way to cover a wooden tabletop?
When choosing a covering, you need to rely on your desires, as well as the design of the room as a whole.
Photo from source: reciclaredecorar.com
Tabletop Cedar 3198/Mw Rhodes Wood
Do you work with wood yourself? Do you want to remodel an old countertop or create one yourself from scratch? Then choose formulations made from oil and wax. They will protect the array from moisture, scratches, and the negative effects of high temperatures. Varnishes are less popular at the moment.
Need a quick restoration of your work surface? An excellent option would be to use self-adhesive film, the color and design of which can be chosen so that the surface is in perfect harmony with the set and the interior as a whole.
If you want to experiment and create a masterpiece with your own hands, try liquid glass. It can be used not only to fill a tree, but also to add a herbarium, shells, sea pebbles, and branches to the composition.
Photo from source: art-build-msk.ru
Painting using a stencil
This method of updating a kitchen countertop with your own hands can be considered one of the most original and creative. In this way, even the most risky fantasies and wishes are realized. Another advantage can be considered low financial costs. The update itself is performed in the following sequence:
- The first step is to choose a design for the stencil. Ideas can be found on the Internet and then printed on paper.
- Now you need to transfer the design onto the stencil material. It can be thick cardboard or thin plastic. Choose a material so that you can cut the template with scissors.
- Prepare brushes of the required size, foam sponge and acrylic paints.
- Wash the countertop surface thoroughly and degrease.
- Now you need to cover it with the main color, which will be the background. You can proceed to the next stage only after this layer has dried.
- Using the prepared stencil and sponge, apply the selected design. The paint layer should be thin. This will prevent paint from flowing under the stencil and making the design blurry. If there is any doubt that you will be able to apply the pattern carefully with a sponge, you can do it with a brush.
If desired, this method can be safely combined with decoupage, but it is not recommended to do this to update the working surface.
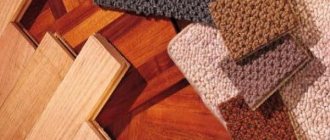
Can chipboard replace natural wood?
Chipboard (chipboard) is a composite material that contains chips mixed with resin. By far, this is the most popular material for making countertops.
If you don’t see the point of spending money on a kitchen top made of natural wood, but want an aesthetic product with good performance characteristics, pay attention to the following options:
Veneered chipboards
Photo from source: zakazat-mebel.ru
The surface is covered with veneer - a thin layer made from natural wood. A protective layer of varnish is applied on top.
Visually they do not differ from solid wood countertops. Disadvantages include an average level of resistance to chemicals and scratches.
Melamine cladding
Photo from source: sdelai-lestnicu.ru
In this case, the chipboard is finished with kraft paper, which is impregnated and coated with melamine resin. Resistant to solvents and moisture.
They can have any pattern, including the texture of natural wood.
Lamination with plastic
Covered with HPL plastic. It is resistant to UV rays, mechanical stress, moisture, food acids and any household chemicals. They are durable and easy to maintain. These are beautiful, varied products.
They give the greatest scope in terms of design. On the market you can find decors with very high-quality imitation wood or stone.
If you are looking for a high-quality countertop with an affordable price tag, then pay attention to chipboard with HPL lamination.
A photorealistic imitation of an array will please the eye, reliability and ease of maintenance will eliminate additional expenses and worries, and a high level of environmental friendliness will allow you not to worry about the health of your family.
It is these advantages that we have embodied in the “Cedar” line of countertops. Our task is to provide the client with a high-quality, aesthetic and durable product at an affordable price. Get more information on the official product resource.
Table top Cedar 690/P Indian wood
5. Will this countertop suit my design?
Wooden surfaces in the kitchen also offer wide design possibilities and are a current trend. Here's what designers think about it.
“The world is becoming more urbanized, and people are experiencing stress due to lack of communication with nature. Natural materials in the interior, such as wood, stone, clay, help modern people feel comfortable in the “concrete jungle,” comments Valentina Konstantinova, creative designer.
The designer gives examples of using wooden tabletops in “star” interiors: “Jake Gyllenhaal, the star of the movie Source Code, uses a wooden tabletop in a Provence-style interior. The kitchen backsplash is finished with small boar tiles, and the furniture is exactly like in the south of France: soft blue with a chamfer and retro handles.
Since wood is not a moisture-resistant material, the part of the countertop adjacent to the sink can be replaced with an artificial stone surface, as in Sarah Jessica Parker's kitchen. The wooden countertop fits perfectly into the modern urban interior of the actress’s kitchen, built on contrasts of textures and colors - white stone and dark brown wood.”
Designer of the interior studio LOFT & HOME Anastasia Yarysheva believes that you can find a place for wood in the kitchen in any style, it is only important to approach the matter correctly. “So, a tabletop made of solid wood with knots, uneven texture, and aging effects will suit a kitchen in a rustic or loft style. But smooth wooden surfaces will look great in modern interiors, high-tech, especially tinted in white, black or graphite - such a tabletop will combine effectively with chrome and glass surfaces. It’s worth paying attention to options made from laminated wood – perhaps even from different species: the rhythmic pattern of the elements can emphasize the beautiful geometry of the room.