After installing the drywall, a small indentation-seam appears between the sheets. It must be sealed to improve the functional and aesthetic properties of the structure. In our article we will learn how to cover drywall seams, what materials will be needed for this and how to carry out all the necessary work.
How to seal drywall seams
Why do you need to seal seams?
Even with the highest quality and correct installation, small seams will appear between the plasterboard boards. They will be visible to the eye, so they will spoil the appearance of the plasterboard structure. But seams need to be sealed not only for aesthetic, but also for functional reasons. If the finishing is not completed, this will be fraught with the following negative effects:
- The drywall base will be uneven. Wallpaper or facing materials will not stick well to it (all bulges and irregularities will be very noticeable).
- There is a risk of cracking the edges of the drywall. Under the influence of temperature, direct sunlight, and humidity, the edges may begin to deform, which will lead to cracking.
- Increased risk of mold formation. If there is high humidity in the room, pathogenic fungus can settle in the seams, which can lead to the formation of harmful mold.
Conditions of work
There are certain conditions under which the final result will only be positive.
- Firstly, it concerns the indoor temperature. It should be no lower than +10C. In this case, the duration of the temperature regime must be maintained throughout the entire period of this type of work. That is, temperature fluctuations are unacceptable.
- Secondly, drafts are prohibited. It is forbidden to open windows and doors when sealing drywall joints.
- Thirdly, there are certain restrictions that relate to humidity inside the room. Therefore, installation of drywall and sealing of its seams can only be done after pouring the floor screed, leveling the ceiling and other wet processes. The thing is that high humidity is the reason why the putty will not bond well to the drywall.
- Fourthly, the fastening of gypsum board sheets to a metal frame must be carried out in accordance with all the rules. Weak fastening is the reason for the sheet to peel off from the frame, which means a crack at the joint under any slightest load. Neither putty nor sickle tape will help.
Back to contents↑
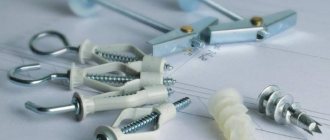
Sealing materials
Materials for sealing seams
Sealing seams can be done in various ways. The main materials are paper tape, self-adhesive sickle tape, putty, primer and plaster. Each material has its own characteristics and nuances, which the master needs to know about in advance. Below we will look at each of the materials in more detail.
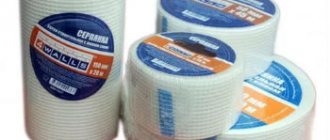
Paper tape
Paper tape
It is a long paper tape collected in small rolls. The tape usually has fiberglass inserts, which makes the material very durable and reliable. The length of the tape is usually 50-100 meters, and the width is 5 centimeters (although wider/longer materials are also available). Features of using paper tape:
- Paper tape is usually mounted on a layer of putty applied to the joint and edges of plasterboard boards. There is no need to apply glue separately, since the tape itself adheres to the putty.
- It is recommended to place the tape in the middle so that it covers the seam and both sheets of drywall. This will ensure high strength and reliable installation.
Note! In terms of technical properties, serpyanka is significantly superior to paper tape. Therefore, it is recommended to take the tape only if you have a very modest budget or if serpyanka is not available in the store.
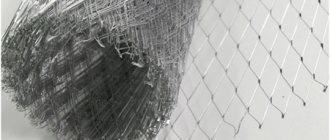
Self-adhesive serpyanka
Self-adhesive serpyanka
Serpyanka is a mesh material in the form of a long but narrow tape, which is also collected in small rolls. The width of the material is usually 5-10 centimeters, and the length is up to 50 meters (although larger rolls are also available). The serpyanka is made on the basis of durable fiberglass, which is very durable. The main feature of the material is the presence of an adhesive layer, which greatly simplifies installation.
Features of using self-adhesive serpyanka:
- An adhesive and a thin layer of paper are applied on top of the serpyanka - to use the serpyanka, you need to carefully remove the paper and bring the serpyanka to the drywall. Please note that at the time of installation the joint must be sealed with putty.
- Serpyanka is suitable for drywall with any edge. It can be used to seal not only seams, but also holes, chips, holes and many other defects on the surface of drywall. The material is universal, suitable for walls of any category.
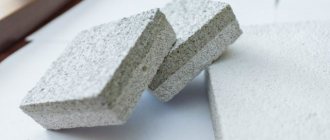
putty
Putty
Putty is a material that is used to directly seal joints. Typically, white gypsum-based mixtures are used as putty. Gypsum is easy to use, easy to store and transport, and to obtain a finishing mixture, you just need to dilute it with water according to the instructions. Features of using gypsum putty:
- As we said earlier, to use the putty, you need to dilute it with water according to the instructions and apply it to the joint using a spatula. The average hardening time for gypsum is 2-6 hours, depending on the brand.
- When choosing a putty, pay attention to its level of shrinkage. Ideally, the lower the shrinkage, the better. If you buy putty with high shrinkage, the material will have to be applied in several layers.
Primer
Primer Primer
is a liquid composition that is used for additional finishing of joints and seams. The primer is usually completely transparent, and no glue or any additional materials are needed to apply it (a brush will be enough). The primer is usually sold in large tanks of 15-20 liters, as well as small bottles of 1-2 liters (the first option is for industrial work, the second for home use).
Features of using the primer:
- The primer must be applied to the drywall before finishing work (before sealing the seam with plaster). In addition, the primer can be used at the final stage of work - it is applied over the entire surface of the plasterboard structure (including seams) before painting or wallpapering.
- The best option would be to purchase an acrylic-based primer. This composition is inexpensive, dries quickly, and has good technical properties. It is sold in the form of a liquid composition, which should be applied with a brush. The average drying time for the primer is 1 day.
Note! Some primers contain additives that reduce drying time to 4-8 hours. Therefore, read the instructions in advance - this way you can save time.
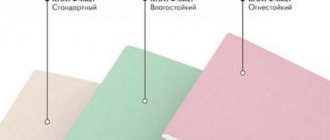
Plaster
Plaster
Plaster is a mixture for finishing a wall. Many people do not apply the finishing layer and completely in vain, since in this case the plasterboard structure may crack over time. In addition, plaster enhances adhesion between drywall and the outer coating, which will allow paint or wallpaper to last longer. Plaster is a cement-lime mixture, which is diluted with water and applied to the wall using a spatula.
Other features of using finishing plaster:
- The plaster is applied to completely dry putty , onto which a primer has been applied and paper/sickle tape has been attached. The plaster can be applied in several layers, and each new layer is applied after the previous one has completely dried.
- After applying the plaster, it is recommended to clean it with fine sandpaper . This will result in a smoother, uniform surface without unevenness. It is recommended to cover the top of the plasterboard structure together with putty-based joints with a layer of primer.
Causes
There are two types of reasons for the appearance of cracks: objective and subjective. The first category includes factors such as shrinkage of the house and the presence of constant influences in the form of vibrations and shocks.
The ceiling, unlike walls, is easier to protect from the influence of such causes, but this must be done at the stage of design and manufacture of the structure.
And all measures designed to minimize such impacts are laid down at the level of materials and technology of the same company Knauf. Therefore, if we take a strict approach, the appearance of cracks is caused solely by failure to follow the recommendations of the manufacturer, who, before “offering” his product on the market, simulates different situations and conducts appropriate tests.
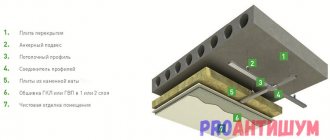
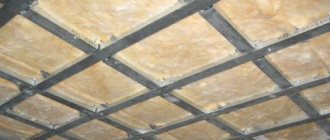
Shrinkage and structural effects
The effects of shrinkage will be less when the suspended ceiling sheathing is not connected to the walls. The facade and internal partitions settle differently, which is why internal tension will inevitably arise in the plasterboard sheathing, which will lead to the appearance of cracks in the “weakest” place - at the seam joints. The floor slab as a structure is more stable - it rests only on load-bearing walls. Therefore, the frame is attached to it, and the gypsum board must be screwed with self-tapping screws only to the CD profiles.
Vibrations or impacts are transmitted through the structures of the enclosing surfaces. There are different ways to reduce their impact: When installing guide profiles, use sealing tape. When installing the frame, a gap of about 5 mm is left on each side between the ends of the ceiling profiles and the inner wall of the guides. This will create a certain degree of freedom for the supporting structure, reducing the influence of wall movement and the transmission of structural influences.
The sheathing sheets should not rest against the walls. A small gap is left between them, which is ensured by gluing a separating tape below the guide profile.
And as a recommendation. When attaching ceiling profiles to the ceiling, it is better to use not ordinary vertical hangers of 120 or 200 mm, but anti-vibration ones with rubber inserts.
Subjective reasons
This category includes installation errors or the choice of low-quality materials. Below is a list of the main causes of cracks:
- the installation of the sheets was carried out without displacement of the second row relative to the first with the formation of a continuous line of the transverse seam;
- “saved” on ceiling profiles - bought products made from cheap thin sheet metal;
- used short dowels or self-tapping screws when attaching hangers to the ceiling;
- installation of direct hangers was carried out at two extreme points, instead of three;
- when cutting the sheet, they forgot to remove the chamfer, so the putty fit “poorly” into the seam;
- the joints were not primed;
- They simply filled the seams with putty - without gluing reinforcing tape on top.
Advice. For painting a suspended ceiling, a multi-layer coating with reinforcement of the entire surface is best suited. The simplest technology is to clean and sand the base layer of putty, and then apply wallpaper for painting.
Required Tools
Materials for sealing seams
So, we have figured out the materials that will be needed for high-quality sealing of seams. But what tools will the master need? Let's figure it out:
- Wide and narrow spatula.
- Plaster falcon (plate with handle).
- Container for mixture + water.
- Fine sandpaper.
- Brush and wide roller.
- Small knife.
Note! You should also take care of personal protective equipment - a respirator, goggles, overalls, gloves. It is recommended to use the respirator only during the preparation of the construction mixture - then it can be removed.
Is grouting of joints necessary?
After the joints on the plasterboard wall have dried, subsequent grouting is carried out. This is what you need to do:
- The remaining stones from the mixture will interfere with subsequent work and may ultimately ruin the appearance of the room.
- Grouting must be done to achieve a smooth surface.
Grouting is done on a dry surface with sandpaper or a sanding machine. For convenience, so that all defects are visible, use a lamp.
After the work, the surface remains smooth and clean.
The procedure for sealing seams
Sealing of joints is carried out in stages - preparing the surface for sealing, jointing, preparing mortar, priming, sealing and many others. Please note that the work may take several days, since the primer, putty and plaster need time to dry completely. Below we will look at each of the stages in detail.
Preparing for work
Immediately before carrying out work, it is recommended to read the instructions for the primer, putty and plaster. All work should be carried out under conditions that comply with the instructions (humidity, temperature). Before carrying out work, it is recommended to ventilate the room well, and then close the windows so that there is no draft in the room. During finishing, it is recommended to turn on overhead lighting so that you can clearly see the main seam, as well as all irregularities and surface defects.
Preparing surfaces for sealing
Now you need to prepare the working surface for sealing. To do this, do the following:
- Check the drywall working surface . If you find burrs, burrs or irregularities, remove them with a knife or fine sandpaper. After cleaning, walk along the wall with a dry cloth to remove dust and debris.
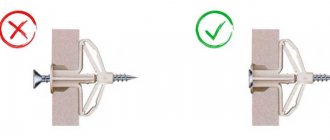
- If the drywall was fastened with screws, check the quality of their fastening . Ideally, they should be slightly recessed, but the heads should not pierce the surface of the cardboard. If the heads are not recessed well, then take a screwdriver and complete the installation. If the heads damage the cardboard, unscrew the screw a little, fill the hole with a small amount of putty, and then screw the screw back.
Note! If you are sealing a hole with putty, then the screw must be tightened immediately, without waiting for the gypsum mixture to dry. Excess putty should be removed with a dry cloth.
Joining seams
Joining is the external processing of the edges of a plasterboard board. As a result of jointing, you should get an open V-shaped recess with approximately the same location of the edges of the plasterboard boards (they should not protrude much above each other, there should be no damaged edges, and so on). Jointing is done using a knife according to the following algorithm:
- If there are damaged areas on the drywall (for example, chips, cut fragments), carefully cut them off using a knife.
- If in some places the edges of one sheet protrude over the other, then such overlaps should also be cut off with a knife, as this will make it difficult for the putty to penetrate.
The jointing should not be done vertically, but at an acute angle of 40-50 degrees. As a result, you should get a V-shaped groove into which putty can easily fall. Some companies sell drywall with already processed edges - if you use such material, you don’t have to do jointing.
Primer of seams
To ensure that the plasterboard boards adhere well to the putty, it is recommended to apply a small layer of primer. The best option would be to use acrylic mixtures with additives that dry in 5-6 hours. To prime, you need to pour a small portion of liquid into a container, and then apply it to the edge using a brush. Wait until the primer is completely dry before moving on to the next step.
Note! At this stage, the primer is applied only to the edge and not to the entire surface of the drywall. The optimal application option is 20-30 centimeters from each edge.
How to prime drywall video
Preparation of putty solution for sealing drywall joints
After the primer has completely dried, you can begin preparing the putty solution. The algorithm for preparing the solution will be simple:
- Read the instructions for the gypsum mixture, approximately calculate the amount of dry composition and water.
- Pour the dry composition into a container for preparing the solution, fill it with the required amount of water.
- Stir the mixture until smooth; If you have a drill with a mixer attachment, you can use that.
- Wait 3-5 minutes for the water to evenly dissolve the powder, and then stir the mixture again.
Sealing drywall seams with putty
The plasterboard mixture is ready - now you can start applying it. At this stage you will also need paper or sickle, so keep them with you. The sealing is done like this:
- Take a wide spatula in your left hand and apply a large layer of putty onto it in a thick layer. Take a small spatula in your right hand and smooth out the putty a little on a wide spatula.
- Using a narrow spatula, scoop small portions of putty from a large one and carefully apply them along the entire groove of the seam. Please note that there is no need to remove excess putty.
- Now take a wide spatula, place it at an angle and move it up and down with slight pressure. As a result, the plaster should spread evenly along the entire edge of the seam.
- When you form the seam, apply paper or sickle tape on top. If you use paper, treat it with boiling water and squeeze it out. To apply, simply bring the paper/sickle tape to the seam and place it on the layer of plaster.
- Apply a thin layer of plaster on top of the paper/serpyanka. Do the finishing like this - use a small spatula to apply a small layer of plaster, and then level it with a wide spatula.
How to putty drywall video
Sanding drywall seams
The gypsum mixture usually dries quickly - from 2 to 6 hours, depending on the brand of the mixture. When the plaster adheres well to the wall surface, take sandpaper and carefully clean the seam. Please note that using a sander is not recommended as this can damage the drywall. Upon completion of cleaning, you need to shake off the dust from the surface of the drywall using a dry cloth.
Main job
Now you can start applying the finishing putty. The work is carried out according to a similar algorithm:
- Pour a small portion of plaster into a container, dilute it with the required amount of water according to the instructions, mix the mixture thoroughly by hand or using a mixer.
- Take a wide spatula and evenly apply the required amount of plaster onto its surface. Using a narrow spatula, scoop out the solution and apply it in small portions to the seam, slightly extending to the edges of the drywall (15-20 centimeters).
- After applying all the plaster, take an empty wide trowel and move it up and down several times with light pressure to distribute the material in a thin layer over the surface of the drywall. The hardening time of the plaster is up to 1 day.
Caulking seams at corners
If you are working with corners, then the seams are sealed using an identical algorithm - stripping, priming, putty, a layer of paper/serpyanka, finishing plaster. The only important point is a different application of serpyanka/paper:
- To seal corners, material of increased width is used - up to 10 centimeters.
- For application, the material is folded strictly in the middle and applied to a layer of plaster.
- An additional layer of plaster must be applied on top of the material + do not forget to grout.
How to putty corners of drywall video
Grouting joints after plastering
After the final plaster has dried, you need to grout the joint. Work is also carried out manually using sandpaper, since a sanding machine can damage the cardboard. Upon completion of work, you need to remove dust and ventilate the room. Then you need to apply a layer of primer over the entire area of the drywall - the work on sealing the seams is completed.
Causes of seams bursting
If the work is carried out incorrectly, the seams may burst. The main reasons for seams bursting:
- Ignoring paper/serpyanka.
- Poor quality jointing.
- Ignoring grouting joints with sandpaper.
- Ignoring dust on the work surface.
- Using low-quality putty/plaster.
- Carrying out work in conditions of excessive humidity.
Paper tape
It is recommended to reinforce the seams with Knauf paper tape with special fiber additives that increase strength. Each leading manufacturer offers its own version of the technology with the most suitable materials. Sheetrock and NextBuild are also popular brands. The presence of a groove in the middle of the tape makes it easier to bend the paper when finishing internal corner seams.
To avoid the formation of bubbles under the paper layer if there is insufficient putty, it is better to purchase tape with micro-perforation.
The tape for sealing may be different - sealing drywall seams with sickle is also practiced, but it should be borne in mind that it is inconvenient to use when processing internal corners. In addition, it has less strength compared to paper tape and is prone to stretching, so it is also not recommended to use it for transverse joints, only for longitudinal ones. The only advantage of serpyanka over paper tape is ease of use due to the self-adhesive layer.
USEFUL INFORMATION: Ceiling in the corridor made of plasterboard 9 photos
Sealing seams without using serpyanka or perforated paper
Plasterboard seams can be sealed without the use of sickle tape or perforated paper. The work is carried out according to an identical algorithm, but with minor differences at the final stage of finishing:
- At first, the work algorithm will be standard - jointing, priming, putty, stripping. The procedures will be carried out in stages, and the primer and plaster must be completely dry before moving on to the next stage.
- And now a small but important difference appears - the final plaster is applied not in one, but in two or three very thin layers. Each layer is applied after the previous one has completely dried.
Elimination of mechanical damage
Cracks can appear not only at the joints of sheets. It can be broken when carrying long objects (pipes, cornices), installing an internal ceiling unit of a split system or an additional lamp. How to repair a crack if there is “emptiness” behind it and there is nothing to use to tighten the edges of the sheets at its border with self-tapping screws? In this case, the scheme has the following sequence: Prepare an embedded material 5-6 cm longer than the crack.
Mark the boundary of the area that needs to be cut out in order to insert the embedded element inside - for this it is enough if the width of the slot is slightly larger than its thickness. For a CD profile - about 35 mm, for edged boards or plywood - 3-5 mm wider than their section height. Prepare the repair fill and drill a couple of holes for screws along its longitudinal axis. Cut out the marked area in the drywall. They screw two screws into the mortgage so that it can be held, insert it into the hole, align it, tighten it and screw it with self-tapping screws along the edges to the sheathing. A patch is cut out of the plasterboard, installed in place, fixed to the mortgage and the joints are sealed, as described above.
Recommendations
Let's consider a few practical tips that will help you carry out the work correctly:
- Do not make the solution in large portions unless you have a mixer. Such a solution will be difficult to mix, so there will be a lot of lumps in it. It is better to make the solution in small but uniform portions - such a solution will be of high quality and reliable.
- Some people place a heating device next to the structure after applying plaster. However, this is not recommended, since the combined effect of the liquid solution and temperature changes can negatively affect the strength of the drywall.
- The prepared gypsum/plaster gradually hardens, and after 30-40 minutes the mixture becomes hard enough to make its application impossible. Therefore, do not hesitate - after preparing the mixture, immediately apply it to the seam/surface of the drywall.
Edge processing
When purchasing drywall, you can see that the edges have a specially made rounding or thinning. This form serves its purpose. Without these edges it will not be possible to seal the seams thoroughly. Putty is applied to these places for leveling.
Only in this way will the surface achieve a good connection between the edges of two sheets of drywall and level the plane. It is considered correct to apply the finishing mixture if it extends slightly beyond this rounding. In this case, you will get a strong and even connection.
All connecting edges must have a recess to ensure a strong and reliable connection. Otherwise, cracks will appear in these places.
Beveled seams on sheets
How to repair a hole in drywall on a wall: 5 simplest and most reliable methods
Renovating a modern apartment is rarely complete without drywall. Leveling walls, installing partitions or creating design delights in the form of arches, figured niches, columns cannot be done without this universal material. Drywall is inferior to classic plaster in only one respect: it does not “withstand impact” enough. A dent or hole can occur under accidental circumstances or during a planned event, such as moving sockets or hanging shelves to another location.
Therefore, an inexperienced craftsman may have a question: how to repair a hole in drywall on a wall? After all, the classic method of filling holes in plaster will not work here - behind the sheet there is usually a void or soft soundproofing material.
But don’t worry that to eliminate the defect you will have to dismantle the entire damaged sheet and buy a new one in its place. The technology for sealing holes in drywall is so simple that even a beginner can handle it. Let's consider methods for repairing damage in order of increasing size.