It doesn’t really matter what kind of tile you are going to lay: porcelain stoneware, ceramic or gypsum - these tips will help you get the job done quickly and efficiently. Even if you have no experience.
The information is intended mainly for beginners in this matter, but will also be useful for those who have already encountered tile laying, but are not professionals.
This material was prepared based on the author’s video from the YouTube channel “MIKHALYCH”.
Mixing tile adhesive
It is important that the container for preparing the solution is large. It is better to mix tile adhesive in a half-filled basin than in a bucket filled to capacity.
It is also necessary to observe the correct sequence of bookmarks. First, water is poured into the container, and then the dry mixture is poured.
After mixing the solution, you need to let it sit for 5 minutes, then mix again.
1
Marking
One of the most important rules for wall cladding is that tiles can only be glued to a perfectly dry surface. After the walls are leveled, primed and dried, you can begin marking. This manipulation allows you to see where trimming will be needed in the future. For example, the most important thing, according to the portal participants, is how the top row will look after tiling - here it is advisable to leave the tiles uncut. However, do not forget to measure the space for the molding for the stretch ceiling, if one is planned. A user with the nickname wadim-ka also advises leaving the entire tile on the front side if the corner goes behind the shower stall or boiler.
There are many ways to mark walls for tiles. The designers of most large construction stores are ready to do this completely free of charge according to your dimensions. Don't trust? Then here is one of the most popular ways - using a measuring stick. It can be pre-made from a wooden beam 50 cm wide, several tiles long, taking into account the seams.
Despite the simplicity of this method, some still prefer to mark the wall in the bathroom using a spirit level and an aluminum rule. To do this, the rule with a spirit level placed horizontally on it must be installed parallel to the wall. The marking begins from top to bottom in steps equal to the exact height of the tile, taking into account the gap. Based on the marks obtained, stepping back one step from the floor (tiles are glued not from the first, but from the second row), you need to draw a horizontal line, from which the cladding will subsequently begin. You can attach a profile for drywall to it, which will allow you not to monitor the horizon at the beginning of work.
By the way, as an alternative to this fairly common technique, a user with the nickname Keks suggests fixing four self-tapping screws in the corners of the wall, then stretching a rope or twine between the top and bottom to create two vertical cords. Between them, he advises attaching a third cord, which will act as a moving level.
Cupcake FORUMHOUSE Member
Thanks to this, we have a constant mobile beacon that will not let us go aside, and we can see in advance: will there be tiles everywhere, or is there a wall blocked somewhere?
This way the device helps to work accurately up to the very top of the wall. But wadim-ka claims that you can mark a wall by simply applying tiles to it with a seam allowance. Choose the method that suits you.
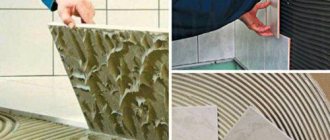
Should I apply the adhesive to the tiles or to the wall?
In fact, both options are correct. It's all about convenience. For example, when applying adhesive to tiles, the edges are usually left blank.
As a result, the tile joints will be clean, and after grouting they will look neat and beautiful.
If the tiles need to be laid quickly, then most often tile adhesive is applied to the wall. However, when pressing the tile, the glue will come out and you will have to constantly remove the excess.
Cleaning
Before you begin tiling, the bathroom walls must be cleaned, leveled and primed. The smoother the surface, the less glue you will have to use, and the faster the work will go. And since “naturally” ideal walls are rare, many repairmen correct the curvature with the help of drywall. Moreover, it is advisable to use moisture-resistant gypsum plasterboard in the bathroom.
IMPORTANT: For the section of wall around the pipes, you will need to install a metal frame. A user with the nickname Master111 recommends first priming the joints in the box and then filling them with tile adhesive.
If you are lucky with the walls, but acrylic or oil paint has already been applied to them, it needs to be cleaned off.
max2741 Member FORUMHOUSE
Believe me, a good scraper, 3-4 hours of torment, and you will succeed. But you won’t have to worry when the tiles start to fall off along with the paint and putty that has left the moisture.
When leveling, it is important to know that gypsum plaster is absolutely not suitable for bathtubs. Here's what a member of the EsKor portal says about this.
EsKor
According to the rules, gypsum plasters are not used in wet rooms - gypsum is hygroscopic.
So, the leveled and cleaned surface is primed. After the soil has dried well, you can proceed to the next stage.
To work you will need the following tools:
- pencil;
- level or hydraulic level;
- square;
- plumb line;
- tile cutters;
- block with sandpaper;
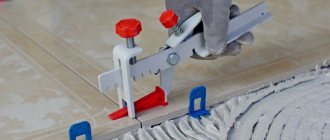
- tile crosses and wedges;
- notched spatula;
- regular spatula 100 mm;
- rubber spatula (for jointing);
- glue container;
- tile cutter;
- tile drill (preferably bimetallic).
Video on the topic
In the author's video you can also learn other equally useful tips on laying tiles. We recommend watching it.
Working tricks! DO NOT LAY TILES WITHOUT LOOKING AT THIS!
Andrey Vasiliev
Ask a Question
Features of laying slabs on different types of surfaces
Depending on the material from which the base is made, there are some differences in the laying of tiles. The reliability of the coating and the quality of adhesion depend on this.
Wooden floor
When working with this type of coating, it is recommended to adhere to the following sequence of actions:
- remove the paint layer from the surface;
- check the joists for strength. If the boards are not securely fastened and sag, they need to be secured with self-tapping screws;
- when installing new logs, it is recommended to fill in an expanded clay layer between them;
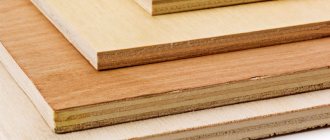
- cover the wooden surface with plywood. The sheets are laid at intervals around the perimeter of the room in increments of 15 to 20 cm;
- if gaps have formed between the floor and the wall, they must be blown out with foam;
- Prime the plywood with a waterproof primer.
By following this sequence of actions, laying the tiles will be easier, and the coating will remain attractive for a long time.
Drywall
Using drywall as a base for installing tiles has a number of significant advantages. For example:
- working with the material is simple and accessible for independent implementation;
- it is possible to save material consumption.
Drywall should be laid on aluminum profiles. The edge of the base should be treated with mastic that has moisture-resistant properties.
Experienced craftsmen recommend, if possible, installing an additional layer of waterproofing material. This will prevent the possibility of mold and mildew developing.
Using PVA glue, a plaster mesh should be glued to the surface of the sheets, and then treated with a primer. This increases the strength of fastening the tiles to the base. Each layer must dry for at least 60 minutes.
Calculation of material quantity
To determine the required amount of mixture, you need to have all the data on the material, glue and area of the working area. The calculation is carried out in several steps.
How to determine the required amount of funds:
- Determine the dimensions of the tiles, based on which, calculate the required thickness.
- Look on the packaging to see the mixture consumption per meter with a layer of 1 mm.
- Multiply these values to obtain the required amount of glue.
- Calculate the area for cladding.
- Multiply the first value by meters.
- Multiply the result by 1.1 for the margin.
On video: Laying porcelain tiles. We calculate the thickness of the glue.
Making corner joints
Corner joints are usually made using aluminum corners. As an example, we can consider the junction of the vertical and horizontal planes.
In this case, on the vertical part the material will fit into the corner groove with the cut edge, and on the horizontal surface the factory edge will rest against the flat part.
- First of all, you should lay the tiles on one surface, and then set the corner.
- The seam must be filled with adhesive.
- Otherwise, the aluminum rail will not hold well.
- You need to move on to facing the perpendicular plane every other day.
- This is when the glue will have time to set well.
Advantageous features of cement mortar
If you have to veneer a rather old and crooked wall, generously covered with potholes and chips, then the best choice in this case would be cement mortar. It falls into the category of thick-layer adhesives.
Cement tile fixative is sold in dry form. Its components are:
- Sand;
- Cement;
- Plasticizers.
The height of the layer in this case is quite capable of reaching one and a half centimeters. Such a thick layer is used to cover the massive and large tiles used to cover the floors.
If cement is used to cover walls with tiles, then it will be possible to limit it to a layer with a height of five to seven millimeters.
First stage
At this stage, you should carefully make all calculations, because how even the cladding will turn out will depend on them.
To do this, you need to mark the location of all samples on paper in advance.
To carry out the work, you must adhere to certain rules; this will help to carry out the facing work efficiently and effectively:
- You should not place the trim on the front part of the surface.
- But if such scraps remain, as a rule, they are less than ½ of the width, then you should move all the tile elements to the center, leaving a space of 2/3 of the width on each edge.
- But it is better to try not to cut the tiles. It is necessary to immediately position the layout so that there are no scraps on the front side.
- If you plan to lay tiles of different shades, this also needs to be indicated in the layout.
Jointing and grouting
It is easier to remove excess solution when it has not yet dried. Subsequently, the resulting recesses are filled with grout.
- Grouting the joints is the final stage of facing work.
- To carry it out, a special composition is used, it is called a fugue.
- Use a rubber spatula to fill all the gaps between the tiles, and then the surface must be thoroughly washed.
By following all the recommendations given and the attached instructions, you can efficiently and effectively lay ceramic tiles with your own hands.
Step-by-step instruction
To make laying tiles on the floor with your own hands easier, detailed step-by-step instructions are presented below for the reader's attention. By strictly following all the steps, you will be able to get the job done quickly and efficiently.
Preparation of required materials and tools
The process of cutting, laying and grouting requires the presence of certain tools and certain materials.
A detailed list of them is presented below:
- metal ruler, corner;
- building level, tape measure;
- core;
- a simple pencil for making notes;
- building level;
- construction mixer with a special nozzle for stirring;
- mechanical tile cutter (if you have a larger budget, you can purchase an electric cutter, the work will go much faster with it);
- spatula with fine teeth;
- rubber spatula (useful when grouting joints);
- trowel, file;
- a container (laundry bucket) with a sponge and several clean rags;
- household gloves, work clothes (or those that you don’t mind getting dirty).
As for building materials, you will need to buy: tiles, special tile adhesive, beacon profiles (preferably steel), primer, sand-cement mixture for screed (if necessary).
Preparing the base
It is advisable to lay tiles exclusively on a flat surface. Even small distortions will provoke increased consumption of glue, plus the floor itself may turn out crooked. The floor is prepared depending on what it is made of.
- If it will be laid on a concrete floor, it must be carefully checked for cracks, chips, and depressions. Identified defects must be corrected. After covering the unevenness, ideally, you need to tap the surface with a hammer. If the surface responds with a clear sound and no fragmentary detachments are observed, then everything is ready. Afterwards, the surface is checked with a level.
- If the subfloor is made of wood, then you need to “walk” through all the wooden parts, checking their integrity. You can get rid of cracks by welding the boards together. Additionally, you can treat the surface with an antiseptic, then use a level to check the floor for slopes.
In the second case, you can do even better - remove the boards and screed, then prime it for better adhesion. This option is much more expensive, but the design is guaranteed to last for decades without requiring intervention.
Performing markup
Before direct installation, it is recommended to estimate the location of the sheets. Here, there are two options to choose from: markings on the floor; drawing on paper, taking into account the metric parameters of the room and tiles. Here are the most popular layout schemes.
When choosing one of the proposed options, you should take into account the decor. Decorated tiles are in most cases much more expensive than plain tiles and require placement in a specific order when laying.
It is also wise to lay out the floor from solid slabs at the entrance, since this is where the eye is drawn when entering a bathroom or toilet. But it is permissible to place cut pieces of tiles in the corners. Do not forget about the compatibility of the floor covering with the walls.
You can take a photo of the walls at home and bring it to the store. This way, before purchasing floor tiles, you can see if the colors will match. There is no need to neglect this; it will be very disappointing to purchase the wrong material and realize the mistake when it has already been laid.
Glue preparation
When choosing a tile adhesive composition, you must rely on the humidity and temperature characteristics of the room. So, for example, in bathrooms you need to use compositions with the lowest possible moisture absorption.
Before preparing the adhesive composition, it is wise to read the instructions for use left on the packaging by the product manufacturer. This is especially true if you purchased two-component glue. Each specimen has its own mixing proportions. Failure to comply with them leads to the fact that the finished glue will not be able to properly perform its function. Now to the technology for preparing the composition:
- To knead, you need to find a clean container; there should be no foreign liquids in it.
- The next step is to fill the container with water, into which dry ingredients are then added according to the established proportions. This must be done in this order to prevent the formation of lumps. There is no need to add any other ingredients other than those that were in the package.
- Next, the mixture must be thoroughly stirred with a spatula or mixer. It is important to remember - the nozzle must be sterile, traces of old compounds must be removed.
- After mixing, the mass is left for 10-15 minutes so that it is saturated with moisture and reaches the required consistency. Afterwards it must be mixed again, achieving the state of “thick sour cream”.
Application of adhesive composition
The glue is ready, the working surface is primed. It's time to apply the adhesive. To do this, you need to pick up a comb and a spatula with a smooth edge. But the question arises: “Where, exactly, should I apply it?” There are 3 options:
- on the back side of the tile;
- on the floor;
- on both surfaces.
There is no particular difference between the first 2 methods. The first helps to increase the pace of work, but it cannot be recommended to a beginner. The third option is applicable if there are uneven surfaces that could not be eliminated first.
Previously, craftsmen sprayed working areas with water. Current binders and primers can effectively prevent moisture leakage. In this regard, no additional moisture is required.
The adhesive composition should be evenly distributed over the entire area. Arc furrows should also be avoided. The glue is spread with a spatula, after which a comb is used to slide it over the composition. The sliding direction should not be chaotic, but strictly vertical, as in the image below.
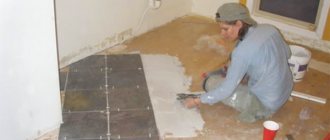
Laying tiles
- When the mortar has been properly applied, you need to install the first tile according to the previously laid out layout. At first, you need to sequentially lay only solid elements; absolutely all trimmings are left for later.
- To tightly shrink the decorative element onto the solution, it must be tapped with a rubber hammer. It is better to tap thin and fragile tiles by hand, it is safer.
- In parallel with installation, you need to control the process with a bubble level, after installing each tile, applying it to the floor in different directions. This approach will allow you to immediately detect the error and quickly eliminate it.
- Special crosses or SVPs (tile leveling systems) are inserted into the seams. They are available for purchase at any hardware store. This is done in order to equalize the size of the spaces between the tiles. SVPs are recommended for use by inexperienced repairmen, since in addition to controlling the distance between the tiles, they also regulate their height.
- Additionally, it is necessary to ensure that no voids form between the floor and the tiles. The facing elements must fit tightly, otherwise the tile may crack due to external mechanical influences. It will have to be replaced.
Trimming elements
Suitable for working with ceramics: glass cutter, tile cutter, grinder. Everyone chooses the most convenient tool for themselves.
Inexperienced repairmen are recommended to use a tile cutter, since it is quite difficult to cut straightly with a grinder if you are not used to it. Plus, cutting with a grinder provokes the formation of a large amount of dust.
The easiest way to use a tile cutter is to:
- Use a pencil and ruler to mark the cutting line.
- Place the tile on the platform.
- Align the mark with the risks.
- Use the handle to make a cut.
- The last action is to press the lever to break off the unnecessary half of the element. If a diagonal cut is made, then it is better to break off the excess part with your own hands, and not with a mechanism.
Grouting joints
Grouting should be done after the glue has dried. It completely hardens, as a rule, within one day, in rare cases it takes a little longer. Until this point you need:
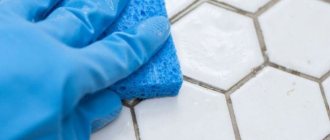
- First, clean the tiles. There is no need to delay this; dried glue is difficult to remove; some brands cannot be removed at all with any solvent.
- Secondly, before the glue hardens, it is necessary to unstitch the seams. For this purpose, a small part of the solution is removed, in place of which grout (fugue) is then placed. It is sold in the form of dry mixtures; it must be diluted in small portions in a clean tray. It is not advisable to beat the composition with a mixer; this will cause too much air to get into it, which is highly undesirable. It is better to use a spatula.
The fugue is applied using a soft rubber tool; a metal spatula is not suitable - it can leave scratches on the tile. Then the remaining grout is removed from the tiles with a cloth or sponge soaked in water (colorless dishwashing detergent).
Base requirements
If you want to get a result that complies with current standards (and this is worth striving for), then you need to have an appropriate basis. So, let's consider what maximum deviations in laying tiles indoors are allowed by SP 71.13330.2017 (Updated edition of SNiP 3.04.01-87):
Walls: • Deviation from the vertical is no more than 1.5 mm. by 1 m, but not more than 4 mm. to the floor. •Deviation of seams horizontally and vertically is no more than 1.5 mm. per 1 meter of seam. •Plane irregularities when checking with the two-meter rule (clearance) are no more than 2 mm. •Seam width deviation ±0.5mm
Floor: •Plane deviations no more than 1 mm. on the two-meter rule. • Deviation from a given slope (slope from the horizon, by default) is no more than 0.2% (2 mm/1 m), but not more than 10 mm.
Therefore, the base must be no worse than the requirement for the lined surface. It’s even more like this: the base should be as perfect as the tiler can level it. A beginner should not hope to correct some errors with the help of cladding - most likely, irregularities will only increase.
Yes, the base must be perfect, so the tiler must be able to plaster. There is an unspoken rule that the master prepares the base for laying the tiles himself - then you certainly won’t be able to blame someone else for poor quality work.