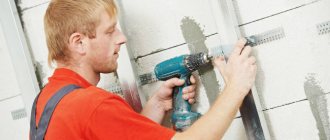
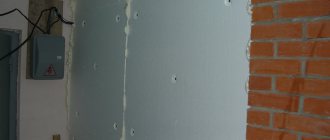
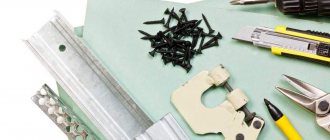
Installation of plasterboard in our time is the most popular way to level the surfaces of walls and ceilings when performing repairs in residential, office and commercial premises. This technology makes it possible to get rid of both small surface imperfections and large irregularities with minimal time and effort. Today, two technologies for installing plasterboard panels are used: using glue and using self-tapping screws. The second method, which involves the use of a metal frame and self-tapping screws, is the most popular in our country.
How do you attach anything to drywall? Drywall fastenings.
Drywall is an excellent building material that allows you to create various designs and achieve almost perfectly smooth surfaces.
However, at the same time, it is quite fragile and attaching anything to its surface is very problematic. Conventional fastening methods using nails or screws become completely ineffective. Even objects of insignificant weight can tear out any self-tapping screw from drywall, leaving a gaping hole in its place. Undoubtedly, the most durable and correct method of fastening to a plasterboard surface will be fastening using so-called “mortgages”. Moreover, before installing the drywall sheets, in places where it is planned to attach something in the future, a wooden beam or a strip of thick plywood is strengthened (laid). In the future, the “mortgage” block will bear the entire load, and fastening is carried out with the most ordinary self-tapping screw. However, experience shows that after installing the plasterboard sheets, various redevelopments are possible, or you simply want to hang another chandelier on the ceiling or another cabinet on the wall. Moreover, this attribute must be securely fixed in the drywall.
Various fastenings have been invented specifically for drywall. However, each has its own installation method and characteristics. Let's look at some of them.
Method 1. Fastening with a nylon or metal anchor.
Schematically, this mounting method looks like this:
1. First, screw the anchor into the drywall using a screwdriver; 2. We fix the object to be fixed using a self-tapping screw, which is usually included in the kit. This method of fastening is the simplest, since it does not require pre-drilling, and at the same time the weakest, because there is no fixation on the back side of the plasterboard sheet.
Method 2. Attachment using a drop-down metal anchor.
The fastening technology is as follows:
1. Insert the folded anchor into the pre-drilled hole; 2. Using a screwdriver, tighten the anchor with a screw. The folding anchor is fixed in a sheet of plasterboard, after which the screw must be unscrewed for further fastening; 3. Secure the item we need using a screw. You will first need to drill a hole in the item to be attached. This fastening method is quite strong, but requires a lot of effort and additional time spent unscrewing and re-screwing the screw to secure it.
Method 3. Attachment using a drop-down plastic anchor.
The mounting sequence is as follows:
1. Drill a hole of a suitable diameter (usually about 10mm); 2. Fold the anchor and insert it into the hole; 3. We secure the item we need using a self-tapping screw. At the same time, the anchor folds, providing fixation on the reverse side. 4. In a similar way, you can connect two sheets of drywall to ensure structural rigidity. This method of fastening can be considered the most durable, combined with the relative simplicity of its implementation.
Method 4. Fastening using a universal plastic dowel.
Installation is carried out in the following sequence:
1. Drill a hole of a suitable diameter; 2. Insert the dowel into the hole; 3. We secure the item we need using a self-tapping screw. The dowel is folded into a knot, providing fixation on the reverse side. This method of fastening is quite simple, but not as reliable as the previous one.
Author: Vyacheslav Radzikovsky © Published: 08/14/2011 |
How to attach to drywall
Upon completion of the renovation work, the stage of installing furniture and household appliances in the room begins. And the problem arises, how to attach heavy objects to drywall? Especially if there is empty space between the load-bearing wall and the finishing, then this is a major headache. How to attach a heavy wall cabinet with dishes to a thin wall made of fragile material, or what to do with hanging a TV? The situation is not hopeless, and there are several main types of fastening materials with which you can hang various large objects on a plasterboard wall.
This option is excellent for fastening large and heavy objects or plasterboard finishes. The main thing is to plan at the renovation stage where and what will stand and hang.
By bookmarking we mean fastening to the main load-bearing wall or inside a light frame partition made of wooden slats or bars.
To do this, you will need a hammer drill and standard dowels with self-tapping screws (as an option, dowel-nails). Holes are punched along the intended surface and bars are secured to dowels, which are then covered with sheets of material. The main thing is to make a plan where the installed bookmarks are located, so that there are no problems with finding them when subsequently hanging furniture and equipment.
Important. If there are walls made of gas or foam concrete blocks, the embedded bars should be attached not to standard plastic dowels, but to special metal “crocodiles”. Ordinary ones simply will not hold up in fragile walls, and after a while the block, under the weight of the weight of the hung object, will come off the wall.
Bookmarking is a great option, but what to do if the home is already finished or you need to rearrange or move items to other places?
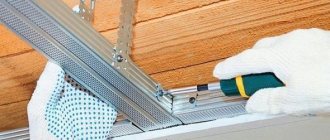
Frame making
Still, it’s not so easy to attach drywall: drywall + self-tapping screws + frame and a handful of patience - that’s what you need first.
Plasterboard wall plan
- We draw a plan for the location of the guide profile on a piece of paper. We fasten the metal with drywall dowels in increments of 50-60 centimeters.
Advice! The profile can be cut with metal scissors or a grinder. In this case, use a grinder, as the edges will be smoother and neater than when using scissors. It is always worth remembering safety when working with an angle grinder!
- On the guide profile, which is attached to the floor, we mark the places where the profile will be attached. The distance from the wall to the first profile should be approximately 20-40 centimeters so that there are no thickenings of drywall at the corners.
- How to use calculations? We attach the following profiles at a distance of 60 centimeters from each other. The dimensions of the last sheets of drywall should be more than 15 centimeters, so the profile pitch can be slightly changed.
- Now, using six-piece dowels, we attach the hangers. To do this, insert vertical profiles, attach a hanger and measure. We drill holes with a hammer drill and attach the suspension. The distance between the hangers is 70-80 centimeters.
- We attach vertical profiles to the hangers.
Advice! You need to attach the thread to the inside of the guide profiles at the level of the hangers and follow its level. This technique will avoid holes in the plasterboard wall.
- Using self-tapping screws, we fix the vertical profiles to the hangers and guide profiles. We fix the vertical profile so that its center coincides with the marks on the guide profile.
- We attach the horizontal profile to pieces of the guide profile or to crab clamps. Self-tapping screw for drywall “the bug also fits here.
- The metal frame for drywall is ready!
Anchor screws
Anchor screws, or anchors, are great in two situations:
- Plasterboard finishing was done using mounting adhesive, and the distance to the load-bearing walls was minimal.
- The gypsum board sheathing is made on a frame, but is located at a short distance from the main wall.
In this case, you will need a hammer drill or drill and anchor screws. The future location of the item is marked on the wall. Holes are punched according to the markings and anchors are driven in. Subsequent tightening will secure the anchor firmly in the wall.
The main subtlety of this fastening is that the hole must be punched according to the diameter of the anchor. If it is smaller, the fasteners simply will not fit, and a large diameter will not provide reliable fastening, and there will be backlash.
But the most problematic question is how to attach a shelf to a plasterboard wall if the load-bearing surface is at a distance of 100 millimeters or more.
How to attach heavy objects to drywall in a void
Often, plasterboard structures may be too far from the load-bearing wall, or the partition may be completely framed. In this case, anchor screws will not work, much less use standard plastic dowels. The anchors, due to the lack of support, will not provide fastening and will create a large load on the wall with its further destruction. And the plastic one will fall out immediately. What to do in this case, how to ensure that heavy objects are fastened to drywall in an almost empty space.
You can use special fasteners for gypsum boards specifically for problematic fastenings of heavy objects:
- Mounting on brackets or hooks.
- Four-segment dowel.
- Butterfly dowel.
- "Driva".
- Dowel type "umbrella".
- Dowel moth (Molly).
Of course, as an option, you can use a method such as attaching it to frame posts. To do this, you need to know where they are and screw the screws into the profile. But this way you can hang objects of relatively small area and weight, for example a painting.
What is the thickness of a plasterboard sheet?
Popular drywall
a sample with
a thickness of
9.5 mm is considered.
It is often used for two-layer wall cladding of metal structures, and also as dry plaster. The standard thickness
of 12.5 mm is often suitable both for leveling walls and for installing ceilings.
Interesting materials:
What does the word loyal person mean? What does the word mercantile mean? What does the word polynomial mean? What does the word Modal mean? What does the word mulching mean? What does the word narcissist mean? What does the word padla mean in Russian? What does the word bastard mean? What does the word Pajero mean in Spanish? What does the word pyramid mean?
Peculiarities
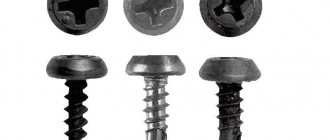
Self-tapping screws are fasteners consisting of a metal head and a rod with sharp threads. The upper part has a special recess into which the tool is inserted to perform a rotational movement.
Self-tapping screws are in many ways similar to screws, being considered a more advanced version. They do not require additional drilling of a hole. The parts can be immediately screwed into the drywall using a screwdriver or screwdriver.
Externally, both mounts are almost the same. The screw under the head has a smooth shaft, while the self-tapping screw has sharp threads throughout the entire surface of the shaft. Small products on the construction market are sold by weight, but large samples can be purchased by the consumer individually.
In order to correctly select fastenings for drywall, you need to know the main technical characteristics according to GOST, namely:
- The length of the screws varies from 11 to 200 mm. Fastening elements for decorative profiles may exceed these parameters;
- for wood, products with rare carvings are used (according to GOST 11371-78), since the wooden material is quite fragile;
- in the case of a metal profile, according to GOST 11652, self-tapping screws with fine threads are required. At the same time, the upper part has an increased diameter.
Production in accordance with GOST takes into account all requirements and safety measures.
Self-tapping screws are in demand in almost all types of construction work. Different types of parts have individual purposes, parameters and models.
Depending on this, before purchasing self-tapping screws, the consumption of self-tapping screws per 1 m² is made. In this case, it is necessary to adhere to the rule - the length of the product must exceed the thickness of the drywall by a centimeter. In the case of a wooden frame, the installation step is 35 cm. For a metal frame, it takes 30–50 cm. Large products (from 200 mm) are used with multi-layer plasterboard or when a plinth is attached to plasterboard. To ensure sufficient rigidity, parts are screwed in more often. The step of attaching a sheet of drywall to the surface is from 30 to 45 cm.
The table will help you find out the number of screws that are needed for the work.
Plasterboard sheets 12.5
Carriers with extended service life
For installation of gypsum boards, mm, m²
To install an additional element
As an example, you can calculate fastening elements for a wall with parameters of 4x5 m. It is important to remember that a standard sheet of plasterboard has a size of 1.2x2.6 m. Because of this, on the wall, in addition to the guides, between which one screw is screwed, jumpers are installed horizontal type (40 cm above the floor level and 40 cm below the ceiling).
The base is made according to the following parameters:
- the distance between the guides is 60 cm;
- the gypsum board sheet is screwed horizontally to 3 guides;
- the estimated pitch is 30 cm.
The calculation is made:
- 260: 40+1 = 8 screws per profile;
- 8*3 = 24 elements for three guide bars;
- 24+6 = 30 fastenings per gypsum board sheet.
Consumption per 1 m² of plasterboard will be:
- the final result is divided by the sheet area of 30: 3.12 = 10;
- the wall area is calculated (4x5=20 m²) and the total quantity is calculated (20*10 = 200).
It is recommended to purchase materials in reserve by 10% more of the total quantity. Therefore, about 220 pieces will be required.
Self-tapping screws for drywall - reliable fixation of the material for many years
In the age of modern technology in the world of home renovation and improvement, everyone has long known about the advantages of drywall as a material for all occasions.
It has always been a leader in the materials market, because its production requires some of the most inexpensive components - gypsum and cardboard. Because of this, it differs from other products in that it is cheap and easy to use, and does not require special training or expensive tools. Working with gypsum plasterboard is so simple that you can easily do the wall covering yourself.
Fastening drywall to the wall with self-tapping screws is a proven technique
But this requires a number of components that contribute to a good result - these are self-tapping screws. Before you get started, you should familiarize yourself with the existing options, how they work and how to choose the ones you need.
What to fasten with?
Self-tapping screws come in different sizes, differing in the geometry of the recesses. Depending on this, a cross-shaped or flat attachment is selected for the tightening tool.
As a last resort, you can use a screwdriver or a classic screwdriver.
A screwdriver is a gun on which a bit is attached - a replaceable attachment of various shapes.
It is important to remember that during operation the drill wears out, thereby requiring regular replacement. You should also think about the need for a tool with a battery.
A budget cordless screwdriver is not suitable for long-term operation. Charging lasts for 30–60 cycles, after which the device may fail.
This drawback can be eliminated by purchasing a mains-powered screwdriver. It is a classic drill with a set of additional functions. The gun includes a gearbox, the lowest speed of which reaches half a revolution per second. Rotation depends entirely on the force of pressing the trigger. When purchasing, it is recommended to take a screwdriver with reverse rotation to remove the screw from its socket.
How to select and secure?
When arranging your home interior yourself, you should decide in advance which screws to attach the drywall directly to the wall.
It is recommended to calculate the number of fasteners in advance, and it is worthwhile to first measure the area of the plasterboard. To avoid additional overpayments, most construction market sellers package individual batches of self-tapping screws in industrial packaging in hundreds and thousands of pieces. And also, most often, the construction market offers to buy a batch of self-tapping screws by weight. In this case, difficulties arise with the calculation per 1 m². To eliminate misunderstandings, you can ask the seller about the approximate number of fasteners per unit of weight.
To calculate the exact number of screws, the following parameters are required:
- the distance of two fasteners relative to each other;
- type of drywall sheet;
- profile material;
- the area of the room or that part of it where the work is carried out.
The installation process of self-tapping screws consists of several stages.
- Before starting work, you should mark the installation locations for the screws. For high-quality work, experienced builders recommend drilling recesses up to 2 mm at the marks with a thin drill. This will eliminate the risk of the screw becoming loose by screwing it tightly into the material.
- For convenience, it is better to use a screwdriver that has a reverse direction of rotation, especially for ceiling cladding. When attaching plasterboard to the wall, you should try to hold the tool and the screw as horizontally as possible. Any distortion makes the structure unstable.
- The head of the self-tapping screw should be located level with the surface of the drywall or at a depth of up to 1 mm. Marking the drill bit on the screwdriver will help make the situation easier.
- If the fastening is unsuccessful, you cannot make a new hole within 5 cm of the incorrect one.
- The self-tapping screw begins to be screwed in when the screwdriver rotates quickly. When the fastener enters the plaster, the drill speed is reduced to minimum.
However, during installation, the consumption of self-tapping screws may unexpectedly increase due to the purchase of defective products. To avoid unpleasant consequences, you should pay attention to several details when purchasing.
- Color. Self-tapping screws have an even black or grayish-black tint, similar for each product in the batch. This color gradient indicates a high-quality anti-corrosion coating using oxidation or phosphating technology. In the absence of a protective layer in conditions of high humidity, the screws will quickly become covered with rust.
- The recess for the slot should be located in the center of the head, observing a clear upward direction. A low-quality slot will not allow you to properly screw the screw into the drywall.
- Appearance . Products in a batch must maintain the same shape and size parameters. Even bent elements indicate a defective batch; they were made with violations at the production stage. Low-quality products do not have markings on the cap. The presence of letters means that the manufacturer has entered the market openly and is fully responsible for the quality of the product.
To work with gypsum plasterboard, ordinary self-tapping screws that fit completely into the sheet are suitable. The differences begin with the geometric indentation in the cap. Define cross, straight and hexagonal cuts.
Self-tapping screws with a complex slot are more in demand on the market, since the head is not susceptible to damage. If necessary, they are easier to unscrew.
If you need to hang a massive structure on drywall, it is better to use a butterfly mount. This type of fastening can withstand loads of up to 30 kg. The fastener consists of a self-tapping dowel with a plastic core. When screwing in the element, the dowel easily enters the plaster, causing the plastic seal to fold, pressing against the plasterboard from the back. Installation of the “butterfly” begins with drilling a hole with a diameter corresponding to the circumference of the screw rod. The length of the hole must exceed the length of the dowel by 5 mm. Before inserting the screw, you must remove dust.
How to screw a self-tapping screw into various materials: important nuances of a seemingly trivial matter
Self-tapping screws are a very common product, widely used for various types of fasteners. However, in order for its capabilities to be used to the maximum and for the fastening made with its help to have maximum reliability, it is necessary to be able to correctly select and screw the self-tapping screw into the load-bearing surface. We intend to pay close attention to these issues today.
Which self-tapping screw to choose for the job
The choice of self-tapping screws according to the type of cutting available on them is small: they can be universal or for wood, the pitch of which is much larger.
If you have to screw a self-tapping screw into metal, chipboard or plywood during your work, feel free to purchase universal products. If the work is to be done with wood, then only those that are designed specifically for this material are suitable. Why, you ask. The answer is simple. For the fixation to be reliable, the material must “settle” securely between the threads. The wood structure cannot do this if the thread pitch is too small.
What to use when you need to screw in a self-tapping screw
If there is only one self-tapping screw or if their number is very small, you can easily use a regular screwdriver. If you are assembling some complex structure with a large number of fasteners, then it would be better to arm yourself with a good-quality screwdriver.
To choose the right screwdriver, read our article, which we devoted specifically to this issue. The effectiveness of this device increases significantly if it is used with quality bits.
Now let's move on to the most important thing - screwing in the screws.
General technology for screwing in self-tapping screws
In order for the self-tapping screw to be securely fixed in the base material, when screwing it in, the following general technology should be followed:
- Use an awl or thin drill to mark the installation location;
- Place the tip of the product in the intended hole;
- carefully screw it in so that the position of the screw becomes stable;
- then continue screwing at maximum speed (if a screwdriver is used) and maximum force;
- at the last stage, reduce the force and speed to avoid damage to the screw and the material.
How to properly screw self-tapping screws into various materials
Concrete
Perhaps the method of installation in concrete is now known to everyone: first you need to install a dowel in it, and then you need to screw the self-tapping screw into this already installed dowel. According to many craftsmen, the reliability of fixation increases significantly if the surface of the dowel is lubricated with appropriate glue.
To drill holes, it is best to use a hammer drill, the rules for choosing which we have already written about earlier. By installing self-tapping screws on dowels, you can use both universal products and wood.
Ceramic tiles and bricks
If you need to screw a self-tapping screw into a brick or ceramic tile, proceed in the same way as with concrete. But to drill holes it is better to use a drill.
Useful tips for drilling tiles can be found here.
Soft non-ferrous metals
To ensure reliable fastening in such metals, before screwing the product into them, you should drill a hole of a very small diameter, smaller than the diameter of the self-tapping screw. Screwing it in is done without any special tricks. The only important point is that it is necessary to use only universal type products.
Hard metals
The diameter of the pre-drilled hole in such material should be equal to the diameter of the universal screw without taking into account its thread or slightly exceed it. However, some hard metals - cast iron, for example - are simply too tough for self-tapping screws.
Plastic
Self-tapping screws are not suitable for all types of plastic; some of its varieties may simply collapse when screwed in. If you are completely sure that your plastic product is not one of them, then in this case you should use the technology that was described above for soft metals, using self-tapping screws for wood.
Wood and wood panels
Naturally, in this case, you should again use self-tapping screws for wood. If they are screwed into thin boards or slabs, as well as into hard wood, a thin receiving hole must first be drilled. The easiest way to work is with thick boards made of soft wood: no special tricks are required for this.
Drywall: pay special attention!
Drywall is a material in which screwing screws into which involves the largest number of different nuances. The main ones include:
- the optimal screw-in step for this fastener is considered to be a distance of about 70 cm;
- When using a screwdriver when working, you should start immediately at maximum speed, gradually reducing it as the screw deepens;
- When working with a regular screwdriver, you need to ensure smooth and restrained movements;
- the head of the twisted screw should press the cardboard surface of the sheet without breaking through it. This condition is the key to maximum strength of the future structure;
- if the surface of the sheet is torn, the screw should be removed, the hole should be filled with putty and a new place to install the fastener should be selected at a distance of about 5-9 cm.
When working with drywall, the type of self-tapping screw is selected based on the material of the supporting sheathing. If it is wooden, then self-tapping screws with wood threads are used; if it is metal, then universal ones are used.
So, we have introduced you to the basic rules that allow you to screw a self-tapping screw into any metal in such a way as to ensure maximum reliability of the structures you create. We hope that our recommendations will allow you to eliminate any defects and make any repairs the way you originally intended.
Peculiarities
The technical characteristics of drywall differ from those of other materials. This is due to the fact that the product consists of loose gypsum, which is held in place by external paper sheets. Therefore, you should work with such a product especially carefully and carefully. Today, various fasteners and screws are used to solve these problems. Externally, these products do not differ from standard screws for wood or metal and consist of several main parts.
This element is optional; it is used when it is necessary to create a strong adhesion between fasteners and drywall. Externally, such a product can have a different shape. It is adjusted to the material in which the screwdriver will be located. They are almost always used when you need to fix a gypsum board sheet to a wall.
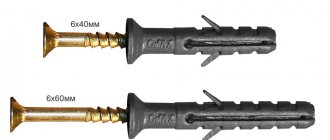
These products are made from metal or plastic. The shape of such hardware can be different. This is due to the fact that each of these screws must withstand different loads. In most cases, they are used in conjunction with a certain type of dowel.
Technically, drywall fasteners are adapted in such a way as to obtain a system that distributes the load as evenly as possible, and is also incapable of destroying the product under high loads. Hardware for working with drywall differs in several technical characteristics. But in most cases, classic screws are used here, which are used to fasten wood or metal. Such systems can be roughly divided into self-tapping screws and dowels. They are independent elements, but are often combined to create a strong connection. You can attach or work with a plasterboard sheet using several types of self-tapping screws.
This class of self-tapping screws is the most common. Such products are ordinary fasteners that are used for working with wood or metal. They differ only in thread pitch and color. In most cases, systems are supplemented with classic plastic dowels. It is recommended to use them in cases where a sheet of drywall is fixed to a wooden or concrete base. In most cases, this involves covering the walls or ceiling.
These products are short in length. In most cases, such fasteners are used to fasten the metal profile from which the entire plasterboard system is formed. A distinctive feature of the product is the presence of a kind of drill at the end of the screw. Therefore, there is no need to drill holes for them in the metal, since they destroy the material well themselves.
Self-tapping screws of this class are used to fasten metal parts from which the frame is formed. They are small in size and have a sharp tip. Therefore, experts recommend sewing together metal profiles with a sheet thickness of no more than 1.2 mm using screws. Otherwise, these products will not be effective.
Basic rules for installing drywall
- Construction of a frame for drywall
- How to properly screw a self-tapping screw into drywall
- Self-tapping screw spacing when attaching drywall
If you are new to such material as drywall. I suggest first reading the article “How to work with drywall correctly.” In it, I described the basics of working with drywall and the list of necessary tools for its installation.
Construction of a frame for drywall
There are two schemes for installing a metal profile frame for a future wall. Transverse (a) and longitudinal diagram of frame installation (b).
In practice, a longitudinal scheme is more often used. The vertical profile of the wall frame for mounting plasterboard is assembled in increments of 60 cm. If you plan to hang furniture, a plasma panel and shelves on the wall, then you need to assemble the frame in increments of 40 cm for the vertical profile.
It’s up to you to decide which installation method to choose. Calculate which method will require less cutting of sheets. And accordingly there will be less waste.
How to properly screw a self-tapping screw into drywall
You need to fasten the screws along the edges of the sheet at a distance:
- from the longitudinal edge of the sheet no more than 10mm
- at least 15 mm from the cut edge of the sheet
The screwed screw should not protrude above the surface of the sheet. It will be correct if the head of the screw enters the drywall by about 1 mm, but does not tear the cardboard covering of the sheet.
If the self-tapping screw goes crooked or pierces the sheet through, unscrew it and, backing off 5 cm, screw in a new one.
When tightening, the self-tapping screw should not protrude from the profile on the other side by more than 10 mm. Optimal for installing drywall in one layer are self-tapping screws 25 mm long, in two layers 35 mm long.
Self-tapping screw spacing when attaching drywall
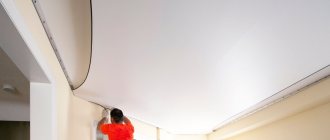
When installing a wall, you need to screw the screws into plasterboard in increments of 250 mm, and when installing the sheet on the ceiling, the increment should be 170 mm. The sheets must be installed in one direction.
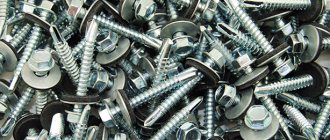
Types of self-tapping screws
A self-tapping screw is a type of fastener equipped with a flat, wide head and a threaded sharp rod. They are made mainly from steel, since it best meets the parameters of strength and rigidity. The following types of steel are used for production:
- Alloyed;
- Stainless;
- Sometimes brass. This alloy perfectly resists corrosion and is therefore often used for outdoor work or installation of drywall in conditions of high humidity (sauna, bathroom, kitchen).
You also need to separately highlight the screws that are covered with reinforcing compounds. In most cases, dowels and self-driving screws for insulation are galvanized, so they better resist aggressive external factors. Fasteners for the frame are coated with phosphates or oxides, they are painted black and are known for their excellent rigidity.
Photo - phosphate fastenings
Self-tapping screws for drywall profiles can be easily attached with your own hands; you do not need to use special tools to install them. But, of course, the installation process goes much faster when working with a screwdriver. The main thing is to choose the right fasteners. Wood and metal frames require different parts. For wood they are mostly shorter - up to 24 mm, while for a metal base the self-tapping screws are up to 32 mm. But this length indicator is not always enough to install individual sheets. For example, if you need to install cardboard on the frame in two levels, then you need to choose between lengths of 33–35 mm.
In order to make screwing in the screws as easy as possible, they are produced with different thread frequencies. Also a key indicator is the thickness of the rod. On average, this parameter can vary from 0.6 to 0.8 mm.
To attach self-tapping screws to drywall, special types are used - with horn-type heads. During installation, they are buried in the surface, which ensures the evenness of the original coating; this is very important for the correct further finishing of the coating.
Photo - drawing of a classic metal self-tapping screw for drywall
Video: how to properly screw a self-tapping screw into drywall
What is a self-tapping screw?
Self-tapping screws for drywall are indispensable
Self-tapping screw is a derivative of the words “self” and “cut”. It is a reliable fastener that has the form of a rod with a head and a pointed spiral, which, when screwed in, is capable of forming an internal thread inside the material. The thread does not completely cover the cylindrical working part.
Related articles: Molly dowel for drywall
Classification of self-tapping screws
Material of manufacture
- Carbon steel;
- Stainless steel (alloy steel, resistant to corrosion and aggressive environments);
- Brass (an alloy whose main components are copper and zinc, with additional components being tin, nickel, and lead);
Differences in applied coating
- Phosphate coating (black);
- Oxide coating (also available in black);
- Galvanized (increased corrosion protection);
- Galvanized, but have a yellow color;
- Without cover.
Differences in thread
- Rare carving;
- Frequent carving.
Differences in tip
- Pointed;
- Drill bit (commonly known as a “self-sharpening screw”)
By purpose
- Universal;
- For working with wood materials;
- For drywall (or for gypsum fiber materials);
- For metal;
- For windows;
- For the roof.
How to choose and install
To choose the right type of parts for installing a profile or drywall, you need to know the distinctive features of each type:
- Self-tapping screws for plasterboard GOST 11371-78, which are used to process wood, have a rarer thread. Due to the fact that wood is a rather fragile building material, fewer turns are used;
- The length can vary from 11 mm to 200, but they are rarely used for repair work. Only if the installation of any special decorative elements is required;
- Self-tapping screws for drywall, which fasten metal, can be installed in any metal coating; they are distinguished by fine threads and a wider head. Another distinctive feature is their larger diameter.
Before you calculate the total consumption of fasteners, you need to know how many screws are needed per sheet of drywall. To connect different types of materials, different numbers of fasteners are used. The default pitch for self-tapping screws for metal profiles is 30 millimeters, for wooden ones 35, in some cases a deviation of several mm is allowed. You also need to immediately consider whether one layer of cardboard sheets or two or more will be installed. In the second case, it will be necessary to reduce the distance between individual fasteners or increase the size of the parts to ensure a rigid installation.
Photo - the difference between self-tapping screws for wood and metal
Based on this, the approximate number of self-tapping screws per sheet of drywall is about 70–110 pieces. How to calculate: one sheet has sides of 1200x2500 or 600x2000 mm. Therefore, we calculate the area of the sheet and extract the pitch of the fasteners from it. Please note that with double installation you need to use more screws.
Step-by-step instructions for installing parts:
- First of all, you need to make markings on the wall. With its help, you can easily install the elements in the right place, calculate their number and calculate the approximate number of screws per sheet of drywall;
- Then use a small drill to make a hole where the fastener will be installed. Depending on the size of the fastener, you can work with either a large or small drill. Please note that the depth of the slot should not exceed 3 mm, otherwise the installation site will quickly become loose;
- To install self-tapping screws on the ceiling profile, a special attachment is used. It controls the depth of penetration of the drill into the surface of the drywall.
After installation, it is recommended that they be treated with anti-corrosion compounds and puttied, otherwise after finishing they will be noticeable on the surface of the sheets. Also try not to “sink” the heads too much to avoid the appearance of large grooves.
You can buy self-tapping screws for drywall in any hardware store, on the market and on the Internet; their price depends on the size and type. On average, one piece will cost a couple of rubles. The cost of a pack (it includes from 100 to 500 pieces) will be slightly lower in ratio - about one ruble.
At what distance to fix drywall with self-tapping screws?
Drywall is a popular material that is used for cladding walls and forming unique structures. Thanks to it, you can create a false wall, shelves, niches, arched entrance. For those who decide to renovate a house using plasterboard sheets, you must first understand how it is attached and what fasteners are needed for this. If the screws are selected incorrectly, this will lead to instability of the structure.
What screws are needed
And although the process of attaching plasterboard is not a difficult job, it is very responsible. The service life of the resulting plasterboard structure will depend on the correctly selected fasteners and the precision of their installation. When choosing self-tapping screws for gypsum board sheets, it is necessary to take into account the dimensions and methods of fastening. You should not use wood screws GOST 1145 80 or others not intended for this work.
Self-tapping screws are a type of fastening elements that are most often used when installing gypsum board sheets. They can be used to install the load-bearing elements of the base on dowels, on which the plasterboard structure will be mounted. At the same time, the metal profile of the base itself also requires fixation.
For these purposes, you will have to choose flat-head screws. Using the same self-tapping screws for drywall with a countersunk head, you need to attach the sheets to the metal profile.
When choosing a fastener, you need to know how to use it. To attach a single sheet to a profile, you need to use metal screws. Their length should not be more than 25 mm. Installation of double sheets is carried out using longer self-tapping screws, from 35 mm. A yellow wood screw is completely unsuitable for use, as it can only damage the material.
On the video, self-tapping screws for attaching drywall to the profile:
Most often, self-tapping screws are used with the following markings:
- Self-tapping screw TN25 (3.5x25 mm). This element is characterized by the presence of a protective coating that prevents the development of corrosion. Used when installing sheets to profiles. It is almost completely embedded into the frame through the gypsum board sheet.
All types of self-tapping screws used for fastening gypsum plaster boards, regardless of their specifics, have certain features that must be taken into account when choosing:
- Black okra . This feature indicates that the fasteners have been treated with an oxidized or phosphated coating. This will provide reliable protection against corrosion.
- Spiral thread . Thanks to it, you can facilitate the process of screwing in a self-tapping screw, regardless of what surface it is.
- Horn type head . When screwing in the self-tapping screw, it completely goes to the sheet and does not interfere with further cladding (applying plaster, painting, wallpaper).
- Cross slot RN-2 . Thanks to it, you can simply screw fasteners into a sheet. Moreover, this can be done with either a screwdriver or a screwdriver. In addition, various cross-shaped nozzles can be selected for this slot, taking into account the resistance to loads.
The video shows the distance between the screws when attaching drywall:
Installation features
As mentioned above, the installation process of gypsum board sheets is simple. The main thing is to do everything correctly and carefully. But before we move on to connecting the metal profile from the sheet with the material, it is necessary to recreate the drawing and plan. Thanks to them, the installation of the material will take place correctly and all fasteners with the sheets will be connected tightly.
The first step is to understand what the size of the future structure will be. Taking into account these dimensions, carry out the plan. If only the installation of drywall on the wall will be carried out, then in the plan show the base on which the material will be supported.
The frame will contain 4 support strips. They should be located in each corner of the structure. You can give the frame stability if you monitor the distance between the slats. It should be the same. In addition, they must not be located on the very edge of the plasterboard sheet, otherwise it may damage it. It is the process of placing the planks while maintaining the correct distance that is the most difficult and time-consuming. The remaining work will go easier and faster.
How to choose the final drywall putty for wallpaper and what you should pay attention to is described in detail in this article.
How to putty plasterboard walls under wallpaper and what tools are needed for this is described in detail in the contents of the article.But what is better to use in construction, plaster or drywall, this information will help you choose: https://resforbuild.ru/sypuchie-materialy/shtukaturka/ili-gipsokarton-chto-luchshe.html
What adhesive is best to use for drywall joints and how to do it correctly is indicated in this article.
Plasterboard sheets are mounted to the profile using metal screws, the length of which is 25 mm. The distance between fasteners should not exceed 20 mm. First, the material is installed around the perimeter, and then to the remaining elements of the frame. The same applies to frames made of plasterboard sheets and various niches and shelves.
Video installation of drywall to the profile:
In this matter, an important role is played by the correct tightening of the fastener. The depth of penetration of the self-tapping screw should not be greater than 1 mm. If this is not the case, then you can damage the gypsum board sheet and not achieve full fastening. Insert the limiter on the screwdriver. If for some reason the fastening element was inserted more than 1 mm, then it must be unscrewed and tightened at a distance of 50 mm from the old hole, which is subsequently sealed with putty.
When joining different sheets together, you need to take care of a slight gap between them. For this, 2-3 mm will be enough. During the application of putty, this will greatly simplify the task of leveling the seam.
You may also be interested in learning about where dowels and butterfly nails are used for drywall.
Here's what screws you should use for drywall and how to make the right choice. The information from the photo in this article will help you understand.
It will also be interesting to learn about how to make a ceiling box with lighting using drywall and self-tapping screws. All information with photos is described in detail in this article.
But you can understand which self-tapping screws for attaching profiles under drywall are most often used if you follow the link and read the information.
Manufacturers and prices
In any hardware store you can see that the range of self-tapping screws is very wide. Among all this abundance, you can find fasteners suitable for drywall sheets.
To be confident in the quality of the purchased product, you must trust the following manufacturers:
- Trust Contract – price 50 rubles.
Self-tapping screws are important elements for complete and correct fastening of plasterboard sheets. Among the wide range of such products, it is difficult to choose the right option. If this is your first time encountering such a problem, it is better to consult a specialist in the store. He will be able to answer all your questions and help you choose the right screws for your design.