There are different ways to treat metal parts to protect them from oxidation and rust formation, and changing the appearance of surfaces. Rubber paint for metal is a universal product that allows you to replace all methods of processing the material. It is important to know how to work with it correctly in order to achieve high-quality results.
Applying rubber paint to metal
Purpose
Rubber coating of metal parts is a procedure that is carried out to protect metal surfaces from oxidation and rust formation.
The technology is used to cover:
- fences, supporting pillars;
- metal roofing sheets;
- galvanized steel sheets;
- corrugated sheets;
- metal structures made of thin sheet steel;
- car body parts, industrial equipment;
- metal parts in places with high humidity levels.
Metal roof
Areas of use
Gumming of metal is widely used for protective coatings in all industrial fields. This method is used to treat the internal space of containers and reservoirs, and to apply it to columns, centrifuges, pipelines, mixers, and stirrers. Before coating, corners are rounded, shells, chips, and cracks are removed. Rubber sheets are glued with special adhesives to a thoroughly cleaned, degreased surface.
Next comes the vulcanization process. The rubber coating is kept at a temperature of 130ºС for 15…25 hours. Vulcanize in autoclaves with water vapor at a pressure of 2.5...3 atm. The internal surfaces of large units are vulcanized with hot air or a salt solution at a temperature of 105...110ºС.
Characteristics
Compound:
- Coalescent. Needed to form a solid film.
- Acrylate latex. Necessary to give elasticity and strength.
- Water. Solvent for coloring composition.
- Antifreeze. Increases the frost resistance of the finished coating.
- Various additives to change the basic characteristics, pigments, fillers.
- Preservative. Needed to preserve the coloring composition during storage.
Characteristics of rubber paint:
- High adhesion.
- Drying time is up to two hours.
- Resistant to temperature changes within -50–+60°C.
- Brushes and rollers are suitable for application. There are rubber coloring compounds that are available in cans for spraying onto metal surfaces.
- Service life - 10 years.
- Extensibility - up to 400%.
The coloring composition is suitable for application to asbestos cement, ferrous metals, asphalt, galvanized steel, aluminum, corrugated sheets, aerated concrete, wood, gypsum, plastic, concrete.
Technology of applying Plasti Dip liquid rubber to a car body
Preparing the vehicle before applying Plasti Dip:
- Wash and dry the car thoroughly.
- Degrease, remove all traces of wax, dirt and any coatings.
The next stage of preparation is to cover all areas that you do not intend to paint, or where it is not desirable to get Plasti Dip liquid rubber:- To prevent Plasti Dip from getting on the radiator, you need to place cardboard sheets behind the radiator grille, and the same must be done with the grilles in the bumper.
- There is no need to cover the front and rear lights; after drying, the liquid rubber can be easily removed from them in one whole piece.
- If you do not cover the rims with liquid rubber, you should cover the entire wheel.
- Framework for government numbers need to be removed.
- The windshield and windows will need to be closed and masking tape will need to be placed around the perimeter of the rubber seal. The glass part of the mirror should also be sealed with tape.
- In order to cover wheel rims with liquid rubber, it is necessary to cover the brake disc and brake system elements.
Plasti Dip allows you to paint without disassembling the car, but for the best result we recommend removing the handles from the car and painting them separately.
Sprayer and paint preparation:
Be sure to protect your respiratory system - wear a respirator! (You can buy a respirator here). You need to paint in a well-ventilated area!
Before filling Plasti Dip into the spray gun (spray gun), it is necessary to dilute it with a solvent in a ratio of 1 to 1. This is necessary in order to obtain the necessary consistency and, as a result, an even layer of liquid rubber on the car body. Plasti Dip must be poured into the sprayer through a standard filter so that coarse particles do not interfere with spraying.
It is better not to fill the sprayer to the brim, but fill it 1/3 or 2/3 of the tank.
Now you will need to configure the sprayer - equipment for liquid rubber. To begin with, set a small flow of paint material, and test on any surface by increasing or decreasing the flow. There is no need to set the Plasti Dip feed too high to avoid material smudges. It would be better if the layers were thinner.
Spraying Plasti Dip:
- The temperature in the room should be 18-20 degrees, there should be no drafts or direct sunlight!
- The sprayer should be held perpendicular to the surface at a distance of 13-16 centimeters. It is necessary to paint with smooth back and forth movements in 2-3 layers.
The second layer is applied in the same way with smooth back and forth movements at a distance of 13-16 centimeters from the surface, only more slowly and carefully. Pay special attention to edges and curves. After the second layer of Liquid Rubber, the transparency of the coating approached 70%. And stripes and transitions can still be seen - this is normal!- The third, fourth and fifth layers are applied according to the principle of the first two.
- The number of layers depends on the desired result. You can apply more layers if, for example, you are covering a black car with white. Or want to get a more saturated color.
- After applying all layers, it is necessary to dry the coating for an hour.
- After drying, carefully remove the masking tape and Plasti Dip from parts where there should not be a coating of liquid rubber. At the joints it is better to use a knife and trim if necessary. Until Plasti Dip is completely dry, it can be easily removed with little effort.
- Liquid rubber coating - Plasti Dip will completely harden in 12-24 hours. (while the coating dries, the car must be left in the box)
- After painting, the car cannot be washed for three days.
- You can use automatic washers and brushes after a month.
- Due to the fact that the coating is afraid of gasoline, it is better to refuel the car yourself.
Don't try to paint the entire surface the first time. The first layer of Liquid Rubber should be thin with a transparency of 50%. Don't worry if it doesn't paint the surface evenly. There is also no need to rush when applying, and do not make sudden movements. Pay attention to edges, curves and ends. The first layer is the basis for subsequent layers. After applying a layer of liquid rubber, leave to dry for 10-15 minutes.
Attention! Restrictions on operating the car after applying Plasti Dip liquid rubber: ● Do not wash the car for 3 days, and especially do not use body cleaners. ● On a car with liquid rubber, we strongly recommend that you pay special attention when refueling the car - to avoid leaks around the gas tank.
Selection principles
To buy high-quality rubber paint, you need to know the selection criteria and study the manufacturers of the coloring composition.
Criteria
Things to consider when purchasing paint:
- appointment;
- availability of a quality certificate;
- best before date;
- consumption per 1 m2.
Even when applying this type of coloring composition in two layers, the consumption remains minimal.
How to determine the quality of paint?
Need to:
- Inspect the packaging of the coloring composition. It should not have any visual damage.
- Read the ingredients. If it contains an antiseptic, such paint is suitable for wood, not metal.
Manufacturers and prices
Manufacturers:
- Dali;
- Rubber Paint;
- Rezolux Universal;
- lasti Dip;
- Super Decor;
- AKTERM.
The average price for 1 liter is 500 rubles.
Advantages and disadvantages
Positive sides:
- No unpleasant odor during application or use.
- High level of adhesion to different types of metals.
- Resistant to moisture.
- Immunity to temperature changes.
- Service life under normal conditions is 10 years.
- Resistance to mechanical stress.
- Anti-slip effect.
- High elasticity.
- Environmentally friendly.
- Dries quickly after spraying or applying with hand tools.
- Vapor permeability.
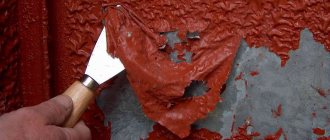
It is important to follow the rules for applying paint. Any mistake can lead to peeling of the coating.
Painting of metal structures
The best rubber paint manufacturers
Latex-containing paint is available in the range of many paint and varnish manufacturers. Among the best Russian manufacturers are the following companies:
- Mizar;
- Technoprok;
- SUPER DECOR;
- ProColor;
- NovBytKhim.
Among foreign manufacturers the best are considered:
- Tikkurila;
- Alpina;
- Caparol.
Products from abroad are often more expensive than domestic ones, but, as a rule, they are characterized by increased durability and better decorative properties.
Facade latex paint “Universal” from Mizar is one of the most popular Russian brands. This company became the first among Russian manufacturers to produce paint containing styrene-acrylic latex at an affordable price. The products of this company are highly water resistant and can even be used in swimming pools and artificial reservoirs.
Principles of coloring
When working with rubber paint, it is important to follow a number of rules and features. They relate to preparation, putty, priming of surfaces, and application of paint.
Tools and materials
You need to prepare:
- paint;
- brushes, roller;
- tray for pouring coloring composition;
- thick plastic film, tape, sharp knife or scissors;
- solvent, metal primer;
- metal brush, grinder.
Preparation
Stages of preparation of metal surfaces:
- Remove any dirt or deposits with sandpaper, a metal brush or a grinder.
- Degrease surfaces with solvent or detergent. It is important to remove all stains.
- Wait until the surfaces are completely dry.
Puttying
Puttying is carried out when there are large damages and cracks on the surfaces. Before continuing to prepare the part, you need to coat it with a special filler and wait for it to dry.
Padding
Another important step in preparing metal surfaces before painting is priming. Primer application process:
- Before covering metal surfaces with a primer, you need to apply a special anti-corrosion compound to them.
- Apply an inhibitory or isolating primer.
Wait for it to dry. Treat glossy surfaces with fine sandpaper to increase adhesion, sweep away any dust that appears.
How to choose the right rubber paint
When choosing, you must carefully study all the characteristics of the product and answer the following questions:
- What work needs to be done, internal or external?
- How severe is the mechanical load experienced by the surface being prepared for painting?
- How much influence will the sun, wind, precipitation have?
- How intense will the contact with water be?
- How important is odorlessness?
- What is the budget for the purchase?
After answering all these questions, it will be possible to select the most suitable options, and only then focus on consumer reviews about a particular manufacturer in order to choose the best product for yourself.
Recommendations
Tips for working with rubber paint:
- Do not use formulations that have expired.
- For painting it is better to use a spray gun. Using this tool, you can achieve a uniform distribution of the paint layer.
- Painted surfaces can only be washed after 7 days.
It is important to properly clean work surfaces to achieve a high level of adhesion.
Rubber paint is a universal composition that is suitable for processing different materials. When using it, you can achieve an anti-slip effect, protection against oxidation, rust formation, and leveling of the sides. It is important to take into account the features of applying the coloring composition.
Plasti Dip liquid rubber consumption, pigment consumption, color consumption
Consumption of Plasti Dip liquid rubber in aerosols.
One aerosol contains 400 grams of liquid rubber. The aerosol is enough for 1 square meter, approximately 6-9 layers. At a consumption of 50-80 g per 1 sq.m. for each layer.
What can be painted with aerosols and the approximate consumption of aerosols when painting from 6-9 layers
Wheel disks
| 13-14 radius | 2 aerosols |
| 15-16 radius | 2 aerosols |
| 17-18 radius | 3-4 aerosols |
| 19-20 radius | 4-5 aerosols |
Body elements (consumption for an average class C, D sedan)
| Hood | 1.5 – 2 aerosols |
| Roof | 1.5 – 2 aerosols |
| trunk lid | 1.5-2 aerosols |
Approximate consumption of liquid rubber per car for high-quality painting from 6 layers
(The table shows the concentrate, remember that it is diluted with a solvent)
| A, B class | you will need 3 - 5 liters of concentrate |
| C, D class | you will need 5 - 7 liters of concentrate |
| E, F, S class | you will need 9 - 12 liters of concentrate |
This table shows the consumption of liquid rubber for high-quality painting, provided that you paint in dark and normal brightness colors. If, for example, you want to paint a black car dazzling white, then the consumption increases to almost 90%.
Consumption of tinting colors on a painted surface
In tinting additive (color) 30 ml. dye, as is correct for 5 liters of Plasti Dip liquid rubber, use 10 - 30 ml, depending on the desired color intensity. Color can also be used to “lighten” and darken colors, making them more saturated. Note that when adding a tint additive, the coverage of liquid rubber increases; the more color you add, the better the coverage. For example, from transparent liquid rubber 5l. if you wanted to make your own color, then you will need only 2-4 colors (depending on obtaining the desired brightness and color saturation)
Consumption of pigment additives for Plasti Dip
| When added to "gloss or clear" | When added to the database | |
| Pearlescent effect | for 3 liters 30-50 g depending on the desired intensity * | For 3 liters of finished PD, 10-20 g. ** |
| Chameleons | for 3 liters 30-50 g depending on the desired intensity * | There will be practically no effect |
| Metallic Effects | for 3 liters 30-50 g depending on the desired intensity * | For 3 liters of finished PD, 10-20 g. ** |
| Metallic effects large particles | for 3 liters 30-50 g depending on the desired intensity * | For 3 liters of finished PD, 10-20 g. ** |
*The pigment is added to Plasti Dip diluted with a solvent (ready-made). Addition of pigment depends on the desired result and may increase the tabulated results.
**When added to the base, it produces a slight shimmer. Addition of pigment depends on the desired result and may increase the tabulated results.
Use of materials is permitted only if there is an active link to the source. All rights to pictures and texts belong to their authors. Source: pldip.ru
Slate painting
A slate roof is painted just to improve its appearance. To do this, it is better to use acrylic or silicone enamels and paints. You can use an organic type solvent or a water-based product. But the first option has a number of advantages:
- the film that forms on the surface is durable;
- there is a moisture-repellent effect;
- high flexibility;
- resistance to ultraviolet rays;
- longer color retention.
The disadvantage of using organic type solvents is that there is a pungent odor, but this will quickly disappear when the layer dries. But this feature is not significant for outdoor work.
The slate needs to be treated with a primer that will close the pores. It is best to apply paint with a swing-type brush with a stiff brush. A roller will not work when processing slate. It is much easier to paint the slate if it lies on the ground, and then only install it.
Care of the finished coating
After drying, the finished coating does not require any special care.
It is enough to adhere to the following rules:
- To clean the surface, you can use plain water or soap solutions.
- There is no need to pour boiling water over the paint, as this may cause it to peel off.
- Renew the coating periodically.
That's all for caring for rubber paint. If applied correctly, you will not have any problems with the coating.
Preparatory work
Before painting a metal roof, it is necessary to carry out a number of works aimed at preparing the surface for applying a protective composition.
All preparatory work comes down to the following points:
The main task is to completely clean the roof surface from old coating, any types of dirt and rust. In order to remove all the old paint, you will need special removers. Rust can be removed in different ways: the simplest solution involves replacing damaged areas, but if you wish, you can arm yourself with an iron brush and special substances that dissolve the old coating. The roof can rust not only from the outside, but also from the inside - moisture very often accumulates under the roof, which destroys the structure from the inside
Particular attention should be paid to the areas between the elements of the sheathing - they are most susceptible to the harmful effects of moisture. The surface of the lathing does not require such close attention, since close contact with the wood reduces the risk of corrosion. Having examined the roof for damage on both sides, you can proceed directly to cleaning
Since this process involves the use of chemically active substances, when working it is worth using personal protective equipment - gloves and safety glasses. Directly when painting, you need to supplement this set with shoes that do not slip on the roof surface. The roof can be painted only after the composition used in preparation has dried. The last stage of preparation is calculating the required number of paints. For calculations, you need to know the total area of the metal roof that will be processed. Knowing the paint consumption per unit of roof area, it will be possible to purchase the required amount of material.
Knowing how to properly paint a roof and competently carried out preparatory work greatly increases the likelihood of creating the most reliable structure.
Advantages
Rubber paints have many advantages. The most important are the following:
- Versatility . The composition can be used for both interior and exterior work.
- Good adhesion . The paint adheres excellently to any type of surface.
- Elasticity . After drying, the coating does not crack even if the base is significantly deformed.
- Water resistance . Rubber paints have water-repellent properties. They can be used outdoors or in rooms with high humidity.
- UV resistance . The coating does not lose its color even with regular exposure to sunlight.
- Fast drying . The paint only takes a few hours to dry.
- Safety . The paint contains no potentially dangerous or harmful compounds that can be released into the air during its application or after drying.
In addition to the above, rubber paints have a fairly affordable price, which makes them as accessible as possible.
Protective equipment and precautions
Do not forget that flammable and toxic substances are used in the work, and for this reason it is necessary to prevent any possibility of contact of paint with open fire. Under no circumstances should you smoke nearby. If the work will be carried out indoors, care should be taken to ensure that it is ventilated as best as possible during and after completion of the work. If you need a large amount of work on a huge area of the surface to be painted, you should acquire respirators in order to protect the respiratory tract. Remember to use gloves, special clothing and comfortable shoes.


